Instruction Manual
Page 1
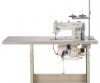
O SINGE IR._ Instruction Manual and Parts List Zigzag Sewing Machine 20U- 109 / 109C 112 / 112C 309 (E) Singer is a registered trademark of The Singer Company Limited or its affiliated companies. © 2009 Copyright The Singer Company Limited
O SINGE IR._ Instruction Manual and Parts List Zigzag Sewing Machine 20U- 109 / 109C 112 / 112C 309 (E) Singer is a registered trademark of The Singer Company Limited or its affiliated companies. © 2009 Copyright The Singer Company Limited
Instruction Manual
Page 3
...Zigzag Stitch Fitting 3.22. Anti-Spill Sleeve Usage 3.24. Motor, Motor Pulley and V-Belt Specifications 2.4. Oil Reservoir Installation 3.3. Machine Threading 3.12. Spool Cap Usage 3.23. Instruction Manual and Parts List 4 4 5 6 6 7 8 8 9 ...Winding 3.9. Zigzag Stitch Width Control 3.20. Needle Bar Frame Clamp Device 3.21. Product Description and Machine Specification 2.1. Lubrication 3.5. Zigzag Sewing Machine Contents 1. Important Safety Instructions 1.2. Safe Operation 2. Product Description 2.2. Setup and Adjustment Instructions 3.1. ...
...Zigzag Stitch Fitting 3.22. Anti-Spill Sleeve Usage 3.24. Motor, Motor Pulley and V-Belt Specifications 2.4. Oil Reservoir Installation 3.3. Machine Threading 3.12. Spool Cap Usage 3.23. Instruction Manual and Parts List 4 4 5 6 6 7 8 8 9 ...Winding 3.9. Zigzag Stitch Width Control 3.20. Needle Bar Frame Clamp Device 3.21. Product Description and Machine Specification 2.1. Lubrication 3.5. Zigzag Sewing Machine Contents 1. Important Safety Instructions 1.2. Safe Operation 2. Product Description 2.2. Setup and Adjustment Instructions 3.1. ...
Instruction Manual
Page 4
... Advancing Crank Components 6.5. Bight Amplitude, Bight and L-C-R Position Components 6.6. Hook and Bobbin Case Components 6.8. Feed Mechanism Components 6.10. Parts List 6.1. Machine Head Cleaning 4.2. Arm Shaft (upright) and Rotating Hook Drive Shaft Components 6.7. Thread Stand Components 6.13. Belt Cover Components and Extra Parts Instruction Manual... Lever Components 6.9. Presser Bar Lifter and Thread Tension Components 6.11. Lubrication 4.3. Troubleshooting 6. Accessories and Attachments 6.12. Zigzag Sewing Machine 4. Maintenance 4.1.
... Advancing Crank Components 6.5. Bight Amplitude, Bight and L-C-R Position Components 6.6. Hook and Bobbin Case Components 6.8. Feed Mechanism Components 6.10. Parts List 6.1. Machine Head Cleaning 4.2. Arm Shaft (upright) and Rotating Hook Drive Shaft Components 6.7. Thread Stand Components 6.13. Belt Cover Components and Extra Parts Instruction Manual... Lever Components 6.9. Presser Bar Lifter and Thread Tension Components 6.11. Lubrication 4.3. Troubleshooting 6. Accessories and Attachments 6.12. Zigzag Sewing Machine 4. Maintenance 4.1.
Instruction Manual
Page 5
...only be operated by properly trained personnel. • Maintenance and repair on electric equipment should be followed. • Singer will not be used running the machine. • In case of lubricant oil contact with the eyes or skin, washed the surface with plenty of use... machine, basic safety procedures must be used to the items following situations arise: o Passing the thread by qualified personnel. o When the operator is in its safety devices. Read all basic safety instructions which are adequate to a sound source as indicated.in maintenance. Zigzag Sewing Machine ...
...only be operated by properly trained personnel. • Maintenance and repair on electric equipment should be followed. • Singer will not be used running the machine. • In case of lubricant oil contact with the eyes or skin, washed the surface with plenty of use... machine, basic safety procedures must be used to the items following situations arise: o Passing the thread by qualified personnel. o When the operator is in its safety devices. Read all basic safety instructions which are adequate to a sound source as indicated.in maintenance. Zigzag Sewing Machine ...
Instruction Manual
Page 6
... the motor wiring box and do not touch the components assembled inside the wiring box. • To avoid injuries do not run the machine without proper grounding. • To minimize the risk of a sudden start , be placed near those parts. • To avoid injuries... or lifting the machine head. • To avoid accident in case any other safety device is removed. • To avoid possible injuries keep them away from wheel, belt and motor when the machine is equipped with a servomotor, it . • Clean the machine periodically. - 5 - Zigzag Sewing Machine Instruction Manual and ...
... the motor wiring box and do not touch the components assembled inside the wiring box. • To avoid injuries do not run the machine without proper grounding. • To minimize the risk of a sudden start , be placed near those parts. • To avoid injuries... or lifting the machine head. • To avoid accident in case any other safety device is removed. • To avoid possible injuries keep them away from wheel, belt and motor when the machine is equipped with a servomotor, it . • Clean the machine periodically. - 5 - Zigzag Sewing Machine Instruction Manual and ...

Instruction Manual
Page 8
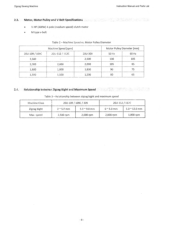
... than 76 dBA at 1,600 spm Maximum speed will vary depending on fabric, threads and sewing condition 2 Noise measurement according to medium Plain zigzag (Straight stitch) 20U-309 3-step zigzag Max. Machine Specification Singer model For sewing Stitch type 20U-109 / 109C 20U-112 / 112C Light to DIN 4563-45-A 1. speed' Max. stitch length 5.0 mm Needle bar stroke...
... than 76 dBA at 1,600 spm Maximum speed will vary depending on fabric, threads and sewing condition 2 Noise measurement according to medium Plain zigzag (Straight stitch) 20U-309 3-step zigzag Max. Machine Specification Singer model For sewing Stitch type 20U-109 / 109C 20U-112 / 112C Light to DIN 4563-45-A 1. speed' Max. stitch length 5.0 mm Needle bar stroke...
Instruction Manual
Page 9
... Zigzag bight Max. Motor, Motor Pulley and V-Belt Specifications • HP (400W) 4-pole (medium speed) clutch motor • M type v-belt 20U-109 / 109C 2,500 2,000 1,800 1,500 Table 2 - Zigzag Sewing Machine Instruction Manual and Parts List 2.3. speed 20U-109 / 109C / 309 0 - 5.0 mm 5.0 - 9.0 mm 2,500 rpm 2,000 rpm 20U-112 / 112C 0 - 5.0 mm 5.0 - 12.0 mm 2,000 rpm 1,800 rpm - 8 -
... Zigzag bight Max. Motor, Motor Pulley and V-Belt Specifications • HP (400W) 4-pole (medium speed) clutch motor • M type v-belt 20U-109 / 109C 2,500 2,000 1,800 1,500 Table 2 - Zigzag Sewing Machine Instruction Manual and Parts List 2.3. speed 20U-109 / 109C / 309 0 - 5.0 mm 5.0 - 9.0 mm 2,500 rpm 2,000 rpm 20U-112 / 112C 0 - 5.0 mm 5.0 - 12.0 mm 2,000 rpm 1,800 rpm - 8 -
Instruction Manual
Page 10
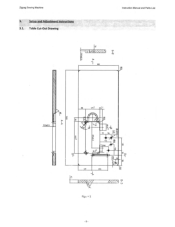
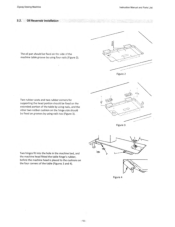
srs L N j us =If ..! 7e. 934jx.;'-' , 10e IOC J Figu -^ 1 - 9 - Table Cut-Out Drawing Instruction Manual and Parts List E 50C - Setup and Adjustment Instructions 3.1. e- Zigzag Sewing Machine 3.
srs L N j us =If ..! 7e. 934jx.;'-' , 10e IOC J Figu -^ 1 - 9 - Table Cut-Out Drawing Instruction Manual and Parts List E 50C - Setup and Adjustment Instructions 3.1. e- Zigzag Sewing Machine 3.
Instruction Manual
Page 11
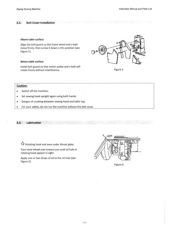
Two hinges fit into the hole in the machine bed, and the machine head fitted the table hinge's rubber, before the machine head is placed to the cushions on the side of the machine table groove by using four nails (Figure 2). Two rubber seats and two rubber corners for supporting the head portion should be... table by using nails, and the other two rubber cushion on the hinge side should be fixed on grooves by using nails too (Figure 3). Zigzag Sewing Machine 3.2. Instruction Manual and Parts List kt1 Figure 2 Figure 3 Figure 4 - 10 -
Two hinges fit into the hole in the machine bed, and the machine head fitted the table hinge's rubber, before the machine head is placed to the cushions on the side of the machine table groove by using four nails (Figure 2). Two rubber seats and two rubber corners for supporting the head portion should be... table by using nails, and the other two rubber cushion on the hinge side should be fixed on grooves by using nails too (Figure 3). Zigzag Sewing Machine 3.2. Instruction Manual and Parts List kt1 Figure 2 Figure 3 Figure 4 - 10 -
Instruction Manual
Page 12
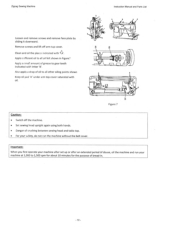
...v-belt will rotate freely without the belt cover. 3.4. Apply one or two drops of crushing between sewing head and table top. • For your safety, do not run the machine without interference. Turn hand wheel over toward you until oil hole in rotating hook appear in sight. ... guard so that hand wheel and v-belt move freely, then screw it down is this position (see Figure 6). 1 0 Figure 6 Zigzag Sewing Machine 3.3. Wit Figure 5 Caution: • Switch off the machine. • Set sewing head upright again using both hands. • Danger of oil to the oil hole (see Figure 5).
...v-belt will rotate freely without the belt cover. 3.4. Apply one or two drops of crushing between sewing head and table top. • For your safety, do not run the machine without interference. Turn hand wheel over toward you until oil hole in rotating hook appear in sight. ... guard so that hand wheel and v-belt move freely, then screw it down is this position (see Figure 6). 1 0 Figure 6 Zigzag Sewing Machine 3.3. Wit Figure 5 Caution: • Switch off the machine. • Set sewing head upright again using both hands. • Danger of oil to the oil hole (see Figure 5).
Instruction Manual
Page 13
... 1,000 to all other oiling points shown Keep oil pad 'A' under arm top cover saturated with oil. Remove screws and lift off the machine. • Set sewing head upright again using both hands. • Danger of bread-in Figure? Instruction Manual and Parts List 0 • 0 O O • Figure 7 Caution: • Switch off arm...
... 1,000 to all other oiling points shown Keep oil pad 'A' under arm top cover saturated with oil. Remove screws and lift off the machine. • Set sewing head upright again using both hands. • Danger of bread-in Figure? Instruction Manual and Parts List 0 • 0 O O • Figure 7 Caution: • Switch off arm...

Instruction Manual
Page 14
Raise needle bar to the table below Model Application Light weight materials 20U-109 / 109C / 112 / 112C / 309 Medium weight materials Mid-heavy weight materials Max. c;P 2 Figure 8 - .3- Tighten -,,edle set screw '1' (see Figure 8). Caution: • Switch off before attaching the needle. 3.6. Zigzag Sewing Machine Instruction Manual and Parts List 3.5. thread size (Nm)Synthetic* 120 60...
Raise needle bar to the table below Model Application Light weight materials 20U-109 / 109C / 112 / 112C / 309 Medium weight materials Mid-heavy weight materials Max. c;P 2 Figure 8 - .3- Tighten -,,edle set screw '1' (see Figure 8). Caution: • Switch off before attaching the needle. 3.6. Zigzag Sewing Machine Instruction Manual and Parts List 3.5. thread size (Nm)Synthetic* 120 60...

Instruction Manual
Page 15
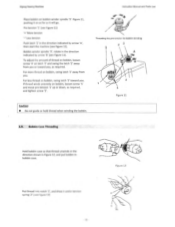
Raise latch '1' (see Figure 9). Lift out bobbin case '2' (see Figure 9). Bobbin Winding Stop motion of needle by loosening stop -motion screw toward you with throat plate left open. 3.8. Zigzag Sewing Machine 3.7. Caution: • Switch off the machine. • Do not operate the machine with right hand. 2 Figure 9 I A Figure 10 - 14 - Bobbin Case Removal Instruction Manual and Parts List Open bed slide. Hold hand wheel with left hand and turn stop -motion screw '1', Figure 10.
Raise latch '1' (see Figure 9). Lift out bobbin case '2' (see Figure 9). Bobbin Winding Stop motion of needle by loosening stop -motion screw toward you with throat plate left open. 3.8. Zigzag Sewing Machine 3.7. Caution: • Switch off the machine. • Do not operate the machine with right hand. 2 Figure 9 I A Figure 10 - 14 - Bobbin Case Removal Instruction Manual and Parts List Open bed slide. Hold hand wheel with left hand and turn stop -motion screw '1', Figure 10.
Instruction Manual
Page 16
...the direction indicated by arrow 'B' (see Figure 13) 15 • Figure 12 Put thread into notch '1', and draw it will go. Zigzag Sewing Machine Instruction Manual and Parts List Place bobbin on bobbin, swing latch '2' toward you . Figure 11, pushing it on bobbin, loosen screw '5' and...Do not guide or hold thread when winding the bobbin. 3.9. Bobbin winder spindle '3', rotate in the direction indicated by arrow 'A', then start the machine (see Figure 11) '+' More tension '-' Less tension Push latch '2' in bobbin case. Pre tension '1' (see Figure 11). For less thread on ...
...the direction indicated by arrow 'B' (see Figure 13) 15 • Figure 12 Put thread into notch '1', and draw it will go. Zigzag Sewing Machine Instruction Manual and Parts List Place bobbin on bobbin, swing latch '2' toward you . Figure 11, pushing it on bobbin, loosen screw '5' and...Do not guide or hold thread when winding the bobbin. 3.9. Bobbin winder spindle '3', rotate in the direction indicated by arrow 'A', then start the machine (see Figure 11) '+' More tension '-' Less tension Push latch '2' in bobbin case. Pre tension '1' (see Figure 11). For less thread on ...

Instruction Manual
Page 17
Figure 14 Figure 15 Note: • When straight stitching, a better result can be obtained if bobbin thread is not threaded through bobbin case thread guide '1', Figure 15. Zigzag Sewing Machine Instruction Manual and Parts List Figure 13 Draw thread out from bobbin. Allow about 4 inches of thread to hang freely from slot '2' on end of spring '1', (Figure 14) and pass it through bobbin case thread guide '1' of Figure 15. - 16 -
Figure 14 Figure 15 Note: • When straight stitching, a better result can be obtained if bobbin thread is not threaded through bobbin case thread guide '1', Figure 15. Zigzag Sewing Machine Instruction Manual and Parts List Figure 13 Draw thread out from bobbin. Allow about 4 inches of thread to hang freely from slot '2' on end of spring '1', (Figure 14) and pass it through bobbin case thread guide '1' of Figure 15. - 16 -
Instruction Manual
Page 18
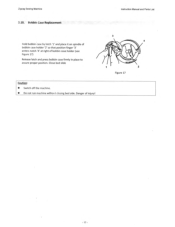
Zigzag Sewing Machine Instruction Manual and Parts List 3.10. Bobbin Case Replacement Hold bobbin case by latch '1' and place it on spindle of bobbin case holder '2' so that position finger '3' enters notch '4' at right of injury! 3 O 1 Figure 17 4 2 - 17 - Danger of bobbin case holder (see Figure 17) Release latch and press bobbin case firmly in place to assure proper position. Close bed slide Caution: • Switch off the machine. • Do not run machine without closing bed side.
Zigzag Sewing Machine Instruction Manual and Parts List 3.10. Bobbin Case Replacement Hold bobbin case by latch '1' and place it on spindle of bobbin case holder '2' so that position finger '3' enters notch '4' at right of injury! 3 O 1 Figure 17 4 2 - 17 - Danger of bobbin case holder (see Figure 17) Release latch and press bobbin case firmly in place to assure proper position. Close bed slide Caution: • Switch off the machine. • Do not run machine without closing bed side.

Instruction Manual
Page 19
Machine Threading Instruction Manual and Parts List 6 i / a co i -# ( G Figure 17 Lead thread from the thread unwinder through all the threading points in the order shown in Figure 17 Thread the needle from front to back, as show in Figure 17 Draw about 3 inches of thread through eye of needle. Caution: • Switch off the machine. • Do not operate the machine without thread take-up guard. • Do not operate the machine without finger guard. -18- Zigzag Sewing Machine 3.11.
Machine Threading Instruction Manual and Parts List 6 i / a co i -# ( G Figure 17 Lead thread from the thread unwinder through all the threading points in the order shown in Figure 17 Thread the needle from front to back, as show in Figure 17 Draw about 3 inches of thread through eye of needle. Caution: • Switch off the machine. • Do not operate the machine without thread take-up guard. • Do not operate the machine without finger guard. -18- Zigzag Sewing Machine 3.11.

Instruction Manual
Page 20
... 19 - 19 - Presser Foot Pressure Adjustment O Figure 18 To regulate the presser foot pressure, turn thumb screw '3' Figure18, toward left or right as required. Zigzag Sewing Machine 3.12. To regulate the reverse stitch length, turn knurled thumb screw '1', Figure 19, toward left or right as required.
... 19 - 19 - Presser Foot Pressure Adjustment O Figure 18 To regulate the presser foot pressure, turn thumb screw '3' Figure18, toward left or right as required. Zigzag Sewing Machine 3.12. To regulate the reverse stitch length, turn knurled thumb screw '1', Figure 19, toward left or right as required.
Instruction Manual
Page 21
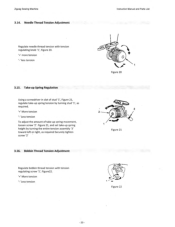
... spring movement, loosen screw '2'. Bobbin Thread Tension Adjustment Regulate bobbin thread tension with tension regulating knob '1', Figure 20. • more tension '-' less tension 3.15. Zigzag Sewing Machine 3.14.
... spring movement, loosen screw '2'. Bobbin Thread Tension Adjustment Regulate bobbin thread tension with tension regulating knob '1', Figure 20. • more tension '-' less tension 3.15. Zigzag Sewing Machine 3.14.
Instruction Manual
Page 22
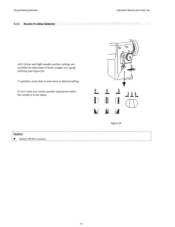
To position, push lever in the fabric. Caution: • Switch off the machine. III II En) Figure 23 - 21 - Instruction Manual and Parts List cCO -7 CIA _Ili L. Zigzag Sewing Machine 3.17_ Needle Position Selector Left, Center and Right needle position settings are available for placement of both straight and zigzag stitching (see Figure23). Do not make any needle position adjustment while the needle is in and move to desired salting.
To position, push lever in the fabric. Caution: • Switch off the machine. III II En) Figure 23 - 21 - Instruction Manual and Parts List cCO -7 CIA _Ili L. Zigzag Sewing Machine 3.17_ Needle Position Selector Left, Center and Right needle position settings are available for placement of both straight and zigzag stitching (see Figure23). Do not make any needle position adjustment while the needle is in and move to desired salting.


