Instruction Manual
Page 3
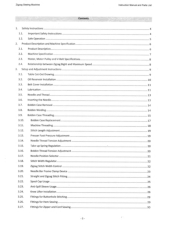
... V-Belt Specifications 2.4. Setup and Adjustment Instructions 3.1. Lubrication 3.5. Needle and Thread 3.6. Needle Thread Tension Adjustment 3.15. Needle Position Selector 3.18. Stitch Width Regulator 3.19. Straight and Zigzag Stitch Fitting 3.22. Spool Cap Usage 3.23. Fittings for Zipper and Cord Sewing - 2 - Instruction Manual and Parts List 4 4 5 6 6 7 8 8 9 9 10 11 11 13 13 14 14 15 17 18 19 19 20 20 20 21 22 22 23 24 25 26 26 29 29 30 Safe Operation 2. Oil Reservoir Installation 3.3. Inserting the Needle 3.7. Presser Foot Pressure Adjustment 3.14...
... V-Belt Specifications 2.4. Setup and Adjustment Instructions 3.1. Lubrication 3.5. Needle and Thread 3.6. Needle Thread Tension Adjustment 3.15. Needle Position Selector 3.18. Stitch Width Regulator 3.19. Straight and Zigzag Stitch Fitting 3.22. Spool Cap Usage 3.23. Fittings for Zipper and Cord Sewing - 2 - Instruction Manual and Parts List 4 4 5 6 6 7 8 8 9 9 10 11 11 13 13 14 14 15 17 18 19 19 20 20 20 21 22 22 23 24 25 26 26 29 29 30 Safe Operation 2. Oil Reservoir Installation 3.3. Inserting the Needle 3.7. Presser Foot Pressure Adjustment 3.14...
Instruction Manual
Page 4
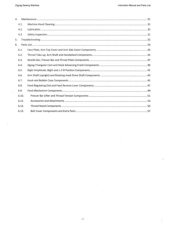
Face Plate, Arm Top Cover and Arm Side Cover Components 6.2. Thread Take-up, Arm Shaft and Handwheel Components 6.3. Needle Bar, Presser Bar and Throat Plate Components 6.4. Feed Regulating Dial and Feed Reverse Lever Components 6.9. Thread Stand Components 6.13. Safety Inspection 5. Troubleshooting 6. Hook and Bobbin Case Components 6.8. Zigzag Triangular Cam and Hook Advancing Crank Components 6.5. Maintenance 4.1. Bight Amplitude, Bight and L-C-R Position Components 6.6. Belt Cover Components and Extra Parts Instruction Manual and Parts List 31 31 31 31 32 33...
Face Plate, Arm Top Cover and Arm Side Cover Components 6.2. Thread Take-up, Arm Shaft and Handwheel Components 6.3. Needle Bar, Presser Bar and Throat Plate Components 6.4. Feed Regulating Dial and Feed Reverse Lever Components 6.9. Thread Stand Components 6.13. Safety Inspection 5. Troubleshooting 6. Hook and Bobbin Case Components 6.8. Zigzag Triangular Cam and Hook Advancing Crank Components 6.5. Maintenance 4.1. Bight Amplitude, Bight and L-C-R Position Components 6.6. Belt Cover Components and Extra Parts Instruction Manual and Parts List 31 31 31 31 32 33...
Instruction Manual
Page 5
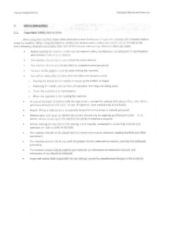
... devices. Zigzag Sewing Machine Instruction Manual and Parts List 1. When using the machine, understand all relevant safety specifications are not limited to specifications and technical rules in your safety, goggles must be used running , a test must be made by the needle or replacing the bobbin or looper. o When the machine is in full running the machine. • Turn off or unplug the machine when the following . In case of...
... devices. Zigzag Sewing Machine Instruction Manual and Parts List 1. When using the machine, understand all relevant safety specifications are not limited to specifications and technical rules in your safety, goggles must be used running , a test must be made by the needle or replacing the bobbin or looper. o When the machine is in full running the machine. • Turn off or unplug the machine when the following . In case of...
Instruction Manual
Page 6
... belt cover or in case of a sudden start , be placed near those parts. • To avoid injuries never put your fingers next to the rotating hook and the thread take-up lever cover when the machine is running. • The rotating hook whirls at high speed while the machine is running, turn the machine off when laying it down, or remove the belt cover and...
... belt cover or in case of a sudden start , be placed near those parts. • To avoid injuries never put your fingers next to the rotating hook and the thread take-up lever cover when the machine is running. • The rotating hook whirls at high speed while the machine is running, turn the machine off when laying it down, or remove the belt cover and...
Instruction Manual
Page 8
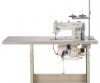
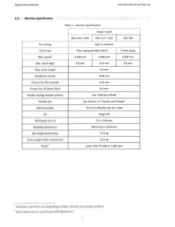
Machine Specification Table 1 - Machine Specification Singer model For sewing Stitch type 20U-109 / 109C 20U-112 / 112C Light to DIN 4563-45-A 1. stitch length 5.0 mm Needle bar stroke 34.8 mm Presser bar lift (manual) 6.35 mm Presser bar lift (knee lifter) 9.0 mm Needle catalog (needle system) Cat. 1910-05 (135x9) Needle size See Section 3.5 "Needle and Thread" Machine pulley 74.0 mm effective dia. Zigzag Sewing Machine Instruction Manual and Parts List 2.2. stitch bight 2,500 rpm 9.0 mm 2,000 rpm 12.0 mm 2,500 rpm 9.0 mm Max. for v-belt Oil Singer Oil ...
Machine Specification Table 1 - Machine Specification Singer model For sewing Stitch type 20U-109 / 109C 20U-112 / 112C Light to DIN 4563-45-A 1. stitch length 5.0 mm Needle bar stroke 34.8 mm Presser bar lift (manual) 6.35 mm Presser bar lift (knee lifter) 9.0 mm Needle catalog (needle system) Cat. 1910-05 (135x9) Needle size See Section 3.5 "Needle and Thread" Machine pulley 74.0 mm effective dia. Zigzag Sewing Machine Instruction Manual and Parts List 2.2. stitch bight 2,500 rpm 9.0 mm 2,000 rpm 12.0 mm 2,500 rpm 9.0 mm Max. for v-belt Oil Singer Oil ...
Instruction Manual
Page 12
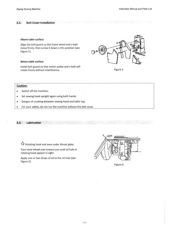
... hook and area under throat plate. Belt Cover Installation Instruction Manual and Parts List Above table surface Align the belt guard so that motor pulley and v-belt will rotate freely without the belt cover. 3.4. Wit Figure 5 Caution: • Switch off the machine. • Set sewing head upright again using both hands. • Danger of oil to the oil hole (see Figure 5). Apply one or two drops of crushing between sewing...
... hook and area under throat plate. Belt Cover Installation Instruction Manual and Parts List Above table surface Align the belt guard so that motor pulley and v-belt will rotate freely without the belt cover. 3.4. Wit Figure 5 Caution: • Switch off the machine. • Set sewing head upright again using both hands. • Danger of oil to the oil hole (see Figure 5). Apply one or two drops of crushing between sewing...
Instruction Manual
Page 13
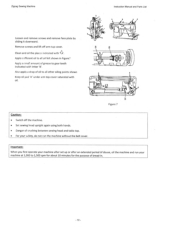
... gear teeth indicated with letter 'B'. Instruction Manual and Parts List 0 • 0 O O • Figure 7 Caution: • Switch off arm top cover. Remove screws and lift off the machine. • Set sewing head upright again using both hands. • Danger of oil to all other oiling points shown Keep oil pad 'A' under arm top cover saturated with '6'. Important: When you first operate your machine after set up or after an extended period...
... gear teeth indicated with letter 'B'. Instruction Manual and Parts List 0 • 0 O O • Figure 7 Caution: • Switch off arm top cover. Remove screws and lift off the machine. • Set sewing head upright again using both hands. • Danger of oil to all other oiling points shown Keep oil pad 'A' under arm top cover saturated with '6'. Important: When you first operate your machine after set up or after an extended period...

Instruction Manual
Page 14
... the material and thread used on the various machine models please refer to be cut off the machine. • Do not operate the machine without the finger guard '2' (see Figure 8) Insert the needle in the needle bar and push it up as far as it will go. Zigzag Sewing Machine Instruction Manual and Parts List 3.5. Needle and Thread Selection of proper needle and thread sizes to the table below Model Application Light weight materials 20U-109 / 109C / 112...
... the material and thread used on the various machine models please refer to be cut off the machine. • Do not operate the machine without the finger guard '2' (see Figure 8) Insert the needle in the needle bar and push it up as far as it will go. Zigzag Sewing Machine Instruction Manual and Parts List 3.5. Needle and Thread Selection of proper needle and thread sizes to the table below Model Application Light weight materials 20U-109 / 109C / 112...

Instruction Manual
Page 19
Caution: • Switch off the machine. • Do not operate the machine without thread take-up guard. • Do not operate the machine without finger guard. -18- Machine Threading Instruction Manual and Parts List 6 i / a co i -# ( G Figure 17 Lead thread from the thread unwinder through all the threading points in the order shown in Figure 17 Thread the needle from front to back, as show in Figure 17 Draw about 3 inches of thread through eye of needle. Zigzag Sewing Machine 3.11.
Caution: • Switch off the machine. • Do not operate the machine without thread take-up guard. • Do not operate the machine without finger guard. -18- Machine Threading Instruction Manual and Parts List 6 i / a co i -# ( G Figure 17 Lead thread from the thread unwinder through all the threading points in the order shown in Figure 17 Thread the needle from front to back, as show in Figure 17 Draw about 3 inches of thread through eye of needle. Zigzag Sewing Machine 3.11.
Instruction Manual
Page 21
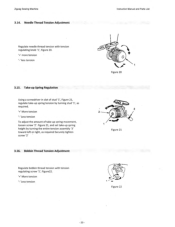
... 22 -20- Figure 21, and set take-up spring height by turning stud '1', as required. • More tension • Less tension To adjust the amount of stud '1', Figure 21, regulate take -up spring tension by turning the entire tension assembly '3' toward left or right, as required Securely tighten screw '2' 3.16. Zigzag Sewing Machine 3.14. Needle Thread Tension Adjustment Instruction Manual and Parts List Regulate needle thread tension with tension regulating screw '1', Figure22. '+' More tension Less tension (0 Figure 20 2 3 --
... 22 -20- Figure 21, and set take-up spring height by turning stud '1', as required. • More tension • Less tension To adjust the amount of stud '1', Figure 21, regulate take -up spring tension by turning the entire tension assembly '3' toward left or right, as required Securely tighten screw '2' 3.16. Zigzag Sewing Machine 3.14. Needle Thread Tension Adjustment Instruction Manual and Parts List Regulate needle thread tension with tension regulating screw '1', Figure22. '+' More tension Less tension (0 Figure 20 2 3 --
Instruction Manual
Page 22
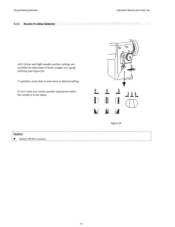
III II En) Figure 23 - 21 - Zigzag Sewing Machine 3.17_ Needle Position Selector Left, Center and Right needle position settings are available for placement of both straight and zigzag stitching (see Figure23). Do not make any needle position adjustment while the needle is in and move to desired salting. Instruction Manual and Parts List cCO -7 CIA _Ili L. To position, push lever in the fabric. Caution: • Switch off the machine.
III II En) Figure 23 - 21 - Zigzag Sewing Machine 3.17_ Needle Position Selector Left, Center and Right needle position settings are available for placement of both straight and zigzag stitching (see Figure23). Do not make any needle position adjustment while the needle is in and move to desired salting. Instruction Manual and Parts List cCO -7 CIA _Ili L. To position, push lever in the fabric. Caution: • Switch off the machine.
Instruction Manual
Page 25
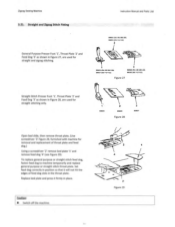
... Presser Foot '1', Throat Plate '2' and Feed Dog '3' as shown in place. Instruction Manual and Parts List 604537 .201,1CA.I C.C•X4I, oc.•o u.i12.112C: 2 I 2C) Figure 27 .00 1 45.064.1.3 4.06493 Figure 28 Open bed slide, then remove throat plate, (Use screwdriver '3' Figure 29, furnished with machine for removal and replacement of feed dog slots in position so that it firmly in Figure 28, are used for straight and zigzag stitching. Replace bed plate...
... Presser Foot '1', Throat Plate '2' and Feed Dog '3' as shown in place. Instruction Manual and Parts List 604537 .201,1CA.I C.C•X4I, oc.•o u.i12.112C: 2 I 2C) Figure 27 .00 1 45.064.1.3 4.06493 Figure 28 Open bed slide, then remove throat plate, (Use screwdriver '3' Figure 29, furnished with machine for removal and replacement of feed dog slots in position so that it firmly in Figure 28, are used for straight and zigzag stitching. Replace bed plate...
Instruction Manual
Page 28
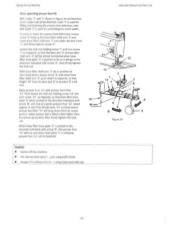
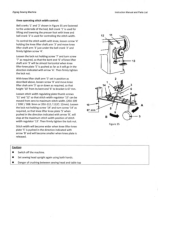
... throat plate '13' surface) where presser bar lifter '11' will drop down as required, so that the bent end '6' of knee lifter shaft arm '3' will go in the direction indicated with arrow 'A', then firmly tighten the lock nut. Raise presser foot '12' with presser foot litter '11'.Then loosen the lock nut holding screw '14' and turn screw '7' as it will be lowered. Zigzag Sewing Machine Knee operating presser foot lift...
... throat plate '13' surface) where presser bar lifter '11' will drop down as required, so that the bent end '6' of knee lifter shaft arm '3' will go in the direction indicated with arrow 'A', then firmly tighten the lock nut. Raise presser foot '12' with presser foot litter '11'.Then loosen the lock nut holding screw '14' and turn screw '7' as it will be lowered. Zigzag Sewing Machine Knee operating presser foot lift...
Instruction Manual
Page 29
... the machine. • Set sewing head upright again using both hands. • Danger of crushing between sewing head and table top Zigzag Sewing Machine Knee operating stitch width control: Bell cranks '1' and '2' shown in Figure 35 are fastened to the underside of the bed, Bell crank '1' is used for lifting and lowering the presser foot with arrow 'B' and will become wider when knee lifter knee plate '5' is...
... the machine. • Set sewing head upright again using both hands. • Danger of crushing between sewing head and table top Zigzag Sewing Machine Knee operating stitch width control: Bell cranks '1' and '2' shown in Figure 35 are fastened to the underside of the bed, Bell crank '1' is used for lifting and lowering the presser foot with arrow 'B' and will become wider when knee lifter knee plate '5' is...
Instruction Manual
Page 30
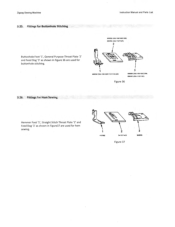
Zigzag Sewing Machine Instruction Manual and Parts List 3.25. I 410192 2 Sat 91£-452 Figure 37 543.70 Fittings for Hem Sewing Hemmer Foot '1', Straight Stitch Throat Plate '2' and Feed Dog '3' as shown in Figure37 are used for buttonhole stitching. 1 6066.2 ,20U-109.109C:11,112C•110. 3 606600 426U-1425,105C:509. 606502 (30U-112.11a, Figure 36 3.26. Fittings for Buttonhole Stitching .06652 e201J-109:105.C.305) 606.02 1201L 112:112C, 2 Buttonhole Foot '1', General Purpose Throat Plate '2' and Feed Dog '3' as shown in Figure 36 are used for hem sewing.
Zigzag Sewing Machine Instruction Manual and Parts List 3.25. I 410192 2 Sat 91£-452 Figure 37 543.70 Fittings for Hem Sewing Hemmer Foot '1', Straight Stitch Throat Plate '2' and Feed Dog '3' as shown in Figure37 are used for buttonhole stitching. 1 6066.2 ,20U-109.109C:11,112C•110. 3 606600 426U-1425,105C:509. 606502 (30U-112.11a, Figure 36 3.26. Fittings for Buttonhole Stitching .06652 e201J-109:105.C.305) 606.02 1201L 112:112C, 2 Buttonhole Foot '1', General Purpose Throat Plate '2' and Feed Dog '3' as shown in Figure 36 are used for hem sewing.

Instruction Manual
Page 33
... needle 14. Is needle clamping screw loose? 17. Is feed regulating dial properly adjusted? 21. Is presser foot pressure adjusted properly? , 22. Insert new needle 25. Adjust needle tension properly Rotating heavy noise 26. Zigzag Sewing Machine Instruction Manual and Parts List 5. Correct needle threading Needle thread breaks 2. Insert new needle 5. Adjust needle & bobbin case thread tension 11. Insert needle correctly Stitches skip 13. Is needle the correct size for thread & fabric? 6. Is there any lint or fluff on feed dog? 27. Is power & light...
... needle 14. Is needle clamping screw loose? 17. Is feed regulating dial properly adjusted? 21. Is presser foot pressure adjusted properly? , 22. Insert new needle 25. Adjust needle tension properly Rotating heavy noise 26. Zigzag Sewing Machine Instruction Manual and Parts List 5. Correct needle threading Needle thread breaks 2. Insert new needle 5. Adjust needle & bobbin case thread tension 11. Insert needle correctly Stitches skip 13. Is needle the correct size for thread & fabric? 6. Is there any lint or fluff on feed dog? 27. Is power & light...

Instruction Manual
Page 35
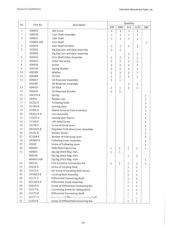
Part No. 1 554113-383 2 606407 3 606395 4 606632 5 606633 6 606634 7 554118-385 8 606635 9 606433 601433 10 606636 11 606454 12 606637 13 606638 GO207-8 14 606452 15 606453 16 606449 17 606451 GS272-8 18 606439 19 550032 20 544208-005 21 606447 22 606448 GZ202-8 23 606446 24 544208-005 25 606639 GR482/6-8 26 606440 27 606442 28 606441 29 606443 GL162-8 30 606439 31 606602 32 606398 GT150-8 33 606397 34 554128 35 554144 36 544212-001 37 Gl Zigzag Sewing Machine No.
Part No. 1 554113-383 2 606407 3 606395 4 606632 5 606633 6 606634 7 554118-385 8 606635 9 606433 601433 10 606636 11 606454 12 606637 13 606638 GO207-8 14 606452 15 606453 16 606449 17 606451 GS272-8 18 606439 19 550032 20 544208-005 21 606447 22 606448 GZ202-8 23 606446 24 544208-005 25 606639 GR482/6-8 26 606440 27 606442 28 606441 29 606443 GL162-8 30 606439 31 606602 32 606398 GT150-8 33 606397 34 554128 35 554144 36 544212-001 37 Gl Zigzag Sewing Machine No.
Instruction Manual
Page 41
... Shaft Oil Wick Zig Zag Cam and Gear Assembly Zig Zag Cam and Gear Assembly Cam Shaft Collar Assembly Collar Set Screw Screw Spring Washer Washer Oil Felt Oil Reservoir Assembly Oil Reservoir Assembly Oil Wick Oil Reservoir Bracket Spring Rubber Cap Following Shaft Leaning Gear Sleeve Screw of Cam Assembly Cam Assembly Leaning gear Sleeve Left-hand Screw Screw of Drive Lever Regulator Fork drive Lever Assembly Washer Screw Washer of Following Lever Following Lever Assembly Screw of Differential Connecting Bar Instruction Manual and Parts List Quantity 109...
... Shaft Oil Wick Zig Zag Cam and Gear Assembly Zig Zag Cam and Gear Assembly Cam Shaft Collar Assembly Collar Set Screw Screw Spring Washer Washer Oil Felt Oil Reservoir Assembly Oil Reservoir Assembly Oil Wick Oil Reservoir Bracket Spring Rubber Cap Following Shaft Leaning Gear Sleeve Screw of Cam Assembly Cam Assembly Leaning gear Sleeve Left-hand Screw Screw of Drive Lever Regulator Fork drive Lever Assembly Washer Screw Washer of Following Lever Following Lever Assembly Screw of Differential Connecting Bar Instruction Manual and Parts List Quantity 109...
Instruction Manual
Page 55
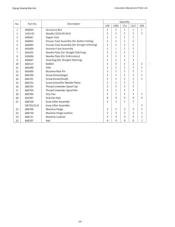
...24 606711 25 606707 Description Accessory Box Needle (1910-05 #14) Zipper Foot Presser Foot Assembly (for Button Holing) Presser Foot Assembly (for Straight Stitching) Hemmer Foot Assembly Needle Plate (for Straight Stitching) Needle Plate (for Embroidery) Feed Dog (for Straight Stitching) Bobbin Oiler Machine Rest Pin Screw Driver(large) Screw Driver(Small) Screw Driver(for Needle Plate) Thread Unwinder Spool Cap Thread Unwinder Spool Net Drip Pan Drip Pan Nail Knee Lifter Assembly Knee Lifter Assembly Machine Hinge Machine Hinge Cushion Machine Cushion Nail Quantity 109 109C 112 112C 309...
...24 606711 25 606707 Description Accessory Box Needle (1910-05 #14) Zipper Foot Presser Foot Assembly (for Button Holing) Presser Foot Assembly (for Straight Stitching) Hemmer Foot Assembly Needle Plate (for Straight Stitching) Needle Plate (for Embroidery) Feed Dog (for Straight Stitching) Bobbin Oiler Machine Rest Pin Screw Driver(large) Screw Driver(Small) Screw Driver(for Needle Plate) Thread Unwinder Spool Cap Thread Unwinder Spool Net Drip Pan Drip Pan Nail Knee Lifter Assembly Knee Lifter Assembly Machine Hinge Machine Hinge Cushion Machine Cushion Nail Quantity 109 109C 112 112C 309...

Instruction Manual
Page 58
Zigzag Sewing Machine 6.13. Belt Cover Components and Extra Parts Instruction Manual and Parts List 15 O 16 1 6 7 O 12 czzOlif"' 11 9 13 10 14 -57-
Zigzag Sewing Machine 6.13. Belt Cover Components and Extra Parts Instruction Manual and Parts List 15 O 16 1 6 7 O 12 czzOlif"' 11 9 13 10 14 -57-


