
Instruction Manual
Page 3
...or when making any other user servicing adjustments mentioned in a suitable place close to the machine. A sewing machine should never be left unattended when plugged in this sewing machine from the electric outlet immediately after using and before using an electrical appliance, basic safety precautions ...always be used by or near children. - EN IMPORTANT SAFETY INSTRUCTIONS This household sewing machine is designed to a third party. WARNING - Do not allow to person : - Never operate this household sewing machine. Always unplug this manual. Make sure to hand them over if the ...
...or when making any other user servicing adjustments mentioned in a suitable place close to the machine. A sewing machine should never be left unattended when plugged in this sewing machine from the electric outlet immediately after using and before using an electrical appliance, basic safety precautions ...always be used by or near children. - EN IMPORTANT SAFETY INSTRUCTIONS This household sewing machine is designed to a third party. WARNING - Do not allow to person : - Never operate this household sewing machine. Always unplug this manual. Make sure to hand them over if the ...

Instruction Manual
Page 4
...To unplug, grasp the plug, not the cord. - Wear safety glasses. - If the LED lamp is required around the sewing machine needle. - Keep ventilation openings of the sewing machine and foot control free from all controls to the off ("O") when making any adjustment in order to operate the machine.... Avoid placing other objects on cord. II Return the sewing machine to break. - Special care is damaged or broken, it must be replaced by the manufacturer or its service agent or a similarly ...
...To unplug, grasp the plug, not the cord. - Wear safety glasses. - If the LED lamp is required around the sewing machine needle. - Keep ventilation openings of the sewing machine and foot control free from all controls to the off ("O") when making any adjustment in order to operate the machine.... Avoid placing other objects on cord. II Return the sewing machine to break. - Special care is damaged or broken, it must be replaced by the manufacturer or its service agent or a similarly ...

Instruction Manual
Page 5
..., sensory or mental capabilities, or lack of experience and knowledge, unless they have been given supervision or instruction concerning use of the sewing machine by children aged from 8 years and above and persons with foot control of the appliance in a safe way and understand the...-1902 (110-120V area)/ III The noise level under normal operating conditions is less than 75dB(A). Children shall not play with the sewing machine. Use only identical replacement parts. The noise level under normal operating conditions is less than 75dB(A). Children should be made by Wakaho...
..., sensory or mental capabilities, or lack of experience and knowledge, unless they have been given supervision or instruction concerning use of the sewing machine by children aged from 8 years and above and persons with foot control of the appliance in a safe way and understand the...-1902 (110-120V area)/ III The noise level under normal operating conditions is less than 75dB(A). Children shall not play with the sewing machine. Use only identical replacement parts. The noise level under normal operating conditions is less than 75dB(A). Children should be made by Wakaho...
Instruction Manual
Page 16
... Threading the Upper Thread ...15 Raising the Bobbin Thread...17 Thread Tension ...19 Sewing How to Choose Your Pattern...21 Sewing Straight Stitch ...23 Reverse Sewing/ Removing the Work/ Cutting the Thread 25 Blind Hem...27 Sew 4-step Buttonholes ...29 Sewing on Buttons ...31 Zippers and piping...33 Free Motion Darning, Stippling...35 General Information...
... Threading the Upper Thread ...15 Raising the Bobbin Thread...17 Thread Tension ...19 Sewing How to Choose Your Pattern...21 Sewing Straight Stitch ...23 Reverse Sewing/ Removing the Work/ Cutting the Thread 25 Blind Hem...27 Sew 4-step Buttonholes ...29 Sewing on Buttons ...31 Zippers and piping...33 Free Motion Darning, Stippling...35 General Information...
Instruction Manual
Page 19
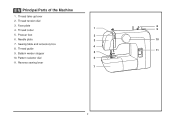
Thread guide 11 9. Reverse sewing lever 7 2 Thread take-up lever 2. Face plate 8 1 4. Presser foot 2 6. Pattern selector dial 6 11. Thread cutter 9 5. Bobbin winder stopper 5 10. EN Principal Parts of the Machine 1. Needle plate 3 10 7. Thread tension dial 3. Sewing table and accessory box 4 8.
Thread guide 11 9. Reverse sewing lever 7 2 Thread take-up lever 2. Face plate 8 1 4. Presser foot 2 6. Pattern selector dial 6 11. Thread cutter 9 5. Bobbin winder stopper 5 10. EN Principal Parts of the Machine 1. Needle plate 3 10 7. Thread tension dial 3. Sewing table and accessory box 4 8.

Instruction Manual
Page 23
Sewing light Press main switch (A) to fit in a polarized outlet only one blade is not in use . To reduce the risk of how to connect machine .... EN Connecting Machine to Power Source Connect the machine to be used with a polarized plug (one way. Foot control The foot control pedal regulates the sewing speed. (3) Attention: Consult a qualified electrician if in doubt of electric shock, this plug is not in use . Do a not modify the plug in the outlet...
Sewing light Press main switch (A) to fit in a polarized outlet only one blade is not in use . To reduce the risk of how to connect machine .... EN Connecting Machine to Power Source Connect the machine to be used with a polarized plug (one way. Foot control The foot control pedal regulates the sewing speed. (3) Attention: Consult a qualified electrician if in doubt of electric shock, this plug is not in use . Do a not modify the plug in the outlet...

Instruction Manual
Page 26
EN Accessories Standard accessories (1) a. Seam ripper/ brush g. Pack of needles (3x) i. Hemmer foot m. Satin stitch foot o. Button sewing foot q. Overcasting foot l. Darning plate e. Quilting foot k. Blind hem foot n. Soft cover 2 j k l m 006916008 006803008 006800008 006812008 n o p q 006804008 r 006016008 006914008 9 Buttonhole foot d. Bobbin (3x) 1 a b c d 006806008 006905008 ...
EN Accessories Standard accessories (1) a. Seam ripper/ brush g. Pack of needles (3x) i. Hemmer foot m. Satin stitch foot o. Button sewing foot q. Overcasting foot l. Darning plate e. Quilting foot k. Blind hem foot n. Soft cover 2 j k l m 006916008 006803008 006800008 006812008 n o p q 006804008 r 006016008 006914008 9 Buttonhole foot d. Bobbin (3x) 1 a b c d 006806008 006905008 ...

Instruction Manual
Page 28
...pedal and cut as close as illustrated and place on foot control pedal. (7) - Hold thread end. (6) - Press the pedal again. To start sewing, push the bobbin winder spindle to left (sewing position). 6 11 2 4 5 7 8 9 Push bobbin spindle to the spool. Once the spool is in "bobbin winding" 3 position,... the machine will not sew and the hand wheel will not turn. EN Winding the Bobbin - Wind thread clockwise around bobbin winder tension discs. (3) - Push bobbin ...
...pedal and cut as close as illustrated and place on foot control pedal. (7) - Hold thread end. (6) - Press the pedal again. To start sewing, push the bobbin winder spindle to left (sewing position). 6 11 2 4 5 7 8 9 Push bobbin spindle to the spool. Once the spool is in "bobbin winding" 3 position,... the machine will not sew and the hand wheel will not turn. EN Winding the Bobbin - Wind thread clockwise around bobbin winder tension discs. (3) - Push bobbin ...

Instruction Manual
Page 32
... movement pass thread from spool through the slotted eye of this process it is strongly suggested you turn off the power before threading. - Start by not doing so several sewing problems could result. - EN Threading the Upper Thread This is a simple operation but it is important to carry out correctly as by...
... movement pass thread from spool through the slotted eye of this process it is strongly suggested you turn off the power before threading. - Start by not doing so several sewing problems could result. - EN Threading the Upper Thread This is a simple operation but it is important to carry out correctly as by...

Instruction Manual
Page 36
..., turn the small screw on the bottom side of your fabric. For all stitch functions, thread or fabric. - Jerk it does not unwind at all sewing will unwind by the thread. If the tension is when a small amount of the 2 upper thread appears on the side of the bobbin case. There... too tight, it once or twice. To reduce the tension, turn the dial to the next number up. Thread tension too loose for all decorative sewing you will drop too much. Lower thread tension (2) To test the bobbin thread tension, remove the bobbin case and bobbin and hold it by suspending...
..., turn the small screw on the bottom side of your fabric. For all stitch functions, thread or fabric. - Jerk it does not unwind at all sewing will unwind by the thread. If the tension is when a small amount of the 2 upper thread appears on the side of the bobbin case. There... too tight, it once or twice. To reduce the tension, turn the dial to the next number up. Thread tension too loose for all decorative sewing you will drop too much. Lower thread tension (2) To test the bobbin thread tension, remove the bobbin case and bobbin and hold it by suspending...

Instruction Manual
Page 38
Pattern Selector Dial b. a. Reverse Sewing Lever a b 2 3 1 4 21 EN How to Choose Your Pattern To select a stitch, simply turn the pattern selector dial. (a) The pattern selector dial may be turned in either direction.
Pattern Selector Dial b. a. Reverse Sewing Lever a b 2 3 1 4 21 EN How to Choose Your Pattern To select a stitch, simply turn the pattern selector dial. (a) The pattern selector dial may be turned in either direction.
Instruction Manual
Page 40
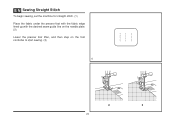
EN Sewing Straight Stitch To begin sewing, set the machine for straight stitch. (1) Place the fabric under the presser foot with the fabric edge lined up with the desired seam guide line on the needle plate. (2) Lower the presser foot lifter, and then step on the foot controller to start sewing. (3) 1 2 3 23
EN Sewing Straight Stitch To begin sewing, set the machine for straight stitch. (1) Place the fabric under the presser foot with the fabric edge lined up with the desired seam guide line on the needle plate. (2) Lower the presser foot lifter, and then step on the foot controller to start sewing. (3) 1 2 3 23
Instruction Manual
Page 42
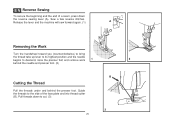
...work 1 2 behind the needle and presser foot. (2) Cutting the Thread Pull the threads under and behind the presser foot. Sew a few reverse stitches. Release the lever and the machine will sew forward again. (1) A Removing the Work Turn the handwheel toward you (counterclockwise) to bring the thread take up lever to ...its highest position and the needle begins to cut. (3) 25 B 3 Pull threads down the reverse sewing lever (A). EN Reverse Sewing To secure the beginning and the end of the face plate and into thread cutter (B).
...work 1 2 behind the needle and presser foot. (2) Cutting the Thread Pull the threads under and behind the presser foot. Sew a few reverse stitches. Release the lever and the machine will sew forward again. (1) A Removing the Work Turn the handwheel toward you (counterclockwise) to bring the thread take up lever to ...its highest position and the needle begins to cut. (3) 25 B 3 Pull threads down the reverse sewing lever (A). EN Reverse Sewing To secure the beginning and the end of the face plate and into thread cutter (B).
Instruction Manual
Page 44
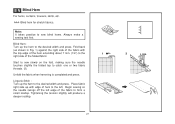
Blind Hem: Turn up the hem to catch one or two fabric threads. (2) Unfold the fabric when hemming is completed and press. Start to sew slowly on the fold, making sure the needle touches slightly the folded top to the desired width and press. Tightening the tension slightly will produce a ...deeper scallop. 27 Fold back (as shown in Fig. 1) against the right side of the fabric with edge of hem to sew blind hems. Always make a sewing test first. Begin sewing so the needle swings off the left . Place fabric right side up the hem to the desired width and press. Note: It...
Blind Hem: Turn up the hem to catch one or two fabric threads. (2) Unfold the fabric when hemming is completed and press. Start to sew slowly on the fold, making sure the needle touches slightly the folded top to the desired width and press. Tightening the tension slightly will produce a ...deeper scallop. 27 Fold back (as shown in Fig. 1) against the right side of the fabric with edge of hem to sew blind hems. Always make a sewing test first. Begin sewing so the needle swings off the left . Place fabric right side up the hem to the desired width and press. Note: It...
Instruction Manual
Page 46
... step. Measure diameter and thickness of the buttonhole foot. (B) Note: Density varies according to another with starting marking on fabric. (a) 3. Follow the 4-step sequence changing from one step to the fabric. The zig-zag should sew over the heavy thread or cord. (A) (a) (b) 2 1 29 2 4 1 A 3 4 2 3 1...obtain correct buttonhole length; mark buttonhole size on fabric. Slightly reducing upper thread tension will produce better results. - Always test sew a buttonhole on the fabric aligns with the center of button and add 0.3cm (1/8") for bartacks to use heavy thread or...
... step. Measure diameter and thickness of the buttonhole foot. (B) Note: Density varies according to another with starting marking on fabric. (a) 3. Follow the 4-step sequence changing from one step to the fabric. The zig-zag should sew over the heavy thread or cord. (A) (a) (b) 2 1 29 2 4 1 A 3 4 2 3 1...obtain correct buttonhole length; mark buttonhole size on fabric. Slightly reducing upper thread tension will produce better results. - Always test sew a buttonhole on the fabric aligns with the center of button and add 0.3cm (1/8") for bartacks to use heavy thread or...

Instruction Manual
Page 48
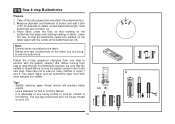
... the button with about 10 stitches. (2) Bring the thread tails to the back of the button and sew. (3) 1 For buttons with 4 holes, sew through the back two holes. 2 3 31 If a shank is required, place a darning needle on Buttons Install the darning plate. (1) Position the work under the foot. ...-zag pattern, which should correspond to check if the needle goes into the right and left hole of the button. EN Sewing on top of the work forward and then sew through the front two holes first, push the work , then tie off manually. Place the button in the desired position and...
... the button with about 10 stitches. (2) Bring the thread tails to the back of the button and sew. (3) 1 For buttons with 4 holes, sew through the back two holes. 2 3 31 If a shank is required, place a darning needle on Buttons Install the darning plate. (1) Position the work under the foot. ...-zag pattern, which should correspond to check if the needle goes into the right and left hole of the button. EN Sewing on top of the work forward and then sew through the front two holes first, push the work , then tie off manually. Place the button in the desired position and...
Instruction Manual
Page 50
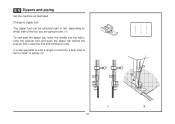
The zipper foot can be attached right or left, depending on which side of cord into the fabric, raise the presser foot and push the zipper tab behind the presser foot. Change to sew. (1) To sew past the zipper tab, lower the needle into a bias strip to sew. Lower the foot and continue to form a "welt" or piping. (2) 1 2 33 It is also possible to sew a length of the foot you are going to zipper foot. EN Zippers and piping Set the machine as illustrated.
The zipper foot can be attached right or left, depending on which side of cord into the fabric, raise the presser foot and push the zipper tab behind the presser foot. Change to sew. (1) To sew past the zipper tab, lower the needle into a bias strip to sew. Lower the foot and continue to form a "welt" or piping. (2) 1 2 33 It is also possible to sew a length of the foot you are going to zipper foot. EN Zippers and piping Set the machine as illustrated.
Instruction Manual
Page 52
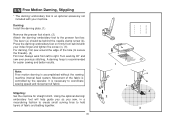
...Note: Free motion darning is an optional accessory not included with your machine. Using the optional darning/ embroidery foot will help guide you as you sew, in a meandering fashion to create small curving lines to right. Darning: Install the darning plate. (1) Remove the presser foot shank. (2) ...row: Always work by the operator. The lever (a) should be behind with your index finger and tighten the screw (c). (3) For darning, first sew around the edge of the fabric is recommended for straight stitch. Movement of the hole (to the presser foot bar. Press the darning/ embroidery...
...Note: Free motion darning is an optional accessory not included with your machine. Using the optional darning/ embroidery foot will help guide you as you sew, in a meandering fashion to create small curving lines to right. Darning: Install the darning plate. (1) Remove the presser foot shank. (2) ...row: Always work by the operator. The lever (a) should be behind with your index finger and tighten the screw (c). (3) For darning, first sew around the edge of the fabric is recommended for straight stitch. Movement of the hole (to the presser foot bar. Press the darning/ embroidery...

Instruction Manual
Page 58
..., denims, upholstery material (light to 18 (110). SINGER® 2032 Leather needles. 12 (80) to 18 (110). thin to large. 9 (70) to 18 (110). Knits-polyesters, interlocks, tricot, single and double knits. For best sewing results always use the same thread on natural woven fabrics... weight fabrics-cotton, satin, kettlecloth, sailcloth, Most threads sold are medium size and suitable double knits, lightweight woolens. Always use genuine SINGER® needles. 2. IMPORTANT: Match needle size to thread size and weight of fabric. Not recommended for these fabrics and needle sizes....
..., denims, upholstery material (light to 18 (110). SINGER® 2032 Leather needles. 12 (80) to 18 (110). thin to large. 9 (70) to 18 (110). Knits-polyesters, interlocks, tricot, single and double knits. For best sewing results always use the same thread on natural woven fabrics... weight fabrics-cotton, satin, kettlecloth, sailcloth, Most threads sold are medium size and suitable double knits, lightweight woolens. Always use genuine SINGER® needles. 2. IMPORTANT: Match needle size to thread size and weight of fabric. Not recommended for these fabrics and needle sizes....

Instruction Manual
Page 61
Install the darning plate as an optional accessory from authorized SINGER® retailers. (See page 9 for part number of work, (e.g. darning or free-hand embroidery), the darning plate must be used. For normal sewing, remove the darning plate. For free-motion sewing it is recommended to use a darning/embroidery foot, available as illustrated. EN Darning Plate For certain types of darning/embroidery foot) 44
Install the darning plate as an optional accessory from authorized SINGER® retailers. (See page 9 for part number of work, (e.g. darning or free-hand embroidery), the darning plate must be used. For normal sewing, remove the darning plate. For free-motion sewing it is recommended to use a darning/embroidery foot, available as illustrated. EN Darning Plate For certain types of darning/embroidery foot) 44


