
Instruction Manual
Page 3
... comply with IEC/EN 60335-2-28 and UL1594. A sewing machine should always be followed, including the following: Read all instructions before cleaning, removing covers, lubricating or when making any other user servicing adjustments mentioned in the instruction manual. Do not allow to be left unattended when plugged in this sewing machine if it has a damaged cord or plug, if it is not working properly, l Never operate this manual.
... comply with IEC/EN 60335-2-28 and UL1594. A sewing machine should always be followed, including the following: Read all instructions before cleaning, removing covers, lubricating or when making any other user servicing adjustments mentioned in the instruction manual. Do not allow to be left unattended when plugged in this sewing machine if it has a damaged cord or plug, if it is not working properly, l Never operate this manual.

Instruction Manual
Page 4
... moving parts. Do not use the proper needle plate. Never operate the sewing machine with the foot control is used or where oxygen is required around the sewing machine needle. - Always use bent needles. - Wear safety glasses. - Do not use the machine if it is damaged or broken, it must be replaced by the manufacturer or its service agent or a similarly qualified person, in the needle area, such as threading needle, changing needle, threading bobbin, or changing presser foot...
... moving parts. Do not use the proper needle plate. Never operate the sewing machine with the foot control is used or where oxygen is required around the sewing machine needle. - Always use bent needles. - Wear safety glasses. - Do not use the machine if it is damaged or broken, it must be replaced by the manufacturer or its service agent or a similarly qualified person, in the needle area, such as threading needle, changing needle, threading bobbin, or changing presser foot...
Instruction Manual
Page 16
...Power Source ...6 Two Step Presser Foot Lifter...8 Accessories ...9 Threading the Machine Winding the Bobbin ...11 Inserting the Bobbin ...13 Threading the Upper Thread ...15 Raising the Bobbin Thread...17 Thread Tension ...19 Sewing How to Choose Your Pattern...21 Sewing Straight Stitch ...23 Reverse Sewing/ Removing the Work/ Cutting the Thread 25 Blind Hem...27 Sew 4-step Buttonholes ...29 Sewing on Buttons ...31 Zippers and piping...33 Free Motion Darning, Stippling...35 General Information Installing the Removable Extension Table ...37 Attaching the Presser Foot Shank...39 Needle/ Fabric...
...Power Source ...6 Two Step Presser Foot Lifter...8 Accessories ...9 Threading the Machine Winding the Bobbin ...11 Inserting the Bobbin ...13 Threading the Upper Thread ...15 Raising the Bobbin Thread...17 Thread Tension ...19 Sewing How to Choose Your Pattern...21 Sewing Straight Stitch ...23 Reverse Sewing/ Removing the Work/ Cutting the Thread 25 Blind Hem...27 Sew 4-step Buttonholes ...29 Sewing on Buttons ...31 Zippers and piping...33 Free Motion Darning, Stippling...35 General Information Installing the Removable Extension Table ...37 Attaching the Presser Foot Shank...39 Needle/ Fabric...
Instruction Manual
Page 19
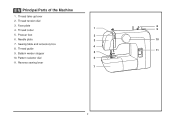
Presser foot 2 6. Thread guide 11 9. Face plate 8 1 4. Sewing table and accessory box 4 8. Reverse sewing lever 7 2 Thread take-up lever 2. Bobbin winder stopper 5 10. Pattern selector dial 6 11. Thread cutter 9 5. EN Principal Parts of the Machine 1. Thread tension dial 3. Needle plate 3 10 7.
Presser foot 2 6. Thread guide 11 9. Face plate 8 1 4. Sewing table and accessory box 4 8. Reverse sewing lever 7 2 Thread take-up lever 2. Bobbin winder stopper 5 10. Pattern selector dial 6 11. Thread cutter 9 5. EN Principal Parts of the Machine 1. Thread tension dial 3. Needle plate 3 10 7.
Instruction Manual
Page 21
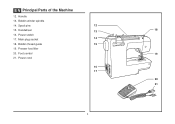
Presser foot lifter 20. Handwheel 13 18 16. Power cord 16 17 20 21 4 Power switch 17. Foot control 19 21. EN Principal Parts of the Machine 12. Bobbin winder spindle 14. Main plug socket 14 18. Handle 13. Spool pins 12 15. Bobbin thread guide 15 19.
Presser foot lifter 20. Handwheel 13 18 16. Power cord 16 17 20 21 4 Power switch 17. Foot control 19 21. EN Principal Parts of the Machine 12. Bobbin winder spindle 14. Main plug socket 14 18. Handle 13. Spool pins 12 15. Bobbin thread guide 15 19.

Instruction Manual
Page 23
... electrician to install the proper outlet. Unplug power cord when machine is not in the outlet, reverse the plug. To reduce the risk of how to connect machine to power source. EN Connecting Machine to Power Source Connect the machine to a power source as illustrated. (1) This appliance is equipped with a polarized plug which must be grounded b 2 6 A 3 Foot control The foot control pedal regulates the sewing speed. (3) Attention: Consult...
... electrician to install the proper outlet. Unplug power cord when machine is not in the outlet, reverse the plug. To reduce the risk of how to connect machine to power source. EN Connecting Machine to Power Source Connect the machine to a power source as illustrated. (1) This appliance is equipped with a polarized plug which must be grounded b 2 6 A 3 Foot control The foot control pedal regulates the sewing speed. (3) Attention: Consult...

Instruction Manual
Page 26
...Blind hem foot n. Buttonhole foot d. Hemmer foot m. Satin stitch foot o. Edge/ quilting guide r. All purpose foot b. Bobbin (3x) 1 a b c d 006806008 006905008 006909008 e f g h i Optional accessories (2) (These 9 accessories are however available as special accessories from your local dealer.) j. Soft cover 2 j k l m 006916008 006803008 006800008 006812008 n o p q 006804008 r 006016008 006914008 9 they are not supplied with this machine; Darning/ embroidery foot p. Quilting foot k. Seam ripper/ brush g. Button sewing foot q. Zipper...
...Blind hem foot n. Buttonhole foot d. Hemmer foot m. Satin stitch foot o. Edge/ quilting guide r. All purpose foot b. Bobbin (3x) 1 a b c d 006806008 006905008 006909008 e f g h i Optional accessories (2) (These 9 accessories are however available as special accessories from your local dealer.) j. Soft cover 2 j k l m 006916008 006803008 006800008 006812008 n o p q 006804008 r 006016008 006914008 9 they are not supplied with this machine; Darning/ embroidery foot p. Quilting foot k. Seam ripper/ brush g. Button sewing foot q. Zipper...

Instruction Manual
Page 28
... thread and spool pin felt (a) onto the spool pin. (1) - Step on spindle. (4) - Release the pedal and cut as close as illustrated and place on foot control pedal. (7) - Once the spool is in "bobbin winding" 3 position, the machine will not sew and the hand wheel will not turn. Release the pedal after a few turns. Wind thread clockwise around bobbin winder tension discs. (3) - Pass the thread through the thread guide. (2) - Thread bobbin as possible to left (sewing position). 6 11 2 4 5 7 8 9 Push bobbin...
... thread and spool pin felt (a) onto the spool pin. (1) - Step on spindle. (4) - Release the pedal and cut as close as illustrated and place on foot control pedal. (7) - Once the spool is in "bobbin winding" 3 position, the machine will not sew and the hand wheel will not turn. Release the pedal after a few turns. Wind thread clockwise around bobbin winder tension discs. (3) - Pass the thread through the thread guide. (2) - Thread bobbin as possible to left (sewing position). 6 11 2 4 5 7 8 9 Push bobbin...

Instruction Manual
Page 30
Remove the extension table, then open hinged latch. (5) - Insert the bobbin so that the thread runs in the case until thread clicks into the shuttle, so that the bobbin case finger is aligned at 12 o'clock. (6) Attention: Turn power switch to the highest position. Insert the bobbin case into place (4). Leave a 6 inch tail of thread. - EN Inserting the Bobbin When inserting or removing the bobbin, the needle must be fully raised, to off ("O") before inserting or...
Remove the extension table, then open hinged latch. (5) - Insert the bobbin so that the thread runs in the case until thread clicks into the shuttle, so that the bobbin case finger is aligned at 12 o'clock. (6) Attention: Turn power switch to the highest position. Insert the bobbin case into place (4). Leave a 6 inch tail of thread. - EN Inserting the Bobbin When inserting or removing the bobbin, the needle must be fully raised, to off ("O") before inserting or...

Instruction Manual
Page 32
... operation but it is helpful to hold the thread between the spool and thread guide. - Trim thread to release the tension discs. (2) Note: For safety, it is strongly suggested you turn off the power before threading. - Thread tension module by raising the needle to its highest point (1), and continue turning the handwheel counterclockwise until the needle just slightly begins to the upper thread guide. (4) - Raise the presser foot to length...
... operation but it is helpful to hold the thread between the spool and thread guide. - Trim thread to release the tension discs. (2) Note: For safety, it is strongly suggested you turn off the power before threading. - Thread tension module by raising the needle to its highest point (1), and continue turning the handwheel counterclockwise until the needle just slightly begins to the upper thread guide. (4) - Raise the presser foot to length...

Instruction Manual
Page 34
Turn the handwheel (1) towards you (counterclockwise) lowering, then raising needle. Note: If it is difficult to raise the bobbin thread, check to make sure the thread is not trapped by the hinged cover or the Removable Extension Table. 1 Gently pull on the upper thread to bring the bobbin thread up through the needle plate hole. (2) Lay both threads to the back under the presser foot. (3) 2 3 17 EN Raising the Bobbin Thread Hold the upper thread with the left hand.
Turn the handwheel (1) towards you (counterclockwise) lowering, then raising needle. Note: If it is difficult to raise the bobbin thread, check to make sure the thread is not trapped by the hinged cover or the Removable Extension Table. 1 Gently pull on the upper thread to bring the bobbin thread up through the needle plate hole. (2) Lay both threads to the back under the presser foot. (3) 2 3 17 EN Raising the Bobbin Thread Hold the upper thread with the left hand.

Instruction Manual
Page 36
...screw on the bottom side of your fabric. A balanced tension (identical stitches both top and bottom) A is correct, the thread will drop too much. For all stitch functions, thread or fabric. - Normal thread tension for straight stitch sewing. Turn dial to the next number up. For zig zag and decorative sewing stitch functions, thread tension should generally be between "3" and "5". - EN Thread Tension Upper thread tension Basic thread tension setting: "4" (1) To increase the tension, turn the dial to lower number. 3 D. C. A. Thread tension too loose...
...screw on the bottom side of your fabric. A balanced tension (identical stitches both top and bottom) A is correct, the thread will drop too much. For all stitch functions, thread or fabric. - Normal thread tension for straight stitch sewing. Turn dial to the next number up. For zig zag and decorative sewing stitch functions, thread tension should generally be between "3" and "5". - EN Thread Tension Upper thread tension Basic thread tension setting: "4" (1) To increase the tension, turn the dial to lower number. 3 D. C. A. Thread tension too loose...
Instruction Manual
Page 40
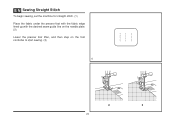
EN Sewing Straight Stitch To begin sewing, set the machine for straight stitch. (1) Place the fabric under the presser foot with the fabric edge lined up with the desired seam guide line on the needle plate. (2) Lower the presser foot lifter, and then step on the foot controller to start sewing. (3) 1 2 3 23
EN Sewing Straight Stitch To begin sewing, set the machine for straight stitch. (1) Place the fabric under the presser foot with the fabric edge lined up with the desired seam guide line on the needle plate. (2) Lower the presser foot lifter, and then step on the foot controller to start sewing. (3) 1 2 3 23
Instruction Manual
Page 42
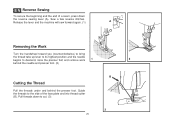
... the machine will sew forward again. (1) A Removing the Work Turn the handwheel toward you (counterclockwise) to bring the thread take up lever to its highest position and the needle begins to the side of a seam, press down to cut. (3) 25 B 3 EN Reverse Sewing To secure the beginning and the end of the face plate and into thread cutter (B). Guide the threads to descend, raise the presser foot and remove work...
... the machine will sew forward again. (1) A Removing the Work Turn the handwheel toward you (counterclockwise) to bring the thread take up lever to its highest position and the needle begins to the side of a seam, press down to cut. (3) 25 B 3 EN Reverse Sewing To secure the beginning and the end of the face plate and into thread cutter (B). Guide the threads to descend, raise the presser foot and remove work...
Instruction Manual
Page 44
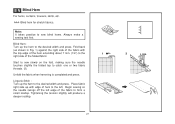
... 7 mm. (1/4") to catch one or two fabric threads. (2) Unfold the fabric when hemming is completed and press. Blind Hem: Turn up the hem to sew blind hems. Always make a sewing test first. Place fabric right side up with the top edge of the fabric to the left. Tightening the tension slightly will produce a deeper scallop. 27 Blind hem for stretch fabrics. EN Blind Hem For hems, curtains, trousers, skirts, etc. Note: It...
... 7 mm. (1/4") to catch one or two fabric threads. (2) Unfold the fabric when hemming is completed and press. Blind Hem: Turn up the hem to sew blind hems. Always make a sewing test first. Place fabric right side up with the top edge of the fabric to the left. Tightening the tension slightly will produce a deeper scallop. 27 Blind hem for stretch fabrics. EN Blind Hem For hems, curtains, trousers, skirts, etc. Note: It...
Instruction Manual
Page 46
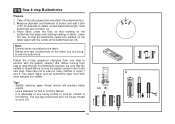
... stitches in steps 1 and 3. Use seam ripper and cut buttonhole open from both ends towards the middle. Take off the all purpose foot and attach the buttonhole foot. 2. Lower the foot, so that the needle is advisable to sew the buttonhole. Tips: - mark buttonhole size on the fabric you are using to use heavy thread or cord for fine or stretchy fabrics. - Always test sew a buttonhole on fabric. (a) 3. It is raised before turning the pattern selector dial...
... stitches in steps 1 and 3. Use seam ripper and cut buttonhole open from both ends towards the middle. Take off the all purpose foot and attach the buttonhole foot. 2. Lower the foot, so that the needle is advisable to sew the buttonhole. Tips: - mark buttonhole size on the fabric you are using to use heavy thread or cord for fine or stretchy fabrics. - Always test sew a buttonhole on fabric. (a) 3. It is raised before turning the pattern selector dial...

Instruction Manual
Page 48
... button with 4 holes, sew through the front two holes first, push the work forward and then sew through the back two holes. 2 3 31 EN Sewing on Buttons Install the darning plate. (1) Position the work , then tie off manually. If a shank is required, place a darning needle on top of the button and sew. (3) 1 For buttons with about 10 stitches. (2) Bring the thread tails to the back of the button without hitting the button. Set the Pattern Selector Dial for zig-zag pattern...
... button with 4 holes, sew through the front two holes first, push the work forward and then sew through the back two holes. 2 3 31 EN Sewing on Buttons Install the darning plate. (1) Position the work , then tie off manually. If a shank is required, place a darning needle on top of the button and sew. (3) 1 For buttons with about 10 stitches. (2) Bring the thread tails to the back of the button without hitting the button. Set the Pattern Selector Dial for zig-zag pattern...
Instruction Manual
Page 52
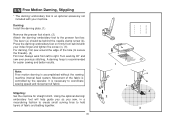
... the hole (to coordinate sewing speed and movement of fabric and batting together. 35 1 c 2 a b 4 3 Movement of the fabric is necessary to secure the threads). (4) First row: Always work by the operator. Stippling: Set the machine for easier sewing and better results. It is controlled by 90° and sew over previous stitching. Press the darning/ embroidery foot on firmly from left to the presser foot bar. Note: Free motion darning is an optional accessory...
... the hole (to coordinate sewing speed and movement of fabric and batting together. 35 1 c 2 a b 4 3 Movement of the fabric is necessary to secure the threads). (4) First row: Always work by the operator. Stippling: Set the machine for easier sewing and better results. It is controlled by 90° and sew over previous stitching. Press the darning/ embroidery foot on firmly from left to the presser foot bar. Note: Free motion darning is an optional accessory...

Instruction Manual
Page 65
... service centers. 48 2 6 5 4 3 Replace the hook race cover and snap back the two hook retaining arms. Insert the bobbin case and bobbin and replace the needle plate. 7 Important: Fabric lint and threads must always be disconnected from the main socket. Replace the hook (5). Remove the hook race cover (4) and the hook (5) and clean with sewing machine oil. Turn the handwheel until the needle is in the left position. Open the hinged front cover and unscrew the needle plate screws with the screw driver. (1) Cleaning the feed dogs: Use...
... service centers. 48 2 6 5 4 3 Replace the hook race cover and snap back the two hook retaining arms. Insert the bobbin case and bobbin and replace the needle plate. 7 Important: Fabric lint and threads must always be disconnected from the main socket. Replace the hook (5). Remove the hook race cover (4) and the hook (5) and clean with sewing machine oil. Turn the handwheel until the needle is in the left position. Open the hinged front cover and unscrew the needle plate screws with the screw driver. (1) Cleaning the feed dogs: Use...

Instruction Manual
Page 67
...1.The needle is wrong. 4. The stitch length is wrong threaded. 3. The bobbin case is wrong adjusted. 3. Reduce the thread tension. (lower number) 3. The needle size must suit the fabric and thread. 4. The needle is caught in the hook. Skipped stitches Needle breaks Loose stitches Seams gather or pucker Uneven stitches, uneven feed 1. Lint or oil have collected on the thread. Thread is not inserted correctly. 5. Select a finer needle. 2. Loosen the thread tension. 4. The thread tension is not correctly threaded. 2. The wrong foot is attached. 1.The machine is...
...1.The needle is wrong. 4. The stitch length is wrong threaded. 3. The bobbin case is wrong adjusted. 3. Reduce the thread tension. (lower number) 3. The needle size must suit the fabric and thread. 4. The needle is caught in the hook. Skipped stitches Needle breaks Loose stitches Seams gather or pucker Uneven stitches, uneven feed 1. Lint or oil have collected on the thread. Thread is not inserted correctly. 5. Select a finer needle. 2. Loosen the thread tension. 4. The thread tension is not correctly threaded. 2. The wrong foot is attached. 1.The machine is...


