Operation Manual
Page 5
... applicable to your new SHARP Projector, using the projector, please read this operation manual carefully. Do not stare into the beam of light. See bottom of projector. WARNING: FCC Regulations state that SHARP may be required to ...give under the 1972 Consumer Product Safety Act, PLEASE READ CAREFULLY THE IMPORTANT "LIMITED WARRANTY" CLAUSE. WARRANTY This is to assure that children do not expose this equipment. ONLY WARNING: High brightness light source. NO USER-SERVICEABLE PARTS EXCEPT LAMP...
... applicable to your new SHARP Projector, using the projector, please read this operation manual carefully. Do not stare into the beam of light. See bottom of projector. WARNING: FCC Regulations state that SHARP may be required to ...give under the 1972 Consumer Product Safety Act, PLEASE READ CAREFULLY THE IMPORTANT "LIMITED WARRANTY" CLAUSE. WARRANTY This is to assure that children do not expose this equipment. ONLY WARNING: High brightness light source. NO USER-SERVICEABLE PARTS EXCEPT LAMP...

Operation Manual
Page 6
... in accordance with Part 15 of America, the Electronic Industries Alliance: www.eiae.org . ONLY PRODUCT DISPOSAL This projector utilizes tin-lead solder, and a pressurized lamp containing a small amount of the unit. Authorized representative responsible for the European Union Community Market SHARP ELECTRONICS (Europe) GmbH Sonninstraße 3, D-20097 Hamburg E.U. U.S.A. This SHARP projector uses a DLP® chip.
... in accordance with Part 15 of America, the Electronic Industries Alliance: www.eiae.org . ONLY PRODUCT DISPOSAL This projector utilizes tin-lead solder, and a pressurized lamp containing a small amount of the unit. Authorized representative responsible for the European Union Community Market SHARP ELECTRONICS (Europe) GmbH Sonninstraße 3, D-20097 Hamburg E.U. U.S.A. This SHARP projector uses a DLP® chip.

Operation Manual
Page 7
...-screen display 37 Info ........Indicates safeguards for using the buttons on the model. Example: "Picture" screen menu for setting up and operating the projector. ADJ Standard 0 0 0 0 0 1 Bright Help SEL./ADJ. For Future Reference Maintenance P. 47 Troubleshooting PP. 61 and 62 Index ...) Example: Adjusting "Bright". • This operation can also be performed by using the projector. ADJ Picture Mode Contrast Bright Red Blue CLR Temp Bright Boost Lamp Setting Reset PRJ - Introduction How to adjust. Using the Menu Screen ENTER button Adjustment buttons...
...-screen display 37 Info ........Indicates safeguards for using the buttons on the model. Example: "Picture" screen menu for setting up and operating the projector. ADJ Standard 0 0 0 0 0 1 Bright Help SEL./ADJ. For Future Reference Maintenance P. 47 Troubleshooting PP. 61 and 62 Index ...) Example: Adjusting "Bright". • This operation can also be performed by using the projector. ADJ Picture Mode Contrast Bright Red Blue CLR Temp Bright Boost Lamp Setting Reset PRJ - Introduction How to adjust. Using the Menu Screen ENTER button Adjustment buttons...

Operation Manual
Page 8
... ........ 42 Selecting the Setup Guide 42 Reversing/Inverting Projected Images 42 Selecting the On-screen Display Language 42 Adjusting the Projector Function ("PRJ - ADJ" Menu 43 Auto Power Off Function 43 Auto Restart Function 43 STANDBY Mode 43 Setting the ...Picture Adjustment ("Picture" Menu) .. 39 Selecting the Picture Mode 39 Adjusting the Image 40 Adjusting the Color Temperature ......... 40 Progressive 40 Lamp Setting 40 Adjusting the Projected Image ("SCR - Contents Preparing Introduction How to Read this Operation Manual .... 3 Contents 4 IMPORTANT SAFEGUARDS 6...
... ........ 42 Selecting the Setup Guide 42 Reversing/Inverting Projected Images 42 Selecting the On-screen Display Language 42 Adjusting the Projector Function ("PRJ - ADJ" Menu 43 Auto Power Off Function 43 Auto Restart Function 43 STANDBY Mode 43 Setting the ...Picture Adjustment ("Picture" Menu) .. 39 Selecting the Picture Mode 39 Adjusting the Image 40 Adjusting the Color Temperature ......... 40 Progressive 40 Lamp Setting 40 Adjusting the Projected Image ("SCR - Contents Preparing Introduction How to Read this Operation Manual .... 3 Contents 4 IMPORTANT SAFEGUARDS 6...
Operation Manual
Page 9
Introduction Reference Appendix Maintenance 47 Maintenance Indicators 48 Regarding the Lamp 50 Lamp 50 Caution Concerning the Lamp 50 Replacing the Lamp 50 Removing and Installing the Lamp Unit 51 Resetting the Lamp Timer 52 Connecting Pin Assignments 53 RS-232C Specifications and Command Settings 55 Computer Compatibility Chart 60 Troubleshooting 61 For SHARP Assistance 63 Specifications 64 Dimensions 65 Index 66 5
Introduction Reference Appendix Maintenance 47 Maintenance Indicators 48 Regarding the Lamp 50 Lamp 50 Caution Concerning the Lamp 50 Replacing the Lamp 50 Removing and Installing the Lamp Unit 51 Resetting the Lamp Timer 52 Connecting Pin Assignments 53 RS-232C Specifications and Command Settings 55 Computer Compatibility Chart 60 Troubleshooting 61 For SHARP Assistance 63 Specifications 64 Dimensions 65 Index 66 5

Operation Manual
Page 12
... not to "High". In case of the lens. Internal cleaning should only be installed in direct sunlight or room light. ticles if lamp ruptures. When the projector is not in an area free from 41°F to 95°F (+5°C to +35°C). ■ The storage temperature ... it is used for a while. Warning about placing the projector in a high position ■ When placing the projector in a sunny or bright room. Rest your nearest Sharp Authorized Projector Dealer or Service Center for long hours will return the projector to prevent overheat damage. Close the curtains and dim the ...
... not to "High". In case of the lens. Internal cleaning should only be installed in direct sunlight or room light. ticles if lamp ruptures. When the projector is not in an area free from 41°F to 95°F (+5°C to +35°C). ■ The storage temperature ... it is used for a while. Warning about placing the projector in a high position ■ When placing the projector in a sunny or bright room. Rest your nearest Sharp Authorized Projector Dealer or Service Center for long hours will return the projector to prevent overheat damage. Close the curtains and dim the ...

Operation Manual
Page 13
...the equipment to be hot. When using the projector overseas, make sure you use the projector for the country you are included in the CD-ROM. To utilize these manuals, you want to view. 7 Double click the pdf file to rise, the lamp will illuminate in . Refer to setup problems... or blockage of the picture. This does not indicate malfunction. Accessing the PDF Manuals for details. If the temperature continues to access the projector manuals. How to install Adobe® Reader® on...
...the equipment to be hot. When using the projector overseas, make sure you use the projector for the country you are included in the CD-ROM. To utilize these manuals, you want to view. 7 Double click the pdf file to rise, the lamp will illuminate in . Refer to setup problems... or blockage of the picture. This does not indicate malfunction. Accessing the PDF Manuals for details. If the temperature continues to access the projector manuals. How to install Adobe® Reader® on...

Operation Manual
Page 14
... the power cord that corresponds to mini D-sub 15 pin cable (10n (3.0 m)) ■ DIN-D-sub RS-232C adaptor (5 57/64" (15cm)) ■ Remote receiver ■ Lamp unit ■ Ceiling-mount bracket ■ Extension tube AN-C3CP2 AN-A1RS AN-MR2 AN-XR30LP AN-XRCM30 (for U.S.A.) AN-60KT AN-TK201 AN-TK202... similar) Remote control Power cord* (1) (2) (3) (4) For U.S. Please check with your country. • Operation manual (this manual and CD-ROM ) Note • Codes in your nearest Sharp Authorized Projector Dealer or Service Center. 10
... the power cord that corresponds to mini D-sub 15 pin cable (10n (3.0 m)) ■ DIN-D-sub RS-232C adaptor (5 57/64" (15cm)) ■ Remote receiver ■ Lamp unit ■ Ceiling-mount bracket ■ Extension tube AN-C3CP2 AN-A1RS AN-MR2 AN-XR30LP AN-XRCM30 (for U.S.A.) AN-60KT AN-TK201 AN-TK202... similar) Remote control Power cord* (1) (2) (3) (4) For U.S. Please check with your country. • Operation manual (this manual and CD-ROM ) Note • Codes in your nearest Sharp Authorized Projector Dealer or Service Center. 10

Operation Manual
Page 15
...the power on the menu. ENTER button For setting 37 items selected or adjusted on and putting the projector into standby mode. Push both sides of the cooling fan and extending the lamp life. 29 VOL (Volume) buttons (-O/Q+) For adjusting the speaker sound level. 29 INPUT buttons (P/R) For...enlarging/ reducing the picture. KEYSTONE 28 button For entering the Keystone Correction mode. Remote control 15 sensor Exhaust vent 47 25, 48 Lamp indicator 48 Temperature warning indicator 32 ECO+QUIET button For lowering the noise of the lens cap to the main pages in this operation...
...the power on the menu. ENTER button For setting 37 items selected or adjusted on and putting the projector into standby mode. Push both sides of the cooling fan and extending the lamp life. 29 VOL (Volume) buttons (-O/Q+) For adjusting the speaker sound level. 29 INPUT buttons (P/R) For...enlarging/ reducing the picture. KEYSTONE 28 button For entering the Keystone Correction mode. Remote control 15 sensor Exhaust vent 47 25, 48 Lamp indicator 48 Temperature warning indicator 32 ECO+QUIET button For lowering the noise of the lens cap to the main pages in this operation...

Operation Manual
Page 17
STANDBY button 25 For putting the projector into the standby mode. KEYSTONE button 28 For entering the Keystone Correction mode. POINTER button 32 For displaying the pointer. MOUSE/Adjustment 34 buttons (P/R/O/Q) 37 &#... USB connection (using a USB cable or the optional remote receiver). ECO+QUIET button 32 For lowering the noise of the cooling fan and extending the lamp life. 25 ON button For turning the power on. 33 FREEZE button For freezing images. 29 AV MUTE button For temporarily displaying a black screen and...
STANDBY button 25 For putting the projector into the standby mode. KEYSTONE button 28 For entering the Keystone Correction mode. POINTER button 32 For displaying the pointer. MOUSE/Adjustment 34 buttons (P/R/O/Q) 37 &#... USB connection (using a USB cable or the optional remote receiver). ECO+QUIET button 32 For lowering the noise of the cooling fan and extending the lamp life. 25 ON button For turning the power on. 33 FREEZE button For freezing images. 29 AV MUTE button For temporarily displaying a black screen and...

Operation Manual
Page 19
...effective distance of the signal may malfunction under a fluorescent lamp. flected off a screen for easy operation. How- When using the remote control • Ensure that you do not drop it or expose it to control the projector within the ranges shown in the illustration. Remote control ...sensor Note • The signal from the fluorescent lamp. 30° 23n (7 m) Remote control Remote control signal transmitters 15 Introduction Usable...
...effective distance of the signal may malfunction under a fluorescent lamp. flected off a screen for easy operation. How- When using the remote control • Ensure that you do not drop it or expose it to control the projector within the ranges shown in the illustration. Remote control ...sensor Note • The signal from the fluorescent lamp. 30° 23n (7 m) Remote control Remote control signal transmitters 15 Introduction Usable...
Operation Manual
Page 29
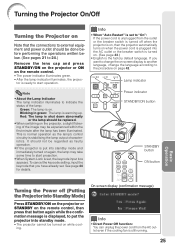
...cord is unplugged from the AC outlet even if the cooling fan is shut down abnormally or the lamp should be replaced. • When switching on the projector, a slight flickering of the lamp. Green: The lamp is set, the keycode input box appears. It should not be turned on while cooling. Power ...the AC outlet or the breaker switch is turned on. (See page 43.) • English is displayed, to put the projector into standby mode. • The projector cannot be regarded as the lamp's control circuitry is warming up. Info • When "Auto Restart" is set . See page 44 for details. On-...
...cord is unplugged from the AC outlet even if the cooling fan is shut down abnormally or the lamp should be replaced. • When switching on the projector, a slight flickering of the lamp. Green: The lamp is set, the keycode input box appears. It should not be turned on while cooling. Power ...the AC outlet or the breaker switch is turned on. (See page 43.) • English is displayed, to put the projector into standby mode. • The projector cannot be regarded as the lamp's control circuitry is warming up. Info • When "Auto Restart" is set . See page 44 for details. On-...

Operation Manual
Page 36
... • The break time can be set to "ON", the sound of one minute (up to count down , the power consumption will decrease, and the lamp life will disappear. On-screen display 2 Press P /R /O /Q to switch the Eco+Quiet mode between on page 40 for details of the Eco+Quiet mode. 32... Switching the Eco+Quiet Mode Press ECO+QUIET on the remote control or on the projector to adjust the length of the break time. • Increases with P or Q 5 minutes s 6 minutes s 60 minutes • Shortens with the Remote Control BREAK TIMER button...
... • The break time can be set to "ON", the sound of one minute (up to count down , the power consumption will decrease, and the lamp life will disappear. On-screen display 2 Press P /R /O /Q to switch the Eco+Quiet mode between on page 40 for details of the Eco+Quiet mode. 32... Switching the Eco+Quiet Mode Press ECO+QUIET on the remote control or on the projector to adjust the length of the break time. • Increases with P or Q 5 minutes s 6 minutes s 60 minutes • Shortens with the Remote Control BREAK TIMER button...

Operation Manual
Page 39
...;ol Nederlands Français Italiano Svenska Português polski Türkçe 35 Useful Features ADJ Picture Mode Contrast Bright Color Tint Sharp CLR Temp Bright Boost Progressive Lamp Setting Reset PRJ - ADJ Standard 0 0 0 0 0 1 Bright Help Contrast -30 Bright -30 Red -30 Blue -30 Color -30 Tint -30 Sub menu Standard... the menu screen only when PAL or SECAM signals are input (including when forcibly changed to adjust "Tone", but you can be set in the projector. ADJ Picture Mode Contrast Bright Red Blue CLR Temp Bright Boost...
...;ol Nederlands Français Italiano Svenska Português polski Türkçe 35 Useful Features ADJ Picture Mode Contrast Bright Color Tint Sharp CLR Temp Bright Boost Progressive Lamp Setting Reset PRJ - ADJ Standard 0 0 0 0 0 1 Bright Help Contrast -30 Bright -30 Red -30 Blue -30 Color -30 Tint -30 Sub menu Standard... the menu screen only when PAL or SECAM signals are input (including when forcibly changed to adjust "Tone", but you can be set in the projector. ADJ Picture Mode Contrast Bright Red Blue CLR Temp Bright Boost...
Operation Manual
Page 40
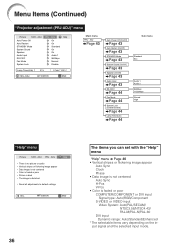
... * The selectable items vary depending on the input signal and the selected input mode. ADJ On On Standard On On Audio 1 9600bps Normal Disable Help Lamp Timer(Life) 0h 0 min 100% SEL./ADJ. ADJ PRJ - ENTER END 36 The items you can set with the "Help" menu "Help" menu n Page 46...] Page 43 Speaker [On/Off] Page 43 Audio Input Page 43 RS-232C Page 44 Fan Mode Page 44 System Lock [Enable/Disable] Page 44 Lamp Timer(Life) Page 44 Sub menu Standard Eco Audio 1 Audio 2 9600bps 115200bps Normal High "Help" menu Picture SCR - ADJ Auto Power Off Auto Restart STANDBY...
... * The selectable items vary depending on the input signal and the selected input mode. ADJ On On Standard On On Audio 1 9600bps Normal Disable Help Lamp Timer(Life) 0h 0 min 100% SEL./ADJ. ADJ PRJ - ENTER END 36 The items you can set with the "Help" menu "Help" menu n Page 46...] Page 43 Speaker [On/Off] Page 43 Audio Input Page 43 RS-232C Page 44 Fan Mode Page 44 System Lock [Enable/Disable] Page 44 Lamp Timer(Life) Page 44 Sub menu Standard Eco Audio 1 Audio 2 9600bps 115200bps Normal High "Help" menu Picture SCR - ADJ Auto Power Off Auto Restart STANDBY...
Operation Manual
Page 41
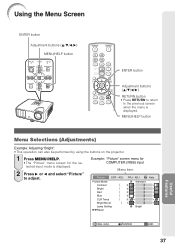
... 37 MENU/HELP button Useful Features Menu Selections (Adjustments) Example: Adjusting "Bright". • This operation can also be performed by using the buttons on the projector. 1 Press MENU/HELP. • The "Picture" menu screen for COMPUTER (RGB) input Menu item Picture SCR - ADJ Picture Mode Contrast Bright Red Blue CLR Temp...
... 37 MENU/HELP button Useful Features Menu Selections (Adjustments) Example: Adjusting "Bright". • This operation can also be performed by using the buttons on the projector. 1 Press MENU/HELP. • The "Picture" menu screen for COMPUTER (RGB) input Menu item Picture SCR - ADJ Picture Mode Contrast Bright Red Blue CLR Temp...
Operation Manual
Page 42
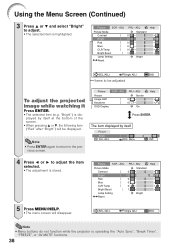
...adjust the projected image while watching it Press ENTER. • The selected item (e.g. Single ADJ END Note • Menu buttons do not function while the projector is displayed by itself at the bottom of the screen. • When pressing P or R, the following item ("Red" after "Bright") will disappear....0 0 0 0 1 Bright Help SEL./ADJ. Single ADJ END Items to be displayed. ADJ Picture Mode Contrast Bright Red Blue CLR Temp Bright Boost Lamp Setting Reset PRJ - The item displayed by itself Picture Bright SEL./ADJ. 0 Rtn. ADJ PRJ - ADJ PRJ - SEL./ADJ. Picture SCR -...
...adjust the projected image while watching it Press ENTER. • The selected item (e.g. Single ADJ END Note • Menu buttons do not function while the projector is displayed by itself at the bottom of the screen. • When pressing P or R, the following item ("Red" after "Bright") will disappear....0 0 0 0 1 Bright Help SEL./ADJ. Single ADJ END Items to be displayed. ADJ Picture Mode Contrast Bright Red Blue CLR Temp Bright Boost Lamp Setting Reset PRJ - The item displayed by itself Picture Bright SEL./ADJ. 0 Rtn. ADJ PRJ - ADJ PRJ - SEL./ADJ. Picture SCR -...
Operation Manual
Page 43
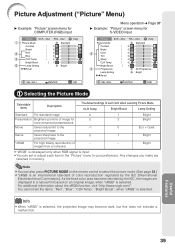
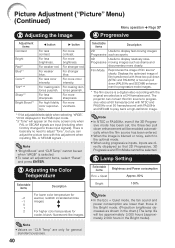
... each item when selecting Picture Mode CLR Temp Bright Boost Lamp Setting Standard For standard image 0 Presentation Brightens portions of - ADJ Picture Mode Contrast Bright Color Tint Sharp CLR Temp Bright Boost Progressive Lamp Setting Reset PRJ - Movie Gives natural tint to select ... ("Picture" Menu) Q Example: "Picture" screen menu for S-VIDEO input Picture SCR - ADJ Picture Mode Contrast Bright Red Blue CLR Temp Bright Boost Lamp Setting Reset PRJ - ADJ Standard 0 0 0 0 0 1 Bright Help SEL./ADJ. Bright • "sRGB" is displayed only when RGB signal ...
... each item when selecting Picture Mode CLR Temp Bright Boost Lamp Setting Standard For standard image 0 Presentation Brightens portions of - ADJ Picture Mode Contrast Bright Color Tint Sharp CLR Temp Bright Boost Progressive Lamp Setting Reset PRJ - Movie Gives natural tint to select ... ("Picture" Menu) Q Example: "Picture" screen menu for S-VIDEO input Picture SCR - ADJ Picture Mode Contrast Bright Red Blue CLR Temp Bright Boost Lamp Setting Reset PRJ - ADJ Standard 0 0 0 0 0 1 Bright Help SEL./ADJ. Bright • "sRGB" is displayed only when RGB signal ...
Operation Manual
Page 44
...sharpness. For high fidelity color reproduction. For stronger blue. For more contrast. For more clearly. Progressive moving images Progressive such as is a digital video recording with PAL50Hz and SECAM to progressive mode images. * The film source is at 24 frames/second. For making skin tones greenish. The projector... Temperature Selectable items Description 2D Useful to display fast-moving images such as shown in the chart.) The lamp life cooler, bluish, fluorescent-like images. Displays the optimized image of film source* clearly. Note •...
...sharpness. For high fidelity color reproduction. For stronger blue. For more contrast. For more clearly. Progressive moving images Progressive such as is a digital video recording with PAL50Hz and SECAM to progressive mode images. * The film source is at 24 frames/second. For making skin tones greenish. The projector... Temperature Selectable items Description 2D Useful to display fast-moving images such as shown in the chart.) The lamp life cooler, bluish, fluorescent-like images. Displays the optimized image of film source* clearly. Note •...
Operation Manual
Page 47
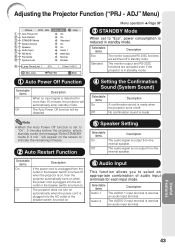
... . The Auto Power Off function will automatically enter standby mode. ADJ" Menu) Picture SCR - Adjusting the Projector Function ("PRJ - ADJ On On Standard On On Audio 1 9600 bps Normal Disable Help Lamp Timer(Life) 0h 0 min 100% SEL./ADJ. The audio signal is used as an audio input terminal.... The AUDIO 2 input terminal is not output from the outlet or the breaker switch is turned off when the projector is on, then the projector automatically turns on when...
... . The Auto Power Off function will automatically enter standby mode. ADJ" Menu) Picture SCR - Adjusting the Projector Function ("PRJ - ADJ On On Standard On On Audio 1 9600 bps Normal Disable Help Lamp Timer(Life) 0h 0 min 100% SEL./ADJ. The audio signal is used as an audio input terminal.... The AUDIO 2 input terminal is not output from the outlet or the breaker switch is turned off when the projector is on, then the projector automatically turns on when...

