PG-MB56X , PG-MB66X Operation Manual
Page 3
...There are two important reasons for about 90 seconds after the projector enters standby mode. NO USER-SERVICEABLE PARTS EXCEPT LAMP UNIT. The lightning flash with the projector. 1. U.S.A. DURING NORMAL OPERATION, NEVER TURN THE PROJECTOR OFF BY DISCONNECTING THE POWER CORD. WARRANTY This is to...state that you immediately receive the full benefit of sufficient magnitude to constitute a risk or electric shock to your new SHARP Projector, using the projector, please read this product to give under the 1972 Consumer Product Safety Act, PLEASE READ CAREFULLY THE IMPORTANT "LIMITED ...
...There are two important reasons for about 90 seconds after the projector enters standby mode. NO USER-SERVICEABLE PARTS EXCEPT LAMP UNIT. The lightning flash with the projector. 1. U.S.A. DURING NORMAL OPERATION, NEVER TURN THE PROJECTOR OFF BY DISCONNECTING THE POWER CORD. WARRANTY This is to...state that you immediately receive the full benefit of sufficient magnitude to constitute a risk or electric shock to your new SHARP Projector, using the projector, please read this product to give under the 1972 Consumer Product Safety Act, PLEASE READ CAREFULLY THE IMPORTANT "LIMITED ...
PG-MB56X , PG-MB66X Operation Manual
Page 4
...conformity SHARP PROJECTOR, MODEL PG-MB66X/PG-MB56X/XG-MB50X-L/XR-11XC-L/XR-10X-L/XR-10S-L This device complies with any interference received, including interference that interference will not affect the picture quality or the life expectancy of these materials may be determined by turning ...reception, which can radiate radio frequency energy and, if not installed and used in accordance with the limits for help. This SHARP projector uses a DMD panel. U.S.A. INFORMATION This equipment has been tested and found to comply with the operation manual, may cause harmful ...
...conformity SHARP PROJECTOR, MODEL PG-MB66X/PG-MB56X/XG-MB50X-L/XR-11XC-L/XR-10X-L/XR-10S-L This device complies with any interference received, including interference that interference will not affect the picture quality or the life expectancy of these materials may be determined by turning ...reception, which can radiate radio frequency energy and, if not installed and used in accordance with the limits for help. This SHARP projector uses a DMD panel. U.S.A. INFORMATION This equipment has been tested and found to comply with the operation manual, may cause harmful ...
PG-MB56X , PG-MB66X Operation Manual
Page 6
... Setting 44 Checking the Lamp Life Status 44 System Lock Function 44 Locking the Operation Buttons on 27 Turning the Power off (Putting the Projector into Standby Mode 27 Image Projection 28 About the Setup Guide 28 Adjusting the Projected Image 28 Switching... ......... 24 Connecting to a Monitor with RGB Input Terminal 25 Controlling the Projector by a Computer 26 Connecting the Power Cord 26 Using Basic Operation Turning the Projector On/Off 27 Turning the Projector on the Projector (Keylock Function 45 Troubleshooting with the Remote Control .... 34 Displaying and Setting...
... Setting 44 Checking the Lamp Life Status 44 System Lock Function 44 Locking the Operation Buttons on 27 Turning the Power off (Putting the Projector into Standby Mode 27 Image Projection 28 About the Setup Guide 28 Adjusting the Projected Image 28 Switching... ......... 24 Connecting to a Monitor with RGB Input Terminal 25 Controlling the Projector by a Computer 26 Connecting the Power Cord 26 Using Basic Operation Turning the Projector On/Off 27 Turning the Projector on the Projector (Keylock Function 45 Troubleshooting with the Remote Control .... 34 Displaying and Setting...
PG-MB56X , PG-MB66X Operation Manual
Page 10
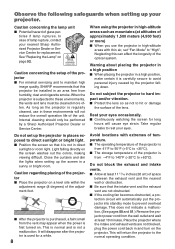
...be cleaned more ) I When you use in places exposed to avoid personal injury caused by a Sharp Authorized Projector Dealer or Service Center. This is normal and is first turned on. Do not subject the projector to prevent overheat damage. I If the cooling fan becomes obstructed, a protection circuit will automatically ... the longevity of the unit. ticles if lamp ruptures. As long as not to maintain high image quality, SHARP recommends that it is regularly cleaned, use the projector in an area free from the wall outlet and wait at least 10 minutes. Do not set "Fan Mode...
...be cleaned more ) I When you use in places exposed to avoid personal injury caused by a Sharp Authorized Projector Dealer or Service Center. This is normal and is first turned on. Do not subject the projector to prevent overheat damage. I If the cooling fan becomes obstructed, a protection circuit will automatically ... the longevity of the unit. ticles if lamp ruptures. As long as not to maintain high image quality, SHARP recommends that it is regularly cleaned, use the projector in an area free from the wall outlet and wait at least 10 minutes. Do not set "Fan Mode...
PG-MB56X , PG-MB66X Operation Manual
Page 11
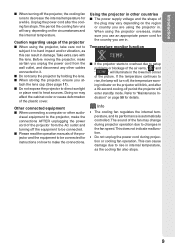
...appropriate power cord for the country you unplug the power cord from the AC outlet and turning off the projector, the cooling fan runs to decrease the internal temperature for details. When using the projector overseas, make the connections AFTER unplugging the power cord of the plug may vary depending...connected. Doing so may change during projection or cooling fan operation. Unplug the power cord after a 90-second cooling-off period the projector will turn off, the temperature warn- Caution regarding usage of the fan may affect the cabinet color or cause deformation of the...
...appropriate power cord for the country you unplug the power cord from the AC outlet and turning off the projector, the cooling fan runs to decrease the internal temperature for details. When using the projector overseas, make the connections AFTER unplugging the power cord of the plug may vary depending...connected. Doing so may change during projection or cooling fan operation. Unplug the power cord after a 90-second cooling-off period the projector will turn off, the temperature warn- Caution regarding usage of the fan may affect the cabinet color or cause deformation of the...
PG-MB56X , PG-MB66X Operation Manual
Page 13
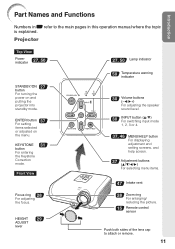
... entering the Keystone Correction mode. ENTER button 37 For setting items selected or adjusted on and putting the projector into standby mode. Projector Top View Power indicator 27, 50 STANDBY/ON 27 button For turning the power on the menu. HEIGHT 29 ADJUST lever 27, 50 Lamp indicator 50 Temperature warning indicator 30...
... entering the Keystone Correction mode. ENTER button 37 For setting items selected or adjusted on and putting the projector into standby mode. Projector Top View Power indicator 27, 50 STANDBY/ON 27 button For turning the power on the menu. HEIGHT 29 ADJUST lever 27, 50 Lamp indicator 50 Temperature warning indicator 30...
PG-MB56X , PG-MB66X Operation Manual
Page 15
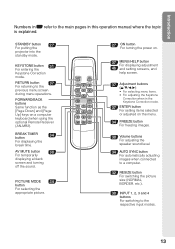
...computer keyboard when using the optional Remote Receiver (AN-MR2). PICTURE MODE 34 button For selecting the appropriate picture. 27 ON button For turning the power on. 37 MENU/HELP button For displaying adjustment 46 and setting screens, and help screen. 37 Adjustment buttons (P/R/O/Q) • ...• For adjusting the Keystone Correction when in this operation manual where the topic is explained. STANDBY button 27 For putting the projector into the standby mode. Introduction Numbers in Z refer to the main pages in the Keystone Correction mode. 37 ENTER button For ...
...computer keyboard when using the optional Remote Receiver (AN-MR2). PICTURE MODE 34 button For selecting the appropriate picture. 27 ON button For turning the power on. 37 MENU/HELP button For displaying adjustment 46 and setting screens, and help screen. 37 Adjustment buttons (P/R/O/Q) • ...• For adjusting the Keystone Correction when in this operation manual where the topic is explained. STANDBY button 27 For putting the projector into the standby mode. Introduction Numbers in Z refer to the main pages in the Keystone Correction mode. 37 ENTER button For ...

PG-MB56X , PG-MB66X Operation Manual
Page 18
...lens cap and turn the projector on On the projector On the remote control _P. 27 16 For details, see pages 24 and 25. _PP. 21-26 3. Connect the projector to the computer and plug the power cord into the AC socket of the projector and the computer ... buttons (P/R/O/Q) 4 HEIGHT ADJUST lever 6 INPUT 1 button 1. Quick Start This section shows the basic operation (projector connecting with the computer). Setup and Projection In this section, connection of the projector When connecting equipment other than a computer, see the page described below for each step. Place the...
...lens cap and turn the projector on On the projector On the remote control _P. 27 16 For details, see pages 24 and 25. _PP. 21-26 3. Connect the projector to the computer and plug the power cord into the AC socket of the projector and the computer ... buttons (P/R/O/Q) 4 HEIGHT ADJUST lever 6 INPUT 1 button 1. Quick Start This section shows the basic operation (projector connecting with the computer). Setup and Projection In this section, connection of the projector When connecting equipment other than a computer, see the page described below for each step. Place the...
PG-MB56X , PG-MB66X Operation Manual
Page 19
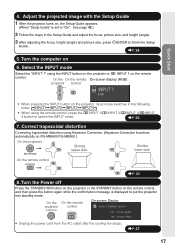
...the confirmation message is set to finish the Setup Guide. _P. 28 5. Turn the Power off Press the STANDBY/ON button on the projector or the STANDBY button on PG-MB66X/PG-MB56X.) On the projector Shrinks upper side. Adjust the projected image with the Setup Guide 1 After ... press the CINPUT 1/CINPUT 2/DINPUT 3/EINPUT 4 button to put the projector into standby mode. On the On the remote On-screen display (RGB) projector control • When pressing the INPUT button on 6. Turn the computer on the projector, input mode switches in the Setup Guide and adjust the focus, picture...
...the confirmation message is set to finish the Setup Guide. _P. 28 5. Turn the Power off Press the STANDBY/ON button on the projector or the STANDBY button on PG-MB66X/PG-MB56X.) On the projector Shrinks upper side. Adjust the projected image with the Setup Guide 1 After ... press the CINPUT 1/CINPUT 2/DINPUT 3/EINPUT 4 button to put the projector into standby mode. On the On the remote On-screen display (RGB) projector control • When pressing the INPUT button on 6. Turn the computer on the projector, input mode switches in the Setup Guide and adjust the focus, picture...
PG-MB56X , PG-MB66X Operation Manual
Page 25
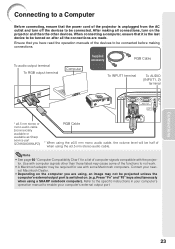
...enable your nearest Macintosh Dealer. • Depending on the computer you have read the operation manuals of the projector is unplugged from the AC outlet and turn on the projector and then the other than those listed may cause some Macintosh computers. After making connections. Note • ...RGB Cable To INPUT1 terminal To AUDIO (INPUT1, 2) terminal * ø3.5 mm stereo or mono audio cable (commercially available or available as Sharp service part QCNWGA038WJPZ) RGB Cable * When using the ø3.5 mm mono audio cable, the volume level will be half of computer signals compatible...
...enable your nearest Macintosh Dealer. • Depending on the computer you have read the operation manuals of the projector is unplugged from the AC outlet and turn on the projector and then the other than those listed may cause some Macintosh computers. After making connections. Note • ...RGB Cable To INPUT1 terminal To AUDIO (INPUT1, 2) terminal * ø3.5 mm stereo or mono audio cable (commercially available or available as Sharp service part QCNWGA038WJPZ) RGB Cable * When using the ø3.5 mm mono audio cable, the volume level will be half of computer signals compatible...
PG-MB56X , PG-MB66X Operation Manual
Page 29
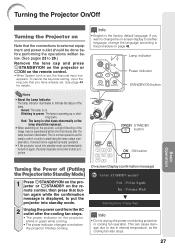
... from the AC outlet after the lamp has been illuminated. STANDBY button ON button Turning the Power off (Putting the Projector into Standby Mode) 1 Press SSTANDBY/ON on the projector or eSTANDBY on the remote control, then press that button again while the confirmation message...On-screen Display (confirmation message) R Info • Do not unplug the power cord during projection or cooling fan operation. Turning the Projector On/Off Turning the Projector on Note that the connections to external equipment and power outlet should be done before performing the operations written below. (See...
... from the AC outlet after the lamp has been illuminated. STANDBY button ON button Turning the Power off (Putting the Projector into Standby Mode) 1 Press SSTANDBY/ON on the projector or eSTANDBY on the remote control, then press that button again while the confirmation message...On-screen Display (confirmation message) R Info • Do not unplug the power cord during projection or cooling fan operation. Turning the Projector On/Off Turning the Projector on Note that the connections to external equipment and power outlet should be done before performing the operations written below. (See...
PG-MB56X , PG-MB66X Operation Manual
Page 30
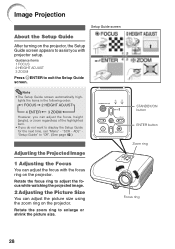
...Projected Image STANDBY/ON button ENTER button Zoom ring 1 Adjusting the Focus You can adjust the picture size using the zoom ring on the projector. Rotate the focus ring to adjust the focus while watching the projected image. 2 Adjusting the Picture Size You can adjust the focus with..., height (angle), or zoom regardless of the highlighted item. • If you with the focus ring on the projector. Image Projection Setup Guide screen About the Setup Guide After turning on the projector, the Setup Guide screen appears to assist you do not want to display the Setup Guide for the next...
...Projected Image STANDBY/ON button ENTER button Zoom ring 1 Adjusting the Focus You can adjust the picture size using the zoom ring on the projector. Rotate the focus ring to adjust the focus while watching the projected image. 2 Adjusting the Picture Size You can adjust the focus with..., height (angle), or zoom regardless of the highlighted item. • If you with the focus ring on the projector. Image Projection Setup Guide screen About the Setup Guide After turning on the projector, the Setup Guide screen appears to assist you do not want to display the Setup Guide for the next...

PG-MB56X , PG-MB66X Operation Manual
Page 32
...Display Note • Pressing MAV MUTE again will raise the volume. • When the projector is connected to "Off". (See page 43.) On-screen Display Displaying the Black Screen and Turning off the sound. Image Projection (Continued) Switching the Input Mode Select the appropriate input mode ... as the Auto Search buttons. (See page 43.) Adjusting the Volume Press K/L on the remote control or -O/Q+ on the projector to temporarily display a black screen and turn off the Sound Temporarily Press MAV MUTE on . 30 AV MUTE button Volume buttons INPUT buttons Note • Pressing K/-O will...
...Display Note • Pressing MAV MUTE again will raise the volume. • When the projector is connected to "Off". (See page 43.) On-screen Display Displaying the Black Screen and Turning off the sound. Image Projection (Continued) Switching the Input Mode Select the appropriate input mode ... as the Auto Search buttons. (See page 43.) Adjusting the Volume Press K/L on the remote control or -O/Q+ on the projector to temporarily display a black screen and turn off the Sound Temporarily Press MAV MUTE on . 30 AV MUTE button Volume buttons INPUT buttons Note • Pressing K/-O will...
PG-MB56X , PG-MB66X Operation Manual
Page 36
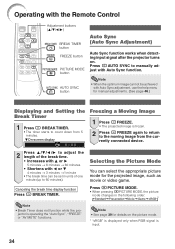
... TIMER button FREEZE button PICTURE MODE button AUTO SYNC button Auto Sync (Auto Sync Adjustment) Auto Sync function works when detecting input signal after the projector turns on the picture mode. * "sRGB" is displayed only when RGB signal is operating the "Auto Sync", "FREEZE" or "AV MUTE" functions. Press FAUTO SYNC to...
... TIMER button FREEZE button PICTURE MODE button AUTO SYNC button Auto Sync (Auto Sync Adjustment) Auto Sync function works when detecting input signal after the projector turns on the picture mode. * "sRGB" is displayed only when RGB signal is operating the "Auto Sync", "FREEZE" or "AV MUTE" functions. Press FAUTO SYNC to...
PG-MB56X , PG-MB66X Operation Manual
Page 44
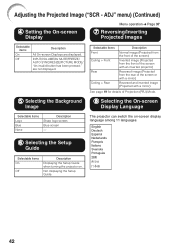
... Description Normal image (Projected from the front of the screen) Inverted image (Projected from the front of the screen with an inverted projector) Reversed image (Projected from the rear of the screen or with a mirror) Reversed and inverted image (Projected with a mirror) ... Selectable items Logo Blue None Description Sharp logo screen Blue screen - 6 Selecting the Setup Guide Selectable items On Off Description Displaying the Setup Guide when turning the projector on -screen display language among 11 languages. are displayed. The projector can switch the on . INPUT/VOLUME...
... Description Normal image (Projected from the front of the screen) Inverted image (Projected from the front of the screen with an inverted projector) Reversed image (Projected from the rear of the screen or with a mirror) Reversed and inverted image (Projected with a mirror) ... Selectable items Logo Blue None Description Sharp logo screen Blue screen - 6 Selecting the Setup Guide Selectable items On Off Description Displaying the Setup Guide when turning the projector on -screen display language among 11 languages. are displayed. The projector can switch the on . INPUT/VOLUME...

PG-MB56X , PG-MB66X Operation Manual
Page 45
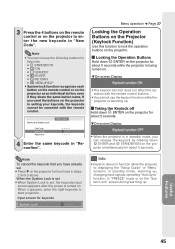
... On On On 9600 bps Normal Menu operation n Page 37 Help Lamp Timer(Life) 0h 100% SEL./ADJ. No confirmation sound is made when the projector turns on or when the input signals are switched, when connected to "On", press C INPUT 1,C INPUT 2, D INPUT 3 or EINPUT 4 on , or ... Auto Search Function This function automatically searches for more input signals are being received, when the projector is turned on the remote control to select an input mode other than 15 minutes, the projector will be achieved with Auto Sync adjustment, use manual adjustments. (See page 46.) Selectable items ...
... On On On 9600 bps Normal Menu operation n Page 37 Help Lamp Timer(Life) 0h 100% SEL./ADJ. No confirmation sound is made when the projector turns on or when the input signals are switched, when connected to "On", press C INPUT 1,C INPUT 2, D INPUT 3 or EINPUT 4 on , or ... Auto Search Function This function automatically searches for more input signals are being received, when the projector is turned on the remote control to select an input mode other than 15 minutes, the projector will be achieved with Auto Sync adjustment, use manual adjustments. (See page 46.) Selectable items ...

PG-MB56X , PG-MB66X Operation Manual
Page 46
...unauthorized use of approximately 1,500 meters (4,900 feet) or more. When you lose or forget your keycode, contact your nearest Sharp Authorized Projector Dealer or Service Center (see page 63). Selectable items Normal High Description Suitable for four times. Setting the System Lock ...warranty is rapid. 7 Fan Mode Setting This function changes the fan rotation speed. Selectable items Description 9600bps Transmission speed is turned on the projector for normal environments. Info • If you press the R button four times, the keycord input screen disappears. 44 ADJ...
...unauthorized use of approximately 1,500 meters (4,900 feet) or more. When you lose or forget your keycode, contact your nearest Sharp Authorized Projector Dealer or Service Center (see page 63). Selectable items Normal High Description Suitable for four times. Setting the System Lock ...warranty is rapid. 7 Fan Mode Setting This function changes the fan rotation speed. Selectable items Description 9600bps Transmission speed is turned on the projector for normal environments. Info • If you press the R button four times, the keycord input screen disappears. 44 ADJ...
PG-MB56X , PG-MB66X Operation Manual
Page 47
... screen during warming up . ROn-screen Display • When the projector is turned on. a Taking the Keylock off Hold down T ENTER and S STANDBY/ON on the projector simultaneously for about 5 seconds. Info • Keylock does not function while the projector is warming up . ADJ **** ---- ---- 4 Enter the same ...Lock is set • When System Lock is being turned on. Setting the System Lock Old Code New Code Reconfirm PRJ - When it appears, enter the right keycode to lock the operation buttons on the projector. Input screen for four times in setting your keycode...
... screen during warming up . ROn-screen Display • When the projector is turned on. a Taking the Keylock off Hold down T ENTER and S STANDBY/ON on the projector simultaneously for about 5 seconds. Info • Keylock does not function while the projector is warming up . ADJ **** ---- ---- 4 Enter the same ...Lock is set • When System Lock is being turned on. Setting the System Lock Old Code New Code Reconfirm PRJ - When it appears, enter the right keycode to lock the operation buttons on the projector. Input screen for four times in setting your keycode...

PG-MB56X , PG-MB66X Operation Manual
Page 50
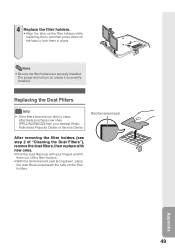
STANDBY/ON button AC socket 2 Remove the filter holders. • Turn the projector over. Clean the filters more often when the projector is used in the tabs while lifting up. 3 Clean the dust off the dust filters and the holders with a hand broom. 48 To remove the ...filter holders, press in a dusty or smoky location. 1 Press SSTANDBY/ON on the projector to put the projector into standby mode. • Wait until the cooling fan stops. • Disconnect the power cord and unplug the power cord from the AC socket...
STANDBY/ON button AC socket 2 Remove the filter holders. • Turn the projector over. Clean the filters more often when the projector is used in the tabs while lifting up. 3 Clean the dust off the dust filters and the holders with a hand broom. 48 To remove the ...filter holders, press in a dusty or smoky location. 1 Press SSTANDBY/ON on the projector to put the projector into standby mode. • Wait until the cooling fan stops. • Disconnect the power cord and unplug the power cord from the AC socket...
PG-MB56X , PG-MB66X Operation Manual
Page 51
... them out of "Cleaning the Dust Filters"), remove the dust filters, then replace with new ones. • Pick the dust filters up with your nearest Sharp Authorized Projector Dealer or Service Center. Appendix 49 Replacing the Dust Filters Info • If the filters become too dirty to lock them in place. 4 Replace... the filter holders while replacing them, and then press down , place the dust filters underneath the tabs on the filter holders. The power will not turn on unless it is correctly installed. Note • Be sure the filter holders are securely installed.
... them out of "Cleaning the Dust Filters"), remove the dust filters, then replace with new ones. • Pick the dust filters up with your nearest Sharp Authorized Projector Dealer or Service Center. Appendix 49 Replacing the Dust Filters Info • If the filters become too dirty to lock them in place. 4 Replace... the filter holders while replacing them, and then press down , place the dust filters underneath the tabs on the filter holders. The power will not turn on unless it is correctly installed. Note • Be sure the filter holders are securely installed.

