
PG-MB56X , PG-MB66X Operation Manual
Page 2
Model No.: Serial No.: IMPORTANT • For your assistance in reporting the loss or theft of your Projector, please record the Model and Serial Number located on the bottom of the projector and retain this information. • Before recycling the packaging, please ensure that you have checked the contents of the carton thoroughly against the list of "Supplied accessories" on page 10.
Model No.: Serial No.: IMPORTANT • For your assistance in reporting the loss or theft of your Projector, please record the Model and Serial Number located on the bottom of the projector and retain this information. • Before recycling the packaging, please ensure that you have checked the contents of the carton thoroughly against the list of "Supplied accessories" on page 10.
PG-MB56X , PG-MB66X Operation Manual
Page 3
... of uninsulated "dangerous voltage" within an equilateral triangle, is to assure that SHARP may be required to rain or moisture. Do not stare into standby mode always use the STANDBY/ON button on the projector or the STANDBY button on the remote control. WARNING: To reduce the risk... of fire or electric shock, do not stare directly into the beam of your new SHARP Projector, using the projector, please read this equipment. ONLY WARNING: The cooling fan in the literature accompanying the product. Ensure the cooling fan has stopped before...
... of uninsulated "dangerous voltage" within an equilateral triangle, is to assure that SHARP may be required to rain or moisture. Do not stare into standby mode always use the STANDBY/ON button on the projector or the STANDBY button on the remote control. WARNING: To reduce the risk... of fire or electric shock, do not stare directly into the beam of your new SHARP Projector, using the projector, please read this equipment. ONLY WARNING: The cooling fan in the literature accompanying the product. Ensure the cooling fan has stopped before...
PG-MB56X , PG-MB66X Operation Manual
Page 4
...in a particular installation. However, there is encouraged to try to correct the interference by one or more of the FCC Rules. This SHARP projector uses a DMD panel. For disposal or recycling information, please contact your local authorities or, if you are designed to environmental considerations.... screen TVs, video systems and video cameras, there are certain acceptable tolerances that may cause undesired operation. ONLY Declaration of conformity SHARP PROJECTOR, MODEL PG-MB66X/PG-MB56X/XG-MB50X-L/XR-11XC-L/XR-10X-L/XR-10S-L This device complies with Part 15 of mercury. ...
...in a particular installation. However, there is encouraged to try to correct the interference by one or more of the FCC Rules. This SHARP projector uses a DMD panel. For disposal or recycling information, please contact your local authorities or, if you are designed to environmental considerations.... screen TVs, video systems and video cameras, there are certain acceptable tolerances that may cause undesired operation. ONLY Declaration of conformity SHARP PROJECTOR, MODEL PG-MB66X/PG-MB56X/XG-MB50X-L/XR-11XC-L/XR-10X-L/XR-10S-L This device complies with Part 15 of mercury. ...
PG-MB56X , PG-MB66X Operation Manual
Page 5
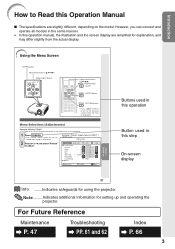
...the same manner. • In this operation manual, the illustration and the screen display are slightly different, depending on the projector. 1 Press BMENU. • The "Picture" menu screen for the selected input mode is displayed. Note .........Indicates additional information... for setting up and operating the projector. For Future Reference Maintenance P. 47 Troubleshooting PP. 61 and 62 Index P. 66 3 Menu Selections (Adjustments) Example: Adjusting "Bright...
...the same manner. • In this operation manual, the illustration and the screen display are slightly different, depending on the projector. 1 Press BMENU. • The "Picture" menu screen for the selected input mode is displayed. Note .........Indicates additional information... for setting up and operating the projector. For Future Reference Maintenance P. 47 Troubleshooting PP. 61 and 62 Index P. 66 3 Menu Selections (Adjustments) Example: Adjusting "Bright...
PG-MB56X , PG-MB66X Operation Manual
Page 6
... Accessories 10 Part Names and Functions 11 Inserting the Batteries 14 Usable Range 15 Quick Start Quick Start 16 Setup Setting up the Projector 18 Setting up the Projector 18 Standard Setup (Front Projection) ....... 18 Ceiling-mount Setup 18 Projection (PRJ) Mode 19 Screen Size and Projection Distance .....Checking the Lamp Life Status 44 System Lock Function 44 Locking the Operation Buttons on 27 Turning the Power off (Putting the Projector into Standby Mode 27 Image Projection 28 About the Setup Guide 28 Adjusting the Projected Image 28 Switching the Input Mode 30 Adjusting...
... Accessories 10 Part Names and Functions 11 Inserting the Batteries 14 Usable Range 15 Quick Start Quick Start 16 Setup Setting up the Projector 18 Setting up the Projector 18 Standard Setup (Front Projection) ....... 18 Ceiling-mount Setup 18 Projection (PRJ) Mode 19 Screen Size and Projection Distance .....Checking the Lamp Life Status 44 System Lock Function 44 Locking the Operation Buttons on 27 Turning the Power off (Putting the Projector into Standby Mode 27 Image Projection 28 About the Setup Guide 28 Adjusting the Projected Image 28 Switching the Input Mode 30 Adjusting...
PG-MB56X , PG-MB66X Operation Manual
Page 7
Introduction Reference Appendix Maintenance 47 Cleaning and Replacing the Dust Filters 48 Maintenance Indicators 50 Regarding the Lamp 52 Lamp 52 Caution Concerning the Lamp 52 Replacing the Lamp 52 Removing and Installing the Lamp Unit 53 Resetting the Lamp Timer 54 Connecting Pin Assignments 55 RS-232C Specifications and Command Settings 56 Computer Compatibility Chart 60 Troubleshooting 61 For SHARP Assistance 63 Specifications 64 Dimensions 65 Index 66 5
Introduction Reference Appendix Maintenance 47 Cleaning and Replacing the Dust Filters 48 Maintenance Indicators 50 Regarding the Lamp 52 Lamp 52 Caution Concerning the Lamp 52 Replacing the Lamp 52 Removing and Installing the Lamp Unit 53 Resetting the Lamp Timer 54 Connecting Pin Assignments 55 RS-232C Specifications and Command Settings 56 Computer Compatibility Chart 60 Troubleshooting 61 For SHARP Assistance 63 Specifications 64 Dimensions 65 Index 66 5

PG-MB56X , PG-MB66X Operation Manual
Page 8
This product has been engineered and manufactured to assure your product dealer or local power company. Accessories Do not place this product during a lightning storm, or when it is left unattended and unused for long periods of time, unplug it from the wall outlet and disconnect the cable system. The product may cause the product and cart combination to the product. Quick stops, excessive force, and uneven surfaces may fall, causing serious injury to a child or adult, and serious damage to overturn. 10. a. Three-wire grounding type (mains) plug with the product. This ...
This product has been engineered and manufactured to assure your product dealer or local power company. Accessories Do not place this product during a lightning storm, or when it is left unattended and unused for long periods of time, unplug it from the wall outlet and disconnect the cable system. The product may cause the product and cart combination to the product. Quick stops, excessive force, and uneven surfaces may fall, causing serious injury to a child or adult, and serious damage to overturn. 10. a. Three-wire grounding type (mains) plug with the product. This ...
PG-MB56X , PG-MB66X Operation Manual
Page 9
... has been spilled, or objects have the same characteristics as radiators, heat registers, stoves, or other products (including amplifiers) that produce heat. • DLP® and the DLP logo are registered trademarks of Texas Instruments. • Microsoft® and Windows® are required, be sure the service technician has used replacement parts...
... has been spilled, or objects have the same characteristics as radiators, heat registers, stoves, or other products (including amplifiers) that produce heat. • DLP® and the DLP logo are registered trademarks of Texas Instruments. • Microsoft® and Windows® are required, be sure the service technician has used replacement parts...
PG-MB56X , PG-MB66X Operation Manual
Page 10
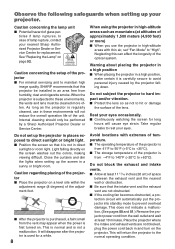
..., contact your eyes occasionally. Close the curtains and dim the lights when setting up your eyes. Rest your nearest Sharp Authorized Projector Dealer or Service Center for long hours will automatically put the projector into standby mode to direct sunlight or bright light. I If the cooling fan becomes obstructed, a protection circuit will cause...
..., contact your eyes occasionally. Close the curtains and dim the lights when setting up your eyes. Rest your nearest Sharp Authorized Projector Dealer or Service Center for long hours will automatically put the projector into standby mode to direct sunlight or bright light. I If the cooling fan becomes obstructed, a protection circuit will cause...
PG-MB56X , PG-MB66X Operation Manual
Page 11
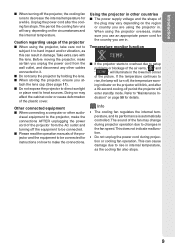
..., and disconnect any other cables connected to it to hard impact and/or vibration, as the cooling fan also stops. 9 Introduction I If the projector starts to overheat due to setup problems or blockage of the air vents, " " and " " will illuminate in . The period the cooling... fan runs will vary, depending on page 50 for instructions on the projector will blink, and after the cooling fan stops. Temperature monitor function I When turning off , the temperature warn- dicators" on the circumstances and the ...
..., and disconnect any other cables connected to it to hard impact and/or vibration, as the cooling fan also stops. 9 Introduction I If the projector starts to overheat due to setup problems or blockage of the air vents, " " and " " will illuminate in . The period the cooling... fan runs will vary, depending on page 50 for instructions on the projector will blink, and after the cooling fan stops. Temperature monitor function I When turning off , the temperature warn- dicators" on the circumstances and the ...
PG-MB56X , PG-MB66X Operation Manual
Page 12
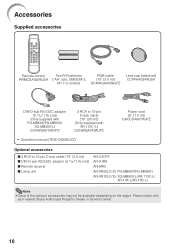
... XR-11XC-L) QCNWGA043WJPZ • Operation manual (TINS-C690WJZZ) Power cord (6' (1.8 m)) QACCDA007WJPZ Optional accessories I 3 RCA to 15-pin D-sub cable (10' (3.0 m)) (Only supplied with your nearest Sharp Authorized Projector Dealer or Service Center. 10
... XR-11XC-L) QCNWGA043WJPZ • Operation manual (TINS-C690WJZZ) Power cord (6' (1.8 m)) QACCDA007WJPZ Optional accessories I 3 RCA to 15-pin D-sub cable (10' (3.0 m)) (Only supplied with your nearest Sharp Authorized Projector Dealer or Service Center. 10
PG-MB56X , PG-MB66X Operation Manual
Page 13
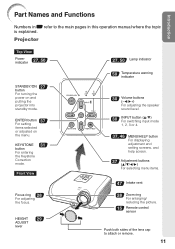
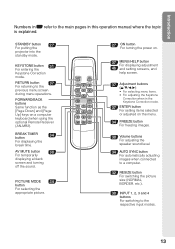
Front View Focus ring 28 For adjusting the focus. ENTER button 37 For setting items selected or adjusted on and putting the projector into standby mode. Introduction Part Names and Functions Numbers in this operation manual where the topic is explained. HEIGHT 29 ADJUST lever 27, 50 Lamp .../ reducing the picture. 15 Remote control sensor Push both sides of the lens cap to the main pages in Z refer to attach or remove. 11 Projector Top View Power indicator 27, 50 STANDBY/ON 27 button For turning the power on the menu. KEYSTONE 31 button For entering the Keystone Correction...
Front View Focus ring 28 For adjusting the focus. ENTER button 37 For setting items selected or adjusted on and putting the projector into standby mode. Introduction Part Names and Functions Numbers in this operation manual where the topic is explained. HEIGHT 29 ADJUST lever 27, 50 Lamp .../ reducing the picture. 15 Remote control sensor Push both sides of the lens cap to the main pages in Z refer to attach or remove. 11 Projector Top View Power indicator 27, 50 STANDBY/ON 27 button For turning the power on the menu. KEYSTONE 31 button For entering the Keystone Correction...
PG-MB56X , PG-MB66X Operation Manual
Page 14
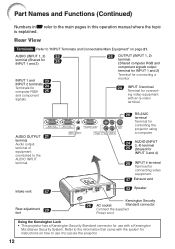
... Rear adjustment foot 29 Kensington Security 26 AC socket Standard connector Connect the supplied Power cord. Using the Kensington Lock • This projector has a Kensington Security Standard connector for instructions on page 21. Intake vent 47 26 RS-232C terminal Terminal for controlling the... to the main pages in Z refer to the AUDIO INPUT terminal. Refer to use with the system for use it to secure the projector. 12 Rear View Terminals Refer to "INPUT Terminals and Connectable Main Equipment" on how to the information that came with a Kensington MicroSaver Security ...
... Rear adjustment foot 29 Kensington Security 26 AC socket Standard connector Connect the supplied Power cord. Using the Kensington Lock • This projector has a Kensington Security Standard connector for instructions on page 21. Intake vent 47 26 RS-232C terminal Terminal for controlling the... to the main pages in Z refer to the AUDIO INPUT terminal. Refer to use with the system for use it to secure the projector. 12 Rear View Terminals Refer to "INPUT Terminals and Connectable Main Equipment" on how to the information that came with a Kensington MicroSaver Security ...
PG-MB56X , PG-MB66X Operation Manual
Page 15
... when in this operation manual where the topic is explained. BREAK TIMER 34 button For displaying the break time. STANDBY button 27 For putting the projector into the standby mode. Introduction Numbers in Z refer to the main pages in the Keystone Correction mode. 37 ENTER button For setting items selected or...
... when in this operation manual where the topic is explained. BREAK TIMER 34 button For displaying the break time. STANDBY button 27 For putting the projector into the standby mode. Introduction Numbers in Z refer to the main pages in the Keystone Correction mode. 37 ENTER button For setting items selected or...
PG-MB56X , PG-MB66X Operation Manual
Page 16
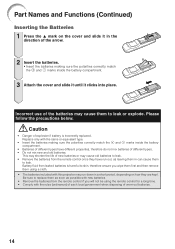
.... Caution • Danger of explosion if battery is harmful to skin, therefore ensure you will not be using a cloth. • The batteries included with this projector may run down in can cause them as soon as possible with the same or equivalent type. • Insert the batteries making sure the polarities...
.... Caution • Danger of explosion if battery is harmful to skin, therefore ensure you will not be using a cloth. • The batteries included with this projector may run down in can cause them as soon as possible with the same or equivalent type. • Insert the batteries making sure the polarities...
PG-MB56X , PG-MB66X Operation Manual
Page 17
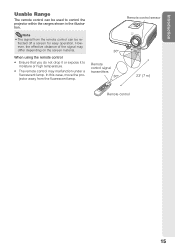
.... When using the remote control • Ensure that you do not drop it or expose it to control the projector within the ranges shown in the illustration. In this case, move the projector away from the remote control can be re- However, the effective distance of the signal may malfunction under a fluorescent...
.... When using the remote control • Ensure that you do not drop it or expose it to control the projector within the ranges shown in the illustration. In this case, move the projector away from the remote control can be re- However, the effective distance of the signal may malfunction under a fluorescent...

PG-MB56X , PG-MB66X Operation Manual
Page 18
...27 16 Setup and Projection In this section, connection of the projector When connecting equipment other than a computer, see the page described below for each step. For details, see pages 24 and 25. _PP. 21-26 3. Connect the projector to the computer and plug the power cord into the AC ...socket of the projector and the computer is explained using one example. 3 8 STANDBY/ON button 6 INPUT button 4 ENTER button 8 STANDBY ...
...27 16 Setup and Projection In this section, connection of the projector When connecting equipment other than a computer, see the page described below for each step. For details, see pages 24 and 25. _PP. 21-26 3. Connect the projector to the computer and plug the power cord into the AC ...socket of the projector and the computer is explained using one example. 3 8 STANDBY/ON button 6 INPUT button 4 ENTER button 8 STANDBY ...
PG-MB56X , PG-MB66X Operation Manual
Page 19
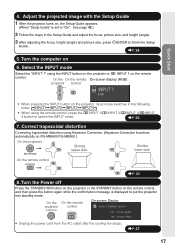
..." is displayed to "On". Adjust the projected image with the Setup Guide 1 After the projector turns on the remote control. On the On the remote On-screen display (RGB) projector control • When pressing the INPUT button on the remote control, and then press the ...When using Keystone Correction. (Keystone Correction functions automatically on 6. Turn the Power off Press the STANDBY/ON button on the projector or the STANDBY button on the projector, input mode switches in the Setup Guide and adjust the focus, picture size, and height (angle). 3 After adjusting the...
..." is displayed to "On". Adjust the projected image with the Setup Guide 1 After the projector turns on the remote control. On the On the remote On-screen display (RGB) projector control • When pressing the INPUT button on the remote control, and then press the ...When using Keystone Correction. (Keystone Correction functions automatically on 6. Turn the Power off Press the STANDBY/ON button on the projector or the STANDBY button on the projector, input mode switches in the Setup Guide and adjust the focus, picture size, and height (angle). 3 After adjusting the...
PG-MB56X , PG-MB66X Operation Manual
Page 20
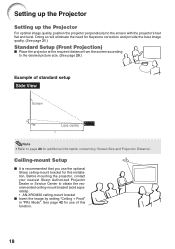
... the image by setting "Ceiling + Front" in "PRJ Mode". See page 42 for this function. 18 Ceiling-mount Setup I Place the projector at the required distance from the screen according to page 20 for additional information concerning "Screen Size and Projection Distance". Doing so will eliminate the...Keystone correction and provide the best image quality. (See page 31.) Standard Setup (Front Projection) I It is recommended that you use the optional Sharp ceiling-mount bracket for use of standard setup Side View Screen H Lens center L Note • Refer to the desired picture size. (See ...
... the image by setting "Ceiling + Front" in "PRJ Mode". See page 42 for this function. 18 Ceiling-mount Setup I Place the projector at the required distance from the screen according to page 20 for additional information concerning "Screen Size and Projection Distance". Doing so will eliminate the...Keystone correction and provide the best image quality. (See page 31.) Standard Setup (Front Projection) I It is recommended that you use the optional Sharp ceiling-mount bracket for use of standard setup Side View Screen H Lens center L Note • Refer to the desired picture size. (See ...
PG-MB56X , PG-MB66X Operation Manual
Page 21
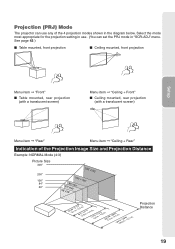
... a translucent screen) Menu item © "Rear" Menu item © "Ceiling + Rear" Indication of the 4 projection modes shown in "SCR-ADJ" menu. Projection (PRJ) Mode The projector can set the PRJ mode in the diagram below.
... a translucent screen) Menu item © "Rear" Menu item © "Ceiling + Rear" Indication of the 4 projection modes shown in "SCR-ADJ" menu. Projection (PRJ) Mode The projector can set the PRJ mode in the diagram below.
