
XR-32S | XR-32X Operation Manual
Page 5
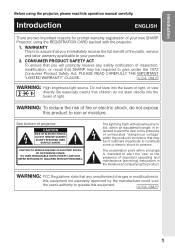
... operate this product to rain or moisture. NO USER-SERVICEABLE PARTS EXCEPT LAMP UNIT. The lightning flash with the projector. 1. Be especially careful that you immediately receive the full benefit of projector. DO NOT REMOVE SCREWS EXCEPT SPECIFIED USER SERVICE SCREW. Introduction Before using... TO QUALIFIED SERVICE PERSONNEL. See bottom of the parts, service and labor warranty applicable to your new SHARP Projector, using the projector, please read this operation manual carefully. U.S.A. CAUTION: TO REDUCE THE RISK OF ELECTRIC SHOCK, DO NOT REMOVE COVER.
... operate this product to rain or moisture. NO USER-SERVICEABLE PARTS EXCEPT LAMP UNIT. The lightning flash with the projector. 1. Be especially careful that you immediately receive the full benefit of projector. DO NOT REMOVE SCREWS EXCEPT SPECIFIED USER SERVICE SCREW. Introduction Before using... TO QUALIFIED SERVICE PERSONNEL. See bottom of the parts, service and labor warranty applicable to your new SHARP Projector, using the projector, please read this operation manual carefully. U.S.A. CAUTION: TO REDUCE THE RISK OF ELECTRIC SHOCK, DO NOT REMOVE COVER.
XR-32S | XR-32X Operation Manual
Page 6
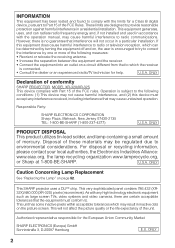
...SHARP PROJECTOR, MODEL XR-32X/XR-32S This device complies with Part 15 of mercury. Responsible Party: SHARP ELECTRONICS CORPORATION Sharp Plaza, Mahwah, New Jersey 07430-2135 TEL: 1-800-BE-SHARP (1-800-237-4277) U.S.A. ONLY PRODUCT DISPOSAL This product utilizes tin-lead solder, and lamp containing a small amount of the FCC rules. This SHARP projector uses a DLP...® chip. This very sophisticated panel contains 786,432 (XR32X)/480,000 (XR-32S) pixels (micromirrors). As ...
...SHARP PROJECTOR, MODEL XR-32X/XR-32S This device complies with Part 15 of mercury. Responsible Party: SHARP ELECTRONICS CORPORATION Sharp Plaza, Mahwah, New Jersey 07430-2135 TEL: 1-800-BE-SHARP (1-800-237-4277) U.S.A. ONLY PRODUCT DISPOSAL This product utilizes tin-lead solder, and lamp containing a small amount of the FCC rules. This SHARP projector uses a DLP...® chip. This very sophisticated panel contains 786,432 (XR32X)/480,000 (XR-32S) pixels (micromirrors). As ...
XR-32S | XR-32X Operation Manual
Page 7
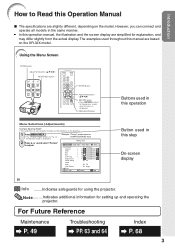
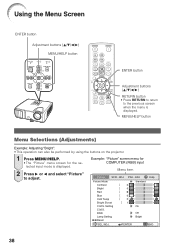
...MENU/HELP button Buttons used throughout this manual are based on the model. However, you can also be performed by using the projector. The examples used in this operation Menu Selections (Adjustments) Example: Adjusting "Bright". • This operation can connect and ...the actual display. ADJ PRJ - Example: "Picture" screen menu for setting up and operating the projector. Introduction How to Read this Operation Manual ■ The specifications are slightly different, depending on the XR-32X model. DNR Lamp Setting Reset Standard 0 0 0 0 0 1 On Off Bright SEL./ADJ.
...MENU/HELP button Buttons used throughout this manual are based on the model. However, you can also be performed by using the projector. The examples used in this operation Menu Selections (Adjustments) Example: Adjusting "Bright". • This operation can connect and ...the actual display. ADJ PRJ - Example: "Picture" screen menu for setting up and operating the projector. Introduction How to Read this Operation Manual ■ The specifications are slightly different, depending on the XR-32X model. DNR Lamp Setting Reset Standard 0 0 0 0 0 1 On Off Bright SEL./ADJ.

XR-32S | XR-32X Operation Manual
Page 8
...View 12 Inserting the Batteries 14 Usable Range 15 Quick Start Quick Start 16 Setup and Projection 16 Setup Setting up the Projector 18 Setting up the Projector 18 Standard Setup (Front Projection) ....... 18 Ceiling-mount Setup 18 Projection (PRJ) Mode 19 Screen Size and Projection ...Adjusting the Image 41 Adjusting the Color Temperature ......... 41 Adjusting the Colors 41 Progressive 42 Reducing Image Noise (DNR 42 Lamp Setting 42 Adjusting the Projector Image ("SCR - ADJ" Menu 43 Setting the Resize Mode 43 Adjusting the Image Position 43 Keystone Correction 43 Setting the...
...View 12 Inserting the Batteries 14 Usable Range 15 Quick Start Quick Start 16 Setup and Projection 16 Setup Setting up the Projector 18 Setting up the Projector 18 Standard Setup (Front Projection) ....... 18 Ceiling-mount Setup 18 Projection (PRJ) Mode 19 Screen Size and Projection ...Adjusting the Image 41 Adjusting the Color Temperature ......... 41 Adjusting the Colors 41 Progressive 42 Reducing Image Noise (DNR 42 Lamp Setting 42 Adjusting the Projector Image ("SCR - ADJ" Menu 43 Setting the Resize Mode 43 Adjusting the Image Position 43 Keystone Correction 43 Setting the...
XR-32S | XR-32X Operation Manual
Page 12
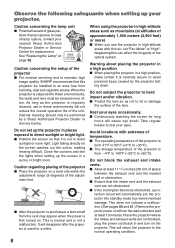
... Observe the following safeguards when setting up the screen in a sunny or bright room. ticles if lamp ruptures. In case of the lens. See "Replacing the Lamp" on the screen washes out the colors, making viewing difficult. Caution concerning the setup of the optical...feet) or more often. When using the projector in high-altitude areas such as not to avoid personal injury caused by a Sharp Authorized Projector Dealer or Service Center. Do not subject the projector to rest your nearest Sharp Authorized Projector Dealer or Service Center for replacement. Take ...
... Observe the following safeguards when setting up the screen in a sunny or bright room. ticles if lamp ruptures. In case of the lens. See "Replacing the Lamp" on the screen washes out the colors, making viewing difficult. Caution concerning the setup of the optical...feet) or more often. When using the projector in high-altitude areas such as not to avoid personal injury caused by a Sharp Authorized Projector Dealer or Service Center. Do not subject the projector to rest your nearest Sharp Authorized Projector Dealer or Service Center for replacement. Take ...

XR-32S | XR-32X Operation Manual
Page 13
...jector manuals. Note • If the desired pdf file cannot be hot. When using the projector overseas, make the connections. If the temperature continues to rise, the lamp will turn off period the projector will illuminate in the lower left corner of the fan may still be opened by holding the... lens. ■ When storing the projector, ensure you attach the lens cap to the projector. (See page 11.) ■ Do ...
...jector manuals. Note • If the desired pdf file cannot be hot. When using the projector overseas, make the connections. If the temperature continues to rise, the lamp will turn off period the projector will illuminate in the lower left corner of the fan may still be opened by holding the... lens. ■ When storing the projector, ensure you attach the lens cap to the projector. (See page 11.) ■ Do ...
XR-32S | XR-32X Operation Manual
Page 14
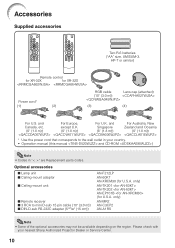
Accessories Supplied accessories Two R-6 batteries ("AA" size, UM/SUM-3, HP-7 or similar) Remote control for XR-32X for U.S.A. Singapore Zealand and Oceania (6' (1.8 m)) (6' (1.8 m)) (6' (1.8 m)) (6' (1.8 m)) * Use the power cord that corresponds to mini D-sub 15 pin cable (10n ...the region. and For Europe, For U.K. Optional accessories ■ Lamp unit ■ Ceiling-mount adaptor ■ Ceiling-mount unit ■ Remote receiver ■ 3 RCA to the wall outlet in your nearest Sharp Authorized Projector Dealer or Service Center. 10 Please check with your country. ...
Accessories Supplied accessories Two R-6 batteries ("AA" size, UM/SUM-3, HP-7 or similar) Remote control for XR-32X for U.S.A. Singapore Zealand and Oceania (6' (1.8 m)) (6' (1.8 m)) (6' (1.8 m)) (6' (1.8 m)) * Use the power cord that corresponds to mini D-sub 15 pin cable (10n ...the region. and For Europe, For U.K. Optional accessories ■ Lamp unit ■ Ceiling-mount adaptor ■ Ceiling-mount unit ■ Remote receiver ■ 3 RCA to the wall outlet in your nearest Sharp Authorized Projector Dealer or Service Center. 10 Please check with your country. ...
XR-32S | XR-32X Operation Manual
Page 15
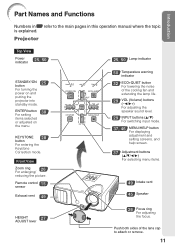
...ENTER button For setting 38 items selected or adjusted on and putting the projector into standby mode. KEYSTONE 28 button For entering the Keystone Correction mode. Push both sides of the cooling fan and extending the lamp life. 29 VOL (Volume) buttons (-O/Q+) For adjusting the speaker sound level... buttons (P/R/O/Q) For selecting menu items. 49 Intake vent 45 Speaker HEIGHT 27 ADJUST lever 26 Focus ring For adjusting the focus. Projector Top View Power indicator 25, 50 STANDBY/ON 25 button For turning the power on the menu. Introduction Part Names and Functions ...
...ENTER button For setting 38 items selected or adjusted on and putting the projector into standby mode. KEYSTONE 28 button For entering the Keystone Correction mode. Push both sides of the cooling fan and extending the lamp life. 29 VOL (Volume) buttons (-O/Q+) For adjusting the speaker sound level... buttons (P/R/O/Q) For selecting menu items. 49 Intake vent 45 Speaker HEIGHT 27 ADJUST lever 26 Focus ring For adjusting the focus. Projector Top View Power indicator 25, 50 STANDBY/ON 25 button For turning the power on the menu. Introduction Part Names and Functions ...
XR-32S | XR-32X Operation Manual
Page 17
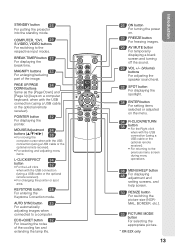
STANDBY button 25 For putting the projector into the standby mode. KEYSTONE button 28 For entering the Keystone Correction mode. ECO+QUIET button 32 For lowering the noise of the image. BREAK ... switching the picture size (NORMAL, BORDER, etc.). 33 PICTURE MODE button For selecting the appropriate picture. * XR-32X only 13 Introduction MAGNIFY buttons 33 For enlarging/reducing part of the cooling fan and extending the lamp life. 25 ON button For turning the power on. 33 FREEZE button For freezing images. 29 AV...
STANDBY button 25 For putting the projector into the standby mode. KEYSTONE button 28 For entering the Keystone Correction mode. ECO+QUIET button 32 For lowering the noise of the image. BREAK ... switching the picture size (NORMAL, BORDER, etc.). 33 PICTURE MODE button For selecting the appropriate picture. * XR-32X only 13 Introduction MAGNIFY buttons 33 For enlarging/reducing part of the cooling fan and extending the lamp life. 25 ON button For turning the power on. 33 FREEZE button For freezing images. 29 AV...
XR-32S | XR-32X Operation Manual
Page 19
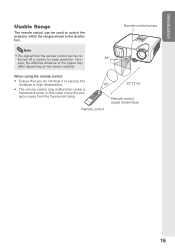
... effective distance of the signal may malfunction under a fluorescent lamp. When using the remote control • Ensure that you do not drop it or expose it to control the projector within the ranges shown in the illustration. In this case, move the projector away from the remote control can be reflected off a screen...
... effective distance of the signal may malfunction under a fluorescent lamp. When using the remote control • Ensure that you do not drop it or expose it to control the projector within the ranges shown in the illustration. In this case, move the projector away from the remote control can be reflected off a screen...

XR-32S | XR-32X Operation Manual
Page 29
... on while cooling. It should be turned on the projector, a slight flickering of the lamp. Blinking in green: The lamp is stabilising the lamp output characteristics. Red: The lamp is put the projector into standby mode and immediately turned on again, the lamp may be regarded as the lamp's control circuitry is warming up. This is normal operation...
... on while cooling. It should be turned on the projector, a slight flickering of the lamp. Blinking in green: The lamp is stabilising the lamp output characteristics. Red: The lamp is put the projector into standby mode and immediately turned on again, the lamp may be regarded as the lamp's control circuitry is warming up. This is normal operation...
XR-32S | XR-32X Operation Manual
Page 39
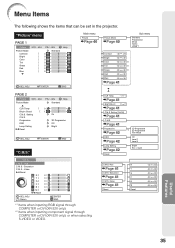
... Contrast Bright Color Tint Sharp Red Blue SCR - C. S. - M. S. - Menu Items The following shows the items that can be set in the projector. ADJ PRJ - ENTER...Reset -30 +30 -30 +30 -30 +30 -30 +30 -30 +30 -30 +30 Useful Features 35 Progressive DNR Lamp Setting Reset 0 1 On 3D Progressive Off Bright SEL./ADJ. S. - M. S. CLR Temp -1 1 Page 41 Bright Boost 02... RGB signal through COMPUTER or DVI (XR-32X only). *2 Items when inputting component signal through COMPUTER or DVI (XR-32X only), or when selecting S-VIDEO or VIDEO. Setting [On/Off] Page 41 C.M.S.
... Contrast Bright Color Tint Sharp Red Blue SCR - C. S. - M. S. - Menu Items The following shows the items that can be set in the projector. ADJ PRJ - ENTER...Reset -30 +30 -30 +30 -30 +30 -30 +30 -30 +30 -30 +30 Useful Features 35 Progressive DNR Lamp Setting Reset 0 1 On 3D Progressive Off Bright SEL./ADJ. S. - M. S. CLR Temp -1 1 Page 41 Bright Boost 02... RGB signal through COMPUTER or DVI (XR-32X only). *2 Items when inputting component signal through COMPUTER or DVI (XR-32X only), or when selecting S-VIDEO or VIDEO. Setting [On/Off] Page 41 C.M.S.
XR-32S | XR-32X Operation Manual
Page 40
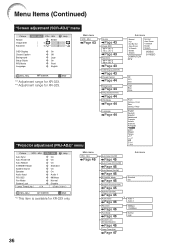
...232C Fan Mode System Lock Lamp Timer(Life) 0h On On On Standard On On Audio 1 9600bps Normal Disable 0 min 100% Main menu PRJ - ADJ PRJ - ENTER END *3 Adjustment range for XR-32X. *4 Adjustment range for XR-32X only. 36 Auto Sync...Page 45 *5 Audio Input Page 46 RS-232C Page 46 Fan Mode Page 46 System Lock [Enable/Disable] Page 46 Lamp Timer(Life) Page 47 Sub menu Standard Eco Audio 1 Audio 2 9600bps 115200bps Normal High ADJ Border 0 0 OSD... Français Italiano Svenska Português polski Magyar Türkçe "Projector adjustment (PRJ-ADJ)" menu Picture SCR -
...232C Fan Mode System Lock Lamp Timer(Life) 0h On On On Standard On On Audio 1 9600bps Normal Disable 0 min 100% Main menu PRJ - ADJ PRJ - ENTER END *3 Adjustment range for XR-32X. *4 Adjustment range for XR-32X only. 36 Auto Sync...Page 45 *5 Audio Input Page 46 RS-232C Page 46 Fan Mode Page 46 System Lock [Enable/Disable] Page 46 Lamp Timer(Life) Page 47 Sub menu Standard Eco Audio 1 Audio 2 9600bps 115200bps Normal High ADJ Border 0 0 OSD... Français Italiano Svenska Português polski Magyar Türkçe "Projector adjustment (PRJ-ADJ)" menu Picture SCR -
XR-32S | XR-32X Operation Manual
Page 42
ADJ PRJ - DNR Lamp Setting Reset Standard 0 0 0 0 0 1 On Off Bright SEL./ADJ. Example: "Picture" screen menu for the selected input mode is displayed. Setting C.M.S. MENU/HELP button Menu Selections (Adjustments) Example: Adjusting "Bright". • This operation can also be performed by using the buttons on the projector. 1 Press MENU/HELP. • The "Picture...
ADJ PRJ - DNR Lamp Setting Reset Standard 0 0 0 0 0 1 On Off Bright SEL./ADJ. Example: "Picture" screen menu for the selected input mode is displayed. Setting C.M.S. MENU/HELP button Menu Selections (Adjustments) Example: Adjusting "Bright". • This operation can also be performed by using the buttons on the projector. 1 Press MENU/HELP. • The "Picture...
XR-32S | XR-32X Operation Manual
Page 43
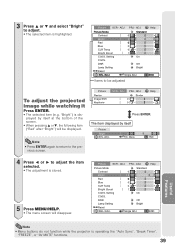
... the projected image while watching it Press ENTER. • The selected item (e.g. vious screen. Setting C.M.S. ADJ Border 0 0 Help Press ENTER. DNR Lamp Setting Reset 0 0 0 1 On Off Bright SEL./ADJ. Picture SCR - Single ADJ END Items to adjust the item selected. • The adjustment...item displayed by itself Picture Bright SEL./ADJ. 0 Rtn. Single ADJ END Useful Features Note • Menu buttons do not function while the projector is displayed by itself at the bottom of the screen. • When pressing P or R, the following item ("Red" after "Bright") ...
... the projected image while watching it Press ENTER. • The selected item (e.g. vious screen. Setting C.M.S. ADJ Border 0 0 Help Press ENTER. DNR Lamp Setting Reset 0 0 0 1 On Off Bright SEL./ADJ. Picture SCR - Single ADJ END Items to adjust the item selected. • The adjustment...item displayed by itself Picture Bright SEL./ADJ. 0 Rtn. Single ADJ END Useful Features Note • Menu buttons do not function while the projector is displayed by itself at the bottom of the screen. • When pressing P or R, the following item ("Red" after "Bright") ...
XR-32S | XR-32X Operation Manual
Page 46
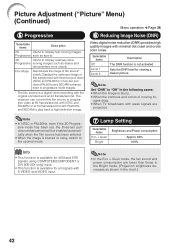
The projector can convert this film source to progressive video at 60 frames/second with S-VIDEO and VIDEO input. Video digital noise reduction (DNR) provides high quality ... the image is blurred or noisy, switch to the optimal mode. 7 Lamp Setting Selectable items Eco + Quiet Bright Brightness and Power consumption Approx. 80% 100% Info • This function is available for 480I and 576I signals using COMPUTER/COMPONENT or DVI (XR-32X only) input. • This function is at 50 frames/second...
The projector can convert this film source to progressive video at 60 frames/second with S-VIDEO and VIDEO input. Video digital noise reduction (DNR) provides high quality ... the image is blurred or noisy, switch to the optimal mode. 7 Lamp Setting Selectable items Eco + Quiet Bright Brightness and Power consumption Approx. 80% 100% Info • This function is available for 480I and 576I signals using COMPUTER/COMPONENT or DVI (XR-32X only) input. • This function is at 50 frames/second...

XR-32S | XR-32X Operation Manual
Page 49
... Help 1 Auto Sync 2 Auto Power Off 3 Auto Restart 4 STANDBY Mode 5 System Sound 6 Speaker 7 Audio Input 8 RS-232C 9 Fan Mode 0 System Lock Lamp Timer(Life) 0h On On On Standard On On Audio 1 9600bps Normal Disable 0 min 100% SEL./ADJ. Auto Sync adjustment is not output from the... the breaker switch is reduced in standby mode. Note • When the Auto Power Off function is set to "On", 5 minutes before the projector enters standby mode, the message "Enter STANDBY mode in standby mode. 5 Setting the Confirmation Sound (System Sound) Selectable items On Off Description A...
... Help 1 Auto Sync 2 Auto Power Off 3 Auto Restart 4 STANDBY Mode 5 System Sound 6 Speaker 7 Audio Input 8 RS-232C 9 Fan Mode 0 System Lock Lamp Timer(Life) 0h On On On Standard On On Audio 1 9600bps Normal Disable 0 min 100% SEL./ADJ. Auto Sync adjustment is not output from the... the breaker switch is reduced in standby mode. Note • When the Auto Power Off function is set to "On", 5 minutes before the projector enters standby mode, the message "Enter STANDBY mode in standby mode. 5 Setting the Confirmation Sound (System Sound) Selectable items On Off Description A...

XR-32S | XR-32X Operation Manual
Page 51
... Locking the Operation Buttons Hold down ENTER on the projector for about 5 seconds. Info • Keylock cannot be changed when the remaining lamp life becomes 5%. • The lamp life may vary depending on the usage condition. • When the projector is in steps 4 and 5 above. On-screen...• It is recommended that you can confirm the cumulative lamp usage time and the remaining lamp life (percentage). When it appears, enter the right keycode to lock the operation buttons on the Projector Use this function to start projection. Keylock Function Locking the ...
... Locking the Operation Buttons Hold down ENTER on the projector for about 5 seconds. Info • Keylock cannot be changed when the remaining lamp life becomes 5%. • The lamp life may vary depending on the usage condition. • When the projector is in steps 4 and 5 above. On-screen...• It is recommended that you can confirm the cumulative lamp usage time and the remaining lamp life (percentage). When it appears, enter the right keycode to lock the operation buttons on the Projector Use this function to start projection. Keylock Function Locking the ...

XR-32S | XR-32X Operation Manual
Page 54
...illuminate in red. ■ If you perform the measures described on the screen. Indicators on the Projector Power indicator Red on Green on Red blinks Green blinks Lamp indicator Green on Green blinks Red on Temperature warning Off indicator Red on Normal (Standby) Normal (...Power on the projector a fourth time without replacing the lamp, the projector will be changed. (See page 51.) Normal The internal temperature is warming up. After the projector has entered standby mode, follow the procedures given below. Top View...
...illuminate in red. ■ If you perform the measures described on the screen. Indicators on the Projector Power indicator Red on Green on Red blinks Green blinks Lamp indicator Green on Green blinks Red on Temperature warning Off indicator Red on Normal (Standby) Normal (...Power on the projector a fourth time without replacing the lamp, the projector will be changed. (See page 51.) Normal The internal temperature is warming up. After the projector has entered standby mode, follow the procedures given below. Top View...

XR-32S | XR-32X Operation Manual
Page 58
... close it in the direction of the projector. 2 Reset the lamp timer. • While simultaneously holding down MENU/HELP, ENTER and R on the projector, press STANDBY/ON on the projector. • "LAMP 0000H" is displayed, indicating that the lamp timer is connected to the projector. Regarding the Lamp (Continued) 4 Remove the lamp unit. • Loosen the securing screws from...
... close it in the direction of the projector. 2 Reset the lamp timer. • While simultaneously holding down MENU/HELP, ENTER and R on the projector, press STANDBY/ON on the projector. • "LAMP 0000H" is displayed, indicating that the lamp timer is connected to the projector. Regarding the Lamp (Continued) 4 Remove the lamp unit. • Loosen the securing screws from...


