
Operation Manual
Page 8
...the Eco+Quiet Mode 32 Auto Sync (Auto Sync Adjustment) ..... 33 Freezing a Moving Image 33 Selecting the Picture Mode 33 Using the Remote Control as the Wireless Computer Mouse 34 Menu Items 35 Using the Menu Screen 37 Menu Selections (Adjustments 37 Picture Adjustment ("Picture" Menu)... 10 Part Names and Functions 11 Inserting the Batteries 14 Usable Range 15 Quick Start Quick Start 16 Setup Setting up the Projector 18 Setting up the Projector 18 Standard Setup (Front Projection) ....... 18 Ceiling-mount Setup 18 Projection (PRJ) Mode 19 Screen Size and Projection Distance ...
...the Eco+Quiet Mode 32 Auto Sync (Auto Sync Adjustment) ..... 33 Freezing a Moving Image 33 Selecting the Picture Mode 33 Using the Remote Control as the Wireless Computer Mouse 34 Menu Items 35 Using the Menu Screen 37 Menu Selections (Adjustments 37 Picture Adjustment ("Picture" Menu)... 10 Part Names and Functions 11 Inserting the Batteries 14 Usable Range 15 Quick Start Quick Start 16 Setup Setting up the Projector 18 Setting up the Projector 18 Standard Setup (Front Projection) ....... 18 Ceiling-mount Setup 18 Projection (PRJ) Mode 19 Screen Size and Projection Distance ...

Operation Manual
Page 14
Please check with your country. • Operation manual (this manual and CD-ROM ) Note • Codes in your nearest Sharp Authorized Projector Dealer or Service Center. 10 and For Australia, New Singapore Zealand and Oceania (6' (1.8 m)) (6' (1.8 m)) * Use the power cord that ...codes. Accessories Supplied accessories Two R-6 batteries RGB cable Lens cap (attached) ("AA" size, UM/SUM-3, (10' (3.0 m)) HP-7 or similar) Remote control Power cord* (1) (2) (3) (4) For U.S. and For Europe, Canada, etc. except U.K. (6' (1.8 m)) (6' (1.8 m)) For U.K.
Please check with your country. • Operation manual (this manual and CD-ROM ) Note • Codes in your nearest Sharp Authorized Projector Dealer or Service Center. 10 and For Australia, New Singapore Zealand and Oceania (6' (1.8 m)) (6' (1.8 m)) * Use the power cord that ...codes. Accessories Supplied accessories Two R-6 batteries RGB cable Lens cap (attached) ("AA" size, UM/SUM-3, (10' (3.0 m)) HP-7 or similar) Remote control Power cord* (1) (2) (3) (4) For U.S. and For Europe, Canada, etc. except U.K. (6' (1.8 m)) (6' (1.8 m)) For U.K.

Operation Manual
Page 15
ENTER button For setting 37 items selected or adjusted on and putting the projector into standby mode. KEYSTONE 28 button For entering the Keystone Correction mode. Front View Zoom ring 26 For enlarging/ reducing the picture. Push both sides .... 47 Intake vent 43 Speaker HEIGHT 27 ADJUST lever 26 Focus ring For adjusting the focus. Projector Top View Power indicator 25, 48 STANDBY/ON 25 button For turning the power on the menu. Remote control 15 sensor Exhaust vent 47 25, 48 Lamp indicator 48 Temperature warning indicator 32 ECO+QUIET...
ENTER button For setting 37 items selected or adjusted on and putting the projector into standby mode. KEYSTONE 28 button For entering the Keystone Correction mode. Front View Zoom ring 26 For enlarging/ reducing the picture. Push both sides .... 47 Intake vent 43 Speaker HEIGHT 27 ADJUST lever 26 Focus ring For adjusting the focus. Projector Top View Power indicator 25, 48 STANDBY/ON 25 button For turning the power on the menu. Remote control 15 sensor Exhaust vent 47 25, 48 Lamp indicator 48 Temperature warning indicator 32 ECO+QUIET...

Operation Manual
Page 16
...manual where the topic is explained. Kensington Security Standard connector Using the Kensington Lock • This projector has a Kensington Security Standard connector for use it to secure the projector. 12 Rear View Terminals AUDIO 1 input terminal 23 DVI-D input terminal 21 Terminal for computer ... with an S-video terminal. 24 RS-232C terminal Terminal for controlling the projector using a computer. 34 USB terminal Terminal connecting with the USB terminal on the computer for using the supplied remote control as the computer mouse. 23 AUDIO 2 input terminal 22 VIDEO input...
...manual where the topic is explained. Kensington Security Standard connector Using the Kensington Lock • This projector has a Kensington Security Standard connector for use it to secure the projector. 12 Rear View Terminals AUDIO 1 input terminal 23 DVI-D input terminal 21 Terminal for computer ... with an S-video terminal. 24 RS-232C terminal Terminal for controlling the projector using a computer. 34 USB terminal Terminal connecting with the USB terminal on the computer for using the supplied remote control as the computer mouse. 23 AUDIO 2 input terminal 22 VIDEO input...

Operation Manual
Page 17
...when with the USB connection (using a USB cable or the optional remote receiver). • For returning to the previous menu screen during ...cursor when with the USB connection (using a USB cable or the optional remote receiver). • For selecting and adjusting menu items. L-CLICK button ...click when with the USB connection (using a USB cable or the optional remote receiver). PAGE UP/PAGE 34 DOWN buttons Same as the [Page Down...when with the USB connection (using a USB cable or the optional remote receiver). POINTER button 32 For displaying the pointer. COMPUTER, DVI, 29...
...when with the USB connection (using a USB cable or the optional remote receiver). • For returning to the previous menu screen during ...cursor when with the USB connection (using a USB cable or the optional remote receiver). • For selecting and adjusting menu items. L-CLICK button ...click when with the USB connection (using a USB cable or the optional remote receiver). PAGE UP/PAGE 34 DOWN buttons Same as the [Page Down...when with the USB connection (using a USB cable or the optional remote receiver). POINTER button 32 For displaying the pointer. COMPUTER, DVI, 29...

Operation Manual
Page 18
Battery fluid from leaked batteries is incorrectly replaced. Replace only with this projector may run out, as possible with new batteries. • Remove the batteries from the remote control once they are kept. This may shorten the life of new batteries or may cause them to leak or explode. ...Caution • Danger of explosion if battery is harmful to leak. • Remove the batteries from the remote control if you wipe them first and then remove them using the remote control for a long time. • Comply with the rules (ordinance) of each local government when disposing ...
Battery fluid from leaked batteries is incorrectly replaced. Replace only with this projector may run out, as possible with new batteries. • Remove the batteries from the remote control once they are kept. This may shorten the life of new batteries or may cause them to leak or explode. ...Caution • Danger of explosion if battery is harmful to leak. • Remove the batteries from the remote control if you wipe them first and then remove them using the remote control for a long time. • Comply with the rules (ordinance) of each local government when disposing ...

Operation Manual
Page 19
... on the screen material. When using the remote control • Ensure that you do not drop it or expose it to control the projector within the ranges shown in the illustration. Remote control sensor Note • The signal from the fluorescent lamp. 30° 23n (7 m) Remote control Remote control signal transmitters 15 In this case...
... on the screen material. When using the remote control • Ensure that you do not drop it or expose it to control the projector within the ranges shown in the illustration. Remote control sensor Note • The signal from the fluorescent lamp. 30° 23n (7 m) Remote control Remote control signal transmitters 15 In this case...

Operation Manual
Page 20
... with the computer). Remove the lens cap and turn the projector on On the projector On the remote control _P. 25 16 Connect the projector to the computer and plug the power cord into the AC socket of the projector and the computer is explained using one example. 3 STANDBY... buttons (P/R/O/Q) 5 KEYSTONE button 1. For details, see pages 22 and 23. _PP. 21, 24 3. Place the projector facing a wall or a screen _P. 18 2. Setup and Projection In this section, connection of the projector When connecting equipment other than a computer, see the page described below for each step.
... with the computer). Remove the lens cap and turn the projector on On the projector On the remote control _P. 25 16 Connect the projector to the computer and plug the power cord into the AC socket of the projector and the computer is explained using one example. 3 STANDBY... buttons (P/R/O/Q) 5 KEYSTONE button 1. For details, see pages 22 and 23. _PP. 21, 24 3. Place the projector facing a wall or a screen _P. 18 2. Setup and Projection In this section, connection of the projector When connecting equipment other than a computer, see the page described below for each step.

Operation Manual
Page 21
.... (When "Setup Guide" is displayed to "On". On the projector Shrinks upper side. Turn the power off Press STANDBY/ON on the projector or STANDBY on the remote control. Turn the computer on the projector, the INPUT list appears. Quick Start 4. Shrinks lower side. See...Correct trapezoidal distortion Correcting trapezoidal distortion using INPUT on the projector or COMPUTER on the remote control, and then press the button again while the confirmation message is set to put the projector into standby mode. On the remote control _P. 28 6. Press '/" to finish the Setup...
.... (When "Setup Guide" is displayed to "On". On the projector Shrinks upper side. Turn the power off Press STANDBY/ON on the projector or STANDBY on the remote control. Turn the computer on the projector, the INPUT list appears. Quick Start 4. Shrinks lower side. See...Correct trapezoidal distortion Correcting trapezoidal distortion using INPUT on the projector or COMPUTER on the remote control, and then press the button again while the confirmation message is set to put the projector into standby mode. On the remote control _P. 28 6. Press '/" to finish the Setup...
Operation Manual
Page 29
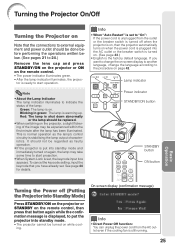
...the on-screen display to another language, change the language according to 24.) Remove the lens cap and press STANDBY/ON on the projector or ON on the remote control. • The power indicator illuminates green. • After the lamp indicator illuminates, the projec- Power indicator STANDBY/ON button... You can unplug the power cord from the outlet or the breaker switch is turned off (Putting the Projector into Standby Mode) Press STANDBY/ON on the projector or STANDBY on the remote control, then press that button again while the confirmation message is on. It should be replaced. •...
...the on-screen display to another language, change the language according to 24.) Remove the lens cap and press STANDBY/ON on the projector or ON on the remote control. • The power indicator illuminates green. • After the lamp indicator illuminates, the projec- Power indicator STANDBY/ON button... You can unplug the power cord from the outlet or the breaker switch is turned off (Putting the Projector into Standby Mode) Press STANDBY/ON on the projector or STANDBY on the remote control, then press that button again while the confirmation message is on. It should be replaced. •...

Operation Manual
Page 33
...or when changing the input signal. • When you press INPUT on the projector or DVI on the remote control, the INPUT list appears. Note • Pressing AV MUTE again will raise the volume. • When the projector is connected to external equipment, set "Speaker" in "PRJ-ADJ" menu to...8226; Pressing VOL+/Q+ will turn off the Sound Temporarily Press AV MUTE on the remote control to select the input mode. • When you do not want to output the sound from the projector's speaker while the projector is connected to "Off". (See page 43.) On-screen display Basic Operation ...
...or when changing the input signal. • When you press INPUT on the projector or DVI on the remote control, the INPUT list appears. Note • Pressing AV MUTE again will raise the volume. • When the projector is connected to external equipment, set "Speaker" in "PRJ-ADJ" menu to...8226; Pressing VOL+/Q+ will turn off the Sound Temporarily Press AV MUTE on the remote control to select the input mode. • When you do not want to output the sound from the projector's speaker while the projector is connected to "Off". (See page 43.) On-screen display Basic Operation ...

Operation Manual
Page 36
...break timer display function Press BREAK TIMER. Switching the Eco+Quiet Mode Press ECO+QUIET on the remote control or on the projector to switch the Eco+Quiet mode between on the remote control to move the spot area. 2 Press SPOT again. • The spot area will ... /Q to adjust the length of the break time. • Increases with P or Q 5 minutes s 6 minutes s 60 minutes • Shortens with the Remote Control BREAK TIMER button POINTER button SPOT button Adjustment buttons (P/R/O/Q) Displaying the Pointer 1 Press POINTER and press P/R/ O/Q on and off. • When the Eco+Quiet...
...break timer display function Press BREAK TIMER. Switching the Eco+Quiet Mode Press ECO+QUIET on the remote control or on the projector to switch the Eco+Quiet mode between on the remote control to move the spot area. 2 Press SPOT again. • The spot area will ... /Q to adjust the length of the break time. • Increases with P or Q 5 minutes s 6 minutes s 60 minutes • Shortens with the Remote Control BREAK TIMER button POINTER button SPOT button Adjustment buttons (P/R/O/Q) Displaying the Pointer 1 Press POINTER and press P/R/ O/Q on and off. • When the Eco+Quiet...

Operation Manual
Page 38
..., you can be connected via the USB cable, the remote receiver (optional, AN-MR2) makes it possible to operate the projector with a USB cable Computer To USB terminal Remote receiver To USB terminal (optional, AN-MR2) or USB cable (commercially available or available as Sharp service part QCNWGA014WJPZ) The mouse pointer can use this...
..., you can be connected via the USB cable, the remote receiver (optional, AN-MR2) makes it possible to operate the projector with a USB cable Computer To USB terminal Remote receiver To USB terminal (optional, AN-MR2) or USB cable (commercially available or available as Sharp service part QCNWGA014WJPZ) The mouse pointer can use this...
Operation Manual
Page 43
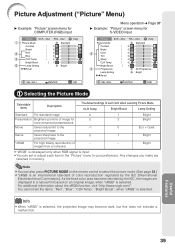
ADJ Picture Mode Contrast Bright Color Tint Sharp CLR Temp Bright Boost Progressive Lamp Setting Reset PRJ - ADJ Help Standard 0 0 0 0 0 0 1 3D Progressive Bright SEL./ADJ. images from a computer. 1 Bright 2 Bright 0 Eco + Quiet... 1 Selecting the Picture Mode Selectable items Description The default settings of each item in memory. Game Gives sharpness to your preference. Any changes you make are displayed in a natural tint based on the remote control to the -1 projected image. Useful Features 39 Info • When "sRGB" is selected. Picture...
ADJ Picture Mode Contrast Bright Color Tint Sharp CLR Temp Bright Boost Progressive Lamp Setting Reset PRJ - ADJ Help Standard 0 0 0 0 0 0 1 3D Progressive Bright SEL./ADJ. images from a computer. 1 Bright 2 Bright 0 Eco + Quiet... 1 Selecting the Picture Mode Selectable items Description The default settings of each item in memory. Game Gives sharpness to your preference. Any changes you make are displayed in a natural tint based on the remote control to the -1 projected image. Useful Features 39 Info • When "sRGB" is selected. Picture...

Operation Manual
Page 45
... also press RESIZE on the "SCR-ADJ" menu and adjust with the slide bar. When the image is called Keystone Correction. Select "Keystone" on the remote con- ADJ PRJ - Note • You cannot set this item when "Resize" is set to set the resize mode. (See page 30.) 2 Adjusting the Image...
... also press RESIZE on the "SCR-ADJ" menu and adjust with the slide bar. When the image is called Keystone Correction. Select "Keystone" on the remote con- ADJ PRJ - Note • You cannot set this item when "Resize" is set to set the resize mode. (See page 30.) 2 Adjusting the Image...
Operation Manual
Page 48
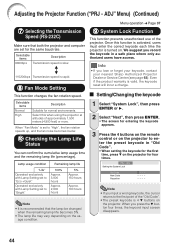
...Code". • When setting the keycode for the first time, press R on the projector for entering the keycode appears. 3 Press the 4 buttons on the remote control or on the projector. Adjusting the Projector Function ("PRJ - Select this function is activated, users must enter the correct keycode each...Code New Code Reconfirm Note • If you lose or forget your keycode, contact your nearest Sharp Authorized Projector Dealer or Service Center (see page 63). Once this when using the projector at altitudes of the "Old Code". • The preset keycode is turned on the usage...
...Code". • When setting the keycode for the first time, press R on the projector for entering the keycode appears. 3 Press the 4 buttons on the remote control or on the projector. Adjusting the Projector Function ("PRJ - Select this function is activated, users must enter the correct keycode each...Code New Code Reconfirm Note • If you lose or forget your keycode, contact your nearest Sharp Authorized Projector Dealer or Service Center (see page 63). Once this when using the projector at altitudes of the "Old Code". • The preset keycode is turned on the usage...

Operation Manual
Page 49
... cannot use the keylock function while the projector is warming up. On-screen display • When the projector is : displaying the "Setup Guide" or "Menu" screens, in standby mode, warming up . 4 Press the 4 buttons on the remote control or on the projector to enter the new keycode in standby ... When the System Lock is set • When System Lock is set • Press R on the projector. On-screen display • The keylock function does not affect the operation with the remote control buttons. • You cannot use the following buttons for keycode: • STANDBY/ON • ...
... cannot use the keylock function while the projector is warming up. On-screen display • When the projector is : displaying the "Setup Guide" or "Menu" screens, in standby mode, warming up . 4 Press the 4 buttons on the remote control or on the projector to enter the new keycode in standby ... When the System Lock is set • When System Lock is set • Press R on the projector. On-screen display • The keylock function does not affect the operation with the remote control buttons. • You cannot use the following buttons for keycode: • STANDBY/ON • ...

Operation Manual
Page 51
... periods. After the cooling fan has stopped, clean the vents. Maintenance Cleaning the projector ■ Ensure that you press STANDBY/ON on the projector or STANDBY on the remote control and put the projector into standby mode. Mild detergent diluted with water, wring the cloth well and then... wipe the projector. Do not use any liquid type cleaning agents, as the operation panel is...
... periods. After the cooling fan has stopped, clean the vents. Maintenance Cleaning the projector ■ Ensure that you press STANDBY/ON on the projector or STANDBY on the remote control and put the projector into standby mode. Mild detergent diluted with water, wring the cloth well and then... wipe the projector. Do not use any liquid type cleaning agents, as the operation panel is...
Operation Manual
Page 55
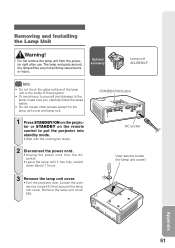
STANDBY/ON button AC socket User service screw (for the lamp unit cover and lamp unit. 1 Press STANDBY/ON on the projector or STANDBY on the remote control to put the projector into standby mode. • Wait until it has fully cooled down (about 1 hour). Remove the lamp unit cover (2). 1 2 ...the AC socket. • Leave the lamp until the cooling fan stops. 2 Disconnect the power cord. • Unplug the power cord from the projector right after use. Loosen the user service screw (1) that secures the lamp unit cover. Optional accessory Lamp unit AN-XR30LP Info • Do not...
STANDBY/ON button AC socket User service screw (for the lamp unit cover and lamp unit. 1 Press STANDBY/ON on the projector or STANDBY on the remote control to put the projector into standby mode. • Wait until it has fully cooled down (about 1 hour). Remove the lamp unit cover (2). 1 2 ...the AC socket. • Leave the lamp until the cooling fan stops. 2 Disconnect the power cord. • Unplug the power cord from the projector right after use. Loosen the user service screw (1) that secures the lamp unit cover. Optional accessory Lamp unit AN-XR30LP Info • Do not...
Operation Manual
Page 65
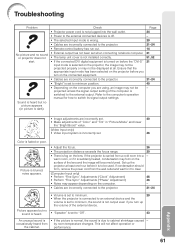
... appears but no picture appears (or picture is selected on the computer you are incorrectly connected to minimum position. • Depending on the projector, the image may not be projected properly or may not be displayed at least one hour before it to clear. (Computer Input only) ...8226; "Speaker" is set to "Off". 43 An unusual sound is • If the picture is normal, the sound is due to the projector. • Remote control battery has run out. • External output has not been set . 46 Color is blurred; This will become blurred. If condensation should form...
... appears but no picture appears (or picture is selected on the computer you are incorrectly connected to minimum position. • Depending on the projector, the image may not be projected properly or may not be displayed at least one hour before it to clear. (Computer Input only) ...8226; "Speaker" is set to "Off". 43 An unusual sound is • If the picture is normal, the sound is due to the projector. • Remote control battery has run out. • External output has not been set . 46 Color is blurred; This will become blurred. If condensation should form...


