
XR10S|XR10X|XR20S|XR20X Operation Manual
Page 1
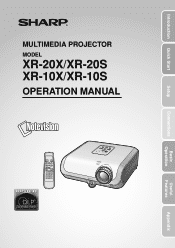
MULTIMEDIA PROJECTOR MODEL XR-20X/XR-20S XR-10X/XR-10S OPERATION MANUAL Introduction Quick Start Setup Connections Basic Operation Useful Features Appendix
MULTIMEDIA PROJECTOR MODEL XR-20X/XR-20S XR-10X/XR-10S OPERATION MANUAL Introduction Quick Start Setup Connections Basic Operation Useful Features Appendix
XR10S|XR10X|XR20S|XR20X Operation Manual
Page 5
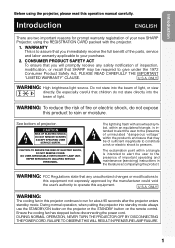
...not stare into the beam of uninsulated "dangerous voltage" within a triangle is to assure that children do not expose this operation manual carefully. Introduction Before using the REGISTRATION CARD packed with arrowhead symbol, within an equilateral triangle, is intended to alert the user...SAFETY ACT To ensure that you immediately receive the full benefit of the parts, service and labor warranty applicable to your new SHARP Projector, using the projector, please read this product to rain or moisture. WARNING: To reduce the risk of fire or electric shock, do not ...
...not stare into the beam of uninsulated "dangerous voltage" within a triangle is to assure that children do not expose this operation manual carefully. Introduction Before using the REGISTRATION CARD packed with arrowhead symbol, within an equilateral triangle, is intended to alert the user...SAFETY ACT To ensure that you immediately receive the full benefit of the parts, service and labor warranty applicable to your new SHARP Projector, using the projector, please read this product to rain or moisture. WARNING: To reduce the risk of fire or electric shock, do not ...

XR10S|XR10X|XR20S|XR20X Operation Manual
Page 6
...DISPOSAL This projector utilizes tin-lead solder, and a pressurized lamp containing a small amount of the FCC Rules. Disposal of the unit. 2 This very sophisticated panel contains 786,432 (XR20X/XR-10X) / 480,000 (XR-20S/XR-10S) pixels (micromirrors). As with the operation manual, may ... or recycling information, please contact your local authorities or, if you are designed to . ONLY Declaration of conformity SHARP PROJECTOR, MODEL XR-20X/XR-20S/XR-10X/XR-10S This device complies with Part 15 of America, the Electronic Industries Alliance: www.eiae.org . Caution Concerning Lamp...
...DISPOSAL This projector utilizes tin-lead solder, and a pressurized lamp containing a small amount of the FCC Rules. Disposal of the unit. 2 This very sophisticated panel contains 786,432 (XR20X/XR-10X) / 480,000 (XR-20S/XR-10S) pixels (micromirrors). As with the operation manual, may ... or recycling information, please contact your local authorities or, if you are designed to . ONLY Declaration of conformity SHARP PROJECTOR, MODEL XR-20X/XR-20S/XR-10X/XR-10S This device complies with Part 15 of America, the Electronic Industries Alliance: www.eiae.org . Caution Concerning Lamp...

XR10S|XR10X|XR20S|XR20X Operation Manual
Page 7
... display. Menu Selections (Adjustments) Example: Adjusting "Bright". • This operation can connect and operate all models in this operation manual, the illustration and the screen display are slightly different, depending on the projector. 1 Press BMENU. • The "Picture" menu screen for the selected input mode is displayed. Note .........Indicates additional information for...
... display. Menu Selections (Adjustments) Example: Adjusting "Bright". • This operation can connect and operate all models in this operation manual, the illustration and the screen display are slightly different, depending on the projector. 1 Press BMENU. • The "Picture" menu screen for the selected input mode is displayed. Note .........Indicates additional information for...

XR10S|XR10X|XR20S|XR20X Operation Manual
Page 8
...menu ..... 46 Utilizing "Help" menu functions 46 Contents Preparing Introduction How to Read this Operation Manual .... 3 Contents 4 IMPORTANT SAFEGUARDS 6 How to Access the PDF Operation Manuals 9 Accessories 10 Part Names and Functions 11 Inserting the Batteries 14 Usable Range 15 Quick ...Start Quick Start 16 Setup Setting up the Projector 18 Setting up the Projector 18 Standard Setup (Front Projection) ....... 18 Ceiling-mount Setup 18 Projection (PRJ) Mode 19 Screen Size and Projection Distance .. 20 Connections Connections 21 Samples of Cables for Connection ........
...menu ..... 46 Utilizing "Help" menu functions 46 Contents Preparing Introduction How to Read this Operation Manual .... 3 Contents 4 IMPORTANT SAFEGUARDS 6 How to Access the PDF Operation Manuals 9 Accessories 10 Part Names and Functions 11 Inserting the Batteries 14 Usable Range 15 Quick ...Start Quick Start 16 Setup Setting up the Projector 18 Setting up the Projector 18 Standard Setup (Front Projection) ....... 18 Ceiling-mount Setup 18 Projection (PRJ) Mode 19 Screen Size and Projection Distance .. 20 Connections Connections 21 Samples of Cables for Connection ........

XR10S|XR10X|XR20S|XR20X Operation Manual
Page 13
... depending on your computer (Windows® or Macintosh®). Using the projector in internal temperature, as this manual. ing indicator on how to rise in other cables connected to it to access the projector manuals. Refer to unplug the power cord from the Internet (http://www.adobe...damage due to make the connections AFTER unplugging the power cord of the projector I When using the "File", "Open" menu. 9 To utilize these manuals, you need to Access the PDF Operation Manuals PDF operation manuals in damage. Note • If the desired pdf file cannot be sure...
... depending on your computer (Windows® or Macintosh®). Using the projector in internal temperature, as this manual. ing indicator on how to rise in other cables connected to it to access the projector manuals. Refer to unplug the power cord from the Internet (http://www.adobe...damage due to make the connections AFTER unplugging the power cord of the projector I When using the "File", "Open" menu. 9 To utilize these manuals, you need to Access the PDF Operation Manuals PDF operation manuals in damage. Note • If the desired pdf file cannot be sure...
XR10S|XR10X|XR20S|XR20X Operation Manual
Page 14
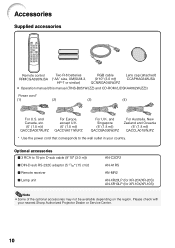
... 3 RCA to the wall outlet in your nearest Sharp Authorized Projector Dealer or Service Center. 10 and Singapore (6' (1.8... m)) QACCBA036WJPZ For Australia, New Zealand and Oceania (6' (1.8 m)) QACCLA018WJPZ * Use the power cord that corresponds to 15-pin D-sub cable (9n10o (3.0 m)) I DIN-D-sub RS-232C adaptor (5 57/64o (15 cm)) I Remote receiver I Lamp unit AN-C3CP2 AN-A1RS AN-MR2 AN-XR20LP (for XR-20X/XR-20S...; Operation manual (this manual (TINS-B851WJZZ) and CD-ROM (UDSKAA062WJZZ)) Power cord* (1) (2) (3) (4) For U.S.
... 3 RCA to the wall outlet in your nearest Sharp Authorized Projector Dealer or Service Center. 10 and Singapore (6' (1.8... m)) QACCBA036WJPZ For Australia, New Zealand and Oceania (6' (1.8 m)) QACCLA018WJPZ * Use the power cord that corresponds to 15-pin D-sub cable (9n10o (3.0 m)) I DIN-D-sub RS-232C adaptor (5 57/64o (15 cm)) I Remote receiver I Lamp unit AN-C3CP2 AN-A1RS AN-MR2 AN-XR20LP (for XR-20X/XR-20S...; Operation manual (this manual (TINS-B851WJZZ) and CD-ROM (UDSKAA062WJZZ)) Power cord* (1) (2) (3) (4) For U.S.

XR10S|XR10X|XR20S|XR20X Operation Manual
Page 15
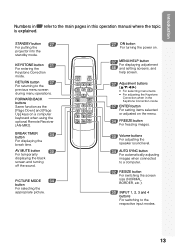
Projector Top View Power indicator 27, 48 STANDBY/ON 27 button For turning the power on the menu. Introduction... KEYSTONE 31 button For entering the Keystone Correction mode. ENTER button 37 For setting items selected or adjusted on and putting the projector into standby mode. HEIGHT 29 ADJUST lever 27, 48 Lamp indicator 48 Temperature warning indicator 30 Volume buttons (-O/Q+) For adjusting the... 15 Remote control sensor Push both sides of the lens cap to the main pages in this operation manual where the topic is explained. Front View Focus ring 28 For adjusting the focus.
Projector Top View Power indicator 27, 48 STANDBY/ON 27 button For turning the power on the menu. Introduction... KEYSTONE 31 button For entering the Keystone Correction mode. ENTER button 37 For setting items selected or adjusted on and putting the projector into standby mode. HEIGHT 29 ADJUST lever 27, 48 Lamp indicator 48 Temperature warning indicator 30 Volume buttons (-O/Q+) For adjusting the... 15 Remote control sensor Push both sides of the lens cap to the main pages in this operation manual where the topic is explained. Front View Focus ring 28 For adjusting the focus.

XR10S|XR10X|XR20S|XR20X Operation Manual
Page 16
... on page 21. Refer to "INPUT Terminals and Connectable Main Equipment" on how to use it to secure the projector. 12 Intake vent 47 26 RS-232C terminal Terminal for controlling the projector using a computer. 24 AUDIO (INPUT 25 3, 4) terminal (Shared for INPUT 3 and 4) 25 INPUT 4 terminal Terminal ... connected to the main pages in Z refer to the AUDIO INPUT terminal. Part Names and Functions (Continued) Numbers in this operation manual where the topic is explained. Rear View Terminals Refer to the information that came with a Kensington MicroSaver Security System.
... on page 21. Refer to "INPUT Terminals and Connectable Main Equipment" on how to use it to secure the projector. 12 Intake vent 47 26 RS-232C terminal Terminal for controlling the projector using a computer. 24 AUDIO (INPUT 25 3, 4) terminal (Shared for INPUT 3 and 4) 25 INPUT 4 terminal Terminal ... connected to the main pages in Z refer to the AUDIO INPUT terminal. Part Names and Functions (Continued) Numbers in this operation manual where the topic is explained. Rear View Terminals Refer to the information that came with a Kensington MicroSaver Security System.
XR10S|XR10X|XR20S|XR20X Operation Manual
Page 17
... help screen. 37 Adjustment buttons (P/R/O/Q) • For selecting menu items. • For adjusting the Keystone Correction when in this operation manual where the topic is explained. Introduction Numbers in Z refer to the main pages in the Keystone Correction mode. 37 ENTER button For ... using the optional Remote Receiver (AN-MR2). KEYSTONE button 31 For entering the Keystone Correction mode. STANDBY button 27 For putting the projector into the standby mode. BREAK TIMER 34 button For displaying the break time. FORWARD/BACK buttons Same function as the [Page Down]...
... help screen. 37 Adjustment buttons (P/R/O/Q) • For selecting menu items. • For adjusting the Keystone Correction when in this operation manual where the topic is explained. Introduction Numbers in Z refer to the main pages in the Keystone Correction mode. 37 ENTER button For ... using the optional Remote Receiver (AN-MR2). KEYSTONE button 31 For entering the Keystone Correction mode. STANDBY button 27 For putting the projector into the standby mode. BREAK TIMER 34 button For displaying the break time. FORWARD/BACK buttons Same function as the [Page Down]...

XR10S|XR10X|XR20S|XR20X Operation Manual
Page 26
...available) AUDIO INPUT or or connect directly to the operation manual of the connecting equipment. • You may need other cables or connectors not listed below. Equipment Input Signal Cable Terminal on the projector Computer RGB video RGB cable (supplied) INPUT1, 2 Audio...-visual equipment ø3.5 mm stereo audio cable AUDIO INPUT Computer (commercially available or available as Sharp service part QCNWGA038WJPZ) audio Component video 3 RCA ...
...available) AUDIO INPUT or or connect directly to the operation manual of the connecting equipment. • You may need other cables or connectors not listed below. Equipment Input Signal Cable Terminal on the projector Computer RGB video RGB cable (supplied) INPUT1, 2 Audio...-visual equipment ø3.5 mm stereo audio cable AUDIO INPUT Computer (commercially available or available as Sharp service part QCNWGA038WJPZ) audio Component video 3 RCA ...

XR10S|XR10X|XR20S|XR20X Operation Manual
Page 27
... your computer's external output port. Note • See page 58 "Computer Compatibility Chart" for use with some of when using a SHARP notebook computer). Ensure that it is the last device to be turned on after all connections, turn off the devices to be projected ... to enable your nearest Macintosh Dealer. • Depending on the projector and then the other than those listed may cause some Macintosh computers. Use with the projector. Refer to the specific instructions in your computer's operation manual to not work. • A Macintosh adaptor may not be connected...
... your computer's external output port. Note • See page 58 "Computer Compatibility Chart" for use with some of when using a SHARP notebook computer). Ensure that it is the last device to be turned on after all connections, turn off the devices to be projected ... to enable your nearest Macintosh Dealer. • Depending on the projector and then the other than those listed may cause some Macintosh computers. Use with the projector. Refer to the specific instructions in your computer's operation manual to not work. • A Macintosh adaptor may not be connected...
XR10S|XR10X|XR20S|XR20X Operation Manual
Page 30
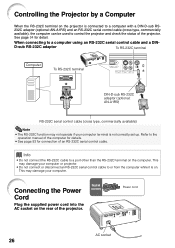
...manual of an RS-232C serial control cable. D-sub RS-232C adaptor To RS-232C terminal Computer To RS-232C terminal DIN-D-sub RS-232C adaptor (optional: AN-A1RS) RS-232C serial control cable (cross type, commercially available) Note • The RS-232C function may not operate if your computer or projector.... Connecting the Power Cord Plug the supplied power cord into the AC socket on the rear of the projector. Controlling the Projector by a Computer When the RS-232C terminal on the projector is connected to a computer with a DIN-D-sub RS232C adaptor (optional: AN-A1RS) and an RS-...
...manual of an RS-232C serial control cable. D-sub RS-232C adaptor To RS-232C terminal Computer To RS-232C terminal DIN-D-sub RS-232C adaptor (optional: AN-A1RS) RS-232C serial control cable (cross type, commercially available) Note • The RS-232C function may not operate if your computer or projector.... Connecting the Power Cord Plug the supplied power cord into the AC socket on the rear of the projector. Controlling the Projector by a Computer When the RS-232C terminal on the projector is connected to a computer with a DIN-D-sub RS232C adaptor (optional: AN-A1RS) and an RS-...
XR10S|XR10X|XR20S|XR20X Operation Manual
Page 38
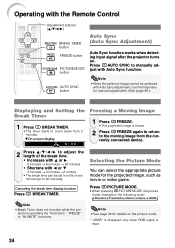
...on . Selecting the Picture Mode You can be achieved with Auto Sync adjustment, use the help menu for manual adjustments. (See page 46.) Displaying and Setting the Break Timer 1 Press k BREAK TIMER. • The ...timer starts to 60 minutes). Press FAUTO SYNC to manually adjust with Auto Sync function. Press GPICTURE MODE. • When pressing GPICTURE MODE, the picture mode changes in...Auto Sync function works when detecting input signal after the projector turns on the picture mode. * "sRGB" is displayed only when RGB signal is input. 34
...on . Selecting the Picture Mode You can be achieved with Auto Sync adjustment, use the help menu for manual adjustments. (See page 46.) Displaying and Setting the Break Timer 1 Press k BREAK TIMER. • The ...timer starts to 60 minutes). Press FAUTO SYNC to manually adjust with Auto Sync function. Press GPICTURE MODE. • When pressing GPICTURE MODE, the picture mode changes in...Auto Sync function works when detecting input signal after the projector turns on the picture mode. * "sRGB" is displayed only when RGB signal is input. 34
XR10S|XR10X|XR20S|XR20X Operation Manual
Page 45
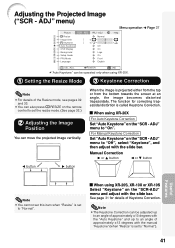
... "Normal"). 41 Manual Correction Q or P button O or R button O button Q button Useful Features Note • You cannot set to "Off", select "Keystone", and then adjust with the slide bar. Note • The Keystone Correction can be operated only when using XR-20S, XR-10X or XR-10S Select "Keystone..." on the remote control to set to "On". a When using XR-20X. 1 Setting the Resize Mode 3 Keystone Correction Note • For details of ...
... "Normal"). 41 Manual Correction Q or P button O or R button O button Q button Useful Features Note • You cannot set to "Off", select "Keystone", and then adjust with the slide bar. Note • The Keystone Correction can be operated only when using XR-20S, XR-10X or XR-10S Select "Keystone..." on the remote control to set to "On". a When using XR-20X. 1 Setting the Resize Mode 3 Keystone Correction Note • For details of ...
XR10S|XR10X|XR20S|XR20X Operation Manual
Page 47
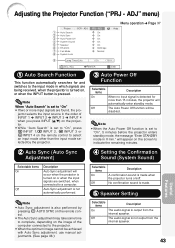
...1,C INPUT 2, D INPUT 3 or EINPUT 4 on the remote control to select an input mode other than 15 minutes, the projector will be achieved with Auto Sync adjustment, use manual adjustments. (See page 46.) Selectable items On Off Description A confirmation sound is turned on /off. Adjusting the... Projector Function ("PRJ - ADJ" menu) Picture SCR - The Auto Power Off function will automatically enter standby mode. Note...
...1,C INPUT 2, D INPUT 3 or EINPUT 4 on the remote control to select an input mode other than 15 minutes, the projector will be achieved with Auto Sync adjustment, use manual adjustments. (See page 46.) Selectable items On Off Description A confirmation sound is turned on /off. Adjusting the... Projector Function ("PRJ - ADJ" menu) Picture SCR - The Auto Power Off function will automatically enter standby mode. Note...

XR10S|XR10X|XR20S|XR20X Operation Manual
Page 63
...• Power to the external connected devices is off. • The selected input mode is heard. Refer to the computer's operation manual for how to switch its signal output settings. An unusual sound is • If the picture is normal, the sound is faded or...distance exceeds the focus range. 20 (Computer Input only) • Perform "Fine Sync" Adjustments ("Clock" Adjustment) 46 • Perform "Fine Sync" Adjustments ("Phase" Adjustment) 46 • Noise may not be • The keylock is blurred; Troubleshooting Problem Check Page • Projector power cord is not plugged ...
...• Power to the external connected devices is off. • The selected input mode is heard. Refer to the computer's operation manual for how to switch its signal output settings. An unusual sound is • If the picture is normal, the sound is faded or...distance exceeds the focus range. 20 (Computer Input only) • Perform "Fine Sync" Adjustments ("Clock" Adjustment) 46 • Perform "Fine Sync" Adjustments ("Phase" Adjustment) 46 • Noise may not be • The keylock is blurred; Troubleshooting Problem Check Page • Projector power cord is not plugged ...

XR10S|XR10X|XR20S|XR20X Operation Manual
Page 65
... http://www.sharp.com.hk Taiwan Sharp Corporation (Taiwan) 0800-025111 http://www.sharp-scot.com.tw Malaysia Sharp-Roxy Sales & Service Co. (60) 3-5125678 U.A.E. For SHARP Assistance If you encounter any problems during setup or operation of this operation manual does not answer your question, please contact the SHARP Service departments listed below. If this projector, first...
... http://www.sharp.com.hk Taiwan Sharp Corporation (Taiwan) 0800-025111 http://www.sharp-scot.com.tw Malaysia Sharp-Roxy Sales & Service Co. (60) 3-5125678 U.A.E. For SHARP Assistance If you encounter any problems during setup or operation of this operation manual does not answer your question, please contact the SHARP Service departments listed below. If this projector, first...

XR10S|XR10X|XR20S|XR20X Operation Manual
Page 66
...and Singapore, Power cord for Australia, New Zealand and Oceania, RGB cable, Operation manual (Printed and CD-ROM) As a part of policy of continuous improvement, SHARP reserves the right to +60°C) Cabinet Plastic I/R carrier frequency 38 kHz ...Power cord for product improvement without prior notice. of production units. Specifications Product type Projector Model XR-20X/XR-20S/XR-10X/XR-10S Video system NTSC3.58/NTSC4.43/PAL/PAL-M/PAL-N/PAL-60/SECAM/DTV480I/DTV480P... DMD panel Panel size: [XR-20X/XR-10X] 0.55" (14 mm), 1chip XGA DMD [XR-20S/XR-10S] 0.55" (14 mm), 1chip SVGA DMD No.
...and Singapore, Power cord for Australia, New Zealand and Oceania, RGB cable, Operation manual (Printed and CD-ROM) As a part of policy of continuous improvement, SHARP reserves the right to +60°C) Cabinet Plastic I/R carrier frequency 38 kHz ...Power cord for product improvement without prior notice. of production units. Specifications Product type Projector Model XR-20X/XR-20S/XR-10X/XR-10S Video system NTSC3.58/NTSC4.43/PAL/PAL-M/PAL-N/PAL-60/SECAM/DTV480I/DTV480P... DMD panel Panel size: [XR-20X/XR-10X] 0.55" (14 mm), 1chip XGA DMD [XR-20S/XR-10S] 0.55" (14 mm), 1chip SVGA DMD No.


