
XR-1S , XR-1X Operation Manual
Page 6
...mode always use the ON/STANDBY button on the projector or on page 55. UV RADIATION : CAN CAUSE EYE DAMAGE. A MANIPULER AVEC PRECAUTION, SE REPORTER AU MODE D'EMPLOI. This very sophisticated panel contains 786,432 (XR1X) / 480,000 (XR-1S) pixels micromirrors. As with any high technology electronic..."Replacing the Lamp" on the remote control. DANGER POTENTIEL DE PARTICULES DE VERRE EN CAS D'ECLATEMENT DE LA LAMPE. The enclosed computer cable must conform to. NE REMPLACER QUE PAR UNE LAMPE SHARP DE MODÈLE AN-XR1LP. REPLACE WITH SAME SHARP LAMP UNIT MODEL AN-XR1LP ONLY...
...mode always use the ON/STANDBY button on the projector or on page 55. UV RADIATION : CAN CAUSE EYE DAMAGE. A MANIPULER AVEC PRECAUTION, SE REPORTER AU MODE D'EMPLOI. This very sophisticated panel contains 786,432 (XR1X) / 480,000 (XR-1S) pixels micromirrors. As with any high technology electronic..."Replacing the Lamp" on the remote control. DANGER POTENTIEL DE PARTICULES DE VERRE EN CAS D'ECLATEMENT DE LA LAMPE. The enclosed computer cable must conform to. NE REMPLACER QUE PAR UNE LAMPE SHARP DE MODÈLE AN-XR1LP. REPLACE WITH SAME SHARP LAMP UNIT MODEL AN-XR1LP ONLY...

XR-1S , XR-1X Operation Manual
Page 8
...System Lock Function 49 Setting/Changing the keycode 49 Setting the Confirmation Sound 50 Checking the Lamp Life Status 50 Troubleshooting with the Remote Control 32 Auto Sync (Auto Sync Adjustment) ..... 32 Freezing a Moving Image 32 Selecting the Picture Mode 32 Using Mouse ...Quick Start Quick Start 16 Setup Setting up the Projector 18 Setting up the Projector 18 Standard Setup (Front Projection) ....... 18 Projecting a Reversed Image 18 Screen Size and Projection Distance (XR-1X 19 Screen Size and Projection Distance (XR-1S 20 Connections Connections 21 Samples of Cables for ...
...System Lock Function 49 Setting/Changing the keycode 49 Setting the Confirmation Sound 50 Checking the Lamp Life Status 50 Troubleshooting with the Remote Control 32 Auto Sync (Auto Sync Adjustment) ..... 32 Freezing a Moving Image 32 Selecting the Picture Mode 32 Using Mouse ...Quick Start Quick Start 16 Setup Setting up the Projector 18 Setting up the Projector 18 Standard Setup (Front Projection) ....... 18 Projecting a Reversed Image 18 Screen Size and Projection Distance (XR-1X 19 Screen Size and Projection Distance (XR-1S 20 Connections Connections 21 Samples of Cables for ...

XR-1S , XR-1X Operation Manual
Page 15
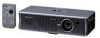
... check with enough shock absorbing material to avoid any damage. If you send the projector in your nearest Sharp Authorized Projector Dealer or Service Center. Introduction Accessories Supplied accessories Remote control RRMCGA256WJSA Lithium battery (CR2025) UBATL0011TAZZ Power cord* (1) Soft case GCASNA011WJZZ (2) RGB/USB cable (6' (1.8 m)) QCNWGA047WJPZ Cable tieK2 UBNDTA015WJZZ • For the RGB/USB cable...
... check with enough shock absorbing material to avoid any damage. If you send the projector in your nearest Sharp Authorized Projector Dealer or Service Center. Introduction Accessories Supplied accessories Remote control RRMCGA256WJSA Lithium battery (CR2025) UBATL0011TAZZ Power cord* (1) Soft case GCASNA011WJZZ (2) RGB/USB cable (6' (1.8 m)) QCNWGA047WJPZ Cable tieK2 UBNDTA015WJZZ • For the RGB/USB cable...
XR-1S , XR-1X Operation Manual
Page 16
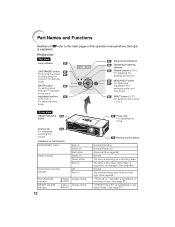
...button 51 For displaying adjustment and setting screens, and help screen. 29 INPUT button (W/Y) For switching input mode 1, 2 or 3. Indicators on the Projector ON/STANDBY button Lamp indicator Temperature warning indicator FOCUS/ZOOM indicator HEIGHT ADJUST indicator 12 Red on Green on Red blinks Green on Green blinks... Red on Off Red on Orange blinks Orange blinks 15 Remote control sensor Normal (Standby) Normal (Power on the Setup Guide. (See page 27.) The lamp is shut down abnormally or requires ...
...button 51 For displaying adjustment and setting screens, and help screen. 29 INPUT button (W/Y) For switching input mode 1, 2 or 3. Indicators on the Projector ON/STANDBY button Lamp indicator Temperature warning indicator FOCUS/ZOOM indicator HEIGHT ADJUST indicator 12 Red on Green on Red blinks Green on Green blinks... Red on Off Red on Orange blinks Orange blinks 15 Remote control sensor Normal (Standby) Normal (Power on the Setup Guide. (See page 27.) The lamp is shut down abnormally or requires ...
XR-1S , XR-1X Operation Manual
Page 17
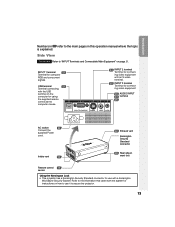
... System. Intake vent 52 52 Exhaust vent Kensington Security Standard connector 28 Rear adjustment foot Remote control 15 sensor Using the Kensington Lock • This projector has a Kensington Security Standard connector for instructions on how to secure the projector. 13 Refer to the information that came with the system for use it to...
... System. Intake vent 52 52 Exhaust vent Kensington Security Standard connector 28 Rear adjustment foot Remote control 15 sensor Using the Kensington Lock • This projector has a Kensington Security Standard connector for instructions on how to secure the projector. 13 Refer to the information that came with the system for use it to...

XR-1S , XR-1X Operation Manual
Page 18
... adjustment and setting screens, and help screen. 33 36 MOUSE/Adjustment buttons (P/R/O/Q) • For moving the computer cursor when connecting the projector USB terminal to the computer with RGB/ USB cable. • For selecting menu items. 33 L CLICK/ENTER button • For...is explained. puter. PICTURE MODE 32 buttons For switching the picture mode. Note • All the buttons on and putting the projector into the remote control. 14 AUTO SYNC button 32 For automatically adjusting images when connected to the respective input modes. INPUT 1, 2, and 3...
... adjustment and setting screens, and help screen. 33 36 MOUSE/Adjustment buttons (P/R/O/Q) • For moving the computer cursor when connecting the projector USB terminal to the computer with RGB/ USB cable. • For selecting menu items. 33 L CLICK/ENTER button • For...is explained. puter. PICTURE MODE 32 buttons For switching the picture mode. Note • All the buttons on and putting the projector into the remote control. 14 AUTO SYNC button 32 For automatically adjusting images when connected to the respective input modes. INPUT 1, 2, and 3...
XR-1S , XR-1X Operation Manual
Page 19
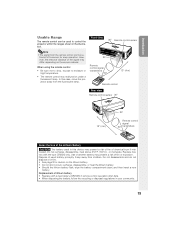
...• Replace with the type CR2025 only. Introduction Usable Range The remote control can be used to moisture or high temperature. • The remote control may present a risk of fire of in this case, move the projector away from children. flected off a screen for caution on the screen... When disposing the battery, follow the recycling or disposal regulations in your community. 15 When using the remote control • Be sure not to drop, expose to control the projector within the ranges shown in the illustration. Do not disassemble and do not dispose of chemical burn if...
...• Replace with the type CR2025 only. Introduction Usable Range The remote control can be used to moisture or high temperature. • The remote control may present a risk of fire of in this case, move the projector away from children. flected off a screen for caution on the screen... When disposing the battery, follow the recycling or disposal regulations in your community. 15 When using the remote control • Be sure not to drop, expose to control the projector within the ranges shown in the illustration. Do not disassemble and do not dispose of chemical burn if...
XR-1S , XR-1X Operation Manual
Page 20
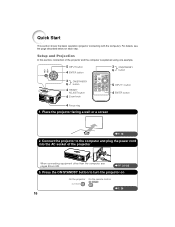
... page described below for each step. Press the ON/STANDBY button to the computer and plug the power cord into the AC socket of the projector and the computer is explained using one example. 5 INPUT button 4 ENTER button 3 ON/STANDBY 6 button 3 ON/STANDBY 6 button 4 HEIGHT ADJUST button 4 Zoom knob ...5 INPUT 1 button 4 ENTER button 4 Focus ring 1. For details, see pages 24 and 25. _PP. 21-25 3. Connect the projector to turn the projector on On the projector On the remote control _P. 26 16 Quick Start This section shows the basic operation...
... page described below for each step. Press the ON/STANDBY button to the computer and plug the power cord into the AC socket of the projector and the computer is explained using one example. 5 INPUT button 4 ENTER button 3 ON/STANDBY 6 button 3 ON/STANDBY 6 button 4 HEIGHT ADJUST button 4 Zoom knob ...5 INPUT 1 button 4 ENTER button 4 Focus ring 1. For details, see pages 24 and 25. _PP. 21-25 3. Connect the projector to turn the projector on On the projector On the remote control _P. 26 16 Quick Start This section shows the basic operation...
XR-1S , XR-1X Operation Manual
Page 21
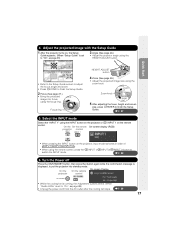
...Guide" is displayed, to "On". On the On-screen Display On the remote projector control • While the cooling fan is running, the Adjustment buttons blinks. (When "Guide LEDs" is set to put the projector into focus using the focus ring. Select the INPUT mode Select the "INPUT ...2 Focus (See page 27.) • Bring the projected image into standby mode. On the On the remote On-screen display (RGB) projector control • When pressing the INPUT button on the projector, input mode switches in zoom out 5 After adjusting the focus, height and screen size, press TENTER to...
...Guide" is displayed, to "On". On the On-screen Display On the remote projector control • While the cooling fan is running, the Adjustment buttons blinks. (When "Guide LEDs" is set to put the projector into focus using the focus ring. Select the INPUT mode Select the "INPUT ...2 Focus (See page 27.) • Bring the projected image into standby mode. On the On the remote On-screen display (RGB) projector control • When pressing the INPUT button on the projector, input mode switches in zoom out 5 After adjusting the focus, height and screen size, press TENTER to...
XR-1S , XR-1X Operation Manual
Page 27
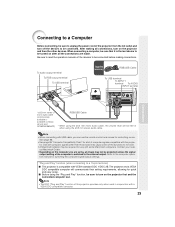
... to the external output. Note • When connecting with a VESA DDC compatible computer. 23 Refer to a 15-pin terminal) ■ This projector is compatible with computer signals other devices. See page 33. • See page 59 "Computer Compatibility Chart" for a list of the devices to...made. Use with VESA-standard DDC 1/DDC 2B. "Plug and Play" function (when connecting to the computer operation manual for use the remote control as Sharp service part QCNWGA038WJPZ) RGB/USB Cable * When using the ø3.5 mm mono audio cable, the volume level will communicate their setting ...
... to the external output. Note • When connecting with a VESA DDC compatible computer. 23 Refer to a 15-pin terminal) ■ This projector is compatible with computer signals other devices. See page 33. • See page 59 "Computer Compatibility Chart" for a list of the devices to...made. Use with VESA-standard DDC 1/DDC 2B. "Plug and Play" function (when connecting to the computer operation manual for use the remote control as Sharp service part QCNWGA038WJPZ) RGB/USB Cable * When using the ø3.5 mm mono audio cable, the volume level will communicate their setting ...
XR-1S , XR-1X Operation Manual
Page 30
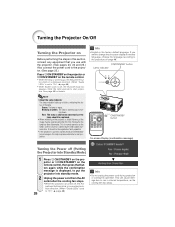
... after the lamp has been illuminated. Enter the right keycode to put into Standby Mode) 1 2 26 Press SON/STANDBY on the projector or AON/STANDBY on the remote control, then press that you want to change the on-screen display to another language, change the language according to the procedure on...is set , the keycode input box appears. If you use with the projector. (See pages 23, 24 and 25.) Also connect the power cord to the projector. (See page 25.) Press SON/STANDBY on the projector or AON/STANDBY on the remote control. • When the lamp is warming up, the Adjustment buttons...
... after the lamp has been illuminated. Enter the right keycode to put into Standby Mode) 1 2 26 Press SON/STANDBY on the projector or AON/STANDBY on the remote control, then press that you want to change the on-screen display to another language, change the language according to the procedure on...is set , the keycode input box appears. If you use with the projector. (See pages 23, 24 and 25.) Also connect the power cord to the projector. (See page 25.) Press SON/STANDBY on the projector or AON/STANDBY on the remote control. • When the lamp is warming up, the Adjustment buttons...

XR-1S , XR-1X Operation Manual
Page 33
...MAV MUTE again will raise the volume. Basic Operation 29 PressC INPUT 1, D INPUT 2 or EINPUT 3 on the remote control to select the input mode. • When pressing INPUT (W/Y) on the projector, input mode switches in order of INPUT1 INPUT2 INPUT3 . • When "Auto Search" is set to temporarily ... the sound. On-screen Display Displaying the Black Screen and Turning off the Sound Temporarily Press MAV MUTE on the remote control to "On", INPUT (W/ Y) on the projector functions as the Auto Search buttons. (See page 47.) INPUT buttons AV MUTE button Volume buttons Adjusting the Volume ...
...MAV MUTE again will raise the volume. Basic Operation 29 PressC INPUT 1, D INPUT 2 or EINPUT 3 on the remote control to select the input mode. • When pressing INPUT (W/Y) on the projector, input mode switches in order of INPUT1 INPUT2 INPUT3 . • When "Auto Search" is set to temporarily ... the sound. On-screen Display Displaying the Black Screen and Turning off the Sound Temporarily Press MAV MUTE on the remote control to "On", INPUT (W/ Y) on the projector functions as the Auto Search buttons. (See page 47.) INPUT buttons AV MUTE button Volume buttons Adjusting the Volume ...
XR-1S , XR-1X Operation Manual
Page 36
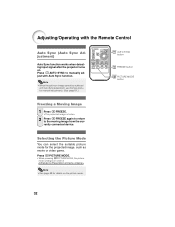
... NFREEZE. • The projected image is frozen. 2 Press NFREEZE again to return to manually adjust with the Remote Control Auto Sync (Auto Sync Adjustment) Auto Sync function works when detecting input signal after the projector turns on the picture mode. 32 Press GPICTURE MODE. • When pressing GPICTURE MODE, the picture mode...
... NFREEZE. • The projected image is frozen. 2 Press NFREEZE again to return to manually adjust with the Remote Control Auto Sync (Auto Sync Adjustment) Auto Sync function works when detecting input signal after the projector turns on the picture mode. 32 Press GPICTURE MODE. • When pressing GPICTURE MODE, the picture mode...
XR-1S , XR-1X Operation Manual
Page 37
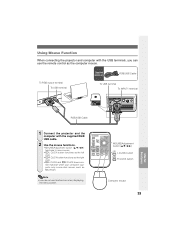
... the computer with the USB terminals, you can use this function when displaying the menu screen. Using Mouse Function When connecting the projector and computer with the supplied RGB/ USB cable. 2 Use the mouse functions. • MOUSE/Adjustment button (P/R/O/Q) functions to move cursor. • IL CLICK button functions ... JR CLICK have common function when your computer supports only a one-click mouse, such as the computer mouse. Note • you can not use the remote control as Macintosh. MOUSE/Adjuatment button (P/R/O/Q) L CLICK button R CLICK button Computer mouse 33
... the computer with the USB terminals, you can use this function when displaying the menu screen. Using Mouse Function When connecting the projector and computer with the supplied RGB/ USB cable. 2 Use the mouse functions. • MOUSE/Adjustment button (P/R/O/Q) functions to move cursor. • IL CLICK button functions ... JR CLICK have common function when your computer supports only a one-click mouse, such as the computer mouse. Note • you can not use the remote control as Macintosh. MOUSE/Adjuatment button (P/R/O/Q) L CLICK button R CLICK button Computer mouse 33
XR-1S , XR-1X Operation Manual
Page 38
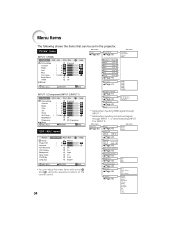
... You can be set in the projector. ADJ Page 43 Resize Page 43 Image Shift [XR-1X] [XR-1S] -96 +96 -75 +75 Page 43 Normal Border Stretch Keystone [XR-1X] -127 +127 [XR-1S] -100 +100 Page 44 Auto... shows the items that can adjust the menu items with icons ( and ) using the respective buttons on the remote control. ADJ" menu Picture SCR - ADJ PRJ - ADJ Picture Mode Contrast Bright Red Blue CLR Temp Bright...-30 +30 Red -30 +30 *1 Blue -30 +30 *1 Color -30 +30 *2 Tint -30 +30 *2 Sharp -30 +30 *2 Page 40 CLR Temp Page 41 Bright Boost [On/Off] Page 41 Progressive Page 42 sRGB [On/...
... You can be set in the projector. ADJ Page 43 Resize Page 43 Image Shift [XR-1X] [XR-1S] -96 +96 -75 +75 Page 43 Normal Border Stretch Keystone [XR-1X] -127 +127 [XR-1S] -100 +100 Page 44 Auto... shows the items that can adjust the menu items with icons ( and ) using the respective buttons on the remote control. ADJ" menu Picture SCR - ADJ PRJ - ADJ Picture Mode Contrast Bright Red Blue CLR Temp Bright...-30 +30 Red -30 +30 *1 Blue -30 +30 *1 Color -30 +30 *2 Tint -30 +30 *2 Sharp -30 +30 *2 Page 40 CLR Temp Page 41 Bright Boost [On/Off] Page 41 Progressive Page 42 sRGB [On/...
XR-1S , XR-1X Operation Manual
Page 44
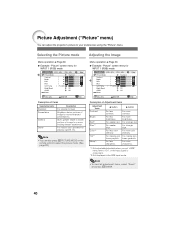
... 0 0 0 7500K Standard Off Off Help SEL./ADJ. Note • You can adjust the projector's picture to your preferences using the "Picture" menu. ADJ Picture Mode Contrast Bright Red Blue CLR Temp .... For stronger red. Picture Adjustment ("Picture" menu) You can also press GPICTURE MODE on the remote control to select the picture mode. (See page 32.) Menu operation n Page 36 Q Example:...menu for a more exciting theater experience. ADJ PRJ - For more brightness. For more contrast. For more sharpness. *1 Not adjustable/selectable when you set "sRGB" menu item to "On", or the input signal ...
... 0 0 0 7500K Standard Off Off Help SEL./ADJ. Note • You can adjust the projector's picture to your preferences using the "Picture" menu. ADJ Picture Mode Contrast Bright Red Blue CLR Temp .... For stronger red. Picture Adjustment ("Picture" menu) You can also press GPICTURE MODE on the remote control to select the picture mode. (See page 32.) Menu operation n Page 36 Q Example:...menu for a more exciting theater experience. ADJ PRJ - For more brightness. For more contrast. For more sharpness. *1 Not adjustable/selectable when you set "sRGB" menu item to "On", or the input signal ...

XR-1S , XR-1X Operation Manual
Page 47
... Image Position Menu operation n Page 38 Picture SCR - ADJ PRJ - Useful Features 43 ENTER Help END You can adjust the projected image and on the remote control to set the resize mode. (See page 30.) O button Q button Note • You cannot set this item when "Resize" is set to "Normal". •...
... Image Position Menu operation n Page 38 Picture SCR - ADJ PRJ - Useful Features 43 ENTER Help END You can adjust the projected image and on the remote control to set the resize mode. (See page 30.) O button Q button Note • You cannot set this item when "Resize" is set to "Normal". •...
XR-1S , XR-1X Operation Manual
Page 51
... Lock PRJ - ADJ On On On On On Help Lamp Timer(Life) SEL./ADJ. 0h ENTER 100% END This function automatically searches for the projector. Menu operation n Page 38 Picture SCR - Useful Features 47 jector selects the input source in the order of INPUT1 INPUT2 INPUT3 by pressing INPUT ...(W/Y) on the remote control to select an input mode other than the input mode selected by the projector. • When "Auto Search" is pressed. ADJ Eco/Quiet Mode Auto Search Auto Power Off Guide...
... Lock PRJ - ADJ On On On On On Help Lamp Timer(Life) SEL./ADJ. 0h ENTER 100% END This function automatically searches for the projector. Menu operation n Page 38 Picture SCR - Useful Features 47 jector selects the input source in the order of INPUT1 INPUT2 INPUT3 by pressing INPUT ...(W/Y) on the remote control to select an input mode other than the input mode selected by the projector. • When "Auto Search" is pressed. ADJ Eco/Quiet Mode Auto Search Auto Power Off Guide...
XR-1S , XR-1X Operation Manual
Page 53
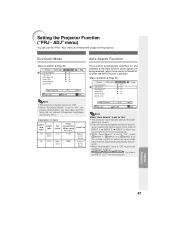
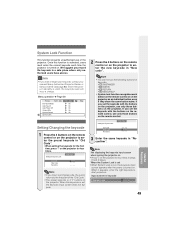
... you set the keycode with the buttons on the remote control, use only those buttons on the remote control. Once this keycode is turned on. We suggest you lose or forget your keycode, contact your nearest Sharp Authorized Projector Dealer or Service Center (see page 62). Info • If you ...record the keycode in a safe place where only authorized users have access. ADJ On On On On On Help 2 Press the 4 buttons on the remote control or on the projector to the first ...
... you set the keycode with the buttons on the remote control, use only those buttons on the remote control. Once this keycode is turned on. We suggest you lose or forget your keycode, contact your nearest Sharp Authorized Projector Dealer or Service Center (see page 62). Info • If you ...record the keycode in a safe place where only authorized users have access. ADJ On On On On On Help 2 Press the 4 buttons on the remote control or on the projector to the first ...
XR-1S , XR-1X Operation Manual
Page 58
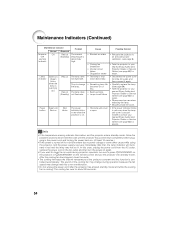
...from the AC outlet, and then connect it again. • Carefully replace the lamp. (See page 56.) • Take the projector to your nearest Sharp Authorized Projector Dealer or Service Center (see page 62) for repair. • Please exercise care when replacing the lamp. • Securely install... is abnormally high. Possible Solution • Relocate the projector to an area with proper ventilation. (see page 8) • Take the projector to press SON/STANDBY on the projector or AON/STANDBY on the remote control and put the projector into standby mode. The cooling fan runs for advice....
...from the AC outlet, and then connect it again. • Carefully replace the lamp. (See page 56.) • Take the projector to your nearest Sharp Authorized Projector Dealer or Service Center (see page 62) for repair. • Please exercise care when replacing the lamp. • Securely install... is abnormally high. Possible Solution • Relocate the projector to an area with proper ventilation. (see page 8) • Take the projector to press SON/STANDBY on the projector or AON/STANDBY on the remote control and put the projector into standby mode. The cooling fan runs for advice....


