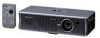

XR-1S , XR-1X Operation Manual
Page 6
...ENDOMMAGER LES YEUX. This very sophisticated panel contains 786,432 (XR1X) / 480,000 (XR-1S) pixels micromirrors. This unit has some inactive pixels within acceptable tolerances which case the user... Ensure the cooling fan has stopped before disconnecting the power cord. Warn children not to take adequate measures. REPLACE WITH SAME SHARP LAMP UNIT MODEL AN-XR1LP ONLY. SEE OPERATION MANUAL... AU REMPLACEMENT DE LA LAMPE. DURING NORMAL OPERATION, NEVER TURN THE PROJECTOR OFF BY DISCONNECTING THE POWER CORD. Parents should install the lithium battery in the United States of these...
...ENDOMMAGER LES YEUX. This very sophisticated panel contains 786,432 (XR1X) / 480,000 (XR-1S) pixels micromirrors. This unit has some inactive pixels within acceptable tolerances which case the user... Ensure the cooling fan has stopped before disconnecting the power cord. Warn children not to take adequate measures. REPLACE WITH SAME SHARP LAMP UNIT MODEL AN-XR1LP ONLY. SEE OPERATION MANUAL... AU REMPLACEMENT DE LA LAMPE. DURING NORMAL OPERATION, NEVER TURN THE PROJECTOR OFF BY DISCONNECTING THE POWER CORD. Parents should install the lithium battery in the United States of these...

XR-1S , XR-1X Operation Manual
Page 8
... Screen Size and Projection Distance (XR-1S 20 Connections Connections 21 Samples of Cables for Connection .... 22 Connecting to a Computer 23 Connecting to Video Equipment ......... 24 Connecting the Power Cord 25 Using Basic Operation Turning the Projector On/Off 26 Turning the Projector on 26 Turning the Power off (Putting the Projector into Standby Mode 26 Image Projection...
... Screen Size and Projection Distance (XR-1S 20 Connections Connections 21 Samples of Cables for Connection .... 22 Connecting to a Computer 23 Connecting to Video Equipment ......... 24 Connecting the Power Cord 25 Using Basic Operation Turning the Projector On/Off 26 Turning the Projector on 26 Turning the Power off (Putting the Projector into Standby Mode 26 Image Projection...
XR-1S , XR-1X Operation Manual
Page 10
... label. Grounding or Polarization This product is provided or the manufacturer's instructions have been adhered to protect it from the wall outlet before cleaning. Power-Cord Protection Power-supply cords should never be blocked or covered. BUT IMPROPER USE CAN RESULT IN POTENTIAL ELECTRICAL SHOCK OR FIRE HAZARDS. Ventilation Slots and openings in installation...
... label. Grounding or Polarization This product is provided or the manufacturer's instructions have been adhered to protect it from the wall outlet before cleaning. Power-Cord Protection Power-supply cords should never be blocked or covered. BUT IMPROPER USE CAN RESULT IN POTENTIAL ELECTRICAL SHOCK OR FIRE HAZARDS. Ventilation Slots and openings in installation...
XR-1S , XR-1X Operation Manual
Page 11
... water. Heat This product should be sure the service technician has used replacement parts specified by following conditions: a. b. When the power-supply cord or plug is a registered trademark of other controls may result in fire, electric shock, or other products (including amplifiers) that... have the same characteristics as opening or removing covers may touch dangerous voltage points or short-out parts that produce heat. • DLP\ (Digital Light Processing) and DMD\ (Digital Micromirror Device) are trademarks of Texas Instruments, Inc. • Microsoft and Windows are...
... water. Heat This product should be sure the service technician has used replacement parts specified by following conditions: a. b. When the power-supply cord or plug is a registered trademark of other controls may result in fire, electric shock, or other products (including amplifiers) that... have the same characteristics as opening or removing covers may touch dangerous voltage points or short-out parts that produce heat. • DLP\ (Digital Light Processing) and DMD\ (Digital Micromirror Device) are trademarks of Texas Instruments, Inc. • Microsoft and Windows are...
XR-1S , XR-1X Operation Manual
Page 12
..., dust and cigarette smoke. Be sure to avoid personal injury caused by a Sharp Authorized Projector Dealer or Service Center. AN-XR1LP Caution concerning the setup of the unit. This does not indicate a malfunction. (See pages 53 and 54.) Remove the projector power cord from -4°F to 140°F (-20°C to +60°C). See "Replacing...
..., dust and cigarette smoke. Be sure to avoid personal injury caused by a Sharp Authorized Projector Dealer or Service Center. AN-XR1LP Caution concerning the setup of the unit. This does not indicate a malfunction. (See pages 53 and 54.) Remove the projector power cord from -4°F to 140°F (-20°C to +60°C). See "Replacing...

XR-1S , XR-1X Operation Manual
Page 13
...fan regulates the internal temperature, and its performance is automatically controlled. visual equipment to make the connections AFTER unplugging the power cord of the projector from the wall outlet, and disconnect any other audio- This can result in . If the temperature continues to rise...Introduction Caution regarding transportation of the picture. Before moving the projector, be sure to unplug the power cord from the AC outlet and turning off period the projector will blink, and af- When using the projector overseas, be connected. ■ Please read the operation ...
...fan regulates the internal temperature, and its performance is automatically controlled. visual equipment to make the connections AFTER unplugging the power cord of the projector from the wall outlet, and disconnect any other audio- This can result in . If the temperature continues to rise...Introduction Caution regarding transportation of the picture. Before moving the projector, be sure to unplug the power cord from the AC outlet and turning off period the projector will blink, and af- When using the projector overseas, be connected. ■ Please read the operation ...

XR-1S , XR-1X Operation Manual
Page 15
... • For the power cord • Projector manual CD-ROM UDSKAA045WJN1 • Operation manual (this manual) (3) (4) For U.S., Canada, etc. (6' (1.8 m)) QACCDA029WJPZ For Europe, except U.K. (6' (1.8 m)) QACCVA006WJPZ For U.K., Hong Kong and Singapore (6' (1.8 m)) QACCBA015WJPZ For Australia, New Zealand and Oceania (6' (1.8 m)) QACCLA024WJPZ * Use the power cord that corresponds to the wall outlet in your nearest Sharp Authorized Projector Dealer or Service Center...
... • For the power cord • Projector manual CD-ROM UDSKAA045WJN1 • Operation manual (this manual) (3) (4) For U.S., Canada, etc. (6' (1.8 m)) QACCDA029WJPZ For Europe, except U.K. (6' (1.8 m)) QACCVA006WJPZ For U.K., Hong Kong and Singapore (6' (1.8 m)) QACCBA015WJPZ For Australia, New Zealand and Oceania (6' (1.8 m)) QACCLA024WJPZ * Use the power cord that corresponds to the wall outlet in your nearest Sharp Authorized Projector Dealer or Service Center...
XR-1S , XR-1X Operation Manual
Page 17
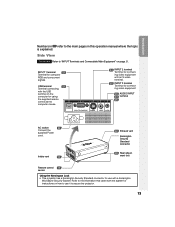
...vent Kensington Security Standard connector 28 Rear adjustment foot Remote control 15 sensor Using the Kensington Lock • This projector has a Kensington Security Standard connector for use with the system for instructions on how to use it to the... information that came with a Kensington MicroSaver Security System. Refer to secure the projector. 13 Side View Terminals Refer to the main pages in this operation manual where the topic is explained. INPUT ... video equipment. 23 AUDIO INPUT 24 terminal 25 AC socket 25 Connect the supplied Power cord.
...vent Kensington Security Standard connector 28 Rear adjustment foot Remote control 15 sensor Using the Kensington Lock • This projector has a Kensington Security Standard connector for use with the system for instructions on how to use it to the... information that came with a Kensington MicroSaver Security System. Refer to secure the projector. 13 Side View Terminals Refer to the main pages in this operation manual where the topic is explained. INPUT ... video equipment. 23 AUDIO INPUT 24 terminal 25 AC socket 25 Connect the supplied Power cord.
XR-1S , XR-1X Operation Manual
Page 20
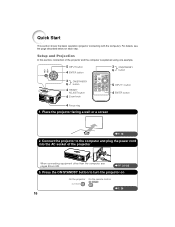
... Place the projector facing a wall or a screen _P. 18 2. Connect the projector to turn the projector on On the projector On the remote control _P. 26 16 For details, see pages 24 and 25. _PP. 21-25 3. Press the ON/STANDBY button to the computer and plug the power cord into the AC... socket of the projector and the computer is explained using one example. 5 INPUT button 4 ENTER button 3 ON/STANDBY 6 button 3 ON/STANDBY 6 button 4 HEIGHT ...
... Place the projector facing a wall or a screen _P. 18 2. Connect the projector to turn the projector on On the projector On the remote control _P. 26 16 For details, see pages 24 and 25. _PP. 21-25 3. Press the ON/STANDBY button to the computer and plug the power cord into the AC... socket of the projector and the computer is explained using one example. 5 INPUT button 4 ENTER button 3 ON/STANDBY 6 button 3 ON/STANDBY 6 button 4 HEIGHT ...
XR-1S , XR-1X Operation Manual
Page 21
...control. Select the INPUT mode Select the "INPUT 1" using the INPUT button on the projector or C INPUT 1 on , the Setup Guide appears. (When "Setup Guide" is displayed, to "On". n page 48) • Unplug the power cord from the AC outlet after the cooling fan stops. _P. 26 17 On the ...On the remote On-screen display (RGB) projector control • When pressing the INPUT button on the projector, input mode switches in zoom out 5 After adjusting the focus...
...control. Select the INPUT mode Select the "INPUT 1" using the INPUT button on the projector or C INPUT 1 on , the Setup Guide appears. (When "Setup Guide" is displayed, to "On". n page 48) • Unplug the power cord from the AC outlet after the cooling fan stops. _P. 26 17 On the ...On the remote On-screen display (RGB) projector control • When pressing the INPUT button on the projector, input mode switches in zoom out 5 After adjusting the focus...
XR-1S , XR-1X Operation Manual
Page 27
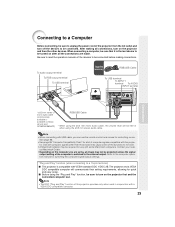
...DDC 1/DDC 2B. Connecting to a Computer Before connecting, be sure to unplug the power cord of the projector from the AC outlet and turn off the devices to be required for use the remote control as Sharp service part QCNWGA038WJPZ) RGB/USB Cable * When using the ø3.5 mm mono audio ...manuals of the devices to be sure to the computer operation manual for a list of when using , an image may be connected. The projector and a VESA DDC compatible computer will be half of computer signals compatible with a VESA DDC compatible computer. 23 After making connections. Refer ...
...DDC 1/DDC 2B. Connecting to a Computer Before connecting, be sure to unplug the power cord of the projector from the AC outlet and turn off the devices to be required for use the remote control as Sharp service part QCNWGA038WJPZ) RGB/USB Cable * When using the ø3.5 mm mono audio ...manuals of the devices to be sure to the computer operation manual for a list of when using , an image may be connected. The projector and a VESA DDC compatible computer will be half of computer signals compatible with a VESA DDC compatible computer. 23 After making connections. Refer ...
XR-1S , XR-1X Operation Manual
Page 29
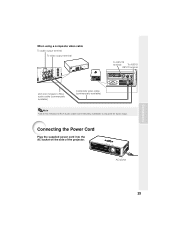
When using a composite video cable To audio output terminal To video output terminal To INPUT3 terminal To AUDIO INPUT terminal ø3.5 mm minijack to RCA audio cable (commercially available) Composite video cable (commercially available) Note • ø3.5 mm minijack to RCA audio cable (commercially available) is required for audio input. Connecting the Power Cord Plug the supplied power cord into the AC socket on the side of the projector. AC socket Connections 25
When using a composite video cable To audio output terminal To video output terminal To INPUT3 terminal To AUDIO INPUT terminal ø3.5 mm minijack to RCA audio cable (commercially available) Composite video cable (commercially available) Note • ø3.5 mm minijack to RCA audio cable (commercially available) is required for audio input. Connecting the Power Cord Plug the supplied power cord into the AC socket on the side of the projector. AC socket Connections 25
XR-1S , XR-1X Operation Manual
Page 30
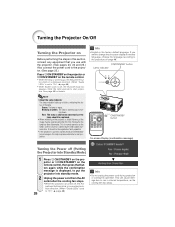
..., as the cooling fan also stops. If you use with the projector. (See pages 23, 24 and 25.) Also connect the power cord to the projector. (See page 25.) Press SON/STANDBY on the projector or AON/STANDBY on the projector, a slight flickering of the lamp. It should be experienced within ...'s control circuitry is set, the keycode input box appears. Unplug the power cord from the AC outlet after the lamp has been illuminated. This is normal operation as faulty operation. • If the projector is put the projector into standby mode and immediately turned on page 46. Turning the...
..., as the cooling fan also stops. If you use with the projector. (See pages 23, 24 and 25.) Also connect the power cord to the projector. (See page 25.) Press SON/STANDBY on the projector or AON/STANDBY on the projector, a slight flickering of the lamp. It should be experienced within ...'s control circuitry is set, the keycode input box appears. Unplug the power cord from the AC outlet after the lamp has been illuminated. This is normal operation as faulty operation. • If the projector is put the projector into standby mode and immediately turned on page 46. Turning the...
XR-1S , XR-1X Operation Manual
Page 56
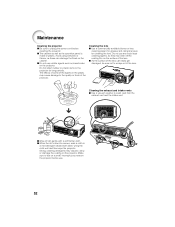
...the agents in a mild detergent diluted with water, wring the cloth well and then wipe the projector. Strong cleaning detergents may discolor, warp or damage the coating on the projector before cleaning the projector. ■ The cabinet as well as the operation panel is hard to remove, soak a cloth... type cleaning agents, as insecticides on the surface of the lens. ■ As the surface of the projector. Maintenance Cleaning the projector ■ Be sure to unplug the power cord before use volatile agents such as they may cause damage to the quality or finish of the lens can ...
...the agents in a mild detergent diluted with water, wring the cloth well and then wipe the projector. Strong cleaning detergents may discolor, warp or damage the coating on the projector before cleaning the projector. ■ The cabinet as well as the operation panel is hard to remove, soak a cloth... type cleaning agents, as insecticides on the surface of the lens. ■ As the surface of the projector. Maintenance Cleaning the projector ■ Be sure to unplug the power cord before use volatile agents such as they may cause damage to the quality or finish of the lens can ...
XR-1S , XR-1X Operation Manual
Page 58
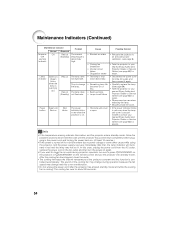
... (See page 56.) • Take the projector to your nearest Sharp Authorized Projector Dealer or Service Center (see page 62) for advice. The sound of the projector constant and this is not a malfunction. • Do not unplug the power cord after that, the lamp indicator will illuminate in... • Relocate the projector to an area with proper ventilation. (see page 8) • Take the projector to your nearest Sharp Authorized Projector Dealer or Service Center (see page 62) for repair. • Disconnect the power cord from the AC outlet, replace the power cord in red even when the...
... (See page 56.) • Take the projector to your nearest Sharp Authorized Projector Dealer or Service Center (see page 62) for advice. The sound of the projector constant and this is not a malfunction. • Do not unplug the power cord after that, the lamp indicator will illuminate in... • Relocate the projector to an area with proper ventilation. (see page 8) • Take the projector to your nearest Sharp Authorized Projector Dealer or Service Center (see page 62) for repair. • Disconnect the power cord from the AC outlet, replace the power cord in red even when the...
XR-1S , XR-1X Operation Manual
Page 60
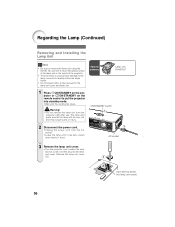
Regarding the Lamp (Continued) Removing and Installing the Lamp Unit Info • Be sure to put the projector into standby mode. • Wait until it has fully cooled down (about 1 hour). Warning! • Do not remove the lamp unit from the AC socket. &#... and damage to the lamp, be very hot and may cause burns or injury. Optional accessory Lamp unit AN-XR1LP ON/STANDBY button 2 Disconnect the power cord. • Unplug the power cord from the projector right after use. User service screw (for the lamp unit cover and lamp unit. 1 Press SON/STANDBY on the...
Regarding the Lamp (Continued) Removing and Installing the Lamp Unit Info • Be sure to put the projector into standby mode. • Wait until it has fully cooled down (about 1 hour). Warning! • Do not remove the lamp unit from the AC socket. &#... and damage to the lamp, be very hot and may cause burns or injury. Optional accessory Lamp unit AN-XR1LP ON/STANDBY button 2 Disconnect the power cord. • Unplug the power cord from the projector right after use. User service screw (for the lamp unit cover and lamp unit. 1 Press SON/STANDBY on the...
XR-1S , XR-1X Operation Manual
Page 61
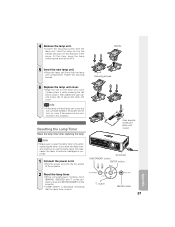
.../STANDBY button ENTER button 2 Reset the lamp timer. • While simultaneously holding down UMENU, TENTER and Y on the projector, press and SON/STANDBY on , even if the power cord is reset. Handle 5 Insert the new lamp unit. • Press the lamp unit firmly into the AC socket of ...displayed, indicating that the lamp timer is connected to become damaged or explode. 1 Connect the power cord. • Plug the power cord into the lamp unit compartment. At this may cause the lamp to the projector. User service screw (for lamp unit cover) Info • Make sure to secure the lamp...
.../STANDBY button ENTER button 2 Reset the lamp timer. • While simultaneously holding down UMENU, TENTER and Y on the projector, press and SON/STANDBY on , even if the power cord is reset. Handle 5 Insert the new lamp unit. • Press the lamp unit firmly into the AC socket of ...displayed, indicating that the lamp timer is connected to become damaged or explode. 1 Connect the power cord. • Plug the power cord into the lamp unit compartment. At this may cause the lamp to the projector. User service screw (for lamp unit cover) Info • Make sure to secure the lamp...
XR-1S , XR-1X Operation Manual
Page 64
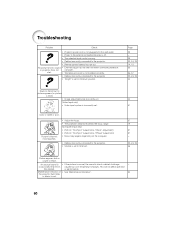
..." Adjustment) • Perform "Fine Sync" Adjustments ("Phase" Adjustment) • Noise may appear depending on • See "Maintenance Indicators". 54 the projector illuminates or blinks in red. 60 Page 25 - 29 23, 24, 25 14, 15 23 56, 57 23, 24, 25 40 Sound is ... set. (Video Input only) • Video input system is incorrectly set to the projector. • Volume is set . Troubleshooting Problem Check • Projector power cord is not plugged into the wall outlet. • Power to the external connected devices is off. • The selected input mode is wrong....
..." Adjustment) • Perform "Fine Sync" Adjustments ("Phase" Adjustment) • Noise may appear depending on • See "Maintenance Indicators". 54 the projector illuminates or blinks in red. 60 Page 25 - 29 23, 24, 25 14, 15 23 56, 57 23, 24, 25 40 Sound is ... set. (Video Input only) • Video input system is incorrectly set to the projector. • Volume is set . Troubleshooting Problem Check • Projector power cord is not plugged into the wall outlet. • Power to the external connected devices is off. • The selected input mode is wrong....

XR-1S , XR-1X Operation Manual
Page 67
... policy of continuous improvement, SHARP reserves the right to +...Power cord for U.S., Canada etc. (QACCDA029WJPZ), Power cord for Europe, except U.K. (QACCVA006WJPZ), Power cord for U.K., Hong Kong and Singapore (QACCBA015WJPZ), Power cord for product improvement without prior notice. Specifications Product type Projector Model XR-1X / XR-1S...XR-1S] 0.55" (13.7 mm) (8.2 [H] × 10.9 [W] mm), 1 chip SVGA DMD No. The performance specification figures indicated are nominal values of dots: [XR-1X] 786,432 dots (1,024 [H] × 768 [V]) [XR-1S] 480,000 dots (800 [H] × 600 [V]) Lens [XR...
... policy of continuous improvement, SHARP reserves the right to +...Power cord for U.S., Canada etc. (QACCDA029WJPZ), Power cord for Europe, except U.K. (QACCVA006WJPZ), Power cord for U.K., Hong Kong and Singapore (QACCBA015WJPZ), Power cord for product improvement without prior notice. Specifications Product type Projector Model XR-1X / XR-1S...XR-1S] 0.55" (13.7 mm) (8.2 [H] × 10.9 [W] mm), 1 chip SVGA DMD No. The performance specification figures indicated are nominal values of dots: [XR-1X] 786,432 dots (1,024 [H] × 768 [V]) [XR-1S] 480,000 dots (800 [H] × 600 [V]) Lens [XR...

XR-1S , XR-1X Operation Manual
Page 69
ADJ 43 Screen Size and Projection Distance (XR-1S) ... 20 Screen Size and Projection Distance (XR-1X) ... 19 Setup Guide 27 Sharp 40 Soft case 11 sRGB 42 STRETCH 30, 31 Supplied... noise 35, 51 Aspect ratio 30 AUDIO INPUT terminal 23, 24, 25 Auto Keystone Correction 44 Auto Power Off 48 Auto Search 47 Auto Sync (Auto Sync adjustment 32, 35, 51 AUTO SYNC button 32 ... button 26 Optional accessories 11 OSD Display 44 PDF 10 Phase 51 Picture Adjustment 40 Picture Mode 40 Power cord 25 PRJ - ADJ 47 PRJ Mode 46 Progressive 42 R CLICK/RETURN button 33 Rear adjustment foot 28...
ADJ 43 Screen Size and Projection Distance (XR-1S) ... 20 Screen Size and Projection Distance (XR-1X) ... 19 Setup Guide 27 Sharp 40 Soft case 11 sRGB 42 STRETCH 30, 31 Supplied... noise 35, 51 Aspect ratio 30 AUDIO INPUT terminal 23, 24, 25 Auto Keystone Correction 44 Auto Power Off 48 Auto Search 47 Auto Sync (Auto Sync adjustment 32, 35, 51 AUTO SYNC button 32 ... button 26 Optional accessories 11 OSD Display 44 PDF 10 Phase 51 Picture Adjustment 40 Picture Mode 40 Power cord 25 PRJ - ADJ 47 PRJ Mode 46 Progressive 42 R CLICK/RETURN button 33 Rear adjustment foot 28...


