
XR10S|XR10X|XR20S|XR20X Operation Manual
Page 1
MULTIMEDIA PROJECTOR MODEL XR-20X/XR-20S XR-10X/XR-10S OPERATION MANUAL Introduction Quick Start Setup Connections Basic Operation Useful Features Appendix
MULTIMEDIA PROJECTOR MODEL XR-20X/XR-20S XR-10X/XR-10S OPERATION MANUAL Introduction Quick Start Setup Connections Basic Operation Useful Features Appendix

XR10S|XR10X|XR20S|XR20X Operation Manual
Page 2
...fit an appropriate plug to the terminal which is marked with the letter N or coloured black. • The wire which is also indicated on page 10. DANGER: The fuse from the cut-off plug should the cut -off plug destroyed immediately and disposed of in a safe manner. Model No.: ...incorporating a 10A fuse. ii IMPORTANT • For your assistance in reporting the loss or theft of your Projector, please record the Model and Serial Number located on the bottom of the projector and retain this apparatus may occur. The mains lead of this product is fitted with the plug supplied, cut...
...fit an appropriate plug to the terminal which is marked with the letter N or coloured black. • The wire which is also indicated on page 10. DANGER: The fuse from the cut-off plug should the cut -off plug destroyed immediately and disposed of in a safe manner. Model No.: ...incorporating a 10A fuse. ii IMPORTANT • For your assistance in reporting the loss or theft of your Projector, please record the Model and Serial Number located on the bottom of the projector and retain this apparatus may occur. The mains lead of this product is fitted with the plug supplied, cut...
XR10S|XR10X|XR20S|XR20X Operation Manual
Page 5
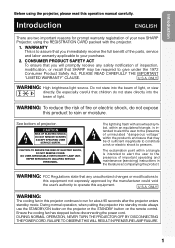
Be especially careful that SHARP may be required to run for prompt warranty registration of your purchase. 2. See bottom of inspection, modification, or recall that children do not expose this projector continues to give under the 1972 Consumer Product Safety Act, PLEASE READ CAREFULLY ...you immediately receive the full benefit of sufficient magnitude to constitute a risk or electric shock to your new SHARP Projector, using the projector, please read this equipment. Ensure the cooling fan has stopped before disconnecting the power cord. During normal operation, when ...
Be especially careful that SHARP may be required to run for prompt warranty registration of your purchase. 2. See bottom of inspection, modification, or recall that children do not expose this projector continues to give under the 1972 Consumer Product Safety Act, PLEASE READ CAREFULLY ...you immediately receive the full benefit of sufficient magnitude to constitute a risk or electric shock to your new SHARP Projector, using the projector, please read this equipment. Ensure the cooling fan has stopped before disconnecting the power cord. During normal operation, when ...

XR10S|XR10X|XR20S|XR20X Operation Manual
Page 6
U.S.A. ONLY Declaration of conformity SHARP PROJECTOR, MODEL XR-20X/XR-20S/XR-10X/XR-10S This device complies with Part 15 of the FCC Rules. Caution Concerning Lamp Replacement See "Replacing the Lamp" on the picture screen. ...such as large screen TVs, video systems and video cameras, there are designed to radio communications. This SHARP projector uses a DMD panel. This very sophisticated panel contains 786,432 (XR20X/XR-10X) / 480,000 (XR-20S/XR-10S) pixels (micromirrors). These limits are certain acceptable tolerances that to which may not cause harmful interference,...
U.S.A. ONLY Declaration of conformity SHARP PROJECTOR, MODEL XR-20X/XR-20S/XR-10X/XR-10S This device complies with Part 15 of the FCC Rules. Caution Concerning Lamp Replacement See "Replacing the Lamp" on the picture screen. ...such as large screen TVs, video systems and video cameras, there are designed to radio communications. This SHARP projector uses a DMD panel. This very sophisticated panel contains 786,432 (XR20X/XR-10X) / 480,000 (XR-20S/XR-10S) pixels (micromirrors). These limits are certain acceptable tolerances that to which may not cause harmful interference,...

XR10S|XR10X|XR20S|XR20X Operation Manual
Page 7
...used in the same manner. • In this operation manual, the illustration and the screen display are slightly different, depending on the projector. 1 Press BMENU. • The "Picture" menu screen for explanation, and may differ slightly from the actual display. For Future ...Q or O and select "Picture" to adjust. Example: "Picture" screen menu for setting up and operating the projector. However, you can also be performed by using the projector. Introduction How to Read this Operation Manual I The specifications are simplified for the selected input mode is displayed.
...used in the same manner. • In this operation manual, the illustration and the screen display are slightly different, depending on the projector. 1 Press BMENU. • The "Picture" menu screen for explanation, and may differ slightly from the actual display. For Future ...Q or O and select "Picture" to adjust. Example: "Picture" screen menu for setting up and operating the projector. However, you can also be performed by using the projector. Introduction How to Read this Operation Manual I The specifications are simplified for the selected input mode is displayed.

XR10S|XR10X|XR20S|XR20X Operation Manual
Page 8
... the Lamp Life Status 44 System Lock Function 44 Locking the Operation Buttons on 27 Turning the Power off (Putting the Projector into Standby Mode 27 Image Projection 28 About the Setup Guide 28 Adjusting the Projected Image 28 Switching the Input Mode 30... 4 IMPORTANT SAFEGUARDS 6 How to Access the PDF Operation Manuals 9 Accessories 10 Part Names and Functions 11 Inserting the Batteries 14 Usable Range 15 Quick Start Quick Start 16 Setup Setting up the Projector 18 Setting up the Projector 18 Standard Setup (Front Projection) ....... 18 Ceiling-mount Setup 18 Projection ...
... the Lamp Life Status 44 System Lock Function 44 Locking the Operation Buttons on 27 Turning the Power off (Putting the Projector into Standby Mode 27 Image Projection 28 About the Setup Guide 28 Adjusting the Projected Image 28 Switching the Input Mode 30... 4 IMPORTANT SAFEGUARDS 6 How to Access the PDF Operation Manuals 9 Accessories 10 Part Names and Functions 11 Inserting the Batteries 14 Usable Range 15 Quick Start Quick Start 16 Setup Setting up the Projector 18 Setting up the Projector 18 Standard Setup (Front Projection) ....... 18 Ceiling-mount Setup 18 Projection ...

XR10S|XR10X|XR20S|XR20X Operation Manual
Page 12
... direct sunlight or bright light. Be sure to occasionally rest your nearest Sharp Authorized Projector Dealer or Service Center for long hours will return the projector to avoid personal injury caused by a Sharp Authorized Projector Dealer or Service Center. I The storage temperature of lamp rupture, contact ...at least 10 minutes. Caution concerning the lamp unit I Be sure that it is from the wall outlet and wait at altitudes of the adjustment foot. 8 Avoid locations with thin air, set up the projector in a high position I Place the projector on the projector. I ...
... direct sunlight or bright light. Be sure to occasionally rest your nearest Sharp Authorized Projector Dealer or Service Center for long hours will return the projector to avoid personal injury caused by a Sharp Authorized Projector Dealer or Service Center. I The storage temperature of lamp rupture, contact ...at least 10 minutes. Caution concerning the lamp unit I Be sure that it is from the wall outlet and wait at altitudes of the adjustment foot. 8 Avoid locations with thin air, set up the projector in a high position I Place the projector on the projector. I ...

XR10S|XR10X|XR20S|XR20X Operation Manual
Page 13
...supply voltage and the shape of the fan may change during projection or cooling fan operation. Other connected equipment I Do not expose the projector to direct sunlight or place next to heat sources. visual equipment to changes in . Info • The cooling fan regulates the internal...Please read the operation manuals of the folder) that you need to make the connections AFTER unplugging the power cord of the projector I When storing the projector, re-attach the lens cap. (See page 11). Doing so may vary depending on the circumstances and the internal temperature....
...supply voltage and the shape of the fan may change during projection or cooling fan operation. Other connected equipment I Do not expose the projector to direct sunlight or place next to heat sources. visual equipment to changes in . Info • The cooling fan regulates the internal...Please read the operation manuals of the folder) that you need to make the connections AFTER unplugging the power cord of the projector I When storing the projector, re-attach the lens cap. (See page 11). Doing so may vary depending on the circumstances and the internal temperature....
XR10S|XR10X|XR20S|XR20X Operation Manual
Page 14
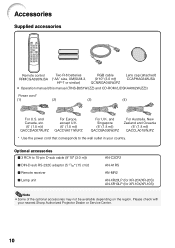
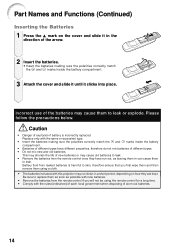
Accessories Supplied accessories Remote control Two R-6 batteries RGB cable RRMCGA398WJSA ("AA" size, UM/SUM-3, (9'10" (3.0 m)) HP-7 or similar) QCNWGA045WJPZ Lens cap (attached) CCAPHA024WJSA • Operation manual (this manual (TINS-B851WJZZ) and CD-ROM (UDSKAA062WJZZ)) Power cord* (1) (2) (3)...receiver I 3 RCA to the wall outlet in your nearest Sharp Authorized Projector Dealer or Service Center. 10 Optional accessories I Lamp unit AN-C3CP2 AN-A1RS AN-MR2 AN-XR20LP (for XR-20X/XR-20S) AN-XR10LP (for XR-10X/XR-10S) Note • Some of the optional accessories may not ...
Accessories Supplied accessories Remote control Two R-6 batteries RGB cable RRMCGA398WJSA ("AA" size, UM/SUM-3, (9'10" (3.0 m)) HP-7 or similar) QCNWGA045WJPZ Lens cap (attached) CCAPHA024WJSA • Operation manual (this manual (TINS-B851WJZZ) and CD-ROM (UDSKAA062WJZZ)) Power cord* (1) (2) (3)...receiver I 3 RCA to the wall outlet in your nearest Sharp Authorized Projector Dealer or Service Center. 10 Optional accessories I Lamp unit AN-C3CP2 AN-A1RS AN-MR2 AN-XR20LP (for XR-20X/XR-20S) AN-XR10LP (for XR-10X/XR-10S) Note • Some of the optional accessories may not ...

XR10S|XR10X|XR20S|XR20X Operation Manual
Page 15
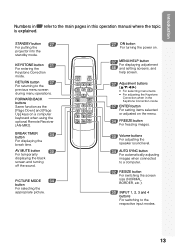
Introduction Part Names and Functions Numbers in this operation manual where the topic is explained. Projector Top View Power indicator 27, 48 STANDBY/ON 27 button For turning the power on the menu. KEYSTONE 31 button For entering the Keystone Correction ... cap to the main pages in Z refer to attach or remove. 11 ENTER button 37 For setting items selected or adjusted on and putting the projector into standby mode.
Introduction Part Names and Functions Numbers in this operation manual where the topic is explained. Projector Top View Power indicator 27, 48 STANDBY/ON 27 button For turning the power on the menu. KEYSTONE 31 button For entering the Keystone Correction ... cap to the main pages in Z refer to attach or remove. 11 ENTER button 37 For setting items selected or adjusted on and putting the projector into standby mode.

XR10S|XR10X|XR20S|XR20X Operation Manual
Page 16
... INPUT 1 and 2) Terminal for connecting a monitor. 24 INPUT 3 terminal Terminal for use it to secure the projector. 12 Intake vent 47 26 RS-232C terminal Terminal for controlling the projector using a computer. 24 AUDIO (INPUT 25 3, 4) terminal (Shared for INPUT 3 and 4) 25 INPUT 4...Kensington Security 26 AC socket Standard connector Connect the supplied Power cord. Using the Kensington Lock • This projector has a Kensington Security Standard connector for connecting video equipment with a Kensington MicroSaver Security System. Refer to use with an S-video ...
... INPUT 1 and 2) Terminal for connecting a monitor. 24 INPUT 3 terminal Terminal for use it to secure the projector. 12 Intake vent 47 26 RS-232C terminal Terminal for controlling the projector using a computer. 24 AUDIO (INPUT 25 3, 4) terminal (Shared for INPUT 3 and 4) 25 INPUT 4...Kensington Security 26 AC socket Standard connector Connect the supplied Power cord. Using the Kensington Lock • This projector has a Kensington Security Standard connector for connecting video equipment with a Kensington MicroSaver Security System. Refer to use with an S-video ...
XR10S|XR10X|XR20S|XR20X Operation Manual
Page 17
STANDBY button 27 For putting the projector into the standby mode. KEYSTONE button 31 For entering the Keystone Correction mode. BREAK TIMER 34 button For displaying the break time. RETURN button 37 ...
STANDBY button 27 For putting the projector into the standby mode. KEYSTONE button 31 For entering the Keystone Correction mode. BREAK TIMER 34 button For displaying the break time. RETURN button 37 ...
XR10S|XR10X|XR20S|XR20X Operation Manual
Page 18
... precautions below. Battery fluid from the remote control if you first wipe them and then remove them using a cloth. • The batteries included with this projector may cause them to skin, therefore ensure that you will not be using the remote control for a long time. • Comply with the same or...
... precautions below. Battery fluid from the remote control if you first wipe them and then remove them using a cloth. • The batteries included with this projector may cause them to skin, therefore ensure that you will not be using the remote control for a long time. • Comply with the same or...
XR10S|XR10X|XR20S|XR20X Operation Manual
Page 19
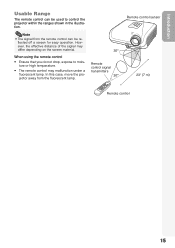
... from the remote control can be re- When using the remote control • Ensure that you do not drop, expose to control the projector within the ranges shown in the illustration. Introduction Usable Range The remote control can be used to mois- flected off a screen for easy operation. ture ...
... from the remote control can be re- When using the remote control • Ensure that you do not drop, expose to control the projector within the ranges shown in the illustration. Introduction Usable Range The remote control can be used to mois- flected off a screen for easy operation. ture ...

XR10S|XR10X|XR20S|XR20X Operation Manual
Page 20
...screen _P. 18 2. Remove the lens cap and turn the projector on On the projector On the remote control _P. 27 16 Connect the projector to the computer and plug the power cord into the AC socket of the projector and the computer is explained using one example. 3 8 ...ring 4 HEIGHT ADJUST lever 6 INPUT 1 button 1. Quick Start This section shows the basic operation (projector connecting with the computer). Setup and Projection In this section, connection of the projector When connecting equipment other than the computer, see the page described below for each step. For details,...
...screen _P. 18 2. Remove the lens cap and turn the projector on On the projector On the remote control _P. 27 16 Connect the projector to the computer and plug the power cord into the AC socket of the projector and the computer is explained using one example. 3 8 ...ring 4 HEIGHT ADJUST lever 6 INPUT 1 button 1. Quick Start This section shows the basic operation (projector connecting with the computer). Setup and Projection In this section, connection of the projector When connecting equipment other than the computer, see the page described below for each step. For details,...

XR10S|XR10X|XR20S|XR20X Operation Manual
Page 21
...) and screen size, press TENTER to put the projector into standby mode. On the remote control _P. 31 8. On the On the remote On-screen display (RGB) projector control • When pressing the INPUT button on XR-20X.) On the projector Shrinks upper side. Turn the Power off Press the... STANDBY/ON button on the projector or the STANDBY button on 6. Turn the computer on the remote ...
...) and screen size, press TENTER to put the projector into standby mode. On the remote control _P. 31 8. On the On the remote On-screen display (RGB) projector control • When pressing the INPUT button on XR-20X.) On the projector Shrinks upper side. Turn the Power off Press the... STANDBY/ON button on the projector or the STANDBY button on 6. Turn the computer on the remote ...

XR10S|XR10X|XR20S|XR20X Operation Manual
Page 22
... extension tubes (for this function. 18 See page 42 for use the optional Sharp ceiling-mount bracket for countries other than the U.S.A.). Before mounting the projector, contact your nearest Sharp Authorized Projector Dealer or Service Center to page 20 for Keystone correction and provide the best...PRJ Mode". Doing so will eliminate the need for additional information concerning "Screen Size and Projection Distance". I Place the projector at the required distance from the screen according to the desired picture size. (See page 20.) Example of this installation. Setting up the...
... extension tubes (for this function. 18 See page 42 for use the optional Sharp ceiling-mount bracket for countries other than the U.S.A.). Before mounting the projector, contact your nearest Sharp Authorized Projector Dealer or Service Center to page 20 for Keystone correction and provide the best...PRJ Mode". Doing so will eliminate the need for additional information concerning "Screen Size and Projection Distance". I Place the projector at the required distance from the screen according to the desired picture size. (See page 20.) Example of this installation. Setting up the...

XR10S|XR10X|XR20S|XR20X Operation Manual
Page 23
Projection (PRJ) Mode The projector can use . (You can set the PRJ mode in the diagram below. See page 42.) I Table mounted, front projection I Ceiling mounted, front projection Setup Menu ...
Projection (PRJ) Mode The projector can use . (You can set the PRJ mode in the diagram below. See page 42.) I Table mounted, front projection I Ceiling mounted, front projection Setup Menu ...

XR10S|XR10X|XR20S|XR20X Operation Manual
Page 24
... (20Љ) 9.5 m (31Ј 1Љ) 11.0 m (36Ј 0Љ) 8.5 m (28Ј 0Љ) 9.9 m (32Ј 5Љ) 7.6 m (24Ј 11Љ) 8.8 m (28Ј 10Љ) 5.7 m (18Ј 8Љ) 6.6 m (21Ј 7Љ) 5.0 m (16Ј 7Љ) 5.8 m (19Ј 2Љ) 4.0 m (13Ј 2Љ) 4.7 m (15Ј 3Љ) ...bottom of the image (H)". • There are some errors in the values in ) See page 41. Setting up the Projector (Continued) Screen Size and Projection Distance NORMAL Mode (4:3) Picture (Screen) size Diag. [χ] Width Height Projection distance ...
... (20Љ) 9.5 m (31Ј 1Љ) 11.0 m (36Ј 0Љ) 8.5 m (28Ј 0Љ) 9.9 m (32Ј 5Љ) 7.6 m (24Ј 11Љ) 8.8 m (28Ј 10Љ) 5.7 m (18Ј 8Љ) 6.6 m (21Ј 7Љ) 5.0 m (16Ј 7Љ) 5.8 m (19Ј 2Љ) 4.0 m (13Ј 2Љ) 4.7 m (15Ј 3Љ) ...bottom of the image (H)". • There are some errors in the values in ) See page 41. Setting up the Projector (Continued) Screen Size and Projection Distance NORMAL Mode (4:3) Picture (Screen) size Diag. [χ] Width Height Projection distance ...

XR10S|XR10X|XR20S|XR20X Operation Manual
Page 25
... INPUT 3 terminal Connecting video equipment with S-video output terminal (VCR, DVD player, etc.). (See page 24.) RS-232C terminal Connecting the computer to control the projector. (See page 26.) AUDIO OUTPUT terminal Connecting to an amplifier or other audio equipment with ø3.5 mm minijack plug to connect to simultaneously watch the...
... INPUT 3 terminal Connecting video equipment with S-video output terminal (VCR, DVD player, etc.). (See page 24.) RS-232C terminal Connecting the computer to control the projector. (See page 26.) AUDIO OUTPUT terminal Connecting to an amplifier or other audio equipment with ø3.5 mm minijack plug to connect to simultaneously watch the...


