

XL-S10 Operation Manual
Page 7
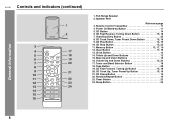
...Eject Button 20, 21, 22 21. CD Repeat Play Indicator 16 28. FM/AM Loop Antenna Jack 9 35. Power On/Stand-by Button 11 3. Memory/Set Button 17, 19 7. CD Track Down or Fast Reverse, Tuner Preset Down Button 15, 19 15. Volume Indicator 12 23. CD Play Indicator 14... 29. FM Stereo Receiving Indicator 18 34. Subwoofer Pre-output Jack 26 37. AC Power Cord 10 General Information XL-S10 7 Clear Button 17, 19 8. Tape Rewind Button 20 19. Equalizer Indicator 12 24. CD Random Play Indicator 16 31. CD Compartment 14 2. Volume ...
...Eject Button 20, 21, 22 21. CD Repeat Play Indicator 16 28. FM/AM Loop Antenna Jack 9 35. Power On/Stand-by Button 11 3. Memory/Set Button 17, 19 7. CD Track Down or Fast Reverse, Tuner Preset Down Button 15, 19 15. Volume Indicator 12 23. CD Play Indicator 14... 29. FM Stereo Receiving Indicator 18 34. Subwoofer Pre-output Jack 26 37. AC Power Cord 10 General Information XL-S10 7 Clear Button 17, 19 8. Tape Rewind Button 20 19. Equalizer Indicator 12 24. CD Random Play Indicator 16 31. CD Compartment 14 2. Volume ...
XL-S10 Operation Manual
Page 8
CD Button 14 6. Memory Button 13, 17, 19 12. Clock Button 13 14. Tuner and Band Selector Button 18 18. Sleep Button 24 8 Remote Control Transmitter 11 4. Bass Up ... 23. Timer Button 23 24. Treble Up and Down Buttons 12 15. Tape Button 20 19. CD Fast Forward, Tuning Up Button 15, 18 20. XL-S10 Controls and indicators (continued) General Information 1 2 3 4 17 5 18 6 19 7 20 8 9 21 10 11 22 12 23 13 24 14 15 16 1. CD Track Down, Tuner...
CD Button 14 6. Memory Button 13, 17, 19 12. Clock Button 13 14. Tuner and Band Selector Button 18 18. Sleep Button 24 8 Remote Control Transmitter 11 4. Bass Up ... 23. Timer Button 23 24. Treble Up and Down Buttons 12 15. Tape Button 20 19. CD Fast Forward, Tuning Up Button 15, 18 20. XL-S10 Controls and indicators (continued) General Information 1 2 3 4 17 5 18 6 19 7 20 8 9 21 10 11 22 12 23 13 24 14 15 16 1. CD Track Down, Tuner...
XL-S10 Operation Manual
Page 13
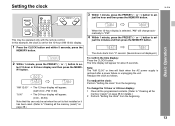
...(AM 12:00 - The time display will appear for the 12-hour (AM 12:00) display. 1 Press the CLOCK button and within 5 seconds, press the MEMORY button. 2 Within 1 minute, press the PRESET ( or ) button to ad- Readjust the clock as follows. "AM 12:00" The 12-hour display will...(Seconds are not displayed.) To confirm the time display: Press the CLOCK button. lect 12-hour or 24-hour display and then press the MEMORY button. To change automatically to "PM". 4 Within 1 minute, press the PRESET ( or ) button to se- XL-S10 Basic Operation This may be set for about 5 seconds.
...(AM 12:00 - The time display will appear for the 12-hour (AM 12:00) display. 1 Press the CLOCK button and within 5 seconds, press the MEMORY button. 2 Within 1 minute, press the PRESET ( or ) button to ad- Readjust the clock as follows. "AM 12:00" The 12-hour display will...(Seconds are not displayed.) To confirm the time display: Press the CLOCK button. lect 12-hour or 24-hour display and then press the MEMORY button. To change automatically to "PM". 4 Within 1 minute, press the PRESET ( or ) button to se- XL-S10 Basic Operation This may be set for about 5 seconds.
XL-S10 Operation Manual
Page 17
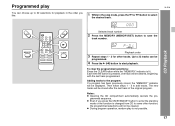
...steps 1 - 2 for playback in the stop mode, press the or button to the program: If a program has been previously stored, the "MEMORY" indicator will be displayed. grammed sequence. ! Up to 32 tracks can choose up to enter the stand-by mode or the function is pressed... track programmed. To clear the programmed selections: Press the CLEAR button while the "MEMORY" indicator is not possible. 17 Then follow steps 1 - 2 to save the track number. XL-S10 Selected track number 2 Press the MEMORY (MEMORY/SET) button to add tracks. During program operation, random play You can be ...
...steps 1 - 2 for playback in the stop mode, press the or button to the program: If a program has been previously stored, the "MEMORY" indicator will be displayed. grammed sequence. ! Up to 32 tracks can choose up to enter the stand-by mode or the function is pressed... track programmed. To clear the programmed selections: Press the CLEAR button while the "MEMORY" indicator is not possible. 17 Then follow steps 1 - 2 to save the track number. XL-S10 Selected track number 2 Press the MEMORY (MEMORY/SET) button to add tracks. During program operation, random play You can be ...
XL-S10 Operation Manual
Page 19
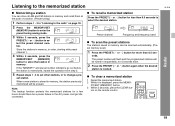
... step 2. 5 Repeat steps 1 - 4 to set station. If the "MEMORY" and preset number indicators go out before the station is stored in memory, the station previously memorized will be erased. Radio XL-S10 19 The preset number will flash and the programmed stations will be tuned in ... seconds, press the PRESET ( or ) button to store that station in order, starting with preset channel 1. 4 Within 5 seconds, press the MEMORY/SET (MEMORY) button to select the preset channel number. onds. Listening to the memorized station " Memorizing a station You can be a power failure or the ...
... step 2. 5 Repeat steps 1 - 4 to set station. If the "MEMORY" and preset number indicators go out before the station is stored in memory, the station previously memorized will be erased. Radio XL-S10 19 The preset number will flash and the programmed stations will be tuned in ... seconds, press the PRESET ( or ) button to store that station in order, starting with preset channel 1. 4 Within 5 seconds, press the MEMORY/SET (MEMORY) button to select the preset channel number. onds. Listening to the memorized station " Memorizing a station You can be a power failure or the ...
XL-S10 Operation Manual
Page 23
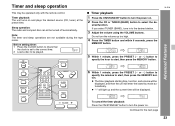
XL-S10 Advanced Features 6 Within 1 minute, press the PRESET ( or ) button to specify the minutes to start , then press the MEMORY button. Before setting timer: 1 Press the CLOCK button to check that the clock is set to the correct time. 2 Load a disc to the desired station. 3... and the current time will enter the stand-by mode automatically. ! " " will light up too high. 4 Press the TIMER button and within 6 seconds, press the MEMORY button. 5 Within 1 minute, press the PRESET ( or ) button to specify the hour to select the de- " Timer playback 1 Press the ON/STAND-BY button...
XL-S10 Advanced Features 6 Within 1 minute, press the PRESET ( or ) button to specify the minutes to start , then press the MEMORY button. Before setting timer: 1 Press the CLOCK button to check that the clock is set to the correct time. 2 Load a disc to the desired station. 3... and the current time will enter the stand-by mode automatically. ! " " will light up too high. 4 Press the TIMER button and within 6 seconds, press the MEMORY button. 5 Within 1 minute, press the PRESET ( or ) button to specify the hour to select the de- " Timer playback 1 Press the ON/STAND-BY button...
XL-S10 Operation Manual
Page 28
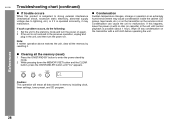
...mode. 2 While pressing down the MEMORY/SET button and the CLEAR button, press the ON/STAND-BY button until normal playback is operated incorrectly, it . " Condensation Sudden temperature changes, storage or operation in an extremely humid environment may malfunction. XL-S10 Troubleshooting chart (continued) " If ... then turn the power on the transmitter with no disc (or cassette) in memory including clock, timer settings, tuner preset, and CD program. 28 References Caution: This operation will erase all the memory (reset) 1 Press the ON/STAND-BY button to lightning, etc.) or ...
...mode. 2 While pressing down the MEMORY/SET button and the CLEAR button, press the ON/STAND-BY button until normal playback is operated incorrectly, it . " Condensation Sudden temperature changes, storage or operation in an extremely humid environment may malfunction. XL-S10 Troubleshooting chart (continued) " If ... then turn the power on the transmitter with no disc (or cassette) in memory including clock, timer settings, tuner preset, and CD program. 28 References Caution: This operation will erase all the memory (reset) 1 Press the ON/STAND-BY button to lightning, etc.) or ...