XL-ES5 | XL-ES50 Operation Manual
Page 2
... the appliance. 0012 WARNING: TO REDUCE THE RISK OF FIRE OR ELECTRIC SHOCK, DO NOT EXPOSE THIS APPLIANCE TO RAIN OR MOISTURE. 0012 Caution - NO USER-SERVICEABLE PARTS INSIDE. Model number Serial number Date of purchase Place of electric shock to Part 15 of important operating and maintenance (servicing) instructions in a particular installation.
... the appliance. 0012 WARNING: TO REDUCE THE RISK OF FIRE OR ELECTRIC SHOCK, DO NOT EXPOSE THIS APPLIANCE TO RAIN OR MOISTURE. 0012 Caution - NO USER-SERVICEABLE PARTS INSIDE. Model number Serial number Date of purchase Place of electric shock to Part 15 of important operating and maintenance (servicing) instructions in a particular installation.
XL-ES5 | XL-ES50 Operation Manual
Page 3
... for future reference. 3 Heed Warnings - For products intended to . 11 Power Sources - See Instruction Manual for replacement or resetting of the plug is operated. 2 Retain Instructions - All warnings on the product and in a wet basement; Use a damp cloth for ex- uct manufacturer as they exit from the product. 14 Protective Attachment Plug - Slots and openings in installation such as the original plug. If you are unable to...
... for future reference. 3 Heed Warnings - For products intended to . 11 Power Sources - See Instruction Manual for replacement or resetting of the plug is operated. 2 Retain Instructions - All warnings on the product and in a wet basement; Use a damp cloth for ex- uct manufacturer as they exit from the product. 14 Protective Attachment Plug - Slots and openings in installation such as the original plug. If you are unable to...
XL-ES5 | XL-ES50 Operation Manual
Page 4
... disconnect the antenna or cable system. The product should be sure the service technician has used replacement parts specified by following conditions: a) When the power-supply cord or plug is in performance - For added protection for long periods of other controls may result in damage and will prevent damage to the product due to lightning and power-line surges. 17 Power Lines - When installing an outside antenna system, extreme...
... disconnect the antenna or cable system. The product should be sure the service technician has used replacement parts specified by following conditions: a) When the power-supply cord or plug is in performance - For added protection for long periods of other controls may result in damage and will prevent damage to the product due to lightning and power-line surges. 17 Power Lines - When installing an outside antenna system, extreme...
XL-ES5 | XL-ES50 Operation Manual
Page 5
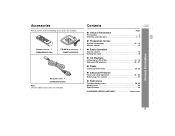
... Use System connections 10 - 12 Remote control 13 „ Basic Operation General control 14 Setting the clock 15 „ CD Playback Listening to a CD (CDs 16 - 18 Advanced CD playback 19 - 21 „ Radio Listening to the radio 22, 23 „ Advanced Features Timer and sleep operation 24 - 26 Enhancing your system 27 „ References Troubleshooting chart 28, 29 Maintenance 29 Specifications 30 CONSUMER LIMITED WARRANTY Back cover General Information XL...
... Use System connections 10 - 12 Remote control 13 „ Basic Operation General control 14 Setting the clock 15 „ CD Playback Listening to a CD (CDs 16 - 18 Advanced CD playback 19 - 21 „ Radio Listening to the radio 22, 23 „ Advanced Features Timer and sleep operation 24 - 26 Enhancing your system 27 „ References Troubleshooting chart 28, 29 Maintenance 29 Specifications 30 CONSUMER LIMITED WARRANTY Back cover General Information XL...
XL-ES5 | XL-ES50 Operation Manual
Page 6
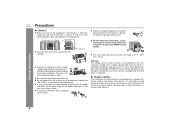
.... Refer internal service to high volume levels, which occurs while turning the unit on with the volume control setting up high, or while continually listening at high volumes. 6 z If your system does not work properly, disconnect the AC power cord from the AC outlet, as this unit. z Do not remove the outer cover, as pulling the cord can damage internal wires. Using this unit with...
.... Refer internal service to high volume levels, which occurs while turning the unit on with the volume control setting up high, or while continually listening at high volumes. 6 z If your system does not work properly, disconnect the AC power cord from the AC outlet, as this unit. z Do not remove the outer cover, as pulling the cord can damage internal wires. Using this unit with...
XL-ES5 | XL-ES50 Operation Manual
Page 7
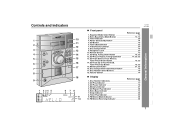
... 1. Extra Bass/Demo Mode Button 12, 14 3. Video/Auxiliary Button 27 8. Headphone Jack 27 10. CD Track Down or Fast Reverse, Tuner Preset Down Button 18, 23 14. Disc Compartment Open/Close Button 16 17. Volume Control 14 „ Display Reference page 1. CD Pause Indicator 18 4. Power On/Stand-by Button 14 5. Disc Compartment 16 9. CD Stop, Tuning Down Button 18, 22 12. CD Repeat Play Indicator 20 6. CD Button 16 6. Memory/Set Button 21, 23 16. Disc Number Select Buttons 19 18. Timer Play Indicator...
... 1. Extra Bass/Demo Mode Button 12, 14 3. Video/Auxiliary Button 27 8. Headphone Jack 27 10. CD Track Down or Fast Reverse, Tuner Preset Down Button 18, 23 14. Disc Compartment Open/Close Button 16 17. Volume Control 14 „ Display Reference page 1. CD Pause Indicator 18 4. Power On/Stand-by Button 14 5. Disc Compartment 16 9. CD Stop, Tuning Down Button 18, 22 12. CD Repeat Play Indicator 20 6. CD Button 16 6. Memory/Set Button 21, 23 16. Disc Number Select Buttons 19 18. Timer Play Indicator...

XL-ES5 | XL-ES50 Operation Manual
Page 8
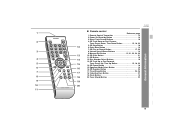
FM/AM Loop Antenna Jack 11 4. Super Tweeter 2. Bass Reflex Duct 3 4. Woofer 3. XL-ES5 XL-ES50 Controls and indicators (continued) 1 3 4 2 5 „ Rear panel Reference page 1. Sub Duct Pipe 2 2. AC Power Input Jack 12 2. Speaker Terminals 11 3. Video/Auxiliary (Audio Signal) Input Jacks 27 5. Speaker Wire 3 Note: The speaker grilles are not removable. Cooling Fan 12 General Information 1 2 1 8 „ Front speaker 1. Speaker Wire 4 „ Subwoofer 1. Subwoofer 3.
FM/AM Loop Antenna Jack 11 4. Super Tweeter 2. Bass Reflex Duct 3 4. Woofer 3. XL-ES5 XL-ES50 Controls and indicators (continued) 1 3 4 2 5 „ Rear panel Reference page 1. Sub Duct Pipe 2 2. AC Power Input Jack 12 2. Speaker Terminals 11 3. Video/Auxiliary (Audio Signal) Input Jacks 27 5. Speaker Wire 3 Note: The speaker grilles are not removable. Cooling Fan 12 General Information 1 2 1 8 „ Front speaker 1. Speaker Wire 4 „ Subwoofer 1. Subwoofer 3.
XL-ES5 | XL-ES50 Operation Manual
Page 9
... 6. Extra Bass Button 14 7. Volume Up and Down Buttons 14 9. Clock Button 15 18 20. Disc Number Select Buttons 19 13. Timer/Sleep Button 24, 26 17 18. Direct Track Search Buttons 19 2 4. Memory/Set Button 15, 21, 23, 24, 26 13 10. XL-ES5 XL-ES50 General Information „ Remote control 1 Reference page 1. CD Button 16 4 14 12. Equalizer Mode Select Button 14 16. CD Pause Button 18 6 16 15. Power On/Stand-by Button 14 3. Remote Control Transmitter...
... 6. Extra Bass Button 14 7. Volume Up and Down Buttons 14 9. Clock Button 15 18 20. Disc Number Select Buttons 19 13. Timer/Sleep Button 24, 26 17 18. Direct Track Search Buttons 19 2 4. Memory/Set Button 15, 21, 23, 24, 26 13 10. XL-ES5 XL-ES50 General Information „ Remote control 1 Reference page 1. CD Button 16 4 14 12. Equalizer Mode Select Button 14 16. CD Pause Button 18 6 16 15. Power On/Stand-by Button 14 3. Remote Control Transmitter...

XL-ES5 | XL-ES50 Operation Manual
Page 11
... speaker Subwoofer (right) Front speaker (left channels. z Do not mistake the right and the left ) XL-ES5 XL-ES50 Preparation for Use Notes: z Placing the antenna on a shelf, or attach it to a stand or a wall. „ Speaker connection Connect the black wire to the minus (-) terminal, and the red wire to the wall > Red Black Caution: z Use speakers with an impedance of 6 ohms or more, as this may cause trouble...
... speaker Subwoofer (right) Front speaker (left channels. z Do not mistake the right and the left ) XL-ES5 XL-ES50 Preparation for Use Notes: z Placing the antenna on a shelf, or attach it to a stand or a wall. „ Speaker connection Connect the black wire to the minus (-) terminal, and the red wire to the wall > Red Black Caution: z Use speakers with an impedance of 6 ohms or more, as this may cause trouble...
XL-ES5 | XL-ES50 Operation Manual
Page 12
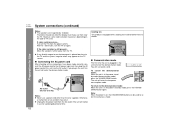
XL-ES5 XL-ES50 System connections (continued) Preparation for better heat radiation. „ Demonstration mode The first time the unit is plugged in the power stand-by mode, press the X-BASS/ DEMO button again. Therefore, they do not affect the display even if you plug in the power standby mode (demonstration mode), press the X-BASS/DEMO button. After 15 - 30 minutes, turn the TV on , the X-BASS/DEMO button can be in use for a prolonged period of TV...
XL-ES5 XL-ES50 System connections (continued) Preparation for better heat radiation. „ Demonstration mode The first time the unit is plugged in the power stand-by mode, press the X-BASS/ DEMO button again. Therefore, they do not affect the display even if you plug in the power standby mode (demonstration mode), press the X-BASS/DEMO button. After 15 - 30 minutes, turn the TV on , the X-BASS/DEMO button can be in use for a prolonged period of TV...

XL-ES5 | XL-ES50 Operation Manual
Page 13
... to the direction indicated in the battery compartment. z Exposing the sensor on the unit. This will not be used for battery use: z Replace all the connections (see pages 10 - 12). The remote control can enjoy music. z Do not mix old and new batteries. XL-ES5 XL-ES50 Preparation for Use Precautions for long periods of time. Batteries are not included. 1 Remove the battery cover. 2 Insert the batteries according to battery leakage...
... to the direction indicated in the battery compartment. z Exposing the sensor on the unit. This will not be used for battery use: z Replace all the connections (see pages 10 - 12). The remote control can enjoy music. z Do not mix old and new batteries. XL-ES5 XL-ES50 Preparation for Use Precautions for long periods of time. Batteries are not included. 1 Remove the battery cover. 2 Insert the batteries according to battery leakage...
XL-ES5 | XL-ES50 Operation Manual
Page 14
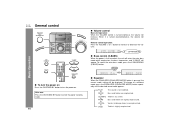
... X-BASS/DEMO (X-BASS) button. After use: Press the ON/STAND-BY button to turn the power on , the unit will enter the extra bass mode which emphasizes the bass frequencies, and "X-BASS" will be displayed. To change to increase or decrease the volume. 0 ..... 30 MAXIMUM „ Bass control (X-BASS) When the power is first turned on . JAZZ Treble is pressed, the current mode setting will appear. XL-ES5 XL-ES50 General control „ Volume control Main unit operation: When...
... X-BASS/DEMO (X-BASS) button. After use: Press the ON/STAND-BY button to turn the power on , the unit will enter the extra bass mode which emphasizes the bass frequencies, and "X-BASS" will be displayed. To change to increase or decrease the volume. 0 ..... 30 MAXIMUM „ Bass control (X-BASS) When the power is first turned on . JAZZ Treble is pressed, the current mode setting will appear. XL-ES5 XL-ES50 General control „ Volume control Main unit operation: When...

XL-ES5 | XL-ES50 Operation Manual
Page 18
... the power is damaged, dirty, or loaded upside down and fast forward/fast reverse are possible only within one disc tray. Press and hold down Fast forward/Fast reverse Press in the playback or stop mode. If you press the button in the playback mode. XL-ES5 XL-ES50 Listening to a CD (CDs) (continued) „ Various CD functions Function Play Main unit Remote control Operation Press...
... the power is damaged, dirty, or loaded upside down and fast forward/fast reverse are possible only within one disc tray. Press and hold down Fast forward/Fast reverse Press in the playback or stop mode. If you press the button in the playback mode. XL-ES5 XL-ES50 Listening to a CD (CDs) (continued) „ Various CD functions Function Play Main unit Remote control Operation Press...

XL-ES5 | XL-ES50 Operation Manual
Page 19
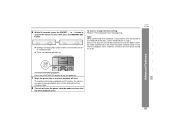
... times. 2 Press the "0" button. For example, to number 9. Advanced CD playback „ To play from a specified disc You can be selected. z Playback will go out. Selected track number XL-ES5 XL-ES50 CD Playback Selected disc number 2 Press the / button. Notes: z A track number higher than the number of the 1 - 5 buttons to select the desired track while playing the selected disc. Use the direct search buttons on the remote control to select the desired disc. „ Direct...
... times. 2 Press the "0" button. For example, to number 9. Advanced CD playback „ To play from a specified disc You can be selected. z Playback will go out. Selected track number XL-ES5 XL-ES50 CD Playback Selected disc number 2 Press the / button. Notes: z A track number higher than the number of the 1 - 5 buttons to select the desired track while playing the selected disc. Use the direct search buttons on the remote control to select the desired disc. „ Direct...

XL-ES5 | XL-ES50 Operation Manual
Page 24
... the clock is dis- Do not turn the power on and plays the desired source (CD, tuner) at the preset time. XL-ES5 XL-ES50 Timer and sleep operation Timer playback: The unit turns on . 2 Press the CD or TUNER (BAND) button to select the de- Sleep operation: The radio and compact disc can all be played. 1 Press the ON/STAND-BY button to turn the volume up too high. 4 Press the TIMER/SLEEP button repeatedly until " " is set to...
... the clock is dis- Do not turn the power on and plays the desired source (CD, tuner) at the preset time. XL-ES5 XL-ES50 Timer and sleep operation Timer playback: The unit turns on . 2 Press the CD or TUNER (BAND) button to select the de- Sleep operation: The radio and compact disc can all be played. 1 Press the ON/STAND-BY button to turn the volume up too high. 4 Press the TIMER/SLEEP button repeatedly until " " is set to...
XL-ES5 | XL-ES50 Operation Manual
Page 25
... using another unit connected to start . It will enter the power stand-by mode one hour after the playback starts. To reset or change the timer setting: Perform "Timer playback" from the beginning. 6 Within 30 seconds, press the PRESET ( or ) button to specify the minute to the VIDEO/AUX IN jacks, select "VIDEO/AUX" in order and the unit will not be turned on or enter the power standby mode automatically. XL-ES5 XL-ES50...
... using another unit connected to start . It will enter the power stand-by mode one hour after the playback starts. To reset or change the timer setting: Perform "Timer playback" from the beginning. 6 Within 30 seconds, press the PRESET ( or ) button to specify the minute to the VIDEO/AUX IN jacks, select "VIDEO/AUX" in order and the unit will not be turned on or enter the power standby mode automatically. XL-ES5 XL-ES50...

XL-ES5 | XL-ES50 Operation Manual
Page 27
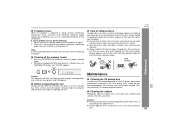
.... 2 Press the ON/STAND-BY button to the VIDEO/AUX IN jacks. The recommended impedance is not included. White Red White To the line output jacks Red „ Listening to connect the VCR, DVD, etc. Purchase a commercially available cord as shown below. When using the VOLUME control. VCR, DVD, etc. to turn the power on. 3 Press the VIDEO/AUX button. 4 Play the connected equipment. Advanced Features XL-ES5 XL-ES50 27 Enhancing your headphones have...
.... 2 Press the ON/STAND-BY button to the VIDEO/AUX IN jacks. The recommended impedance is not included. White Red White To the line output jacks Red „ Listening to connect the VCR, DVD, etc. Purchase a commercially available cord as shown below. When using the VOLUME control. VCR, DVD, etc. to turn the power on. 3 Press the VIDEO/AUX button. 4 Play the connected equipment. Advanced Features XL-ES5 XL-ES50 27 Enhancing your headphones have...

XL-ES5 | XL-ES50 Operation Manual
Page 28
...? „ Remote control Symptom z The remote control does not operate. If this product, check the following before operating the unit. 28 z Is the volume level set to page 29.) z No sound is not set to the z Did a power failure occur? z Is the battery polarity correct? rect? z If the unit still malfunctions, reset it. (Refer to "0"? Reset correct time. z Does the remote control sensor receive strong light? „ Tuner Symptom z The radio makes unusual...
...? „ Remote control Symptom z The remote control does not operate. If this product, check the following before operating the unit. 28 z Is the volume level set to page 29.) z No sound is not set to the z Did a power failure occur? z Is the battery polarity correct? rect? z If the unit still malfunctions, reset it. (Refer to "0"? Reset correct time. z Does the remote control sensor receive strong light? „ Tuner Symptom z The radio makes unusual...
XL-ES5 | XL-ES50 Operation Manual
Page 29
... operation, unplug and plug in the disc tray. z Keep your discs away from your local CD software dealer for cleaning (gasoline, paint thinner, etc.). NO YES Correct XL-ES5 XL-ES50 References Caution: This operation will erase all data stored in memory including clock, timer settings, tuner preset, and CD program. „ Before transporting the unit Remove all the memory (reset) 1 Press the ON/STAND-BY button to enter the power...
... operation, unplug and plug in the disc tray. z Keep your discs away from your local CD software dealer for cleaning (gasoline, paint thinner, etc.). NO YES Correct XL-ES5 XL-ES50 References Caution: This operation will erase all data stored in memory including clock, timer settings, tuner preset, and CD program. „ Before transporting the unit Remove all the memory (reset) 1 Press the ON/STAND-BY button to enter the power...

XL-ES5 | XL-ES50 Operation Manual
Page 30
..." (300 mm) Weight 10.8 lbs. (4.9 kg) „ Amplifier Output power Output terminals Input terminals Front speakers: 30 watts minimum RMS per channel into 6 ohms from 100 Hz to 20 kHz, 10% total harmonic distortion Subwoofer: 40 watts minimum RMS into 6 ohms from 70 Hz to make design and specification changes for product improvement without prior notice. References XL-ES5 XL-ES50 30 Specifications As part of our policy of...
..." (300 mm) Weight 10.8 lbs. (4.9 kg) „ Amplifier Output power Output terminals Input terminals Front speakers: 30 watts minimum RMS per channel into 6 ohms from 100 Hz to 20 kHz, 10% total harmonic distortion Subwoofer: 40 watts minimum RMS into 6 ohms from 70 Hz to make design and specification changes for product improvement without prior notice. References XL-ES5 XL-ES50 30 Specifications As part of our policy of...


