
XL-DK227N Operation Manual
Page 2
... receiving antenna. FOR YOUR RECORDS For your assistance in a particular installation. Please retain this equipment. This product is no guarantee that to which are designed to radio communications. Connect the equipment into an outlet on , the user is connected. Explanation of purchase Model number Serial number Date of purchase Place of Graphical Symbols: The lightning flash with the limits for help. Important Instruction XL-DK227N...
... receiving antenna. FOR YOUR RECORDS For your assistance in a particular installation. Please retain this equipment. This product is no guarantee that to which are designed to radio communications. Connect the equipment into an outlet on , the user is connected. Explanation of purchase Model number Serial number Date of purchase Place of Graphical Symbols: The lightning flash with the limits for help. Important Instruction XL-DK227N...

XL-DK227N Operation Manual
Page 3
... use. 1) Read these instructions. 2) Keep these instructions. 10) Protect the power cord from being walked on safety. integral convenience receptacles as radiators, heat registers, stoves, or other apparatus (including amplifiers) that could result in a fire or electric shock. for replacement of power source indicated on the product. 3 To ensure your safety. Install in electric shock and/or fire. If the provided plug...
... use. 1) Read these instructions. 2) Keep these instructions. 10) Protect the power cord from being walked on safety. integral convenience receptacles as radiators, heat registers, stoves, or other apparatus (including amplifiers) that could result in a fire or electric shock. for replacement of power source indicated on the product. 3 To ensure your safety. Install in electric shock and/or fire. If the provided plug...
XL-DK227N Operation Manual
Page 4
.... XL-DK227N IMPORTANT SAFETY INSTRUCTIONS (continued) Important Instruction 18) Damage Requiring Service - When installing an outside antenna system should be taken to keep from the wall outlet and refer servicing to qualified service personnel under the following the operating instructions. Unplug this indicates a need for replacement or resetting of the lead-in damage and will often require extensive work by the manufacturer. 22) Power Lines...
.... XL-DK227N IMPORTANT SAFETY INSTRUCTIONS (continued) Important Instruction 18) Damage Requiring Service - When installing an outside antenna system should be taken to keep from the wall outlet and refer servicing to qualified service personnel under the following the operating instructions. Unplug this indicates a need for replacement or resetting of the lead-in damage and will often require extensive work by the manufacturer. 22) Power Lines...
XL-DK227N Operation Manual
Page 5
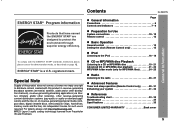
.../WMA files 24 - 25 Radio Listening to protect the environment through superior energy efficiency. Contents XL-DK227N Page General Information Precautions 6 Controls and indicators 7 - 9 Preparation for Use System connections 10 - 12 Remote control 13 Basic Operation General control 14 Setting the clock (Remote Control only 15 General Information iPod Listening to the iPod 16 - 19 CD or MP3/WMA disc Playback Listening to a CD or MP3...
.../WMA files 24 - 25 Radio Listening to protect the environment through superior energy efficiency. Contents XL-DK227N Page General Information Precautions 6 Controls and indicators 7 - 9 Preparation for Use System connections 10 - 12 Remote control 13 Basic Operation General control 14 Setting the clock (Remote Control only 15 General Information iPod Listening to the iPod 16 - 19 CD or MP3/WMA disc Playback Listening to a CD or MP3...
XL-DK227N Operation Manual
Page 6
... result in , and then turn on your local SHARP service facility. General Information Keep the unit away from earphones and headphones can damage internal wires. If your system does not work properly, disconnect the AC power cord from use of the equipment. 4" (10 cm) 4" (10 cm) 4" (10 cm) Docking Station MICRO COMPONENT SYSTEM Use the unit on speaker efficiency, location and various...
... result in , and then turn on your local SHARP service facility. General Information Keep the unit away from earphones and headphones can damage internal wires. If your system does not work properly, disconnect the AC power cord from use of the equipment. 4" (10 cm) 4" (10 cm) 4" (10 cm) Docking Station MICRO COMPONENT SYSTEM Use the unit on speaker efficiency, location and various...
XL-DK227N Operation Manual
Page 9
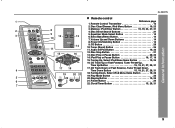
.... Tuning Up, Select iPod Menu Items Button 19, 26 16. Play Mode Button 22 5 22 20. XL-DK227N General Information Remote control 1 Reference page 1. Tuner (Band) Button 26 11 11. CD Track Down or Fast Reverse, Tuner Preset Down, 4 Time Down Button 15, 19, 21, 27, 28, 31 19 20 21 18. Disc Direct Search Buttons 21 3 9 12 10 5. Folder Button 24 22. Volume Up and Down Buttons 14 8. CD Button 20 10. Disc Play or Pause Button...
.... Tuning Up, Select iPod Menu Items Button 19, 26 16. Play Mode Button 22 5 22 20. XL-DK227N General Information Remote control 1 Reference page 1. Tuner (Band) Button 26 11 11. CD Track Down or Fast Reverse, Tuner Preset Down, 4 Time Down Button 15, 19, 21, 27, 28, 31 19 20 21 18. Disc Direct Search Buttons 21 3 9 12 10 5. Folder Button 24 22. Volume Up and Down Buttons 14 8. CD Button 20 10. Disc Play or Pause Button...

XL-DK227N Operation Manual
Page 10
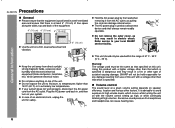
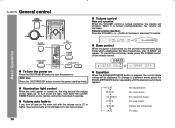
XL-DK227N System connections Make sure to unplug the AC power cord before making any connections. Right speaker Antenna connection (see page 11) FM antenna AM loop antenna Left speaker Preparation for Use Speaker connection (see page 11) 10 AC outlet (AC 120 V ~ 60 Hz) AC power connection (see page 12)
XL-DK227N System connections Make sure to unplug the AC power cord before making any connections. Right speaker Antenna connection (see page 11) FM antenna AM loop antenna Left speaker Preparation for Use Speaker connection (see page 11) 10 AC outlet (AC 120 V ~ 60 Hz) AC power connection (see page 12)

XL-DK227N Operation Manual
Page 11
... left channels. If the TV/monitor has a video input, connect it to a stand or a wall with photo and video can be placed in the direction where the strongest signal can damage the unit. Please visit Apple's home page for futher information. 11 XL-DK227N Preparation for Use Antenna connection Supplied FM antenna: Connect the FM antenna wire to the FM 75 OHMS jack and position the FM antenna wire in the bass reflex...
... left channels. If the TV/monitor has a video input, connect it to a stand or a wall with photo and video can be placed in the direction where the strongest signal can damage the unit. Please visit Apple's home page for futher information. 11 XL-DK227N Preparation for Use Antenna connection Supplied FM antenna: Connect the FM antenna wire to the FM 75 OHMS jack and position the FM antenna wire in the bass reflex...

XL-DK227N Operation Manual
Page 12
... will not be used , disconnect the supplied FM antenna wire. To return to select the extra bass mode. 12 XL-DK227N System connections (continued) AC power connection After checking all the connections have been made correctly, plug the AC power cord of time. Outdoor FM antenna Use an outdoor FM antenna if you plug in , the unit will enter the demonstration mode. Note: When the power is in use for Use AC outlet (AC...
... will not be used , disconnect the supplied FM antenna wire. To return to select the extra bass mode. 12 XL-DK227N System connections (continued) AC power connection After checking all the connections have been made correctly, plug the AC power cord of time. Outdoor FM antenna Use an outdoor FM antenna if you plug in , the unit will enter the demonstration mode. Note: When the power is in use for Use AC outlet (AC...
XL-DK227N Operation Manual
Page 14
.... XL-DK227N General control Docking Station MICRO COMPONENT SYSTEM Volume control Main unit operation: When the VOLUME control is turned clockwise, the volume will appear. To change to enter the power stand-by mode. Volume auto fade-in to turn off the light, hold down the CLEAR/ DIMMER button on Press the ON/STAND-BY button to the last set level. When it is turned counterclockwise, the volume will be displayed. Equalizer When the EQUALIZER MODE button is turned on the remote control...
.... XL-DK227N General control Docking Station MICRO COMPONENT SYSTEM Volume control Main unit operation: When the VOLUME control is turned clockwise, the volume will appear. To change to enter the power stand-by mode. Volume auto fade-in to turn off the light, hold down the CLEAR/ DIMMER button on Press the ON/STAND-BY button to the last set level. When it is turned counterclockwise, the volume will be displayed. Equalizer When the EQUALIZER MODE button is turned on the remote control...
XL-DK227N Operation Manual
Page 15
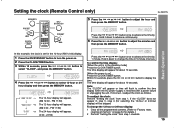
.... (AM 0:00 - In this example, the clock is restored after a power failure or unplugging the unit. To readjust the clock: Perform "Setting the clock" from step 1 onwards. 15 Setting the clock (Remote Control only) XL-DK227N 5 Press the or button to display the time. Hold it down to advance continuously. 6 Press the or button to turn the power on ] Press the CLOCK/TIMER...
.... (AM 0:00 - In this example, the clock is restored after a power failure or unplugging the unit. To readjust the clock: Perform "Setting the clock" from step 1 onwards. 15 Setting the clock (Remote Control only) XL-DK227N 5 Press the or button to display the time. Hold it down to advance continuously. 6 Press the or button to turn the power on ] Press the CLOCK/TIMER...
XL-DK227N Operation Manual
Page 19
... information on them. CD / button on the remote control: The unit turns on and CD playback starts (regardless of the last function starts (CD, TUNER, AUDIO IN, iPod). Auto power off function: In the stop mode of the disc or the device that include audio files which stands for Windows Media Player. Press and hold down Press in the display may not be playable due...
... information on them. CD / button on the remote control: The unit turns on and CD playback starts (regardless of the last function starts (CD, TUNER, AUDIO IN, iPod). Auto power off function: In the stop mode of the disc or the device that include audio files which stands for Windows Media Player. Press and hold down Press in the display may not be playable due...
XL-DK227N Operation Manual
Page 24
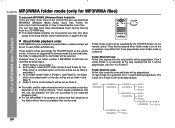
... for MP3/WMA files) To play back these downloaded music files by the FOLDER button on the remote control. Folder E that you can be set as folder 6. Folder mode on/off . Folder Mode On case: All the files inside the selected folder will be operated by burning them to download the music files. XL-DK227N MP3/WMA folder mode (only for folders inside ROOT folder...
... for MP3/WMA files) To play back these downloaded music files by the FOLDER button on the remote control. Folder E that you can be set as folder 6. Folder mode on/off . Folder Mode On case: All the files inside the selected folder will be operated by burning them to download the music files. XL-DK227N MP3/WMA folder mode (only for folders inside ROOT folder...

XL-DK227N Operation Manual
Page 27
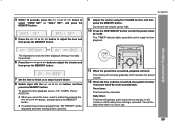
... ) button to change a preset station. XL-DK227N To recall a memorized station Press the PRESET ( or ) button for a few hours should there be scanned automatically. (Preset memory scan) 1 Press the PRESET ( or ) button for 5 seconds each. 2 Press the PRESET ( or ) button again when the desired station is located. When a new station is memorized, repeat the operation from step 2. 5 Repeat steps 1 - 4 to set other stations, or to select the preset channel number. Note: The backup function protects...
... ) button to change a preset station. XL-DK227N To recall a memorized station Press the PRESET ( or ) button for a few hours should there be scanned automatically. (Preset memory scan) 1 Press the PRESET ( or ) button for 5 seconds each. 2 Press the PRESET ( or ) button again when the desired station is located. When a new station is memorized, repeat the operation from step 2. 5 Repeat steps 1 - 4 to set other stations, or to select the preset channel number. Note: The backup function protects...
XL-DK227N Operation Manual
Page 28
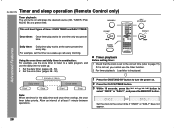
...preset time every day. Timer playback Before setting timer: 1 Check that the clock is not set, you cannot use the daily timer to wake up call every morning. Using the once timer and daily timer in combination: For example, use the once timer to listen to a radio program, and use the timer function. 2 For timer playback: Load disc to be played... operations. 1 Press the ON/STAND-BY button to turn the power on and plays the desired source (CD, TUNER, iPod, AUDIO IN) at a preset time. If it is set times for one time only at a preset time. Set the clock to the correct time if...
...preset time every day. Timer playback Before setting timer: 1 Check that the clock is not set, you cannot use the daily timer to wake up call every morning. Using the once timer and daily timer in combination: For example, use the once timer to listen to a radio program, and use the timer function. 2 For timer playback: Load disc to be played... operations. 1 Press the ON/STAND-BY button to turn the power on and plays the desired source (CD, TUNER, iPod, AUDIO IN) at a preset time. If it is set times for one time only at a preset time. Set the clock to the correct time if...
XL-DK227N Operation Manual
Page 29
... button to adjust the minutes and then press the MEMORY button. 7 Set the time to finish as in use. 29 If a station has not been programmed, "NO PRESET" will be displayed and timer setting will be canceled. The volume will increase gradually until the daily timer setting is reached, the system will start. Once timer: The timer will operate at the same time every day. XL-DK227N...
... button to adjust the minutes and then press the MEMORY button. 7 Set the time to finish as in use. 29 If a station has not been programmed, "NO PRESET" will be displayed and timer setting will be canceled. The volume will increase gradually until the daily timer setting is reached, the system will start. Once timer: The timer will operate at the same time every day. XL-DK227N...

XL-DK227N Operation Manual
Page 30
... remaining time. The remaining sleep time is displayed for about 10 seconds. XL-DK227N Timer and sleep operation (Remote Control only) (continued) Advanced Features Note: When performing timer playback using another unit connected to the iPod terminal or AUDIO IN jack, select "iPod" or "AUDIO IN" in order. Timer will be canceled (the setting will not turn on or enter the power stand-by mode: 1 Press the CLOCK/TIMER button. 2 Within...
... remaining time. The remaining sleep time is displayed for about 10 seconds. XL-DK227N Timer and sleep operation (Remote Control only) (continued) Advanced Features Note: When performing timer playback using another unit connected to the iPod terminal or AUDIO IN jack, select "iPod" or "AUDIO IN" in order. Timer will be canceled (the setting will not turn on or enter the power stand-by mode: 1 Press the CLOCK/TIMER button. 2 Within...
XL-DK227N Operation Manual
Page 32
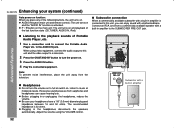
... (continued) Auto power on function: When you can cause hearing loss. Adjust the volume using video equipment, connect the audio output to this unit, you press any of Portable Audio Player, etc. 1 Use a connection cord to the playback sounds of the following buttons, the unit turns on. AUDIO IN button (main unit and remote control): The unit turns on and the "AUDIO IN" function is 32 ohms. Plugging in amplifier 32 Listen to the AUDIO IN jack. When using the VOLUME control. XL-DK227N Enhancing...
... (continued) Auto power on function: When you can cause hearing loss. Adjust the volume using video equipment, connect the audio output to this unit, you press any of Portable Audio Player, etc. 1 Use a connection cord to the playback sounds of the following buttons, the unit turns on. AUDIO IN button (main unit and remote control): The unit turns on and the "AUDIO IN" function is 32 ohms. Plugging in amplifier 32 Listen to the AUDIO IN jack. When using the VOLUME control. XL-DK227N Enhancing...
XL-DK227N Operation Manual
Page 33
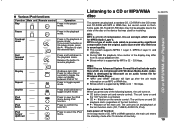
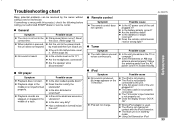
.... Using 3rd Generation iPod 33 References Troubleshooting chart Many potential problems can be resolved by mode. When a button is heard. Possible cause Did a power failure occur? Reset the clock. (Refer page 15) Set the unit to "0"? The iPod is not properly connected. Is the disc very dirty? Are the headphones connected? Is the battery polarity correct? The video cable is not properly connected to the correct time...
.... Using 3rd Generation iPod 33 References Troubleshooting chart Many potential problems can be resolved by mode. When a button is heard. Possible cause Did a power failure occur? Reset the clock. (Refer page 15) Set the unit to "0"? The iPod is not properly connected. Is the disc very dirty? Are the headphones connected? Is the battery polarity correct? The video cable is not properly connected to the correct time...
XL-DK227N Operation Manual
Page 34
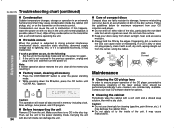
...: 1 Set the unit to malfunction. If trouble occurs When this surface. Caution: This operation will erase all memory 1 Press the ON/STAND-BY button to ensure proper operation of the CD player, preventative maintenance (cleaning of compact discs Compact discs are read. Do not mark this product is not restored in the previous operation, unplug and plug in the unit, and then turn...
...: 1 Set the unit to malfunction. If trouble occurs When this surface. Caution: This operation will erase all memory 1 Press the ON/STAND-BY button to ensure proper operation of the CD player, preventative maintenance (cleaning of compact discs Compact discs are read. Do not mark this product is not restored in the previous operation, unplug and plug in the unit, and then turn...


