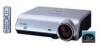
XG-MB70X Operation Manual
Page 5
...the 1972 Consumer Product Safety Act, PLEASE READ CAREFULLY THE IMPORTANT "LIMITED WARRANTY" CLAUSE. In a domestic environment this operation manual carefully. These limits are two important reasons for prompt warranty registration of your purchase. 2. ONLY The enclosed computer cable must... careful that you immediately receive the full benefit of the parts, service and labor warranty applicable to your new SHARP Projector, using the projector, please read this product may cause radio interference in which case the user will promptly receive any safety notification of...
...the 1972 Consumer Product Safety Act, PLEASE READ CAREFULLY THE IMPORTANT "LIMITED WARRANTY" CLAUSE. In a domestic environment this operation manual carefully. These limits are two important reasons for prompt warranty registration of your purchase. 2. ONLY The enclosed computer cable must... careful that you immediately receive the full benefit of the parts, service and labor warranty applicable to your new SHARP Projector, using the projector, please read this product may cause radio interference in which case the user will promptly receive any safety notification of...
XG-MB70X Operation Manual
Page 6
... GLASS PARTICLES IF LAMP HAS RUPTURED. NE REMPLACER QUE PAR UNE LAMPE SHARP DE MODÈLE AN-MB70LP. HIGH PRESSURE LAMP : RISK OF EXPLOSION. SE REPORTER AU MODE D'EMPLOI. This SHARP projector uses a DMD panel. This will not affect the picture quality or ...ONLY. L'INTERIEUR DU BOITIER ETANT EXTREMEMENT CHAUD, ATTENDRE 1 HEURE AVANT DE PROCEDER AU REMPLACEMENT DE LA LAMPE. A MANIPULER AVEC PRECAUTION. SEE OPERATION MANUAL. AVERTISSEMENT CONCERNANT LE REMPLACEMENT DE LA LAMPE : ETEINDRE LA LAMPE ET DEBRANCHER LE CORDON D'ALIMENTATION AVANT D'OUVRIR LE COUVERCLE. nies. -2 LAMPE ...
... GLASS PARTICLES IF LAMP HAS RUPTURED. NE REMPLACER QUE PAR UNE LAMPE SHARP DE MODÈLE AN-MB70LP. HIGH PRESSURE LAMP : RISK OF EXPLOSION. SE REPORTER AU MODE D'EMPLOI. This SHARP projector uses a DMD panel. This will not affect the picture quality or ...ONLY. L'INTERIEUR DU BOITIER ETANT EXTREMEMENT CHAUD, ATTENDRE 1 HEURE AVANT DE PROCEDER AU REMPLACEMENT DE LA LAMPE. A MANIPULER AVEC PRECAUTION. SEE OPERATION MANUAL. AVERTISSEMENT CONCERNANT LE REMPLACEMENT DE LA LAMPE : ETEINDRE LA LAMPE ET DEBRANCHER LE CORDON D'ALIMENTATION AVANT D'OUVRIR LE COUVERCLE. nies. -2 LAMPE ...
XG-MB70X Operation Manual
Page 7
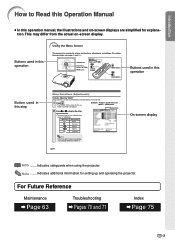
...screen displays are simplified for explanation. Introduction How to Read this Operation Manual • In this step Menu Selections (Adjustments) Example: Adjusting "Bright" • This operation can be performed by using the buttons on the projector. 1 Press . • The "Picture" menu screen for ...the selected input mode is not available for selecting INPUT 3 or INPUT 4. -40 On-screen display Info ........Indicates safeguards when using the projector. Example: "Picture" screen menu for INPUT 1 (RGB) mode Menu icons 2 Press | or \ to display the other menu screens. &#...
...screen displays are simplified for explanation. Introduction How to Read this Operation Manual • In this step Menu Selections (Adjustments) Example: Adjusting "Bright" • This operation can be performed by using the buttons on the projector. 1 Press . • The "Picture" menu screen for ...the selected input mode is not available for selecting INPUT 3 or INPUT 4. -40 On-screen display Info ........Indicates safeguards when using the projector. Example: "Picture" screen menu for INPUT 1 (RGB) mode Menu icons 2 Press | or \ to display the other menu screens. &#...
XG-MB70X Operation Manual
Page 8
Contents Preparing Introduction How to Read this Operation Manual 3 Contents 4 IMPORTANT SAFEGUARDS 6 How to Access the PDF Operation Manuals ... 9 Accessories 10 Part Names and Functions 11 Using the Remote Control 15 Usable Range 15 Inserting the Batteries 15 Quick Start Quick Start 16 Setup Storing the Projector 18 How to Use the Storage Case...
Contents Preparing Introduction How to Read this Operation Manual 3 Contents 4 IMPORTANT SAFEGUARDS 6 How to Access the PDF Operation Manuals ... 9 Accessories 10 Part Names and Functions 11 Using the Remote Control 15 Usable Range 15 Inserting the Batteries 15 Quick Start Quick Start 16 Setup Storing the Projector 18 How to Use the Storage Case...
XG-MB70X Operation Manual
Page 12
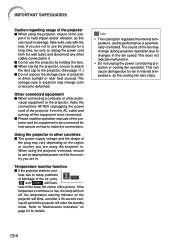
... countries ■ The power supply voltage and the shape of the plug may change color or become deformed. Temperature monitor function ■ If the projector starts to setup problems or blockage of the air vents, " " and " " will illumi- heat due to over- This does not indicate malfunction... on page 64 for instructions on how to be connected. ■ Please read the operation manuals of the projector and the equipment to make the connections AFTER unplugging the power cord of the projector from the wall outlet, and disconnect any other audio- nate in . The sound of the...
... countries ■ The power supply voltage and the shape of the plug may change color or become deformed. Temperature monitor function ■ If the projector starts to setup problems or blockage of the air vents, " " and " " will illumi- heat due to over- This does not indicate malfunction... on page 64 for instructions on how to be connected. ■ Please read the operation manuals of the projector and the equipment to make the connections AFTER unplugging the power cord of the projector from the wall outlet, and disconnect any other audio- nate in . The sound of the...

XG-MB70X Operation Manual
Page 13
...SETUP" folder. 2) Double click the language (name of the folder) that you want to view. 3) Double click the "MB70" pdf file to access the projector manuals. For Macintosh®: 1 Insert the CD-ROM in the CD-ROM drive. 2 Double click the "CD-ROM" icon. 3 When you want to view...ROM" drive. 4 When you want to view the operation manual 1) Double click the "MANUALS" folder. 2) Double click the language (name of the folder) that you can work with the projector. Introduction How to Access the PDF Operation Manuals PDF operation manuals in several languages are included in the CD-ROM, so ...
...SETUP" folder. 2) Double click the language (name of the folder) that you want to view. 3) Double click the "MB70" pdf file to access the projector manuals. For Macintosh®: 1 Insert the CD-ROM in the CD-ROM drive. 2 Double click the "CD-ROM" icon. 3 When you want to view...ROM" drive. 4 When you want to view the operation manual 1) Double click the "MANUALS" folder. 2) Double click the language (name of the folder) that you can work with the projector. Introduction How to Access the PDF Operation Manuals PDF operation manuals in several languages are included in the CD-ROM, so ...

XG-MB70X Operation Manual
Page 14
...(9'10" (3.0 m)) QCNWGA014WJPZ Storage case GCASNA014WJSA Lens cap (attached) RCAPHA021WJSA Projector manual and technical reference CD-ROM UDSKAA052WJZZ "QUICK GUIDE" label TLABZA717WJZZ Optional accessories ■ 3 RCA to the wall outlet in your nearest Sharp Authorized Projector Dealer or Service Center. -10 Please check with your country. Accessories ...-D-sub RS-232C adaptor (5 57/64'' (15 cm)) ■ Lamp unit AN-C3CP AN-A1RS AN-MB70LP Operation manual (this manual) TINS-B416WJZZ Note • Some of the optional accessories may not be available depending on the region.
...(9'10" (3.0 m)) QCNWGA014WJPZ Storage case GCASNA014WJSA Lens cap (attached) RCAPHA021WJSA Projector manual and technical reference CD-ROM UDSKAA052WJZZ "QUICK GUIDE" label TLABZA717WJZZ Optional accessories ■ 3 RCA to the wall outlet in your nearest Sharp Authorized Projector Dealer or Service Center. -10 Please check with your country. Accessories ...-D-sub RS-232C adaptor (5 57/64'' (15 cm)) ■ Lamp unit AN-C3CP AN-A1RS AN-MB70LP Operation manual (this manual) TINS-B416WJZZ Note • Some of the optional accessories may not be available depending on the region.

XG-MB70X Operation Manual
Page 15
...main pages in refer to a computer. Remove any obstructions, dirt or dust. 58 Speaker Front adjustment foot 30 (on the bottom of the projector) HEIGHT ADJUST button 30 • Attaching the lens cap Push the lens cap on the menu. KEYSTONE button 31 For entering the Keystone Correction...Removing the lens cap Pull the lens cap directly outward. -11 Introduction Part Names and Functions Numbers in this operation manual where the topic is dirt or dust on . Projector Top View ON button 29 For turning the power on the auto focus sensor. Remote control sensor 15 Auto focus ...
...main pages in refer to a computer. Remove any obstructions, dirt or dust. 58 Speaker Front adjustment foot 30 (on the bottom of the projector) HEIGHT ADJUST button 30 • Attaching the lens cap Push the lens cap on the menu. KEYSTONE button 31 For entering the Keystone Correction...Removing the lens cap Pull the lens cap directly outward. -11 Introduction Part Names and Functions Numbers in this operation manual where the topic is dirt or dust on . Projector Top View ON button 29 For turning the power on the auto focus sensor. Remote control sensor 15 Auto focus ...

XG-MB70X Operation Manual
Page 17
AUDIO OUTPUT terminal 28 Audio output terminal of the cooling fan may change during operation in this operation manual where the topic is normal operation and does not indicate a malfunction. 15 Remote control sensor 13 Kensington Security Standard connector...video terminal. 26 AUDIO INPUT 3, 4 terminal Shared audio input terminal for INPUT 3 and 4. 23 USB terminal 27 RS-232C terminal Terminal for controlling the projector using a computer. 27 LAN terminal Terminal for connecting a monitor. OUTPUT (INPUT 1, 2) terminal 28 · Shared computer RGB and component signals output terminal ...
AUDIO OUTPUT terminal 28 Audio output terminal of the cooling fan may change during operation in this operation manual where the topic is normal operation and does not indicate a malfunction. 15 Remote control sensor 13 Kensington Security Standard connector...video terminal. 26 AUDIO INPUT 3, 4 terminal Shared audio input terminal for INPUT 3 and 4. 23 USB terminal 27 RS-232C terminal Terminal for controlling the projector using a computer. 27 LAN terminal Terminal for connecting a monitor. OUTPUT (INPUT 1, 2) terminal 28 · Shared computer RGB and component signals output terminal ...

XG-MB70X Operation Manual
Page 18
...For displaying adjustment and setting screens. 24·40 MOUSE/Adjustment button For moving the computer cursor when connecting the projector USB terminal to the computer with USB cable. • For selecting menu items. 24·40 R-CLICK/UNDO... button • For the Right click when connecting the projector USB terminal to the computer with USB cable. • For setting items selected or adjusted on the menu. ENLARGE...and Functions Numbers in refer to the main pages in this operation manual where the topic is visible in the dark.
...For displaying adjustment and setting screens. 24·40 MOUSE/Adjustment button For moving the computer cursor when connecting the projector USB terminal to the computer with USB cable. • For selecting menu items. 24·40 R-CLICK/UNDO... button • For the Right click when connecting the projector USB terminal to the computer with USB cable. • For setting items selected or adjusted on the menu. ENLARGE...and Functions Numbers in refer to the main pages in this operation manual where the topic is visible in the dark.

XG-MB70X Operation Manual
Page 21
...Display (RGB) • When pressing '/" on the projector, input mode switches in order of focus or you want to put the projector into focus • When the projector is displayed, to finely adjust the focus, adjust the focus manually. On the projector 1 Press . 2 Adjust by pressing \ or ...8226; To perform Auto Focus again, press the AUTO FOCUS button. On the remote control Adjust by adjusting zoom. On the projector 1 Press . The correction is made automatically provided the vertical incline or decline is automatically adjusted, and then the focus pattern ...
...Display (RGB) • When pressing '/" on the projector, input mode switches in order of focus or you want to put the projector into focus • When the projector is displayed, to finely adjust the focus, adjust the focus manually. On the projector 1 Press . 2 Adjust by pressing \ or ...8226; To perform Auto Focus again, press the AUTO FOCUS button. On the remote control Adjust by adjusting zoom. On the projector 1 Press . The correction is made automatically provided the vertical incline or decline is automatically adjusted, and then the focus pattern ...

XG-MB70X Operation Manual
Page 26
...Dedicated cable cable ø3.5 mm minijack to RCA audio cable (commercially available) AUDIO INPUT ø3.5 mm minijack to the opeation manual of the connecting equipment. • You may need other cables or connectors not listed below. Equipment Computer Terminal on connected ...equipment RGB cable (supplied) RGB output terminal Cable Terminal on the projector INPUT 1, 2 ø3.5 mm stereo audio cable (commercially available) Audio output terminal AUDIO INPUT Audio-visual equipment 3 RCA (Component...
...Dedicated cable cable ø3.5 mm minijack to RCA audio cable (commercially available) AUDIO INPUT ø3.5 mm minijack to the opeation manual of the connecting equipment. • You may need other cables or connectors not listed below. Equipment Computer Terminal on connected ...equipment RGB cable (supplied) RGB output terminal Cable Terminal on the projector INPUT 1, 2 ø3.5 mm stereo audio cable (commercially available) Audio output terminal AUDIO INPUT Audio-visual equipment 3 RCA (Component...

XG-MB70X Operation Manual
Page 27
...when using the ø3.5 mm stereo audio cable. "Plug and Play" function (when connecting to the computer operation manual for use with the projector. Ensure the operation manuals of computer signals compatible with some Macintosh computers. Use with a VESA DDC compatible computer. -23 Contact your nearest... 1, 2 terminal To USB terminal Connections RGB cable * ø3.5 mm stereo or mono audio cable (commercially available or available as Sharp service part QCNWGA038WJPZ) USB cable Connect to turn on after all connections, turn on the computer you can use the remote control as...
...when using the ø3.5 mm stereo audio cable. "Plug and Play" function (when connecting to the computer operation manual for use with the projector. Ensure the operation manuals of computer signals compatible with some Macintosh computers. Use with a VESA DDC compatible computer. -23 Contact your nearest... 1, 2 terminal To USB terminal Connections RGB cable * ø3.5 mm stereo or mono audio cable (commercially available or available as Sharp service part QCNWGA038WJPZ) USB cable Connect to turn on after all connections, turn on the computer you can use the remote control as...

XG-MB70X Operation Manual
Page 31
...Illuminates when transmitting/receiving data. Refer to the "SETUP GUIDE" contained on the supplied CD-ROM for details. Refer to the operation manual of the projector. When connecting to the LAN terminal using an RS-232C serial control cable and a DIN-D-sub RS-232C adaptor Computer To RS-... Refer to the "SETUP GUIDE" contained on the supplied CD-ROM for "RS-232C Specifications and Commands". Controlling the Projector by a Computer When the RS-232C terminal on the projector is not correctly set up. Info • Do not connect the RS-232C cable to computer, use cross-over category...
...Illuminates when transmitting/receiving data. Refer to the "SETUP GUIDE" contained on the supplied CD-ROM for details. Refer to the operation manual of the projector. When connecting to the LAN terminal using an RS-232C serial control cable and a DIN-D-sub RS-232C adaptor Computer To RS-... Refer to the "SETUP GUIDE" contained on the supplied CD-ROM for "RS-232C Specifications and Commands". Controlling the Projector by a Computer When the RS-232C terminal on the projector is not correctly set up. Info • Do not connect the RS-232C cable to computer, use cross-over category...

XG-MB70X Operation Manual
Page 34
... • The front adjustment foot comes out. Install the projector so that it may be difficult to move the front adjustment foot because the installation surface is difficult to adjust the automatically corrected image, use the manual keystone correction. (See page 31.) HEIGHT ADJUST button Front ...adjustment foot Info • Do not press the HEIGHT ADJUST button when the front adjustment foot comes out without firmly holding the projector. • Do not hold the lens...
... • The front adjustment foot comes out. Install the projector so that it may be difficult to move the front adjustment foot because the installation surface is difficult to adjust the automatically corrected image, use the manual keystone correction. (See page 31.) HEIGHT ADJUST button Front ...adjustment foot Info • Do not press the HEIGHT ADJUST button when the front adjustment foot comes out without firmly holding the projector. • Do not hold the lens...
XG-MB70X Operation Manual
Page 35
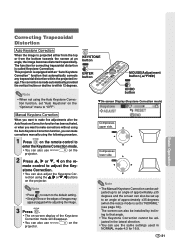
... ENTER button MOUSE/Adjustment button ('/"/\/|) UNDO button "On-screen Display (Keystone Correction mode) Basic Operation Manual Keystone Correction When you want to make fine adjustments after the Auto Keystone Correction function has been activated... using the Auto Keystone Correction function, you can make corrections manually using the following procedure. 1 Press on the projector. on the 2 Press ', | or ", \ on the projector. Note • The Manual Keystone Correction can also use projector. This projector is equipped with an "Auto Keystone Correction" function that angle...
... ENTER button MOUSE/Adjustment button ('/"/\/|) UNDO button "On-screen Display (Keystone Correction mode) Basic Operation Manual Keystone Correction When you want to make fine adjustments after the Auto Keystone Correction function has been activated... using the Auto Keystone Correction function, you can make corrections manually using the following procedure. 1 Press on the projector. on the 2 Press ', | or ", \ on the projector. Note • The Manual Keystone Correction can also use projector. This projector is equipped with an "Auto Keystone Correction" function that angle...

XG-MB70X Operation Manual
Page 36
... control. • The focus is adjusted automatically after you can display the test pattern by pressing \ or |. Press on the projector or on the projector, you can operate the Auto Focus function using the buttons on the remote control Adjust by pressing ' or ". When adjusting the ...focus using the following procedure. on the remote control Adjust by pressing the ZOOM buttons. -32 Note • Manually adjusting the focus or...
... control. • The focus is adjusted automatically after you can display the test pattern by pressing \ or |. Press on the projector or on the projector, you can operate the Auto Focus function using the buttons on the remote control Adjust by pressing ' or ". When adjusting the ...focus using the following procedure. on the remote control Adjust by pressing the ZOOM buttons. -32 Note • Manually adjusting the focus or...

XG-MB70X Operation Manual
Page 53
... to complete, depending on the image of the computer connected to the projector. • When the optimum image cannot be achieved with Auto Sync adjustment, use manual adjustments. (See page 31.) Note • The projector will display the number of Auto Sync Adjustment Selectable items (ON) (... to a computer. Note • Auto Sync adjustment is not automatically performed. Auto Sync adjustment is also performed by pressing on the projector or on or when the input signals are switched, when connected to automatically adjust a computer image. Menu operation Page 42 Example: "Fine...
... to complete, depending on the image of the computer connected to the projector. • When the optimum image cannot be achieved with Auto Sync adjustment, use manual adjustments. (See page 31.) Note • The projector will display the number of Auto Sync Adjustment Selectable items (ON) (... to a computer. Note • Auto Sync adjustment is not automatically performed. Auto Sync adjustment is also performed by pressing on the projector or on or when the input signals are switched, when connected to automatically adjust a computer image. Menu operation Page 42 Example: "Fine...

XG-MB70X Operation Manual
Page 61
Note • Trapezoidal distortion can be used with on the projector or with on the remote control. • Adjust the focus manually when the focus is not adjusted with respect to the screen. • When the screen is slanting or the image is deteriorated, ... Page 42 Example: "Options2" screen menu Useful Features Description of the screen and the surrounding brightness. • When the distance between the projector and the screen does not change (fixing installation), it is recommended that "Auto Focus" is adjusted automatically. Focus is not adjusted automatically when...
Note • Trapezoidal distortion can be used with on the projector or with on the remote control. • Adjust the focus manually when the focus is not adjusted with respect to the screen. • When the screen is slanting or the image is deteriorated, ... Page 42 Example: "Options2" screen menu Useful Features Description of the screen and the surrounding brightness. • When the distance between the projector and the screen does not change (fixing installation), it is recommended that "Auto Focus" is adjusted automatically. Focus is not adjusted automatically when...

XG-MB70X Operation Manual
Page 63
... Menu operation Page 42 Example: "Options2" screen menu Selecting the Transmission Speed (RS-232C) Make sure that allows you to the computer's operation manual for instructions for the same baud rate. Menu operation Page 42 Example: "Options2" screen menu Useful Features Description of PRJ Modes Selectable items Front ... items 9600 bps Description Transmission speed is slow. 115200 bps Transmission speed is equipped with a reverse/invert image function that both the projector and computer are set for setting the computer's baud rate. -59 Reversing/Inverting Projected Images This...
... Menu operation Page 42 Example: "Options2" screen menu Selecting the Transmission Speed (RS-232C) Make sure that allows you to the computer's operation manual for instructions for the same baud rate. Menu operation Page 42 Example: "Options2" screen menu Useful Features Description of PRJ Modes Selectable items Front ... items 9600 bps Description Transmission speed is slow. 115200 bps Transmission speed is equipped with a reverse/invert image function that both the projector and computer are set for setting the computer's baud rate. -59 Reversing/Inverting Projected Images This...


