
CD-SW340 Operation Manual
Page 2
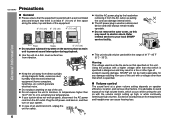
... NOTES CD-SW340 Important Instruction CAUTION: TO REDUCE THE RISK OF ELECTRIC SHOCK, DO NOT REMOVE COVER (OR BACK). Explanation of Graphical Symbols: The lightning flash with the copyright laws of the following measures: Reorient or relocate the receiving antenna. use of the FCC Rules. Please retain this unit in case of important operating and maintenance (servicing) instructions in a particular installation.
... NOTES CD-SW340 Important Instruction CAUTION: TO REDUCE THE RISK OF ELECTRIC SHOCK, DO NOT REMOVE COVER (OR BACK). Explanation of Graphical Symbols: The lightning flash with the copyright laws of the following measures: Reorient or relocate the receiving antenna. use of the FCC Rules. Please retain this unit in case of important operating and maintenance (servicing) instructions in a particular installation.
CD-SW340 Operation Manual
Page 3
... plug has two blades with the manufacturer's instructions. 8) Do not install near water. 14) Refer all servicing to rain or moisture, does not operate normally, or has been dropped. 6) Clean only with the apparatus. Do not overload wall outlets, extension cords, or integral convenience receptacles as they exit from battery power, or other sources, refer to perform many useful functions, but...
... plug has two blades with the manufacturer's instructions. 8) Do not install near water. 14) Refer all servicing to rain or moisture, does not operate normally, or has been dropped. 6) Clean only with the apparatus. Do not overload wall outlets, extension cords, or integral convenience receptacles as they exit from battery power, or other sources, refer to perform many useful functions, but...
CD-SW340 Operation Manual
Page 4
... the National Electrical Code, ANSI/NFPA 70, provides information with the product. CD-SW340 IMPORTANT SAFETY INSTRUCTIONS (continued) Important Instruction 18) Damage Requiring Service - Upon completion of overhead power lines or other hazards. 20) Safety Check - When installing an outside antenna or cable system is connected to the product, be sure the service technician has used a replacement plug specified by following the operating instructions. This is...
... the National Electrical Code, ANSI/NFPA 70, provides information with the product. CD-SW340 IMPORTANT SAFETY INSTRUCTIONS (continued) Important Instruction 18) Damage Requiring Service - Upon completion of overhead power lines or other hazards. 20) Safety Check - When installing an outside antenna or cable system is connected to the product, be sure the service technician has used a replacement plug specified by following the operating instructions. This is...
CD-SW340 Operation Manual
Page 5
...; standards mentioned above, please cancel the demonstration mode, as described on page 13. For details, please visit http://mp3licensing.com Maintenance 38 MPEG Layer-3 audio coding technology licensed from Fraunhofer Specifications 38 - 39 IIS and Thomson. Preparation for Use System connections 11 - 13 Remote control 14 Basic Operation General control 15 Setting the clock (Remote control only 16 General Information To comply with...
...; standards mentioned above, please cancel the demonstration mode, as described on page 13. For details, please visit http://mp3licensing.com Maintenance 38 MPEG Layer-3 audio coding technology licensed from Fraunhofer Specifications 38 - 39 IIS and Thomson. Preparation for Use System connections 11 - 13 Remote control 14 Basic Operation General control 15 Setting the clock (Remote control only 16 General Information To comply with...
CD-SW340 Operation Manual
Page 6
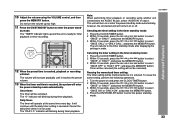
... AC power plug by the head when removing it from direct sunlight, strong magnetic fields, excessive dust, humidity and electronic/electrical equipment (home computers, facsimiles, etc.) which occurs while turning the unit on the same surface as pulling the cord can cause hearing loss. 6 Use the unit on a firm, level surface free from vibration. 5 4 3 2 1 TIMER 5 CD 4 3 2 1 PLAYBACK (PLAY & STOP) PHONES AUDIO IN...
... AC power plug by the head when removing it from direct sunlight, strong magnetic fields, excessive dust, humidity and electronic/electrical equipment (home computers, facsimiles, etc.) which occurs while turning the unit on the same surface as pulling the cord can cause hearing loss. 6 Use the unit on a firm, level surface free from vibration. 5 4 3 2 1 TIMER 5 CD 4 3 2 1 PLAYBACK (PLAY & STOP) PHONES AUDIO IN...
CD-SW340 Operation Manual
Page 7
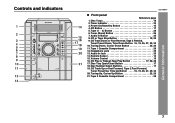
..., 27, 29, 32 20. Timer Indicator 33 3. Tape 1 Cassette Compartment 28 12. Volume Control 15 16. Controls and indicators TIMER CD 5 4 3 2 1 PLAYBACK (PLAY & STOP) PHONES AUDIO IN RECORD/PLAYBACK CD-SW340 Front panel Reference page 1. CD Button 17 5. Headphone Jack 35 13. Audio In Jack 35 14. Remote Sensor 14 15. Disc Tray Open/Close Button 17 18. Tape 2 Cassette Compartment 28 General Information 7 Tape...
..., 27, 29, 32 20. Timer Indicator 33 3. Tape 1 Cassette Compartment 28 12. Volume Control 15 16. Controls and indicators TIMER CD 5 4 3 2 1 PLAYBACK (PLAY & STOP) PHONES AUDIO IN RECORD/PLAYBACK CD-SW340 Front panel Reference page 1. CD Button 17 5. Headphone Jack 35 13. Audio In Jack 35 14. Remote Sensor 14 15. Disc Tray Open/Close Button 17 18. Tape 2 Cassette Compartment 28 General Information 7 Tape...
CD-SW340 Operation Manual
Page 8
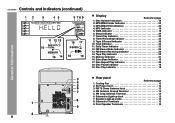
... Play Indicator 32 8. Disc Play Indicator 18 Rear panel Reference page 1. Subwoofer Terminals 12 9. Timer Recording Indicator 32 9. Disc Number Indicators 18 2. Memory Indicator 21 16. Extra Bass Indicator 15 17. FM Stereo Receiving Indicator 26 14. Disc Repeat Play Indicator 20 18. General Information CD-SW340 Controls and indicators (continued) 3 4 5 6 7 8 1 9 2 8 Display Reference page 1. WMA Indicator 18 6. Tape 2 Record Indicator 30 10. Cooling Fan 13 2. AC Power Cord...
... Play Indicator 32 8. Disc Play Indicator 18 Rear panel Reference page 1. Subwoofer Terminals 12 9. Timer Recording Indicator 32 9. Disc Number Indicators 18 2. Memory Indicator 21 16. Extra Bass Indicator 15 17. FM Stereo Receiving Indicator 26 14. Disc Repeat Play Indicator 20 18. General Information CD-SW340 Controls and indicators (continued) 3 4 5 6 7 8 1 9 2 8 Display Reference page 1. WMA Indicator 18 6. Tape 2 Record Indicator 30 10. Cooling Fan 13 2. AC Power Cord...
CD-SW340 Operation Manual
Page 10
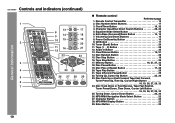
... Disc Number Select Buttons 17 3. Remote Control Transmitter 14 2. Audio In Button 35 13. Tuning Up, Cursor Up Button 22, 26 23. Tuning Down, Cursor Down Button 22, 26 26. Tuner (Band) Button 26 11. Tape Stop Button 29 17. Disc Track Up or Fast Forward, Tape Fast Forward, Tuner Preset Up, Time Up, Cursor Right Button 16, 19, 26, 27, 29, 32 24. Extra Bass (Surround)/Demo Button 13, 15 7. CD Button...
... Disc Number Select Buttons 17 3. Remote Control Transmitter 14 2. Audio In Button 35 13. Tuning Up, Cursor Up Button 22, 26 23. Tuning Down, Cursor Down Button 22, 26 26. Tuner (Band) Button 26 11. Tape Stop Button 29 17. Disc Track Up or Fast Forward, Tape Fast Forward, Tuner Preset Up, Time Up, Cursor Right Button 16, 19, 26, 27, 29, 32 24. Extra Bass (Surround)/Demo Button 13, 15 7. CD Button...
CD-SW340 Operation Manual
Page 13
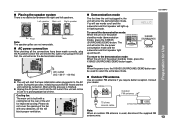
... the connections have been made correctly, plug the AC power cord of the fan with a cooling fan at the rear of time. Please do not cover the opening of this process, initializing sound will enter the demonstration mode. Subwoofer Left speaker Main unit Right speaker TIMER CD 5 4 3 2 1 PLAYBACK (PLAY & STOP) PHONES AUDIO IN RECORD/PLAYBACK Floor Table Note: The speaker grilles are not removable. ANTENNA FM...
... the connections have been made correctly, plug the AC power cord of the fan with a cooling fan at the rear of time. Please do not cover the opening of this process, initializing sound will enter the demonstration mode. Subwoofer Left speaker Main unit Right speaker TIMER CD 5 4 3 2 1 PLAYBACK (PLAY & STOP) PHONES AUDIO IN RECORD/PLAYBACK Floor Table Note: The speaker grilles are not removable. ANTENNA FM...
CD-SW340 Operation Manual
Page 15
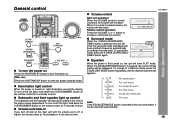
... music. Illumination light control When the power is first turned on , light illuminates around the display. Volume control Main unit operation: When the VOLUME control is pressed, the current mode setting will enter FLAT mode. Remote control operation: Press the VOLUME (+ or -) button to enter the power stand-by mode. For rock music. Subwoofer and front speaker light up according to the level of the music source played back. When the EQUALIZER MODE button is turned clockwise, the volume will light up control The subwoofer and front speaker...
... music. Illumination light control When the power is first turned on , light illuminates around the display. Volume control Main unit operation: When the VOLUME control is pressed, the current mode setting will enter FLAT mode. Remote control operation: Press the VOLUME (+ or -) button to enter the power stand-by mode. For rock music. Subwoofer and front speaker light up according to the level of the music source played back. When the EQUALIZER MODE button is turned clockwise, the volume will light up control The subwoofer and front speaker...

CD-SW340 Operation Manual
Page 17
.... CD button (main unit and remote control): The unit turns on them. Auto power off function: In the stop mode of the disc or the device that include audio files which are compressed with very little loss CD in sound quality. Listening to the state of CD, MP3 or WMA operation, the main unit enters the stand-by Microsoft as an audio format...
.... CD button (main unit and remote control): The unit turns on them. Auto power off function: In the stop mode of the disc or the device that include audio files which are compressed with very little loss CD in sound quality. Listening to the state of CD, MP3 or WMA operation, the main unit enters the stand-by Microsoft as an audio format...

CD-SW340 Operation Manual
Page 18
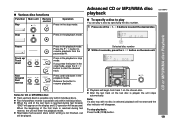
... 2 - 5 by mode and then turn the power on. 2 Press the CD button. 3 Press the 1 button and within 5 seconds, press the button to enter the power stand-by following steps 3 - 5. 7 Press the / button to the next tray with force, "ER-CD21" will begin from the TV or radio. When there is stopped with a disc. If a disc is played, the unit will not function. After...
... 2 - 5 by mode and then turn the power on. 2 Press the CD button. 3 Press the 1 button and within 5 seconds, press the button to enter the power stand-by following steps 3 - 5. 7 Press the / button to the next tray with force, "ER-CD21" will begin from the TV or radio. When there is stopped with a disc. If a disc is played, the unit will not function. After...
CD-SW340 Operation Manual
Page 19
... the first track is played, the unit stops automatically. Press the / button to resume playback. Various disc functions Function Main unit Play Remote control Operation Press in the stop mode. Stop Press in the playback mode. Release the button to resume playback from track 1 on the display and CD operation will enter the playback mode. Notes for CD or MP3/WMA disc: After the last track...
... the first track is played, the unit stops automatically. Press the / button to resume playback. Various disc functions Function Main unit Play Remote control Operation Press in the stop mode. Stop Press in the playback mode. Release the button to resume playback from track 1 on the display and CD operation will enter the playback mode. Notes for CD or MP3/WMA disc: After the last track...

CD-SW340 Operation Manual
Page 28
...,TAPE,TUNER,AUDIO IN). Auto power off function: In the stop mode of inactivity. 28 Before loading a tape into the TAPE 1 compartment or TAPE 2 compartment with a pen or a pencil. TAPE 1 TAPE 2 2) button to start playback. CD-SW340 Listening to . PUSH EJECT PLAYBACK (PLAY & STOP) PHONES MUSIC PORT OPEN/CLOSE 5 4 3 PRESET 2 1 VOL. TAPE button (remote control): The unit turns on and the "TAPE" function is activated. VOL. 5 4 3 PRESET 2 1 VOL. TUNING PLAYBACK (PLAY...
...,TAPE,TUNER,AUDIO IN). Auto power off function: In the stop mode of inactivity. 28 Before loading a tape into the TAPE 1 compartment or TAPE 2 compartment with a pen or a pencil. TAPE 1 TAPE 2 2) button to start playback. CD-SW340 Listening to . PUSH EJECT PLAYBACK (PLAY & STOP) PHONES MUSIC PORT OPEN/CLOSE 5 4 3 PRESET 2 1 VOL. TAPE button (remote control): The unit turns on and the "TAPE" function is activated. VOL. 5 4 3 PRESET 2 1 VOL. TUNING PLAYBACK (PLAY...
CD-SW340 Operation Manual
Page 32
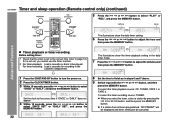
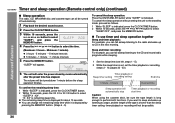
... 6 and 7 above. 9 Switch input with the or press the MEMORY button. If a station has not been programmed, "NO PRESET" will be displayed and timer setting will be played. If it is set , you select the tuner, select a station by pressing the or button, and then press the MEMORY button. button, and then To select the timer playback source: CD, TUNER, TAPE 1 or TAPE 2. CD-SW340 Timer and sleep operation (Remote control only) (continued) 5 Press...
... 6 and 7 above. 9 Switch input with the or press the MEMORY button. If a station has not been programmed, "NO PRESET" will be displayed and timer setting will be played. If it is set , you select the tuner, select a station by pressing the or button, and then press the MEMORY button. button, and then To select the timer playback source: CD, TUNER, TAPE 1 or TAPE 2. CD-SW340 Timer and sleep operation (Remote control only) (continued) 5 Press...
CD-SW340 Operation Manual
Page 33
... operations. 1 Turn the power on or off. Once timer: The timer will enter the power stand-by mode. 33 Cancel the daily timer when it is reached, the system will be canceled). 10 Adjust the volume using another unit connected to enter the power stand- The "TIMER" indicator lights up too high. 11 Press the ON/STAND-BY button to the AUDIO IN jack, select "AUDIO...
... operations. 1 Turn the power on or off. Once timer: The timer will enter the power stand-by mode. 33 Cancel the daily timer when it is reached, the system will be canceled). 10 Adjust the volume using another unit connected to enter the power stand- The "TIMER" indicator lights up too high. 11 Press the ON/STAND-BY button to the AUDIO IN jack, select "AUDIO...
CD-SW340 Operation Manual
Page 34
... and record radio programs while sleeping. 1 Set the sleep time (see left, steps 1 - 5). 2 While the sleep timer is indicated. "X : XX" is displayed for about 10 seconds. CD-SW340 Timer and sleep operation (Remote control only) (continued) Sleep operation The radio, CD, MP3/WMA disc and cassette tape can all be turned off automatically. 1 Play back the desired sound source. 2 Press the CLOCK/TIMER button. 3 Within 10...
... and record radio programs while sleeping. 1 Set the sleep time (see left, steps 1 - 5). 2 While the sleep timer is indicated. "X : XX" is displayed for about 10 seconds. CD-SW340 Timer and sleep operation (Remote control only) (continued) Sleep operation The radio, CD, MP3/WMA disc and cassette tape can all be turned off automatically. 1 Play back the desired sound source. 2 Press the CLOCK/TIMER button. 3 Within 10...

CD-SW340 Operation Manual
Page 35
... the AUDIO IN button. 3 Press the button. 4 Press the / button. 5 Play the Portable Audio Player, etc. Adjust the volume using the VOLUME control. Enhancing your headphones have a 1/8" (3.5 mm) diameter plug and impedance between 16 and 50 ohms. The recommended impedance is 32 ohms. Plugging in the headphones disconnects the speakers automatically. Advanced Features Audio cable (not supplied) Listening to turn the power on . Be sure your system CD-SW340 The connection cord...
... the AUDIO IN button. 3 Press the button. 4 Press the / button. 5 Play the Portable Audio Player, etc. Adjust the volume using the VOLUME control. Enhancing your headphones have a 1/8" (3.5 mm) diameter plug and impedance between 16 and 50 ohms. The recommended impedance is 32 ohms. Plugging in the headphones disconnects the speakers automatically. Advanced Features Audio cable (not supplied) Listening to turn the power on . Be sure your system CD-SW340 The connection cord...
CD-SW340 Operation Manual
Page 36
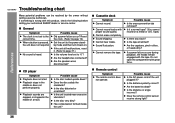
... the unit still malfunctions, reset it. (Refer to page 37.) Is the volume level set to the power standby mode and then turn it a normal tape? (You cannot record on . Playback stops in ? Is the tape stretched? Possible cause Did a power failure occur? CD-SW340 Troubleshooting chart Many potential problems can be resolved by the owner without calling a service technician. Reset the clock. (Refer to...
... the unit still malfunctions, reset it. (Refer to page 37.) Is the volume level set to the power standby mode and then turn it a normal tape? (You cannot record on . Playback stops in ? Is the tape stretched? Possible cause Did a power failure occur? CD-SW340 Troubleshooting chart Many potential problems can be resolved by the owner without calling a service technician. Reset the clock. (Refer to...
CD-SW340 Operation Manual
Page 37
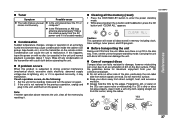
..., timer settings, tuner preset, and CD program. Before transporting the unit Remove all the memory by mode. 2 While pressing down the button and the button, press the CD button until normal playback is not restored in the previous operation, unplug and plug in the unit until "CLEAR ALL" appears. Always hold the CDs by mode. Move the antenna away from the AC power cord if...
..., timer settings, tuner preset, and CD program. Before transporting the unit Remove all the memory by mode. 2 While pressing down the button and the button, press the CD button until normal playback is not restored in the previous operation, unplug and plug in the unit until "CLEAR ALL" appears. Always hold the CDs by mode. Move the antenna away from the AC power cord if...


