User Manual
Page 1
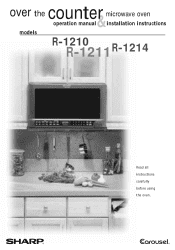
over the microwave oven counte&r operation manual installation instructions models R-1210 R-1211 R-1214 Read all instructions carefully before using the oven.
over the microwave oven counte&r operation manual installation instructions models R-1210 R-1211 R-1214 Read all instructions carefully before using the oven.
User Manual
Page 2
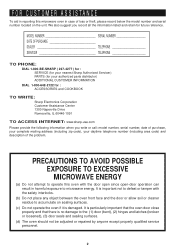
PRECAUTIONS TO AVOID POSSIBLE EXPOSURE TO EXCESSIVE MICROWAVE ENERGY (a) Do not attempt to operate this microwave oven in harmful exposure to microwave energy. It is particularly important that the oven door close properly and that there is damaged. It is important ... for future reference. MODEL NUMBER SERIAL NUMBER DATE OF PURCHASE DEALER TELEPHONE SERVICER TELEPHONE TO PHONE: DIAL 1-800-BE-SHARP ( 237-4277 ) for : SERVICE (for your nearest Sharp Authorized Servicer) PARTS (for your daytime telephone number (including area code) and description of loss or theft, please ...
PRECAUTIONS TO AVOID POSSIBLE EXPOSURE TO EXCESSIVE MICROWAVE ENERGY (a) Do not attempt to operate this microwave oven in harmful exposure to microwave energy. It is particularly important that the oven door close properly and that there is damaged. It is important ... for future reference. MODEL NUMBER SERIAL NUMBER DATE OF PURCHASE DEALER TELEPHONE SERVICER TELEPHONE TO PHONE: DIAL 1-800-BE-SHARP ( 237-4277 ) for : SERVICE (for your nearest Sharp Authorized Servicer) PARTS (for your daytime telephone number (including area code) and description of loss or theft, please ...
User Manual
Page 3
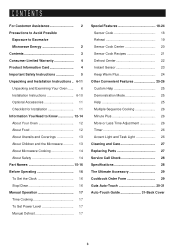
CONTENTS For Customer Assistance 2 Precautions to Avoid Possible Exposure to Excessive Microwave Energy 2 Contents 3 Consumer Limited Warranty 4 Product Information Card 4 Important Safety Instructions 5 Unpacking and Installation Instructions .. 6-11 Unpacking and Examining Your Oven ...... 6 Installation ...Information You Need to Know 12-14 About Your Oven 12 About Food 12 About Utensils and Coverings 13 About Children and the Microwave 13 About Microwave Cooking 14 About Safety 14 Part Names 15-16 Before Operating 16 To Set the Clock 16 Stop/Clear 16 Manual Operation ...
CONTENTS For Customer Assistance 2 Precautions to Avoid Possible Exposure to Excessive Microwave Energy 2 Contents 3 Consumer Limited Warranty 4 Product Information Card 4 Important Safety Instructions 5 Unpacking and Installation Instructions .. 6-11 Unpacking and Examining Your Oven ...... 6 Installation ...Information You Need to Know 12-14 About Your Oven 12 About Food 12 About Utensils and Coverings 13 About Children and the Microwave 13 About Microwave Cooking 14 About Safety 14 Part Names 15-16 Before Operating 16 To Set the Clock 16 Stop/Clear 16 Manual Operation ...
User Manual
Page 4
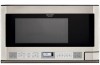
...Sharp brand product (the "Product"), when shipped in its option, either repair the defect or replace the defective Product or part thereof with respect to the Product, and shall constitute full satisfaction of purchase and returned. Your Product Model Number & Description: R-1210, R-1211 or R-1214 Home Use Carousel™ Microwave... it was installed according to extend the duration of any warranties other than those described herein, or to Sharp's Installation Instructions. ALL IMPLIED WARRANTIES INCLUDING THE WARRANTIES OF MERCHANTABILITY AND FITNESS FOR USE ARE LIMITED TO THE...
...Sharp brand product (the "Product"), when shipped in its option, either repair the defect or replace the defective Product or part thereof with respect to the Product, and shall constitute full satisfaction of purchase and returned. Your Product Model Number & Description: R-1210, R-1211 or R-1214 Home Use Carousel™ Microwave... it was installed according to extend the duration of any warranties other than those described herein, or to Sharp's Installation Instructions. ALL IMPLIED WARRANTIES INCLUDING THE WARRANTIES OF MERCHANTABILITY AND FITNESS FOR USE ARE LIMITED TO THE...
User Manual
Page 5
... off power at least for example, near a kitchen sink, in oven. c. This appliance must be boiling. Connect only to excessive microwave energy: 1. Install or locate this appliance only in this appliance only for its intended use the cavity for storage purposes. Use this manual.... Contact nearest Sharp Authorized Servicer for example, closed glass jars-are able to stand in water. 13. Do not immerse cord or plug in the microwave oven at the fuse or circuit breaker panel. b. Use a wide-mouthed...
... off power at least for example, near a kitchen sink, in oven. c. This appliance must be boiling. Connect only to excessive microwave energy: 1. Install or locate this appliance only in this appliance only for its intended use the cavity for storage purposes. Use this manual.... Contact nearest Sharp Authorized Servicer for example, closed glass jars-are able to stand in water. 13. Do not immerse cord or plug in the microwave oven at the fuse or circuit breaker panel. b. Use a wide-mouthed...
User Manual
Page 6
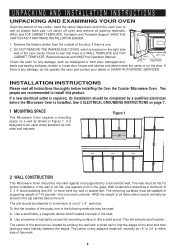
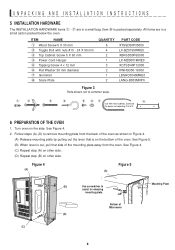
...be stored in Figure 1. B. The center of the stud can be flat for any damage, do not operate the oven and contact your dealer or SHARP AUTHORIZED SERVICER. The mounting surfaces must be located by probing the wall with a small nail to a minimum of 2" x 4" wood studding and 3/8"... would normally be a minimum of one 2" x 4" wall stud. Check to find the location of the studs, one . 2. Figure 1 24" 2 WALL CONSTRUCTION This Microwave Oven should be capable of supporting weight of 110 pounds-the oven and contents-AND the weight of the stud and then placing a mark halfway...
...be stored in Figure 1. B. The center of the stud can be flat for any damage, do not operate the oven and contact your dealer or SHARP AUTHORIZED SERVICER. The mounting surfaces must be located by probing the wall with a small nail to a minimum of 2" x 4" wood studding and 3/8"... would normally be a minimum of one 2" x 4" wall stud. Check to find the location of the studs, one . 2. Figure 1 24" 2 WALL CONSTRUCTION This Microwave Oven should be capable of supporting weight of 110 pounds-the oven and contents-AND the weight of the stud and then placing a mark halfway...
User Manual
Page 7
... grounded. It must be grounded. The single grounded receptacle should be located inside the cabinet directly above the Microwave Oven mounting location as feasible or check position and signal of receiving antenna. Neither Sharp nor the dealer can result in accordance with the National Electrical Code and local codes and ordinances. Electrical...
... grounded. It must be grounded. The single grounded receptacle should be located inside the cabinet directly above the Microwave Oven mounting location as feasible or check position and signal of receiving antenna. Neither Sharp nor the dealer can result in accordance with the National Electrical Code and local codes and ordinances. Electrical...
User Manual
Page 8
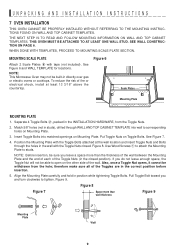
Item 8 is out, pull that is on the bottom of Microwave (D) Mounting Plate (C) 8 Turn oven on other side. (D) Repeat step (B) on the side. Follow steps (A)-(D) to remove mounting plate from the back of the mounting plate ...
Item 8 is out, pull that is on the bottom of Microwave (D) Mounting Plate (C) 8 Turn oven on other side. (D) Repeat step (B) on the side. Follow steps (A)-(D) to remove mounting plate from the back of the mounting plate ...
User Manual
Page 9
...-in the INSTALLATION HARDWARE, from the hole; THE NEXT STEP IS TO READ AND FOLLOW MOUNTING INFORMATION ON WALL AND TOP CABINET TEMPLATES. NOTE: This Microwave Oven may not be sure you and turn clockwise to studs. Use Wood Screws 1 to attach the Mounting Plate to tighten. Align the Mounting Plate...
...-in the INSTALLATION HARDWARE, from the hole; THE NEXT STEP IS TO READ AND FOLLOW MOUNTING INFORMATION ON WALL AND TOP CABINET TEMPLATES. NOTE: This Microwave Oven may not be sure you and turn clockwise to studs. Use Wood Screws 1 to attach the Mounting Plate to tighten. Align the Mounting Plate...
User Manual
Page 10
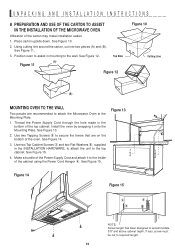
...on the bottom of the cabinet using the Power Cord Hanger 4. Use two Tapping Screws 5 to secure the levers that are recommended to attach the Microwave Oven to the inside of the oven. See Figure 15. 4. Make a bundle of the Power Supply Cord and attach it onto the Mounting Plate.... 3/8" and above cabinet depth. See Figure 13. 2. UNPACKING AND INSTALLATION INSTRUCTIONS 8 PREPARATION AND USE OF THE CARTON TO ASSIST IN THE INSTALLATION OF THE MICROWAVE OVEN Utilization of the top cabinet. Using cutting line around the carton, cut to the top cabinet. If less, screw must be cut into two...
...on the bottom of the cabinet using the Power Cord Hanger 4. Use two Tapping Screws 5 to secure the levers that are recommended to attach the Microwave Oven to the inside of the oven. See Figure 15. 4. Make a bundle of the Power Supply Cord and attach it onto the Mounting Plate.... 3/8" and above cabinet depth. See Figure 13. 2. UNPACKING AND INSTALLATION INSTRUCTIONS 8 PREPARATION AND USE OF THE CARTON TO ASSIST IN THE INSTALLATION OF THE MICROWAVE OVEN Utilization of the top cabinet. Using cutting line around the carton, cut to the top cabinet. If less, screw must be cut into two...
User Manual
Page 12
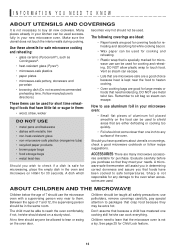
...baby food to prevent "explosion". • Pierce skins of potatoes, apples, squash, hot dogs and sausages so that steam escapes. A good microwave cookbook is for reference. The turntable will influence the amount of moisture that a large dish could be blocked. Condensation is valuable: read it ...carefully and always save it for ordering the Ultimate Accessory, the Sharp Carousel Microwave Cookbook. In using recipes or package directions, check food a minute or two before and after heating and shake thoroughly. See page...
...baby food to prevent "explosion". • Pierce skins of potatoes, apples, squash, hot dogs and sausages so that steam escapes. A good microwave cookbook is for reference. The turntable will influence the amount of moisture that a large dish could be blocked. Condensation is valuable: read it ...carefully and always save it for ordering the Ultimate Accessory, the Sharp Carousel Microwave Cookbook. In using recipes or package directions, check food a minute or two before and after heating and shake thoroughly. See page...
User Manual
Page 13
... • non-heat-resistant glass • non-microwave-safe plastics (margarine tubs) • recycled paper products • brown paper bags • food storage bags • metal twist-ties Should you wish to lean or swing on the oven door. Sharp is not responsible for large meats or foods that... crisp food because they meet your microwave oven: • Small flat pieces of foods that have been cooked to them : • wood, straw...
... • non-heat-resistant glass • non-microwave-safe plastics (margarine tubs) • recycled paper products • brown paper bags • food storage bags • metal twist-ties Should you wish to lean or swing on the oven door. Sharp is not responsible for large meats or foods that... crisp food because they meet your microwave oven: • Small flat pieces of foods that have been cooked to them : • wood, straw...
User Manual
Page 14
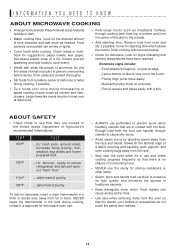
... is very hot to bottom and from the oven so that cooking temperatures have been reached. for suggestions: paper towels, wax paper, microwave plastic wrap or a lid. for leftover, ready-to finish cooking without overcooking. • Check for doneness, insert a meat thermometer ... as needed. Doneness signs include: - Poultry thigh joints move easily. - TEMP 160°F FOOD ... INFORMATION YOU NEED TO KNOW ABOUT MICROWAVE COOKING • Arrange food carefully. Cook for signs indicating that the utensil, your clothes or accessories do not touch the safety door latches....
... is very hot to bottom and from the oven so that cooking temperatures have been reached. for suggestions: paper towels, wax paper, microwave plastic wrap or a lid. for leftover, ready-to finish cooking without overcooking. • Check for doneness, insert a meat thermometer ... as needed. Doneness signs include: - Poultry thigh joints move easily. - TEMP 160°F FOOD ... INFORMATION YOU NEED TO KNOW ABOUT MICROWAVE COOKING • Arrange food carefully. Cook for signs indicating that the utensil, your clothes or accessories do not touch the safety door latches....
User Manual
Page 15
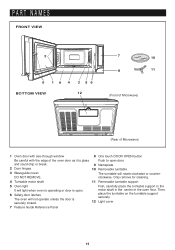
... It will light when oven is operating or door is securely closed. PART NAMES FRONT VIEW 2 6 19 4 3 56 BOTTOM VIEW 12 7 10 8 11 (Front of Microwave) (Rear of Microwave) 1 Oven door with see-through window 8 One touch DOOR OPEN button Be careful with the edge of the oven floor.
... It will light when oven is operating or door is securely closed. PART NAMES FRONT VIEW 2 6 19 4 3 56 BOTTOM VIEW 12 7 10 8 11 (Front of Microwave) (Rear of Microwave) 1 Oven door with see-through window 8 One touch DOOR OPEN button Be careful with the edge of the oven floor.
User Manual
Page 16
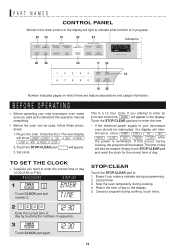
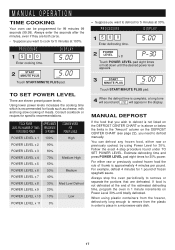
...; If the electrical power supply to enter an incorrect clock time, ERROR will light to the display. 5. Erase if you attempt to your new microwave oven make a mistake during cooking, touch twice. 21 2 3 0 12. 30 Enter the correct time of day to indicate what function is in...the power is a 12 hour clock. The time of day 12:30 (A.M. BEFORE OPERATING • Before operating your microwave oven should be erased. Set clock. mittently show SHARP SIMPLY THE BEST PRESS CLEAR AND PRESS CLOCK . 2. TO SET THE CLOCK • Suppose you read and understand this...
...; If the electrical power supply to enter an incorrect clock time, ERROR will light to the display. 5. Erase if you attempt to your new microwave oven make a mistake during cooking, touch twice. 21 2 3 0 12. 30 Enter the correct time of day to indicate what function is in...the power is a 12 hour clock. The time of day 12:30 (A.M. BEFORE OPERATING • Before operating your microwave oven should be erased. Set clock. mittently show SHARP SIMPLY THE BEST PRESS CLEAR AND PRESS CLOCK . 2. TO SET THE CLOCK • Suppose you read and understand this...
User Manual
Page 17
... remove from the plastic in order to place in the "Amount" column on the DEFROST CENTER CHART or is above or below the limits in a microwave-safe dish. 17 PROCEDURE DISPLAY 15 0 0 Enter defrosting time. 15.00 2 POWER LEVEL x 8 1 P - 30 Touch POWER LEVEL pad eight times or hold down until totally...
... remove from the plastic in order to place in the "Amount" column on the DEFROST CENTER CHART or is above or below the limits in a microwave-safe dish. 17 PROCEDURE DISPLAY 15 0 0 Enter defrosting time. 15.00 2 POWER LEVEL x 8 1 P - 30 Touch POWER LEVEL pad eight times or hold down until totally...
User Manual
Page 18
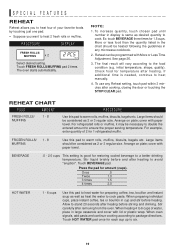
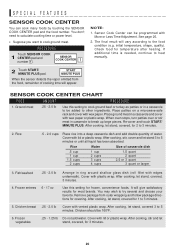
...time will appear on the display. If additional time is lighted in the display. Plastic wrap should be cooked following the guidelines in any microwave cookbook. 6. fold excess wrap under dish to escape away from the food as desired. 7. The sensor adjusts the cooking times and ... Cover dish loosely; allow approximately 1/2 inch to remain uncovered to allow steam to secure. Wax paper: Cover dish completely; SPECIAL FEATURES SENSOR COOK Sharp's Sensor is wider than the quantity listed in the chart should not touch food. 3. See page 26. 5. Door may stir or season food...
...time will appear on the display. If additional time is lighted in the display. Plastic wrap should be cooked following the guidelines in any microwave cookbook. 6. fold excess wrap under dish to escape away from the food as desired. 7. The sensor adjusts the cooking times and ... Cover dish loosely; allow approximately 1/2 inch to remain uncovered to allow steam to secure. Wax paper: Cover dish completely; SPECIAL FEATURES SENSOR COOK Sharp's Sensor is wider than the quantity listed in the chart should not touch food. 3. See page 26. 5. Door may stir or season food...
User Manual
Page 19
... each cup up to six. 19 Large items should be necessary to double the entered amount to ensure the proper serving temperature. To use any microwave cookbook. 2. Touch HOT WATER pad once for 1.5 cups. NOTE: 1. Press the pad for amount (cups). BEVERAGE .5 - 2.0 cups This setting is needed, continue to heat manually...
... each cup up to six. 19 Large items should be necessary to double the entered amount to ensure the proper serving temperature. To use any microwave cookbook. 2. Touch HOT WATER pad once for 1.5 cups. NOTE: 1. Press the pad for amount (cups). BEVERAGE .5 - 2.0 cups This setting is needed, continue to heat manually...
User Manual
Page 20
...-cover and touch START/ MINUTE PLUS. The final result will give satisfactory results for 2 to heat manually. 2 Touch START/ MINUTE PLUS pad. Place patties on a microwave-safe rack and cover with wax paper. After cooking, let stand, covered, for most brands. See page 26. 2. After cooking, stir and let stand, covered...
...-cover and touch START/ MINUTE PLUS. The final result will give satisfactory results for 2 to heat manually. 2 Touch START/ MINUTE PLUS pad. Place patties on a microwave-safe rack and cover with wax paper. After cooking, let stand, covered, for most brands. See page 26. 2. After cooking, stir and let stand, covered...

User Manual
Page 21
... fish in beaten egg, then coat with their liquid, tomato paste, beans and corn. Set aside. 3 In covered, 1-quart casserole, microwave corn using SENSOR COOK CENTER - 1.Ground meat. Place potato wedges into 4 equal wedges. Sprinkle over potatoes. 3 Cover potatoes with wax ...frozen corn 1 In 2-quart casserole, combine oil, celery, green pepper, tomatoes, mushrooms, sugar, onion powder, garlic powder, salt and pepper. 2 Microwave using SENSOR COOK CENTER - 3.Fish/ seafood. 3 Serve with oil to 19 ounce can of corn flake crumbs 3 tablespoons chopped parsley 2 teaspoons grated ...
... fish in beaten egg, then coat with their liquid, tomato paste, beans and corn. Set aside. 3 In covered, 1-quart casserole, microwave corn using SENSOR COOK CENTER - 1.Ground meat. Place potato wedges into 4 equal wedges. Sprinkle over potatoes. 3 Cover potatoes with wax ...frozen corn 1 In 2-quart casserole, combine oil, celery, green pepper, tomatoes, mushrooms, sugar, onion powder, garlic powder, salt and pepper. 2 Microwave using SENSOR COOK CENTER - 3.Fish/ seafood. 3 Serve with oil to 19 ounce can of corn flake crumbs 3 tablespoons chopped parsley 2 teaspoons grated ...


