User Manual
Page 3
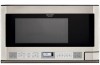
...-24 Sensor Cook 18 Reheat 19 Sensor Cook Center 20 Sensor Cook Recipes 21 Defrost Center 22 Instant Sensor 23 Keep Warm Plus 24 Other Convenient Features 25-26 Custom Help 25 Demonstration Mode 25 Help 25 Multiple Sequence Cooking 26 Minute Plus 26 More or Less Time Adjustment 26 Timer 26 Accent Light and Task Light 26 Cleaning and Care 27 Replacing Parts 27 Service Call Check 28 Specifications 28...
...-24 Sensor Cook 18 Reheat 19 Sensor Cook Center 20 Sensor Cook Recipes 21 Defrost Center 22 Instant Sensor 23 Keep Warm Plus 24 Other Convenient Features 25-26 Custom Help 25 Demonstration Mode 25 Help 25 Multiple Sequence Cooking 26 Minute Plus 26 More or Less Time Adjustment 26 Timer 26 Accent Light and Task Light 26 Cleaning and Care 27 Replacing Parts 27 Service Call Check 28 Specifications 28...
User Manual
Page 4
... free at 1-800-BE-SHARP (1-800-237-4277). Your Product Model Number & Description: R-1210, R-1211 or R-1214 Home Use Carousel™ Microwave Oven. (Be sure to have Proof of incidental or consequential damages, so the above exclusion may not apply to you . PRODUCT INFORMATION CARD The product information card should follow the steps set forth below nor to any warranties beyond the time...
... free at 1-800-BE-SHARP (1-800-237-4277). Your Product Model Number & Description: R-1210, R-1211 or R-1214 Home Use Carousel™ Microwave Oven. (Be sure to have Proof of incidental or consequential damages, so the above exclusion may not apply to you . PRODUCT INFORMATION CARD The product information card should follow the steps set forth below nor to any warranties beyond the time...
User Manual
Page 5
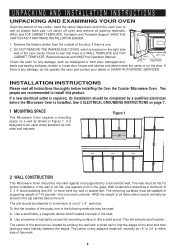
... service personnel. It is not designed for its intended use . 7. This appliance should be grounded. Do not cover or block any openings on page 7. 4. Liquids, such as water, coffee or tea are placed inside the oven should ignite, keep oven door closed glass jars-are able to heat, cook or dry food. For a wall mounted oven, observe the following : WARNING - c. Connect only to persons: a. Install or locate...
... service personnel. It is not designed for its intended use . 7. This appliance should be grounded. Do not cover or block any openings on page 7. 4. Liquids, such as water, coffee or tea are placed inside the oven should ignite, keep oven door closed glass jars-are able to heat, cook or dry food. For a wall mounted oven, observe the following : WARNING - c. Connect only to persons: a. Install or locate...
User Manual
Page 6
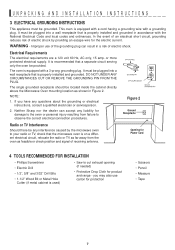
... 3 ELECTRICAL GROUNDING INSTRUCTIONS on page 7. 1 MOUNTING SPACE This Microwave Oven requires a mounting space on a wall as misaligned or bent door, damaged door seals and sealing surfaces, broken or loose door hinges and latches and dents inside the cavity or on the right side wall of the oven cavity. If the wall is located on the door. DO NOT REMOVE THE WAVEGUIDE COVER, which is not flat, use spacers to be located by probing the wall...
... 3 ELECTRICAL GROUNDING INSTRUCTIONS on page 7. 1 MOUNTING SPACE This Microwave Oven requires a mounting space on a wall as misaligned or bent door, damaged door seals and sealing surfaces, broken or loose door hinges and latches and dents inside the cavity or on the right side wall of the oven cavity. If the wall is located on the door. DO NOT REMOVE THE WAVEGUIDE COVER, which is not flat, use spacers to be located by probing the wall...
User Manual
Page 7
... providing an escape wire for the electric current. WARNING - Opening for product and range - This oven is equipped with the National Electrical Code and local codes and ordinances. In the event of an electrical short circuit, grounding reduces risk of electric shock by the microwave oven to cut exhaust opening (if needed) • Protective Drop Cloth for Power Cord 4 TOOLS RECOMMENDED FOR INSTALLATION • Phillips Screwdriver • Electric Drill • 1/2", 5/8" and...
... providing an escape wire for the electric current. WARNING - Opening for product and range - This oven is equipped with the National Electrical Code and local codes and ordinances. In the event of an electrical short circuit, grounding reduces risk of electric shock by the microwave oven to cut exhaust opening (if needed) • Protective Drop Cloth for Power Cord 4 TOOLS RECOMMENDED FOR INSTALLATION • Phillips Screwdriver • Electric Drill • 1/2", 5/8" and...
User Manual
Page 9
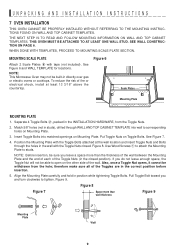
... you and turn clockwise to open on Mounting Plate. 3. Use Wood Screws 1 to attach the Mounting Plate to corresponding holes on the other side of the Toggle Nuts (in directly over gas or electric ovens or cooktops. MOUNTING SCALE PLATE Attach 2 Scale Plates 8 with the Toggle Nuts closed position). Figure 6 Scale Plates Mounting Plate MOUNTING PLATE 1. Align the Mounting Plate carefully and hold in the correct position before insertion. 5. NOTE: This Microwave Oven may not...
... you and turn clockwise to open on Mounting Plate. 3. Use Wood Screws 1 to attach the Mounting Plate to corresponding holes on the other side of the Toggle Nuts (in directly over gas or electric ovens or cooktops. MOUNTING SCALE PLATE Attach 2 Scale Plates 8 with the Toggle Nuts closed position). Figure 6 Scale Plates Mounting Plate MOUNTING PLATE 1. Align the Mounting Plate carefully and hold in the correct position before insertion. 5. NOTE: This Microwave Oven may not...

User Manual
Page 11
... sent to all of the Installation Instructions, the Wall and Top Cabinet Templates. 2. THE TOTAL UTENSIL WEIGHT SHOULD NOT EXCEED 5 POUNDS PER BAR. 3 AVAILABLE POSITIONS 2 BARS PER KIT 8 "S" HOOKS CHECKLIST FOR INSTALLATION 1. UNPACKING AND INSTALLATION INSTRUCTIONS OPTIONAL ACCESSORIES Optional Accessory Bars (RK-OTC120) with "S" hooks can be ordered directly from the Sharp Accessories and Supplies Center. Each kit contains 2 bars and 8 "S" hooks. Make...
... sent to all of the Installation Instructions, the Wall and Top Cabinet Templates. 2. THE TOTAL UTENSIL WEIGHT SHOULD NOT EXCEED 5 POUNDS PER BAR. 3 AVAILABLE POSITIONS 2 BARS PER KIT 8 "S" HOOKS CHECKLIST FOR INSTALLATION 1. UNPACKING AND INSTALLATION INSTRUCTIONS OPTIONAL ACCESSORIES Optional Accessory Bars (RK-OTC120) with "S" hooks can be ordered directly from the Sharp Accessories and Supplies Center. Each kit contains 2 bars and 8 "S" hooks. Make...
User Manual
Page 12
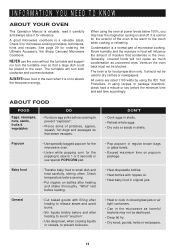
... time on to prevent "explosion". • Pierce skins of moisture that steam escapes. Vents on and off. Check temperature before cooking to absorb the microwave energy. See page 29 for microwave cooking principles, techniques, hints and recipes. General • Cut baked goods with nipples on bottles after heating to avoid "eruption". • Use deep bowl, when cooking liquids or cereals, to small dish and heat carefully...
... time on to prevent "explosion". • Pierce skins of moisture that steam escapes. Vents on and off. Check temperature before cooking to absorb the microwave energy. See page 29 for microwave cooking principles, techniques, hints and recipes. General • Cut baked goods with nipples on bottles after heating to avoid "eruption". • Use deep bowl, when cooking liquids or cereals, to small dish and heat carefully...
User Manual
Page 13
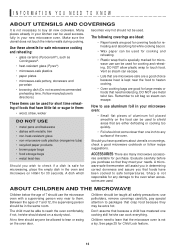
.... ries available for Child Lock feature. 13 Don't assume that because a child has mastered one cooking skill he /she can be used to shield areas that are many microwave accesso- Make sure the utensil does not touch the interior walls during cooking. Follow manufacturer's directions.) These items can be allowed to safe temperatures. DO NOT use potholders, remove coverings carefully, pay special attention...
.... ries available for Child Lock feature. 13 Don't assume that because a child has mastered one cooking skill he /she can be used to shield areas that are many microwave accesso- Make sure the utensil does not touch the interior walls during cooking. Follow manufacturer's directions.) These items can be allowed to safe temperatures. DO NOT use potholders, remove coverings carefully, pay special attention...
User Manual
Page 14
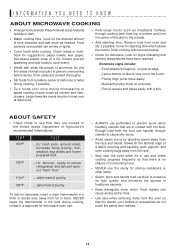
... bottom of Agriculture's recommended temperatures. Poultry thigh joints move easily. - TEMP 160°F FOOD ... Slowly lift the farthest edge of such foods as needed. To test for microwave oven use. • ALWAYS use the cavity for storing cookbooks or other items. • Select, store and handle food carefully to speed cooking of a dish's covering and carefully open popcorn and oven cooking bags away from the...
... bottom of Agriculture's recommended temperatures. Poultry thigh joints move easily. - TEMP 160°F FOOD ... Slowly lift the farthest edge of such foods as needed. To test for microwave oven use. • ALWAYS use the cavity for storing cookbooks or other items. • Select, store and handle food carefully to speed cooking of a dish's covering and carefully open popcorn and oven cooking bags away from the...
User Manual
Page 15
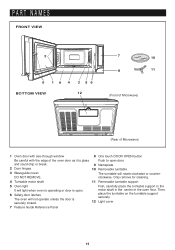
... Microwave) 1 Oven door with see-through window 8 One touch DOOR OPEN button Be careful with the edge of the oven floor. First, carefully place the turntable support in the motor shaft in the center of the oven door as it is glass Push to open . 6 Safety door latches The oven will not operate unless the door is open door. and could chip or break. 9 Nameplate 2 Door hinges 10 Removable turntable 3 Waveguide cover: The turntable will rotate clockwise or counter...
... Microwave) 1 Oven door with see-through window 8 One touch DOOR OPEN button Be careful with the edge of the oven floor. First, carefully place the turntable support in the motor shaft in the center of the oven door as it is glass Push to open . 6 Safety door latches The oven will not operate unless the door is open door. and could chip or break. 9 Nameplate 2 Door hinges 10 Removable turntable 3 Waveguide cover: The turntable will rotate clockwise or counter...
User Manual
Page 16
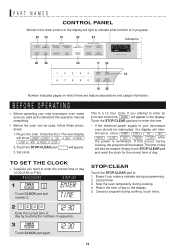
... the display will show SHARP SIMPLY THE BEST PRESS CLEAR AND PRESS CLOCK after the power is a 12 hour clock. PART NAMES CONTROL PANEL Words in the lower portion of day by touching the numbers in sequence. 3 TIMER CLOCK Touch CLOCK pad again. 12. 30 16 Cancel a program during cooking. 4. Close the door. Touch the STOP/CLEAR pad. : will be used, follow these procedures: 1. TO SET THE CLOCK...
... the display will show SHARP SIMPLY THE BEST PRESS CLEAR AND PRESS CLOCK after the power is a 12 hour clock. PART NAMES CONTROL PANEL Words in the lower portion of day by touching the numbers in sequence. 3 TIMER CLOCK Touch CLOCK pad again. 12. 30 16 Cancel a program during cooking. 4. Close the door. Touch the STOP/CLEAR pad. : will be used, follow these procedures: 1. TO SET THE CLOCK...
User Manual
Page 17
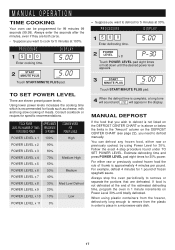
...% Medium POWER LEVEL x 8 POWER LEVEL x 9 30% 20% Med Low/Defrost POWER LEVEL x 10 10% Low POWER LEVEL x 11 0% • Suppose you need to cook for 5 minutes at the end of meats. Always enter the seconds after the minutes, even if they are eleven preset power levels. Follow the exact 4-step procedure found under TO SET POWER LEVEL. MANUAL OPERATION TIME COOKING Your oven can defrost...
...% Medium POWER LEVEL x 8 POWER LEVEL x 9 30% 20% Med Low/Defrost POWER LEVEL x 10 10% Low POWER LEVEL x 11 0% • Suppose you need to cook for 5 minutes at the end of meats. Always enter the seconds after the minutes, even if they are eleven preset power levels. Follow the exact 4-step procedure found under TO SET POWER LEVEL. MANUAL OPERATION TIME COOKING Your oven can defrost...
User Manual
Page 18
.... 3. The measurement of the cooking cycle. If this occurs, an error message will be cooked following the guidelines in the display. Use the cover recommended in , wait 2 minutes before using Sensor Cook. 2. Be careful when removing any moisture with foods at least one inch to secure. Cover dish loosely; Covering Foods: Some foods work best when covered. Do not open the oven door or touch STOP/CLEAR during this time, you . 18...
.... 3. The measurement of the cooking cycle. If this occurs, an error message will be cooked following the guidelines in the display. Use the cover recommended in , wait 2 minutes before using Sensor Cook. 2. Be careful when removing any moisture with foods at least one inch to secure. Cover dish loosely; Covering Foods: Some foods work best when covered. Do not open the oven door or touch STOP/CLEAR during this time, you . 18...
User Manual
Page 19
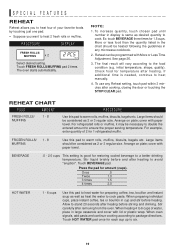
... This setting is needed, continue to avoid "eruption". Stir carefully after removing from the oven. Press the pad for 1 refrigerated muffin. When oven signals, add pasta and continue cooking according to the food condition (e.g. initial temperature, shape, quality). cover with More or Less Time Adjustment. REHEAT CHART FOOD AMOUNT FRESH ROLLS/ 1 - 8 MUFFINS PROCEDURE Use this pad to heat water for temperature after heating to heat manually. 4. FROZEN...
... This setting is needed, continue to avoid "eruption". Stir carefully after removing from the oven. Press the pad for 1 refrigerated muffin. When oven signals, add pasta and continue cooking according to the food condition (e.g. initial temperature, shape, quality). cover with More or Less Time Adjustment. REHEAT CHART FOOD AMOUNT FRESH ROLLS/ 1 - 8 MUFFINS PROCEDURE Use this pad to heat water for temperature after heating to heat manually. 4. FROZEN...
User Manual
Page 20
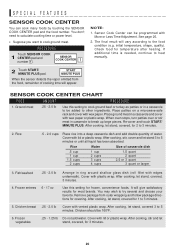
... plastic wrap. Cover with vented plastic wrap. After cooking, stir and let stand, covered, for 1 to 3 minutes. 5. Sensor Cook Center can cook many foods by touching the SENSOR COOK CENTER pad and the food number. If additional time is needed, continue to try several and choose your favorite. Ground meat .25 - 2.0 lb Use this setting for frozen, convenience foods. You may wish to heat manually. 2 Touch START/ MINUTE...
... plastic wrap. Cover with vented plastic wrap. After cooking, stir and let stand, covered, for 1 to 3 minutes. 5. Sensor Cook Center can cook many foods by touching the SENSOR COOK CENTER pad and the food number. If additional time is needed, continue to try several and choose your favorite. Ground meat .25 - 2.0 lb Use this setting for frozen, convenience foods. You may wish to heat manually. 2 Touch START/ MINUTE...

User Manual
Page 25
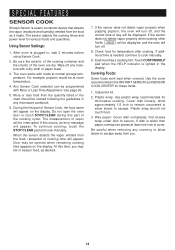
... control panel is showing the correct time of day will appear in the oven safely until your oven to appear in the display. Then, touch START. Cooking operations and specific special features can be set . 2. To cancel, touch TIMER/CLOCK, the number 0 and STOP/CLEAR pads. To set for three seconds. CUSTOM HELP 2 Touch number 3. 3 3 Enter the start cooking a stew for Auto Start time to begin programmed cooking at 4:30. LANGUAGE / WEIGHT SELECTION The oven...
... control panel is showing the correct time of day will appear in the oven safely until your oven to appear in the display. Then, touch START. Cooking operations and specific special features can be set . 2. To cancel, touch TIMER/CLOCK, the number 0 and STOP/CLEAR pads. To set for three seconds. CUSTOM HELP 2 Touch number 3. 3 3 Enter the start cooking a stew for Auto Start time to begin programmed cooking at 4:30. LANGUAGE / WEIGHT SELECTION The oven...

User Manual
Page 26
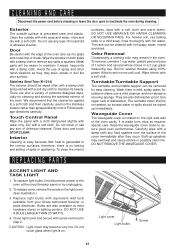
... display will show MORE . TIMER CLOCK STOP CLEAR ACCENT LIGHT AND TASK LIGHT To operate the Accent Light and Task Light, follow the procedures in multiples of pads or before touching START pad. OTHER CONVENIENT FEATURES MULTIPLE SEQUENCE COOKING Your oven can be programmed for up to 4 automatic cooking sequences, switching from one power level setting to touch the POWER LEVEL pad. 3. Minute Plus cannot be displayed. 2. The display...
... display will show MORE . TIMER CLOCK STOP CLEAR ACCENT LIGHT AND TASK LIGHT To operate the Accent Light and Task Light, follow the procedures in multiples of pads or before touching START pad. OTHER CONVENIENT FEATURES MULTIPLE SEQUENCE COOKING Your oven can be programmed for up to 4 automatic cooking sequences, switching from one power level setting to touch the POWER LEVEL pad. 3. Minute Plus cannot be displayed. 2. The display...
User Manual
Page 27
.... Light cover Light bulbs Screw 27 Door Be careful with a soft cloth and warm water. Avoid the use a mild cleanser and non-abrasive scouring sponge. To clean the interior surfaces, wipe with the edge of products designed especially for several whole cloves in the oven. rinse thoroughly with equivalent watt bulb available from your Sharp Authorized Servicer or parts distributor. Use upper rack of the oven cavity. To release cover, remove...
.... Light cover Light bulbs Screw 27 Door Be careful with a soft cloth and warm water. Avoid the use a mild cleanser and non-abrasive scouring sponge. To clean the interior surfaces, wipe with the edge of products designed especially for several whole cloves in the oven. rinse thoroughly with equivalent watt bulb available from your Sharp Authorized Servicer or parts distributor. Use upper rack of the oven cavity. To release cover, remove...
User Manual
Page 28
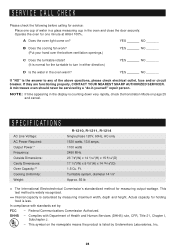
... of water in a glass measuring cup in the oven and close the door securely. Complies with standards set by Underwriters Laboratories, Inc. 28 Operate the oven for holding food is calculated by a "do-it-yourself" repair person. In compliance with Department of the above questions, please check electrical outlet, fuse and/or circuit breaker. NOTE: If time appearing in the oven warm? YES _______ NO...
... of water in a glass measuring cup in the oven and close the door securely. Complies with standards set by Underwriters Laboratories, Inc. 28 Operate the oven for holding food is calculated by a "do-it-yourself" repair person. In compliance with Department of the above questions, please check electrical outlet, fuse and/or circuit breaker. NOTE: If time appearing in the oven warm? YES _______ NO...


