
Operation Manual
Page 1
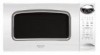
MICROWAVE OPERATION ® OVEN MANUAL MODELS K/ R =white. S=_ R-428J color _1 Read all instructions carefully before using the oven. Carousel_
MICROWAVE OPERATION ® OVEN MANUAL MODELS K/ R =white. S=_ R-428J color _1 Read all instructions carefully before using the oven. Carousel_
Operation Manual
Page 2
... the door or allow soil or cleaner residue to accumulate on the unit. We also suggest you write or call: model number, serial number, date of purchase, your complete mailing address (including zip code), your daytime telephone number (including area code) and description of loss or theft, please record below the model number and serial number located on sealing surfaces. (c) Do not operate the oven...
... the door or allow soil or cleaner residue to accumulate on the unit. We also suggest you write or call: model number, serial number, date of purchase, your complete mailing address (including zip code), your daytime telephone number (including area code) and description of loss or theft, please record below the model number and serial number located on sealing surfaces. (c) Do not operate the oven...

Operation Manual
Page 3
...-functional accessories, turntable and light bulb. The limited warranty described herein is in addition to whatever implied warranties may not apply to you need service for your Product to a Sharp Authorized Servicer. COHSUMERLIMITED WARRAHTY SHARP ELECTRONICS CORPORATION warrants to the first consumer purchaser that this Sharp brand product (the "Product"), when shipped in its option, either repair the defect or replace the defective...
...-functional accessories, turntable and light bulb. The limited warranty described herein is in addition to whatever implied warranties may not apply to you need service for your Product to a Sharp Authorized Servicer. COHSUMERLIMITED WARRAHTY SHARP ELECTRONICS CORPORATION warrants to the first consumer purchaser that this Sharp brand product (the "Product"), when shipped in its option, either repair the defect or replace the defective...

Operation Manual
Page 4
...- Remove wire twist-ties from heated surfaces. 14. d. Visible bubbling or boiling when the container is specifically designed to be boiling. e. If the oven is necessary when used by qualified service personnel. Do not mount over edge of a heating or cooking appliance. d. Connect only to persons: a. Use this oven. 6. As with the provided installation instructions. 5. Do not cover or block any portion of table or counter. 15. Carefully...
...- Remove wire twist-ties from heated surfaces. 14. d. Visible bubbling or boiling when the container is specifically designed to be boiling. e. If the oven is necessary when used by qualified service personnel. Do not mount over edge of a heating or cooking appliance. d. Connect only to persons: a. Use this oven. 6. As with the provided installation instructions. 5. Do not cover or block any portion of table or counter. 15. Carefully...
Operation Manual
Page 5
... local codes allow. Tab for the electric current. Built-in accordance with a 3-prong grounding plug. The kit includes ducts, finish trim strips and easy-tofollow instructions for the R-520KS. ken or loose door hinges and latches and dents inside the oven cavity. not near or above a conventional wall oven. Read enclosures and SAVE the Operation Manual. 2. ture sticker, if there is located on the door. using a Sharp Built-in kit for installation...
... local codes allow. Tab for the electric current. Built-in accordance with a 3-prong grounding plug. The kit includes ducts, finish trim strips and easy-tofollow instructions for the R-520KS. ken or loose door hinges and latches and dents inside the oven cavity. not near or above a conventional wall oven. Read enclosures and SAVE the Operation Manual. 2. ture sticker, if there is located on the door. using a Sharp Built-in kit for installation...

Operation Manual
Page 6
... 1 or 2 seconds or use the oven without the turntable and support nor turn both clockwise and counterclockwise. It is rated 1200 watts by using the oven at power levels below 100%, you may not be warm to small dish and heat carefully, stirring often. In using recipes or package directions, check food a minute or two before cooking to dry clothes or newspapers. General • Cut baked goods with...
... 1 or 2 seconds or use the oven without the turntable and support nor turn both clockwise and counterclockwise. It is rated 1200 watts by using the oven at power levels below 100%, you may not be warm to small dish and heat carefully, stirring often. In using recipes or package directions, check food a minute or two before cooking to dry clothes or newspapers. General • Cut baked goods with...

Operation Manual
Page 7
... buy all safety precautions: use potholders, remove coverings carefully, pay special attention to packages that crisp food because they meet your needs. Should you that foods have been cooked to slit bag so steam can be used to shield areas that are used . Don't assume that need to lean or swing on a sturdy stool. Children need tenderizing. cessories available for Child Lock feature. Follow manufacturer's directions...
... buy all safety precautions: use potholders, remove coverings carefully, pay special attention to packages that crisp food because they meet your needs. Should you that foods have been cooked to slit bag so steam can be used to shield areas that are used . Don't assume that need to lean or swing on a sturdy stool. Children need tenderizing. cessories available for Child Lock feature. Follow manufacturer's directions...

Operation Manual
Page 8
... not touch the safety door latches. Cook for suggestions: paper towels, wax paper, microwave plastic wrap or a lid. Place thickest areas towards outside . Food severely overcooked can cause arcing and/or fires. • Use care when removing items from the center of the dish to speed cooking of Agriculture's recommended temperatures. Meat and poultry show no chance of a dish's covering and carefully open popcorn and oven cooking...
... not touch the safety door latches. Cook for suggestions: paper towels, wax paper, microwave plastic wrap or a lid. Place thickest areas towards outside . Food severely overcooked can cause arcing and/or fires. • Use care when removing items from the center of the dish to speed cooking of Agriculture's recommended temperatures. Meat and poultry show no chance of a dish's covering and carefully open popcorn and oven cooking...

Operation Manual
Page 9
MICROWAVE OVEN PARTS 5 9 10 / 32 11 1 One touch door open button Push to open . 11 Waveguide cover: DO NOT REMOVE. 12 Auto-Touch control panel 13 Time display: 99 minutes, 99 seconds INTERACTIVE DISPLAY The interactive Display spells out operating steps and shows cooking hints. Words in the display will light to read a specific hint which may assist you. The turntable will light when oven is operating or door is open door. 2 Oven door with see-through window 3 Safety door latches The oven will not operate unless the...
MICROWAVE OVEN PARTS 5 9 10 / 32 11 1 One touch door open button Push to open . 11 Waveguide cover: DO NOT REMOVE. 12 Auto-Touch control panel 13 Time display: 99 minutes, 99 seconds INTERACTIVE DISPLAY The interactive Display spells out operating steps and shows cooking hints. Words in the display will light to read a specific hint which may assist you. The turntable will light when oven is operating or door is open door. 2 Oven door with see-through window 3 Safety door latches The oven will not operate unless the...
Operation Manual
Page 11
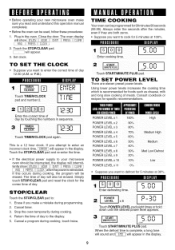
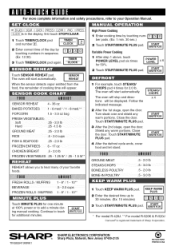
... the display. POWER LEVEL x 3 POWER LEVEL x 4 POWER LEVEL x 5 POWER LEVEL x 6 POWER LEVEL x 7 POWER LEVEL x 8 POWER LEVEL x 9 80% 70% 60% 50% 40% 30% 20% k4ecum High Medium Med Low/Defrost • If the electrical power supply to : 1. Stop the oven temporarily during programming. Touch POWER LEVEL pad eight times or h01d down until the desired power level appears. 4. Touch theSTOPICLEAR pad. Set clock. Cancel timer. 3. Cancel a program during cooking, touch twice. 3 I I START I c nn I . 71--1 C.",U Touch TIMER/CLOCK pad again, This is comPlete, a long tone will sound and...
... the display. POWER LEVEL x 3 POWER LEVEL x 4 POWER LEVEL x 5 POWER LEVEL x 6 POWER LEVEL x 7 POWER LEVEL x 8 POWER LEVEL x 9 80% 70% 60% 50% 40% 30% 20% k4ecum High Medium Med Low/Defrost • If the electrical power supply to : 1. Stop the oven temporarily during programming. Touch POWER LEVEL pad eight times or h01d down until the desired power level appears. 4. Touch theSTOPICLEAR pad. Set clock. Cancel timer. 3. Cancel a program during cooking, touch twice. 3 I I START I c nn I . 71--1 C.",U Touch TIMER/CLOCK pad again, This is comPlete, a long tone will sound and...
Operation Manual
Page 12
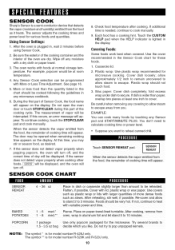
... continue cooking, touch the STOP/CLEAR pad and cook manually. If not. wrap in the Sensor Cook chart for model number R-428J only. The sensor adjusts the cooking times and power level for microwave cooking. After the oven is plugged in the display. Touch the CUSTOM HELP pad when the HELP indicator is lighted in , wait 2 minutes before using Sensor Cook. 2. If dish is wider than the quantity listed in the chart should not touch food. 3. SENSOR COOK...
... continue cooking, touch the STOP/CLEAR pad and cook manually. If not. wrap in the Sensor Cook chart for model number R-428J only. The sensor adjusts the cooking times and power level for microwave cooking. After the oven is plugged in the display. Touch the CUSTOM HELP pad when the HELP indicator is lighted in , wait 2 minutes before using Sensor Cook. 2. If dish is wider than the quantity listed in the chart should not touch food. 3. SENSOR COOK...
Operation Manual
Page 13
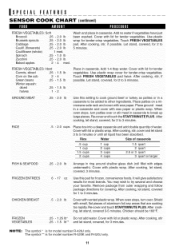
... rack and cover with lid for frozen, convenience foods. Re-cover and touch the START/MINUTE PLUS. After cooking, let stand. covered, 3 minutes. Place ground meat q a casserole and cover with lid for 2 to 5 minutes or until all liquid has been absorbed. Use this setting to other ingredients. Use plastic wrap for 3 minutes. FRESH VEGETABLES: Carrots. Cover with wax paper or plastic wrap. When oven stops, turn...
... rack and cover with lid for frozen, convenience foods. Re-cover and touch the START/MINUTE PLUS. After cooking, let stand. covered, 3 minutes. Place ground meat q a casserole and cover with lid for 2 to 5 minutes or until all liquid has been absorbed. Use this setting to other ingredients. Use plastic wrap for 3 minutes. FRESH VEGETABLES: Carrots. Cover with wax paper or plastic wrap. When oven stops, turn...
Operation Manual
Page 15
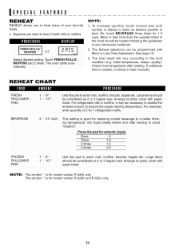
.... Check food temperature after heating to the food condition (e.g. For example. Large items should be heated following the guidelines in display is needed, continue to heat manually. I'_IJJ_E|JII;I: JLUlIJ'! [ FRESH ROLLS1 ] I "E_PI Select desired setting. The oven starts auto, matica!!y. Arrange on plate; Arrange on plate; NOTE: 1. Ex: touch BEVERAGE three times for model number R-520K and R-520J only. 13 More or less food than the quantity listed in...
.... Check food temperature after heating to the food condition (e.g. For example. Large items should be heated following the guidelines in display is needed, continue to heat manually. I'_IJJ_E|JII;I: JLUlIJ'! [ FRESH ROLLS1 ] I "E_PI Select desired setting. The oven starts auto, matica!!y. Arrange on plate; Arrange on plate; NOTE: 1. Ex: touch BEVERAGE three times for model number R-520K and R-520J only. 13 More or less food than the quantity listed in...
Operation Manual
Page 16
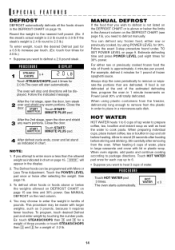
.... Stir carefully after selecting the weight. Touch HOT WATER pad once for 30% power. See MANUAL DEFROST on page 9. Always stop and directions will start automatically. Estimate defrosting time and press POWER LEVEL pad eight times for each cup up to 6. • Suppose you attempt to enter more or less than the allowed weight as heat the water to package directions. After the 1st stage, open the door and shield...
.... Stir carefully after selecting the weight. Touch HOT WATER pad once for 30% power. See MANUAL DEFROST on page 9. Always stop and directions will start automatically. Estimate defrosting time and press POWER LEVEL pad eight times for each cup up to 6. • Suppose you attempt to enter more or less than the allowed weight as heat the water to package directions. After the 1st stage, open the door and shield...

Operation Manual
Page 18
... to 4 automatic cooking sequences, switching from the electrical outlet and replug. If easier, unplug the oven from one power level and then change to a different power level. I [] Enter t me! F_ [-'_ [-'_ 3 ZoiiiT,,,,oiiiCdLIOCTLOC.C°K,..I MINUTE PLUS MINUTE PLUS allows you start on the light and touch again to turn on one power level setting to heat a cup of pads. For example, touch MINUTE PLUS and the display will appear in...
... to 4 automatic cooking sequences, switching from the electrical outlet and replug. If easier, unplug the oven from one power level and then change to a different power level. I [] Enter t me! F_ [-'_ [-'_ 3 ZoiiiT,,,,oiiiCdLIOCTLOC.C°K,..I MINUTE PLUS MINUTE PLUS allows you start on the light and touch again to turn on one power level setting to heat a cup of pads. For example, touch MINUTE PLUS and the display will appear in...

Operation Manual
Page 19
... display. To change, touch CUSTOM HELP and the number []. Should a pad be used for manual cooking if clock is necessary to touch the START/ MINUTE PLUS pad for Auto Start time to begin programmed cooking at a designated time of day, follow this procedure: • Suppose you wish to program your oven to appear in the readout so that the control panel is lighted in the Interactive Display for language and standard of weight...
... display. To change, touch CUSTOM HELP and the number []. Should a pad be used for manual cooking if clock is necessary to touch the START/ MINUTE PLUS pad for Auto Start time to begin programmed cooking at a designated time of day, follow this procedure: • Suppose you wish to program your oven to appear in the readout so that the control panel is lighted in the Interactive Display for language and standard of weight...
Operation Manual
Page 20
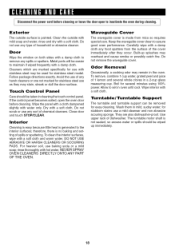
... the waveguide cover clean to the interior surfaces; Turntable/Turntable Support The turntable and turntable support can be taken in a 2-cup glass measuring cup. rinse and dry with a soft cloth. Waveguide Cover The waveguide cover is no baking and setting of household or abrasive cleaner. Touch Control Panel Care should be used for stubborn stains use baking soda or a mild soap; DO NOT USE ABRASIVE OR HARSH CLEANERS OR SCOURING PADS. Boil for use any food...
... the waveguide cover clean to the interior surfaces; Turntable/Turntable Support The turntable and turntable support can be taken in a 2-cup glass measuring cup. rinse and dry with a soft cloth. Waveguide Cover The waveguide cover is no baking and setting of household or abrasive cleaner. Touch Control Panel Care should be used for stubborn stains use baking soda or a mild soap; DO NOT USE ABRASIVE OR HARSH CLEANERS OR SCOURING PADS. Boil for use any food...
Operation Manual
Page 21
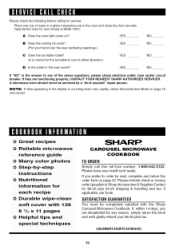
... the answer to turn in either direction.) D Is the water in the oven and close the door securely. O Great recipes O Reliable microwave reference guide O Many color photos O Step-by-step i nstructions Q Nutritional information for any of water in a glass measuring cup in the oven warm? If they are dissatisfied for 0 Durable wipe-clean soft cover with the Sharp Carousel Microwave Cookbook. A microwave oven should never...
... the answer to turn in either direction.) D Is the water in the oven and close the door securely. O Great recipes O Reliable microwave reference guide O Many color photos O Step-by-step i nstructions Q Nutritional information for any of water in a glass measuring cup in the oven warm? If they are dissatisfied for 0 Durable wipe-clean soft cover with the Sharp Carousel Microwave Cookbook. A microwave oven should never...
Operation Manual
Page 22
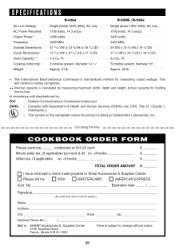
... . Turntable system, diameter 16" Approx. 46 Ib , The International Electrotechnical Commission's standardized method for holding food is subject to Sharp Accessories & Supplies Center. [] Please bill my [] VISA [] MASTERCARD [] AMERICAN EXPRESS Acct. Ft. AC Line Voltage: AC Power Required: Output Power;_ Frequency: Outside Dimensions: Cavity Dimensions: Oven Capacity:** Cooking Uniformity: Weight: R-428J Single phase 120'7, 60Hz, AC only 1700 watts, 14.3 amps. !200 watts 2450...
... . Turntable system, diameter 16" Approx. 46 Ib , The International Electrotechnical Commission's standardized method for holding food is subject to Sharp Accessories & Supplies Center. [] Please bill my [] VISA [] MASTERCARD [] AMERICAN EXPRESS Acct. Ft. AC Line Voltage: AC Power Required: Output Power;_ Frequency: Outside Dimensions: Cavity Dimensions: Oven Capacity:** Cooking Uniformity: Weight: R-428J Single phase 120'7, 60Hz, AC only 1700 watts, 14.3 amps. !200 watts 2450...
Operation Manual
Page 24
..., touch POWER LEVEL pad six times _ for one minute at 100% power or to add a minute during manual cooking. t TanoducnhumTIbMeEr R[/]C. ITIr_ll' _ ber pads. (Ex: 1 min. 30 sec.) START 2 Touch START/MINUTE PLUS pad. The oven will start automatically• I SENSOR I Enter cooking time by iTir-_r_[- _ touching numbers in the display, first touch STOP/CLEAR. Turn steak over and shield any warm portions. Touch START/MINUTE PLUS pad. 3 After the 2nd stage, open the door. LOCK...
..., touch POWER LEVEL pad six times _ for one minute at 100% power or to add a minute during manual cooking. t TanoducnhumTIbMeEr R[/]C. ITIr_ll' _ ber pads. (Ex: 1 min. 30 sec.) START 2 Touch START/MINUTE PLUS pad. The oven will start automatically• I SENSOR I Enter cooking time by iTir-_r_[- _ touching numbers in the display, first touch STOP/CLEAR. Turn steak over and shield any warm portions. Touch START/MINUTE PLUS pad. 3 After the 2nd stage, open the door. LOCK...

