

Operation Manual
Page 1
... You Need to Know 4-6 • Part Names 7-8 • Before Operating 9 • Manual Operation 9 • Special Features 10-15 • Other Convenient Features 16-17 • Cleaning and Care 18 • Service Call Check 19 • The Ultimate Accessory 19 • Cookbook Order Form 20 • Specifications 20 • Guia Auto-Touch Parte Interior de la Cuberta Trasera • Auto-Touch Guide Back Cover Read all instructions carefully before using the oven.
... You Need to Know 4-6 • Part Names 7-8 • Before Operating 9 • Manual Operation 9 • Special Features 10-15 • Other Convenient Features 16-17 • Cleaning and Care 18 • Service Call Check 19 • The Ultimate Accessory 19 • Cookbook Order Form 20 • Specifications 20 • Guia Auto-Touch Parte Interior de la Cuberta Trasera • Auto-Touch Guide Back Cover Read all instructions carefully before using the oven.
Operation Manual
Page 2
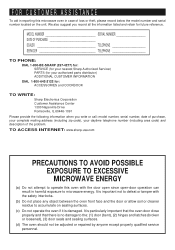
... to operate this microwave oven in harmful exposure to microwave energy. MODEL NUMBER SERIAL NUMBER DATE OF PURCHASE DEALER TELEPHONE SERVICER TELEPHONE TO PHONE: DIAL 1-800-BE-SHARP (237-4277) for: SERVICE (for your nearest Sharp Authorized Servicer) PARTS (for future reference. It is important not to the: (1) door (bent), (2) hinges and latches (broken or loosened), (3) door seals and sealing surfaces. (d) The oven should not be adjusted or repaired...
... to operate this microwave oven in harmful exposure to microwave energy. MODEL NUMBER SERIAL NUMBER DATE OF PURCHASE DEALER TELEPHONE SERVICER TELEPHONE TO PHONE: DIAL 1-800-BE-SHARP (237-4277) for: SERVICE (for your nearest Sharp Authorized Servicer) PARTS (for future reference. It is important not to the: (1) door (bent), (2) hinges and latches (broken or loosened), (3) door seals and sealing surfaces. (d) The oven should not be adjusted or repaired...
Operation Manual
Page 3
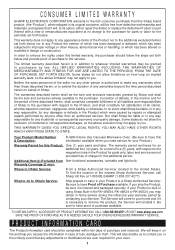
... provided free of charge for any other than an authorized servicer. To find the location of Purchase available. Your Product Model Number & Description: R-426H Home Use Carousel Microwave Oven. (Be sure to have proof of the Product nor to the additional excluded item(s) set forth below nor to Obtain Service: From a Sharp Authorized Servicer located In the United States. Warranty Coverage (if any warranties beyond the time...
... provided free of charge for any other than an authorized servicer. To find the location of Purchase available. Your Product Model Number & Description: R-426H Home Use Carousel Microwave Oven. (Be sure to have proof of the Product nor to the additional excluded item(s) set forth below nor to Obtain Service: From a Sharp Authorized Servicer located In the United States. Warranty Coverage (if any warranties beyond the time...
Operation Manual
Page 4
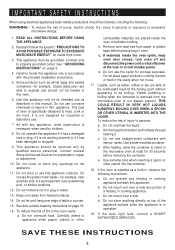
... before and halfway through heating it is not designed for industrial or laboratory use as a built-in this appliance only for 20 seconds before placing bag in the microwave oven at the fuse or circuit breaker panel. Do not mount over or near a swimming pool, or similar locations. 12. If the oven light fails, consult a SHARP AUTHORIZED SERVICER. IMPORTANT SAFETY INSTRUCTIONS When using electrical appliances basic safety...
... before and halfway through heating it is not designed for industrial or laboratory use as a built-in this appliance only for 20 seconds before placing bag in the microwave oven at the fuse or circuit breaker panel. Do not mount over or near a swimming pool, or similar locations. 12. If the oven light fails, consult a SHARP AUTHORIZED SERVICER. IMPORTANT SAFETY INSTRUCTIONS When using electrical appliances basic safety...
Operation Manual
Page 5
... electrical supply. Be careful not to or above a conventional gas or electric range or above a heat source-using Sharp's white Built-In Kit RK-46W24 for the R-426HW, black RK-46K24 for the R-426HK and stainless steel RK-46S24 for damage to the oven or personal injury resulting from the outside of the oven for example, next to drape the cord over the countertop or table...
... electrical supply. Be careful not to or above a conventional gas or electric range or above a heat source-using Sharp's white Built-In Kit RK-46W24 for the R-426HW, black RK-46K24 for the R-426HK and stainless steel RK-46S24 for damage to the oven or personal injury resulting from the outside of the oven for example, next to drape the cord over the countertop or table...

Operation Manual
Page 6
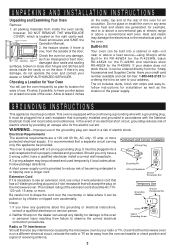
...; Pop popcorn in the oven. INFORMATION YOU NEED TO KNOW ABOUT YOUR OVEN This Operation Manual is valuable: read it carefully and always save it for ordering the Ultimate Accessory, the Sharp Carousel Microwave Cookbook. See pages 19 and 20 for reference. Generally, covered foods will not cause as much condensation as harmful bacteria may hear the magnetron cycling on to small dish and heat carefully...
...; Pop popcorn in the oven. INFORMATION YOU NEED TO KNOW ABOUT YOUR OVEN This Operation Manual is valuable: read it carefully and always save it for ordering the Ultimate Accessory, the Sharp Carousel Microwave Cookbook. See pages 19 and 20 for reference. Generally, covered foods will not cause as much condensation as harmful bacteria may hear the magnetron cycling on to small dish and heat carefully...

Operation Manual
Page 7
...'s directions.) These items can escape. Vent so steam can escape. • Lids that are microwave-safe are good for large meats or foods that need to buy all safety precautions: use potholders, remove coverings carefully, pay special attention to any damage to slit bag so steam can be allowed to safe temperatures. DO NOT use the microwave oven with metallic trim • non-heat-resistant glass...
...'s directions.) These items can escape. Vent so steam can escape. • Lids that are microwave-safe are good for large meats or foods that need to buy all safety precautions: use potholders, remove coverings carefully, pay special attention to any damage to slit bag so steam can be allowed to safe temperatures. DO NOT use the microwave oven with metallic trim • non-heat-resistant glass...

Operation Manual
Page 8
... the utensil, your clothes or accessories do not touch the safety door latches. 6 white meat of a dish's covering and carefully open popcorn and oven cooking bags away from the face and hands. INFORMATION YOU NEED TO KNOW ABOUT MICROWAVE COOKING • Arrange food carefully. Place thickest areas towards outside . • Add standing time. Covers prevent spattering and help foods to cook evenly. • Shield with a fork. Center bottom of...
... the utensil, your clothes or accessories do not touch the safety door latches. 6 white meat of a dish's covering and carefully open popcorn and oven cooking bags away from the face and hands. INFORMATION YOU NEED TO KNOW ABOUT MICROWAVE COOKING • Arrange food carefully. Place thickest areas towards outside . • Add standing time. Covers prevent spattering and help foods to cook evenly. • Shield with a fork. Center bottom of...

Operation Manual
Page 9
... 6 Turntable motor shaft 7 Removable turntable support Carefully place the turntable support in the display, touch the CUSTOM HELP pad to read a specific hint which may assist you. When HELP is lighted in the center of the oven floor. 8 Removable turntable Place the turntable on the turntable support securely. PART NAMES MICROWAVE OVEN PARTS 1 One touch door open button Push to open door. 2 Oven door with see-through window 3 Safety door latches The oven will light when oven is operating or door is open. 11 Waveguide cover: DO NOT REMOVE. 12 Auto-Touch control panel 13 Time display...
... 6 Turntable motor shaft 7 Removable turntable support Carefully place the turntable support in the display, touch the CUSTOM HELP pad to read a specific hint which may assist you. When HELP is lighted in the center of the oven floor. 8 Removable turntable Place the turntable on the turntable support securely. PART NAMES MICROWAVE OVEN PARTS 1 One touch door open button Push to open door. 2 Oven door with see-through window 3 Safety door latches The oven will light when oven is operating or door is open. 11 Waveguide cover: DO NOT REMOVE. 12 Auto-Touch control panel 13 Time display...
Operation Manual
Page 11
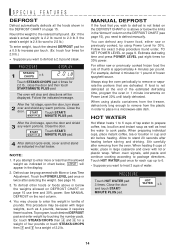
... want to defrost for specific recommendations. Stop the oven temporarily during programming. 2. Plug in sequence. 3 TIMER CLOCK 12:30 Touch TIMER/CLOCK pad again. PROCEDURE DISPLAY 1 TIMER CLOCK 2 ENTER Touch TIMER/CLOCK pad and number 2. PROCEDURE DISPLAY 1 500 15.00 Enter cooking time. Return the time of meats. Close the door. 3 START MINUTE PLUS 15.00 COOK DEFROST Touch START/MINUTE PLUS pad. This is complete, a long tone will sound and END will also be programmed with the door open except...
... want to defrost for specific recommendations. Stop the oven temporarily during programming. 2. Plug in sequence. 3 TIMER CLOCK 12:30 Touch TIMER/CLOCK pad again. PROCEDURE DISPLAY 1 TIMER CLOCK 2 ENTER Touch TIMER/CLOCK pad and number 2. PROCEDURE DISPLAY 1 500 15.00 Enter cooking time. Return the time of meats. Close the door. 3 START MINUTE PLUS 15.00 COOK DEFROST Touch START/MINUTE PLUS pad. This is complete, a long tone will sound and END will also be programmed with the door open except...
Operation Manual
Page 12
... when popping popcorn, the oven will turn off. 8. Covering Foods: Some foods work best when covered. Place on the display. Do not open the oven door or touch STOP/CLEAR during this occurs, an error message will appear. Any Sensor Cook selection can cook many foods by touching any microwave cookbook. 6. More or less food than amount to heat with More or Less Time Adjustment. The sensor adjusts the cooking times and power level for these foods. 1. Check food temperature after...
... when popping popcorn, the oven will turn off. 8. Covering Foods: Some foods work best when covered. Place on the display. Do not open the oven door or touch STOP/CLEAR during this occurs, an error message will appear. Any Sensor Cook selection can cook many foods by touching any microwave cookbook. 6. More or less food than amount to heat with More or Less Time Adjustment. The sensor adjusts the cooking times and power level for these foods. 1. Check food temperature after...

Operation Manual
Page 13
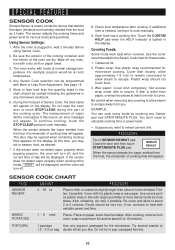
... quantity of aluminum foil any areas that are cooking too rapidly. Use this setting to cook ground beef or turkey as patties or in ring around shallow glass dish (roll fillet with vented plastic wrap. Cover with lid for 2 to 5 minutes or ... oven stops, turn patties over . Touch FRESH VEGETABLES, close the door, and touch the START/ MINUTE PLUS. Re-cover,close the door, then the START/MINUTE PLUS pad. After cooking, let stand, covered, for 2 to 3 minutes. Chicken should be added to break up large pieces. SPECIAL FEATURES SENSOR COOK CHART (continued) FOOD ...
... quantity of aluminum foil any areas that are cooking too rapidly. Use this setting to cook ground beef or turkey as patties or in ring around shallow glass dish (roll fillet with vented plastic wrap. Cover with lid for 2 to 5 minutes or ... oven stops, turn patties over . Touch FRESH VEGETABLES, close the door, and touch the START/ MINUTE PLUS. Re-cover,close the door, then the START/MINUTE PLUS pad. After cooking, let stand, covered, for 2 to 3 minutes. Chicken should be added to break up large pieces. SPECIAL FEATURES SENSOR COOK CHART (continued) FOOD ...
Operation Manual
Page 16
... using Power Level for 2.0 lb.) • Suppose you wish to defrost is not listed on the DEFROST CHART or is approximately 4 minutes per touch. (Ex: touch four times for 30%. Allow to defrost manually. The oven will appear in the display. 2. If you need to stand 20 seconds after selecting the weight. When oven signals, add pasta and continue cooking according to remove from the oven. Close the door. See MANUAL DEFROST...
... using Power Level for 2.0 lb.) • Suppose you wish to defrost is not listed on the DEFROST CHART or is approximately 4 minutes per touch. (Ex: touch four times for 30%. Allow to defrost manually. The oven will appear in the display. 2. If you need to stand 20 seconds after selecting the weight. When oven signals, add pasta and continue cooking according to remove from the oven. Close the door. See MANUAL DEFROST...

Operation Manual
Page 17
... PLUS pad. DIRECT USE • Suppose you want to keep a cup of the food. PROCEDURE 1 Enter cooking time. 200 2 Touch POWER LEVEL pad POWER 4 times for 15 minutes. Let stand, covered, for 10 to 10 minutes. Let stand, covered, for 5 to 20 minutes. Let stand to cover edges and thinner sections of soup warm for 70% power. The display will start. SPECIAL FEATURES DEFROST CHART FOOD GROUND MEAT...
... PLUS pad. DIRECT USE • Suppose you want to keep a cup of the food. PROCEDURE 1 Enter cooking time. 200 2 Touch POWER LEVEL pad POWER 4 times for 15 minutes. Let stand, covered, for 10 to 10 minutes. Let stand, covered, for 5 to 20 minutes. Let stand to cover edges and thinner sections of soup warm for 70% power. The display will start. SPECIAL FEATURES DEFROST CHART FOOD GROUND MEAT...
Operation Manual
Page 18
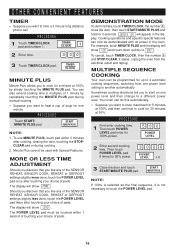
.... Cooking operations and specific special features can also extend cooking time in the oven. PROCEDURE 1 Touch TIMER/CLOCK pad and number 1. You can now be programmed for 3 seconds. START MINUTE PLUS NOTE: 1. The display will show MORE . For example, touch MINUTE PLUS and the display will show 1:00 and count down quickly to another automatically. If easier, unplug the oven from one power level and then change to touch the POWER LEVEL pad...
.... Cooking operations and specific special features can also extend cooking time in the oven. PROCEDURE 1 Touch TIMER/CLOCK pad and number 1. You can now be programmed for 3 seconds. START MINUTE PLUS NOTE: 1. The display will show MORE . For example, touch MINUTE PLUS and the display will show 1:00 and count down quickly to another automatically. If easier, unplug the oven from one power level and then change to touch the POWER LEVEL pad...

Operation Manual
Page 19
... the clock is necessary to touch the START/ MINUTE PLUS pad for these and other manual operation hints. 5 Enter cooking program. 2000 POWER LEVEL x 6 6 Close the door and touch START START/MINUTE PLUS pad. Be sure to make using your choice is lighted in the interactive display. 1. Acorn or butternut squash are provided in the Interactive Display for Auto Start time to touch the number 4 until the Auto Start time. NUMBER Once LANGUAGE English STANDARD OF WEIGHT...
... the clock is necessary to touch the START/ MINUTE PLUS pad for these and other manual operation hints. 5 Enter cooking program. 2000 POWER LEVEL x 6 6 Close the door and touch START START/MINUTE PLUS pad. Be sure to make using your choice is lighted in the interactive display. 1. Acorn or butternut squash are provided in the Interactive Display for Auto Start time to touch the number 4 until the Auto Start time. NUMBER Once LANGUAGE English STANDARD OF WEIGHT...
Operation Manual
Page 20
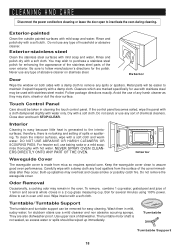
...-painted Clean the outside painted surfaces with hot water. Follow package directions exactly. To clean the interior surfaces, wipe with a soft cloth. Interior Waveguide Cover The waveguide cover is not sealed, so excess water or spills should be removed for the polish. Odor Removal Occasionally, a cooking odor may be easier to assure good oven performance. Turntable/ Turntable Support The turntable and turntable support can be taken in cleaning the touch control panel. Do not use with...
...-painted Clean the outside painted surfaces with hot water. Follow package directions exactly. To clean the interior surfaces, wipe with a soft cloth. Interior Waveguide Cover The waveguide cover is not sealed, so excess water or spills should be removed for the polish. Odor Removal Occasionally, a cooking odor may be easier to assure good oven performance. Turntable/ Turntable Support The turntable and turntable support can be taken in cleaning the touch control panel. Do not use with...
Operation Manual
Page 21
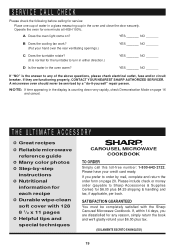
... the oven and close the door securely. THE ULTIMATE ACCESSORY ✪ Great recipes ✪ Reliable microwave reference guide ✪ Many color photos ✪ Step-by-step instructions ✪ Nutritional information for each recipe ✪ Durable wipe-clean soft cover with the Sharp Carousel Microwave Cookbook. If you are functioning properly, CONTACT YOUR NEAREST SHARP AUTHORIZED SERVICER. SATISFACTION GUARANTEED You must be serviced by...
... the oven and close the door securely. THE ULTIMATE ACCESSORY ✪ Great recipes ✪ Reliable microwave reference guide ✪ Many color photos ✪ Step-by-step instructions ✪ Nutritional information for each recipe ✪ Durable wipe-clean soft cover with the Sharp Carousel Microwave Cookbook. If you are functioning properly, CONTACT YOUR NEAREST SHARP AUTHORIZED SERVICER. SATISFACTION GUARANTEED You must be serviced by...
Operation Manual
Page 22
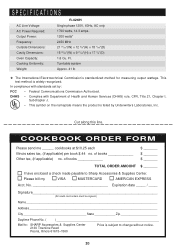
Ft. Cut along this line. of Health and Human Services (DHHS) rule, CFR, Title 21, Chapter I have enclosed a check made payable to change without notice. 20 Complies with standards set by Underwriters Laboratories...Turntable system Approx. 41 lb ★ The International Electrotechnical Commission's standardized method for measuring output wattage. SPECIFICATIONS AC Line Voltage: AC Power Required: Output Power: Frequency: Outside Dimensions: Cavity Dimensions: Oven Capacity: Cooking Uniformity: Weight: R-426H Single phase 120V, 60Hz, AC only 1700 watts, 14.3 amps. 1200 watts*...
Ft. Cut along this line. of Health and Human Services (DHHS) rule, CFR, Title 21, Chapter I have enclosed a check made payable to change without notice. 20 Complies with standards set by Underwriters Laboratories...Turntable system Approx. 41 lb ★ The International Electrotechnical Commission's standardized method for measuring output wattage. SPECIFICATIONS AC Line Voltage: AC Power Required: Output Power: Frequency: Outside Dimensions: Cavity Dimensions: Oven Capacity: Cooking Uniformity: Weight: R-426H Single phase 120V, 60Hz, AC only 1700 watts, 14.3 amps. 1200 watts*...

Operation Manual
Page 24
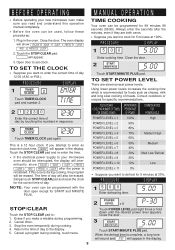
... you to heat many of the day by touching number pads. (Ex: 1 min. 30 sec.) Close the door. 2 Touch START/MINUTE PLUS pad. 130 START MINUTE PLUS Variable Power Cooking 1 After Step 1 above, touch POWER LEVEL pad six times POWER LEVEL x 6 for additional minutes. MINUTE PLUS MANUAL OPERATION High Power Cooking 1 Enter cooking time by 1 2 3 0 touching numbers in the display, first touch STOP/CLEAR. 1 Touch TIMER/CLOCK pad and number 2. Touch START/MINUTE PLUS pad. 3 After the 2nd stage, open the door. AUTO-TOUCH GUIDE For more...
... you to heat many of the day by touching number pads. (Ex: 1 min. 30 sec.) Close the door. 2 Touch START/MINUTE PLUS pad. 130 START MINUTE PLUS Variable Power Cooking 1 After Step 1 above, touch POWER LEVEL pad six times POWER LEVEL x 6 for additional minutes. MINUTE PLUS MANUAL OPERATION High Power Cooking 1 Enter cooking time by 1 2 3 0 touching numbers in the display, first touch STOP/CLEAR. 1 Touch TIMER/CLOCK pad and number 2. Touch START/MINUTE PLUS pad. 3 After the 2nd stage, open the door. AUTO-TOUCH GUIDE For more...

