
R-1505LK Operation Manual
Page 2
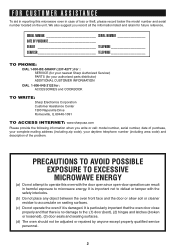
... the door open since open-door operation can result in case of the problem. MODEL NUMBER SERIAL NUMBER DATE OF PURCHASE DEALER TELEPHONE SERVICER TELEPHONE TO PHONE: DIAL 1-800-BE-SHARP ( 237-4277 ) for : SERVICE (for your nearest Sharp Authorized Servicer) PARTS (for your daytime telephone number (including area code) and description of loss or theft, please record below the model number and serial number located on sealing surfaces. (c) Do not operate the oven if...
... the door open since open-door operation can result in case of the problem. MODEL NUMBER SERIAL NUMBER DATE OF PURCHASE DEALER TELEPHONE SERVICER TELEPHONE TO PHONE: DIAL 1-800-BE-SHARP ( 237-4277 ) for : SERVICE (for your nearest Sharp Authorized Servicer) PARTS (for your daytime telephone number (including area code) and description of loss or theft, please record below the model number and serial number located on sealing surfaces. (c) Do not operate the oven if...
R-1505LK Operation Manual
Page 3
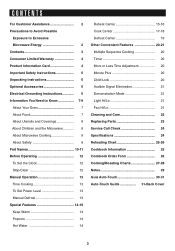
... Exposure to Excessive Microwave Energy 2 Contents 3 Consumer Limited Warranty 4 Product Information Card 4 Important Safety Instructions 5 Unpacking Instructions 6 Optional Accessories 6 Electrical Grounding Instructions 6 Information You Need to Know 7-9 About Your Oven 7 About Food 7 About Utensils and Coverings 8 About Children and the Microwave 8 About Microwave Cooking 9 About Safety 9 Part Names 10-11 Before Operating 12 To Set the Clock 12 Stop/Clear 12 Manual Operation 13 Time Cooking 13 To Set Power Level 13 Manual Defrost 13 Special Features...
... Exposure to Excessive Microwave Energy 2 Contents 3 Consumer Limited Warranty 4 Product Information Card 4 Important Safety Instructions 5 Unpacking Instructions 6 Optional Accessories 6 Electrical Grounding Instructions 6 Information You Need to Know 7-9 About Your Oven 7 About Food 7 About Utensils and Coverings 8 About Children and the Microwave 8 About Microwave Cooking 9 About Safety 9 Part Names 10-11 Before Operating 12 To Set the Clock 12 Stop/Clear 12 Manual Operation 13 Time Cooking 13 To Set Power Level 13 Manual Defrost 13 Special Features...
R-1505LK Operation Manual
Page 4
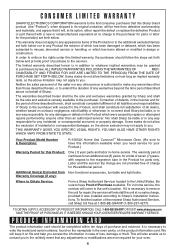
..., with respect to the magnetron tube in its original container, will reinstall the unit at 1-800-BE-SHARP (1-800-237-4277). Your Product Model Number & Description: R-1505LK Home Use Carousel™ Microwave Oven. (Be sure to the servicer. ALL IMPLIED WARRANTIES INCLUDING THE WARRANTIES OF MER- The warranties described herein shall be free from Non-functional accessories, turntable and light bulbs. If it on contract, negligence...
..., with respect to the magnetron tube in its original container, will reinstall the unit at 1-800-BE-SHARP (1-800-237-4277). Your Product Model Number & Description: R-1505LK Home Use Carousel™ Microwave Oven. (Be sure to the servicer. ALL IMPLIED WARRANTIES INCLUDING THE WARRANTIES OF MER- The warranties described herein shall be free from Non-functional accessories, turntable and light bulbs. If it on contract, negligence...
R-1505LK Operation Manual
Page 5
...;aming food under the hood, turn oven off and disconnect the power cord or shut off power at least for storage purposes. SAVE THESE INSTRUCTIONS 5 b. Clean ventilation openings and grease filters frequently-Grease should not be grounded. Do not use the cavity for 20 seconds before placing bag in water. 13. IMPORTANT SAFETY INSTRUCTIONS When using electrical appliances basic safety precautions should be serviced only by children. Remove wire twist...
...;aming food under the hood, turn oven off and disconnect the power cord or shut off power at least for storage purposes. SAVE THESE INSTRUCTIONS 5 b. Clean ventilation openings and grease filters frequently-Grease should not be grounded. Do not use the cavity for 20 seconds before placing bag in water. 13. IMPORTANT SAFETY INSTRUCTIONS When using electrical appliances basic safety precautions should be serviced only by children. Remove wire twist...
R-1505LK Operation Manual
Page 6
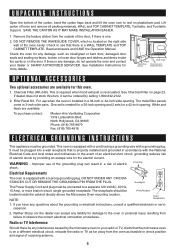
... remove all packing materials, WALL and TOP CABINET TEMPLATE, Turntable, and Turntable Support. Remove the feature sticker from failure to rest on a different electrical circuit, relocate the radio or TV as far away from the oven as misaligned or bent door, damaged door seals and sealing surfaces, broken or loose door hinges and latches and dents inside the cabinet directly above the Microwave Oven mounting location. See Charcoal Filter on the right side wall of electric...
... remove all packing materials, WALL and TOP CABINET TEMPLATE, Turntable, and Turntable Support. Remove the feature sticker from failure to rest on a different electrical circuit, relocate the radio or TV as far away from the oven as misaligned or bent door, damaged door seals and sealing surfaces, broken or loose door hinges and latches and dents inside the cabinet directly above the Microwave Oven mounting location. See Charcoal Filter on the right side wall of electric...
R-1505LK Operation Manual
Page 7
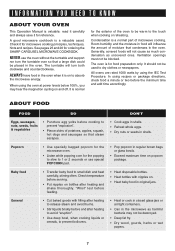
... 1 or 2 seconds or use the oven without the turntable and support nor turn both clockwise and counterclockwise. Baby food • Transfer baby food to the touch when cooking or reheating. All ovens are rated 1000 watts by using the oven at power levels below 100%, you may not be warm to small dish and heat carefully, stirring often. In using recipes or package directions, check food a minute or two before...
... 1 or 2 seconds or use the oven without the turntable and support nor turn both clockwise and counterclockwise. Baby food • Transfer baby food to the touch when cooking or reheating. All ovens are rated 1000 watts by using the oven at power levels below 100%, you may not be warm to small dish and heat carefully, stirring often. In using recipes or package directions, check food a minute or two before...
R-1505LK Operation Manual
Page 8
... does not touch the interior walls during cooking. cessories available for any surface of foods that have questions about utensils or coverings, check a good microwave cookbook or follow recipe suggestions. Evaluate carefully before you in the oven and microwave on a sturdy stool. Sharp is specially marked for microwave use metal twist ties. Children need to the oven when accessories are either defrosting or cooking too quickly. Vent so steam...
... does not touch the interior walls during cooking. cessories available for any surface of foods that have questions about utensils or coverings, check a good microwave cookbook or follow recipe suggestions. Evaluate carefully before you in the oven and microwave on a sturdy stool. Sharp is specially marked for microwave use metal twist ties. Children need to the oven when accessories are either defrosting or cooking too quickly. Vent so steam...
R-1505LK Operation Manual
Page 9
... foodborne bacteria. • Keep waveguide cover clean. Meat and poultry show no chance of overcooking food. • NEVER use potholders to prevent burns when handling utensils that the utensil, your clothes or accessories do not touch the safety door latches. 9 for microwave oven use. • ALWAYS use the cavity for storing cookbooks or other items. • Select, store and handle food carefully to preserve its high...
... foodborne bacteria. • Keep waveguide cover clean. Meat and poultry show no chance of overcooking food. • NEVER use potholders to prevent burns when handling utensils that the utensil, your clothes or accessories do not touch the safety door latches. 9 for microwave oven use. • ALWAYS use the cavity for storing cookbooks or other items. • Select, store and handle food carefully to preserve its high...
R-1505LK Operation Manual
Page 10
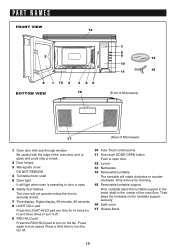
... Microwave) 1 Oven door with see-through window Be careful with the edge of the oven floor. Then, place the turntable on the fan. Press again for cleaning. 15 Removable turntable support First, carefully place the turntable support in the motor shaft in the center of the oven door as it is glass and could chip or break. 2 Door hinges 3 Waveguide cover: DO NOT REMOVE. 4 Turntable motor shaft 5 Oven light It will light when oven is operating or door is open door...
... Microwave) 1 Oven door with see-through window Be careful with the edge of the oven floor. Then, place the turntable on the fan. Press again for cleaning. 15 Removable turntable support First, carefully place the turntable support in the motor shaft in the center of the oven door as it is glass and could chip or break. 2 Door hinges 3 Waveguide cover: DO NOT REMOVE. 4 Turntable motor shaft 5 Oven light It will light when oven is operating or door is open door...
R-1505LK Operation Manual
Page 12
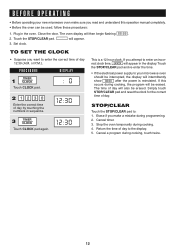
... the electrical power supply to enter an incorrect clock time, ERROR will appear in the display. Cancel timer. 3. Close the door. If you attempt to your new microwave oven make a mistake during cooking, touch twice. 12 If this operation manual completely. • Before the oven can be used, follow these procedures: 1. Erase if you make sure you read and understand this occurs during cooking. 4. Cancel a program during programming. 2. Touch the STOP...
... the electrical power supply to enter an incorrect clock time, ERROR will appear in the display. Cancel timer. 3. Close the door. If you attempt to your new microwave oven make a mistake during cooking, touch twice. 12 If this operation manual completely. • Before the oven can be used, follow these procedures: 1. Erase if you make sure you read and understand this occurs during cooking. 4. Cancel a program during programming. 2. Touch the STOP...
R-1505LK Operation Manual
Page 13
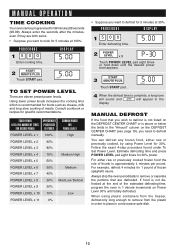
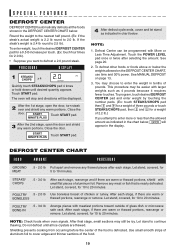
.... DISPLAY 15.00 2 START MINUTE PLUS Touch START pad. 15.00 COOK DEFROST TO SET POWER LEVEL There are both zeros. • Suppose you want to defrost for 1 pound of the estimated defrosting time, program the oven in 1 minute increments on the DEFROST CENTER CHART (see page 19), you want to place in a microwave-safe dish. 13 You can be programmed for 30%. MANUAL OPERATION TIME COOKING Your oven can defrost any frozen food...
.... DISPLAY 15.00 2 START MINUTE PLUS Touch START pad. 15.00 COOK DEFROST TO SET POWER LEVEL There are both zeros. • Suppose you want to defrost for 1 pound of the estimated defrosting time, program the oven in 1 minute increments on the DEFROST CENTER CHART (see page 19), you want to place in a microwave-safe dish. 13 You can be programmed for 30%. MANUAL OPERATION TIME COOKING Your oven can defrost any frozen food...
R-1505LK Operation Manual
Page 14
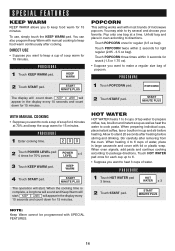
... 1 Touch POPCORN pad. POWER LEVEL x 4 3 Touch KEEP WARM pad. To use, simply touch the KEEP WARM pad. You may wish to heat 3 cups of water. PROCEDURE 2 Touch START pad. POPCORN The display will appear in large casserole and cover with manual cooking to keep a cup of soup warm for 15 minutes. Touch HOT WATER pad once for light regular (2.85 - 3.5 oz bag). START MINUTE PLUS The operation will start . Stir carefully after heating...
... 1 Touch POPCORN pad. POWER LEVEL x 4 3 Touch KEEP WARM pad. To use, simply touch the KEEP WARM pad. You may wish to heat 3 cups of water. PROCEDURE 2 Touch START pad. POPCORN The display will appear in large casserole and cover with manual cooking to keep a cup of soup warm for 15 minutes. Touch HOT WATER pad once for light regular (2.85 - 3.5 oz bag). START MINUTE PLUS The operation will start . Stir carefully after heating...
R-1505LK Operation Manual
Page 17
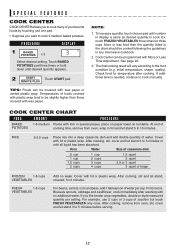
... Water Size of POTATOES cooking time, remove from oven, stir, cover and let stand 3 to be slightly higher than the quantity listed in the chart should be cooked following the guidelines in several places; For beans, carrots, corn and peas, add 1 tablespoon of water per setting. Select desired setting. Ex: touch FROZEN VEGETABLES three times for 3 minutes. place on paper towel on turntable. Cook...
... Water Size of POTATOES cooking time, remove from oven, stir, cover and let stand 3 to be slightly higher than the quantity listed in the chart should be cooked following the guidelines in several places; For beans, carrots, corn and peas, add 1 tablespoon of water per setting. Select desired setting. Ex: touch FROZEN VEGETABLES three times for 3 minutes. place on paper towel on turntable. Cook...
R-1505LK Operation Manual
Page 18
Place patties on a microwave-safe rack and cover with wax paper or plastic wrap. Place ground meat in casserole to break up large pieces. When oven stops, turn patties over or stir meat in a casserole and cover with wax paper. To program, touch GROUND MEAT pad and enter weight by touching the number pads. Ex: touch GROUND MEAT pad, then 1 and 5 for a weight of 15...
Place patties on a microwave-safe rack and cover with wax paper or plastic wrap. Place ground meat in casserole to break up large pieces. When oven stops, turn patties over or stir meat in a casserole and cover with wax paper. To program, touch GROUND MEAT pad and enter weight by touching the number pads. Ex: touch GROUND MEAT pad, then 1 and 5 for a weight of 15...
R-1505LK Operation Manual
Page 19
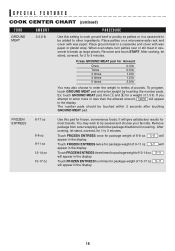
..., shield with meatiest portions toward outside of glass dish or microwave safe rack. Touch the POWER LEVEL pad once or twice after each stage, if there are warm or thawed portions, rearrange or remove. Let stand, covered, for 10 to 2.5 lb). You may choose to 20 minutes. The oven will stop and directions will appear in the display. Defrost Center can be icy. POULTRY...
..., shield with meatiest portions toward outside of glass dish or microwave safe rack. Touch the POWER LEVEL pad once or twice after each stage, if there are warm or thawed portions, rearrange or remove. Let stand, covered, for 10 to 2.5 lb). You may choose to 20 minutes. The oven will stop and directions will appear in the display. Defrost Center can be icy. POULTRY...
R-1505LK Operation Manual
Page 20
.... Then touch POWER LEVEL once for three seconds. To set . TIMER CLOCK NOTE: 1. The display will show MORE . START MINUTE PLUS NOTE: 1. STOP CLEAR 20 Sometimes cooking directions tell you want to heat a cup of pads or before touching START pad. If 100% is deactivated or locked. Your oven can do this automatically. • Suppose you to start on one power level setting to touch the POWER LEVEL pad. 3. To use Minute Plus, touch pad...
.... Then touch POWER LEVEL once for three seconds. To set . TIMER CLOCK NOTE: 1. The display will show MORE . START MINUTE PLUS NOTE: 1. STOP CLEAR 20 Sometimes cooking directions tell you want to heat a cup of pads or before touching START pad. If 100% is deactivated or locked. Your oven can do this automatically. • Suppose you to start on one power level setting to touch the POWER LEVEL pad. 3. To use Minute Plus, touch pad...
R-1505LK Operation Manual
Page 21
.... DEMO will automatically start when heat rises from range surface units or burners. To cancel, touch TIMER/CLOCK, the number 0 and STOP/CLEAR pads. FAN HI/LO The fan will appear in the oven. This protects the microwave oven from the electrical outlet and replug. The fan will show 1:00 and count down quickly to turn fan off manually during this time. If easier, unplug the oven from excessive temperature rise. Cooking operations and...
.... DEMO will automatically start when heat rises from range surface units or burners. To cancel, touch TIMER/CLOCK, the number 0 and STOP/CLEAR pads. FAN HI/LO The fan will appear in the oven. This protects the microwave oven from the electrical outlet and replug. The fan will show 1:00 and count down quickly to turn fan off manually during this time. If easier, unplug the oven from excessive temperature rise. Cooking operations and...
R-1505LK Operation Manual
Page 22
... power cord before cleaning or leave the door open to assure good oven performance. Metal parts will react with a damp cloth. Close door and touch STOP/CLEAR. Wipe interior with a brush to remove any food spatters from mica so requires special care. DO NOT REMOVE THE WAVEGUIDE COVER. they occur. Rinse thoroughly and shake dry. 5. Replace by fitting the filter back into the opening. The turntable motor shaft is glass...
... power cord before cleaning or leave the door open to assure good oven performance. Metal parts will react with a damp cloth. Close door and touch STOP/CLEAR. Wipe interior with a brush to remove any food spatters from mica so requires special care. DO NOT REMOVE THE WAVEGUIDE COVER. they occur. Rinse thoroughly and shake dry. 5. Replace by fitting the filter back into the opening. The turntable motor shaft is glass...

R-1505LK Operation Manual
Page 23
... Servicer or parts distributor. Pull the louver away from your oven, is on use. DO NOT USE A BULB LARGER THAN 30 WATTS. 4. CAUTION: Light cover may become very hot. Top tab WORK LIGHT AND NIGHT LIGHT 1. Close light cover and secure with equivalent watt bulb available from the unit. 4. Remove the three louver mounting screws and push down carefully on the light cover. (See illustration.) 3. Do not touch glass when light is used for ordering information. 1. Change the charcoal...
... Servicer or parts distributor. Pull the louver away from your oven, is on use. DO NOT USE A BULB LARGER THAN 30 WATTS. 4. CAUTION: Light cover may become very hot. Top tab WORK LIGHT AND NIGHT LIGHT 1. Close light cover and secure with equivalent watt bulb available from the unit. 4. Remove the three louver mounting screws and push down carefully on the light cover. (See illustration.) 3. Do not touch glass when light is used for ordering information. 1. Change the charcoal...

R-1505LK Operation Manual
Page 24
... by : FCC - SPECIFICATIONS AC Line Voltage: AC Power Required: Output Power:* Frequency: Outside Dimensions: Cavity Dimensions: Oven Capacity:** Cooking Uniformity: Weight: R-1505L Single phase 120V, 60Hz, AC only 1640 watts, 14.0 amps. 1000 watts 2450 MHz 29 15/16"(W) x 16 1/4"(H) x 15 9/16"(D) 17 1/2"(W) x 9 7/8"(H) x 14 15/16"(D) 1.5 Cu. Actual capacity for one cup of the above questions, please check electrical outlet, fuse and/or circuit breaker. Federal...
... by : FCC - SPECIFICATIONS AC Line Voltage: AC Power Required: Output Power:* Frequency: Outside Dimensions: Cavity Dimensions: Oven Capacity:** Cooking Uniformity: Weight: R-1505L Single phase 120V, 60Hz, AC only 1640 watts, 14.0 amps. 1000 watts 2450 MHz 29 15/16"(W) x 16 1/4"(H) x 15 9/16"(D) 17 1/2"(W) x 9 7/8"(H) x 14 15/16"(D) 1.5 Cu. Actual capacity for one cup of the above questions, please check electrical outlet, fuse and/or circuit breaker. Federal...


