PNS525 Operation Manual
Page 8
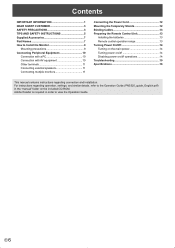
... folder on /off 14 Disabling power on the included CD-ROM. For instructions regarding connection and installation. E6 Contents IMPORTANT INFORMATION 1 DEAR SHARP CUSTOMER 3 SAFETY PRECAUTIONS 3 TIPS AND SAFETY INSTRUCTIONS 5 Supplied Accessories 7 Part Names 7 How to Install the Monitor 9 Mounting precautions 9 ... Other terminals 11 Connecting external speakers 11 Connecting multiple monitors 11 Connecting the Power Cord 12 Mounting the Temporary Stands 12 Binding Cables 13 Preparing the Remote Control Unit 13 Installing the batteries 13 Remote control operation range 13...
... folder on /off 14 Disabling power on the included CD-ROM. For instructions regarding connection and installation. E6 Contents IMPORTANT INFORMATION 1 DEAR SHARP CUSTOMER 3 SAFETY PRECAUTIONS 3 TIPS AND SAFETY INSTRUCTIONS 5 Supplied Accessories 7 Part Names 7 How to Install the Monitor 9 Mounting precautions 9 ... Other terminals 11 Connecting external speakers 11 Connecting multiple monitors 11 Connecting the Power Cord 12 Mounting the Temporary Stands 12 Binding Cables 13 Preparing the Remote Control Unit 13 Installing the batteries 13 Remote control operation range 13...
PNS525 Operation Manual
Page 9
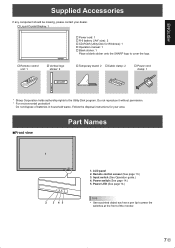
... for your dealer. � Liquid Crystal Display: 1 � Power cord: 1 � R-6 battery ("AA" size): 2 � CD-ROM (Utility Disk for Windows): 1 � Operation manual: 1 � Blank sticker: 1 Place a blank sticker onto the SHARP logo to cover the logo. � Remote...� Vertical logo sticker: 2 � Temporary stand: 2 � Cable clamp: 2 � Power cord clamp: 1 INPUT * Sharp Corporation holds authorship rights to press the switches at the front of batteries in household waste. LCD panel 2. Do not dispose of the monitor. 7E Remote...
... for your dealer. � Liquid Crystal Display: 1 � Power cord: 1 � R-6 battery ("AA" size): 2 � CD-ROM (Utility Disk for Windows): 1 � Operation manual: 1 � Blank sticker: 1 Place a blank sticker onto the SHARP logo to cover the logo. � Remote...� Vertical logo sticker: 2 � Temporary stand: 2 � Cable clamp: 2 � Power cord clamp: 1 INPUT * Sharp Corporation holds authorship rights to press the switches at the front of batteries in household waste. LCD panel 2. Do not dispose of the monitor. 7E Remote...
PNS525 Operation Manual
Page 11
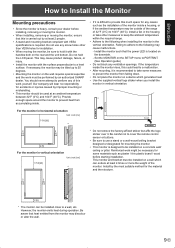
...or moving the monitor. • When installing, removing or moving the monitor, be performed by an authorized SHARP dealer. This monitor and bracket must be sure to hold the LCD panel. Be aware that the power LED is located on the rear and the unit bottom. Set the MONITOR ... ENGLISH How to Install the Monitor Mounting precautions • Since the monitor is heavy, consult your dealer before starting installation. Do not use a stand or a wall-mount/ceiling bracket designed or designated for installation. • When moving the monitor, ensure that this is carried out by at ...
...or moving the monitor. • When installing, removing or moving the monitor, be performed by an authorized SHARP dealer. This monitor and bracket must be sure to hold the LCD panel. Be aware that the power LED is located on the rear and the unit bottom. Set the MONITOR ... ENGLISH How to Install the Monitor Mounting precautions • Since the monitor is heavy, consult your dealer before starting installation. Do not use a stand or a wall-mount/ceiling bracket designed or designated for installation. • When moving the monitor, ensure that this is carried out by at ...
PNS525 Operation Manual
Page 14
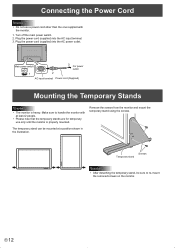
...properly mounted. Make sure to re-mount the removed screws on the monitor. Screws Temporary stand Caution • After detaching the temporary stand, be mounted at least 2 people. • Please note that the temporary stands are for temporary use a power cord other than the one supplied with at a position... shown in the illustration. Plug the power cord (supplied) into the AC input terminal. 3. The temporary stand can be sure to handle the monitor with the monitor. 1. Plug the power cord (supplied) into the AC power outlet. Turn off the ...
...properly mounted. Make sure to re-mount the removed screws on the monitor. Screws Temporary stand Caution • After detaching the temporary stand, be mounted at least 2 people. • Please note that the temporary stands are for temporary use a power cord other than the one supplied with at a position... shown in the illustration. Plug the power cord (supplied) into the AC input terminal. 3. The temporary stand can be sure to handle the monitor with the monitor. 1. Plug the power cord (supplied) into the AC power outlet. Turn off the ...
PNS525 Operation Manual
Page 18
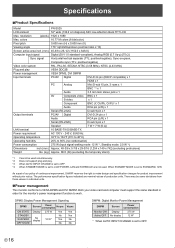
...display 12 W* * When AUTO INPUT CHANGE is set to STANDARD, 12W. There may be used . E 16 When STANDBY MODE is set to LOW POWER, LAN and SCHEDULE are nominal values of continuous improvement, SHARP...29-3/16 (1,254 x 149 x 742) (excluding protrusions) Approx. 86.0 (39) (excluding the temporary stand) *1 Cannot be some deviations from these values in order for product improvement without prior notice. colors Pixel...consumption Dimensions inch (mm) Weight lbs. (kg) PN-S525 52" wide (132.2 cm diagonal) ASV low-reflection black TFT LCD 1920 x 1080 16.77 M colors (8 bits/...
...display 12 W* * When AUTO INPUT CHANGE is set to STANDARD, 12W. There may be used . E 16 When STANDBY MODE is set to LOW POWER, LAN and SCHEDULE are nominal values of continuous improvement, SHARP...29-3/16 (1,254 x 149 x 742) (excluding protrusions) Approx. 86.0 (39) (excluding the temporary stand) *1 Cannot be some deviations from these values in order for product improvement without prior notice. colors Pixel...consumption Dimensions inch (mm) Weight lbs. (kg) PN-S525 52" wide (132.2 cm diagonal) ASV low-reflection black TFT LCD 1920 x 1080 16.77 M colors (8 bits/...


