PN-465U Operation Manual
Page 8
Contents Introduction IMPORTANT INFORMATION 1 DEAR SHARP CUSTOMER 3 SAFETY PRECAUTIONS 3 TIPS AND SAFETY INSTRUCTIONS 5 Supplied Accessories 7 Part Names 7 Front view 7 Rear view 8 Remote control unit 8 Connection and Installation How to Install the Monitor 9 Mounting precautions 9 Connecting Peripheral Equipment 10 Connection...Setting the batteries 13 Remote control operation range 13 Basic Operation Turning Power On/Off 14 Turning on the main power 14 Turning power on/off 14 Disabling power on/off operations 14 Basic Operation 15 Menu Items 17 Displaying the menu screen ...
Contents Introduction IMPORTANT INFORMATION 1 DEAR SHARP CUSTOMER 3 SAFETY PRECAUTIONS 3 TIPS AND SAFETY INSTRUCTIONS 5 Supplied Accessories 7 Part Names 7 Front view 7 Rear view 8 Remote control unit 8 Connection and Installation How to Install the Monitor 9 Mounting precautions 9 Connecting Peripheral Equipment 10 Connection...Setting the batteries 13 Remote control operation range 13 Basic Operation Turning Power On/Off 14 Turning on the main power 14 Turning power on/off 14 Disabling power on/off operations 14 Basic Operation 15 Menu Items 17 Displaying the menu screen ...
PN-465U Operation Manual
Page 9
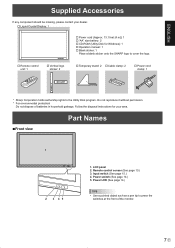
... TIPS • Use a pointed object such as a pen tip to the Utility Disk program. Follow the disposal instructions for your dealer. � Liquid Crystal Display: 1 � Power cord (Approx. 13.1 feet [4 m]): 1 � "AA" size battery: 2 � CD-ROM (Utility Disk for Windows...: 2 � Power cord clamp: 1 INPUT * Sharp Corporation holds authorship rights to press the switches at the front of batteries in household garbage. Power switch (See page 14.) 5. Remote control sensor (See page 13.) 3. LCD panel 2. Do not reproduce it without permission. * For environmental...
... TIPS • Use a pointed object such as a pen tip to the Utility Disk program. Follow the disposal instructions for your dealer. � Liquid Crystal Display: 1 � Power cord (Approx. 13.1 feet [4 m]): 1 � "AA" size battery: 2 � CD-ROM (Utility Disk for Windows...: 2 � Power cord clamp: 1 INPUT * Sharp Corporation holds authorship rights to press the switches at the front of batteries in household garbage. Power switch (See page 14.) 5. Remote control sensor (See page 13.) 3. LCD panel 2. Do not reproduce it without permission. * For environmental...
PN-465U Operation Manual
Page 11
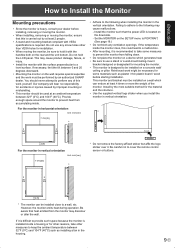
... concrete wall/ ceiling or pillar. This monitor and bracket must be sure to hold the LCD panel. Do not hold it with the handles both on the downside. - Failing to adhere to the... temperature between 32°F (0°C) and 104°F (40°C). Install by an authorized SHARP dealer. Be aware that the power LED is located on the rear and the unit bottom....monitor in vertical orientation. * INPUT 2 [5] For the monitor in the housing. 9E Be careful not to cover the remote control sensor or buttons. 2 2 [5] [5] 2 [5] * The monitor can endure at least 4 times or more...
... concrete wall/ ceiling or pillar. This monitor and bracket must be sure to hold the LCD panel. Do not hold it with the handles both on the downside. - Failing to adhere to the... temperature between 32°F (0°C) and 104°F (40°C). Install by an authorized SHARP dealer. Be aware that the power LED is located on the rear and the unit bottom....monitor in vertical orientation. * INPUT 2 [5] For the monitor in the housing. 9E Be careful not to cover the remote control sensor or buttons. 2 2 [5] [5] 2 [5] * The monitor can endure at least 4 times or more...

PN-465U Operation Manual
Page 15
... clamp cannot be fastened using the supplied cable clamps as air conditioner, stereo components, etc. 13 E While holding the tail of the remote control sensor. 2. See the instructions in the compartment and put in the supplied batteries (2 "AA" size batteries) with proper operation. ... ENGLISH Binding Cables Cable clamp positions Cable clamp attachment Insert the cable clamp into the hole for attaching a cable clamp in advance. Remote control operation range The operation range of approx 10° from being disconnected accidentally. 1. Press the cover gently and slide it ....
... clamp cannot be fastened using the supplied cable clamps as air conditioner, stereo components, etc. 13 E While holding the tail of the remote control sensor. 2. See the instructions in the compartment and put in the supplied batteries (2 "AA" size batteries) with proper operation. ... ENGLISH Binding Cables Cable clamp positions Cable clamp attachment Insert the cable clamp into the hole for attaching a cable clamp in advance. Remote control operation range The operation range of approx 10° from being disconnected accidentally. 1. Press the cover gently and slide it ....

PN-465U Operation Manual
Page 16
... standby mode. The power-off status that stops the clock depends on the status of the monitor.) Disabling power on/off operations Power on the remote control unit. Turning on the main power Main power switch TIPS • If the monitor is off, the monitor cannot be turned on using the... 07 / 01 / 01 00 : 00 When the main power switch is in the input signal standby mode and you press the POWER button on the remote control unit, the monitor enters standby mode. • You can turn the power ON/OFF. Press , , or to select the date and time, and press...
... standby mode. The power-off status that stops the clock depends on the status of the monitor.) Disabling power on/off operations Power on the remote control unit. Turning on the main power Main power switch TIPS • If the monitor is off, the monitor cannot be turned on using the... 07 / 01 / 01 00 : 00 When the main power switch is in the input signal standby mode and you press the POWER button on the remote control unit, the monitor enters standby mode. • You can turn the power ON/OFF. Press , , or to select the date and time, and press...
PN-465U Operation Manual
Page 20
... of the image. OSD V-POSITION Adjusts the vertical display position of the image. When using a remote control unit. (See page 15.) * sRGB is set . H-POS Adjust the horizontal position of menu screen. changes it . SHARPNESS Adjusts the sharpness of treble-level sound. WHITE BALANCE THRU Displays the input signal level as is set for details...
... of the image. OSD V-POSITION Adjusts the vertical display position of the image. When using a remote control unit. (See page 15.) * sRGB is set . H-POS Adjust the horizontal position of menu screen. changes it . SHARPNESS Adjusts the sharpness of treble-level sound. WHITE BALANCE THRU Displays the input signal level as is set for details...

PN-465U Operation Manual
Page 26
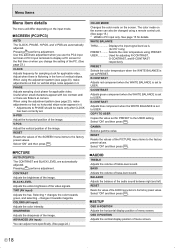
.... E 24 RS-232C Specifies whether to the factory default settings. Press MENU to return to light power LEDs. ON ...........Displays the menus. OFF .........Does not light power LEDs. UNLOCKED........Enables control via RS-232C. 3. OFF ...Enables operation. 1 ........Disables all... operations other than FUNCTION (not even power on the monitor and the remote control unit that order. OSD DISPLAY Hides/shows menus. Select and set the items. ALL RESET Resets the settings to allow control via RS-232C. ...
.... E 24 RS-232C Specifies whether to the factory default settings. Press MENU to return to light power LEDs. ON ...........Displays the menus. OFF .........Does not light power LEDs. UNLOCKED........Enables control via RS-232C. 3. OFF ...Enables operation. 1 ........Disables all... operations other than FUNCTION (not even power on the monitor and the remote control unit that order. OSD DISPLAY Hides/shows menus. Select and set the items. ALL RESET Resets the settings to allow control via RS-232C. ...

PN-465U Operation Manual
Page 28
... monitor with ID 4 to 20". When repeater control is used , "WAIT" is returned. They can assign ID numbers either from the menu screen (using the remote control) or from the PC. You can also be connected as in a daisy chain by designating ID numbers, you wait a while. When controlling monitors linked...
... monitor with ID 4 to 20". When repeater control is used , "WAIT" is returned. They can assign ID numbers either from the menu screen (using the remote control) or from the PC. You can also be connected as in a daisy chain by designating ID numbers, you wait a while. When controlling monitors linked...
PN-465U Operation Manual
Page 35
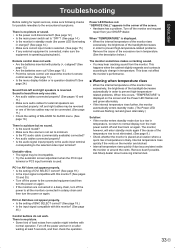
...the vents on after waiting at a location where a quick rise in temperature. (See the description below.) Remote control does not work . There is reversed. When "TEMPERATURE" is displayed. • When the internal temperature of the monitor rises excessively, the brightness of the backlight decreases in...for repair services, make sure the equipment is used. Unstable video. • The signal may hear cracking sound from your SHARP dealer. Ask Sharp dealer about removing internal dust. Turn off the power to the selected video input terminal? PC1 or AV1 does not appear ...
...the vents on after waiting at a location where a quick rise in temperature. (See the description below.) Remote control does not work . There is reversed. When "TEMPERATURE" is displayed. • When the internal temperature of the monitor rises excessively, the brightness of the backlight decreases in...for repair services, make sure the equipment is used. Unstable video. • The signal may hear cracking sound from your SHARP dealer. Ask Sharp dealer about removing internal dust. Turn off the power to the selected video input terminal? PC1 or AV1 does not appear ...


