
Operation Manual
Page 2
Model No.: Serial No.: ii IMPORTANT • For your assistance in reporting the loss or theft of your Projector, please record the Model and Serial Number located on the bottom of the projector and retain this information. • Before recycling the packaging, please ensure that you have checked the contents of the carton thoroughly against the list of "Supplied accessories" on page 10.
Model No.: Serial No.: ii IMPORTANT • For your assistance in reporting the loss or theft of your Projector, please record the Model and Serial Number located on the bottom of the projector and retain this information. • Before recycling the packaging, please ensure that you have checked the contents of the carton thoroughly against the list of "Supplied accessories" on page 10.

Operation Manual
Page 5
... shock, do not expose this equipment not expressly approved by the manufacturer could void the user's authority to your new SHARP Projector, using the projector, please read this equipment. Be especially careful that children do not stare directly into the beam of important operating and...) instructions in the literature accompanying the product. WARNING: FCC Regulations state that SHARP may be required to persons. WARNING: To reduce the risk of light. The lightning flash with the projector. 1. CONSUMER PRODUCT SAFETY ACT To ensure that you will promptly receive any ...
... shock, do not expose this equipment not expressly approved by the manufacturer could void the user's authority to your new SHARP Projector, using the projector, please read this equipment. Be especially careful that children do not stare directly into the beam of important operating and...) instructions in the literature accompanying the product. WARNING: FCC Regulations state that SHARP may be required to persons. WARNING: To reduce the risk of light. The lightning flash with the projector. 1. CONSUMER PRODUCT SAFETY ACT To ensure that you will promptly receive any ...

Operation Manual
Page 6
Disposal of mercury. This SHARP projector uses a DLP® chip. This will be required to correct the interference at 1-800-BE-SHARP. The cable is operated in a commercial environment. In a domestic environment this equipment in which case the user may... information, please contact your local authorities, the Electronics Industries Alliance: www.eiae.org, the lamp recycling organization www.lamprecycle.org, or Sharp at his own expense. U.S.A. PRODUCT DISPOSAL This product utilizes tin-lead solder, and lamp containing a small amount of these materials may...
Disposal of mercury. This SHARP projector uses a DLP® chip. This will be required to correct the interference at 1-800-BE-SHARP. The cable is operated in a commercial environment. In a domestic environment this equipment in which case the user may... information, please contact your local authorities, the Electronics Industries Alliance: www.eiae.org, the lamp recycling organization www.lamprecycle.org, or Sharp at his own expense. U.S.A. PRODUCT DISPOSAL This product utilizes tin-lead solder, and lamp containing a small amount of these materials may...

Operation Manual
Page 7
Example: "Picture" screen menu for setting up and operating the projector. Note .........Indicates additional information for COMPUTER (RGB) input Menu item Picture SCR - ADJ Picture Mode Contrast Bright Red Blue CLR Temp Bright Boost Lamp Setting...". • This operation can connect and operate all models in this operation manual, the illustration and the screen display are slightly different, depending on the projector. 1 Press MENU/HELP. • The "Picture" menu screen for using the buttons on the model. ENTER END Useful Features Button used in this Operation ...
Example: "Picture" screen menu for setting up and operating the projector. Note .........Indicates additional information for COMPUTER (RGB) input Menu item Picture SCR - ADJ Picture Mode Contrast Bright Red Blue CLR Temp Bright Boost Lamp Setting...". • This operation can connect and operate all models in this operation manual, the illustration and the screen display are slightly different, depending on the projector. 1 Press MENU/HELP. • The "Picture" menu screen for using the buttons on the model. ENTER END Useful Features Button used in this Operation ...
Operation Manual
Page 8
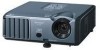
...the Background Image ........ 42 Selecting the Setup Guide 42 Reversing/Inverting Projected Images 42 Selecting the On-screen Display Language 42 Adjusting the Projector Function ("PRJ - Contents Preparing Introduction How to Read this Operation Manual .... 3 Contents 4 IMPORTANT SAFEGUARDS 6 How to Access the PDF...Part Names and Functions 11 Inserting the Batteries 14 Usable Range 15 Quick Start Quick Start 16 Setup Setting up the Projector 18 Setting up the Projector 18 Standard Setup (Front Projection) ....... 18 Ceiling-mount Setup 18 Projection (PRJ) Mode 19 Screen Size and ...
...the Background Image ........ 42 Selecting the Setup Guide 42 Reversing/Inverting Projected Images 42 Selecting the On-screen Display Language 42 Adjusting the Projector Function ("PRJ - Contents Preparing Introduction How to Read this Operation Manual .... 3 Contents 4 IMPORTANT SAFEGUARDS 6 How to Access the PDF...Part Names and Functions 11 Inserting the Batteries 14 Usable Range 15 Quick Start Quick Start 16 Setup Setting up the Projector 18 Setting up the Projector 18 Standard Setup (Front Projection) ....... 18 Ceiling-mount Setup 18 Projection (PRJ) Mode 19 Screen Size and ...

Operation Manual
Page 12
... your eyes. Observe the following safeguards when setting up your nearest Sharp Authorized Projector Dealer or Service Center for replacement. Internal cleaning should only be performed by the projector falling down. When using the projector in and turn on page 50. This does not indicate a ...air, set up the screen in direct sunlight or room light. This will automatically put the projector into standby mode to avoid personal injury caused by a Sharp Authorized Projector Dealer or Service Center. Caution concerning the lamp unit ■ Potential hazard of the lens...
... your eyes. Observe the following safeguards when setting up your nearest Sharp Authorized Projector Dealer or Service Center for replacement. Internal cleaning should only be performed by the projector falling down. When using the projector in and turn on page 50. This does not indicate a ...air, set up the screen in direct sunlight or room light. This will automatically put the projector into standby mode to avoid personal injury caused by a Sharp Authorized Projector Dealer or Service Center. Caution concerning the lamp unit ■ Potential hazard of the lens...
Operation Manual
Page 13
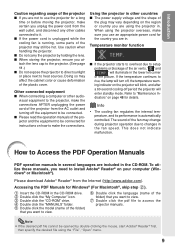
... of the fan may affect the cabinet color or cause deformation of the plastic cover. This does not indicate malfunction. visual equipment to the projector, make the connections. ing indicator on the region or country you are using the "File", "Open" menu. 9 Accessing the PDF Manuals...9632; When connecting a computer or other countries ■ The power supply voltage and the shape of the plug may vary depending on the projector will illuminate in . dicators" on your computer (Windows® or Macintosh®). How to setup problems or blockage of the picture. Please...
... of the fan may affect the cabinet color or cause deformation of the plastic cover. This does not indicate malfunction. visual equipment to the projector, make the connections. ing indicator on the region or country you are using the "File", "Open" menu. 9 Accessing the PDF Manuals...9632; When connecting a computer or other countries ■ The power supply voltage and the shape of the plug may vary depending on the projector will illuminate in . dicators" on your computer (Windows® or Macintosh®). How to setup problems or blockage of the picture. Please...

Operation Manual
Page 14
... be available depending on the region. Please check with your country. • Operation manual (this manual and CD-ROM ) Note • Codes in your nearest Sharp Authorized Projector Dealer or Service Center. 10 Accessories Supplied accessories Two R-6 batteries RGB cable Lens cap (attached) ("AA" size, UM/SUM-3, (10' (3.0 m)) HP-7 or similar) Remote...
... be available depending on the region. Please check with your country. • Operation manual (this manual and CD-ROM ) Note • Codes in your nearest Sharp Authorized Projector Dealer or Service Center. 10 Accessories Supplied accessories Two R-6 batteries RGB cable Lens cap (attached) ("AA" size, UM/SUM-3, (10' (3.0 m)) HP-7 or similar) Remote...
Operation Manual
Page 15
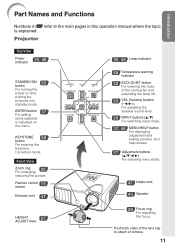
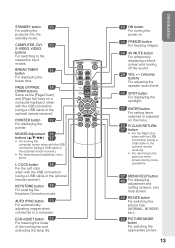
... adjusting the focus. KEYSTONE 28 button For entering the Keystone Correction mode. ENTER button For setting 37 items selected or adjusted on and putting the projector into standby mode. Projector Top View Power indicator 25, 48 STANDBY/ON 25 button For turning the power on the menu.
... adjusting the focus. KEYSTONE 28 button For entering the Keystone Correction mode. ENTER button For setting 37 items selected or adjusted on and putting the projector into standby mode. Projector Top View Power indicator 25, 48 STANDBY/ON 25 button For turning the power on the menu.

Operation Manual
Page 16
... connecting with the USB terminal on how to use with an S-video terminal. 24 RS-232C terminal Terminal for controlling the projector using the supplied remote control as the computer mouse. 23 AUDIO 2 input terminal 22 VIDEO input terminal Terminal for DVI digital...Rear 27 adjustment foot 24 AC socket Connect the supplied power cord. Kensington Security Standard connector Using the Kensington Lock • This projector has a Kensington Security Standard connector for computer RGB and component signals. Part Names and Functions (Continued) Numbers in this operation manual...
... connecting with the USB terminal on how to use with an S-video terminal. 24 RS-232C terminal Terminal for controlling the projector using the supplied remote control as the computer mouse. 23 AUDIO 2 input terminal 22 VIDEO input terminal Terminal for DVI digital...Rear 27 adjustment foot 24 AC socket Connect the supplied power cord. Kensington Security Standard connector Using the Kensington Lock • This projector has a Kensington Security Standard connector for computer RGB and component signals. Part Names and Functions (Continued) Numbers in this operation manual...
Operation Manual
Page 17
... connection (using a USB cable or the optional remote receiver). COMPUTER, DVI, 29 S-VIDEO, VIDEO buttons For switching to a computer. STANDBY button 25 For putting the projector into the standby mode.
... connection (using a USB cable or the optional remote receiver). COMPUTER, DVI, 29 S-VIDEO, VIDEO buttons For switching to a computer. STANDBY button 25 For putting the projector into the standby mode.
Operation Manual
Page 18
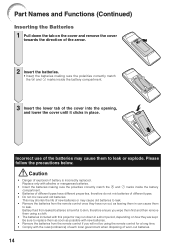
... batteries or may cause them to leak. Be sure to skin, therefore ensure you will not be using a cloth. • The batteries included with this projector may run out, as leaving them in place. Part Names and Functions (Continued) Inserting the Batteries 1 Pull down in a short period, depending on the cover...
... batteries or may cause them to leak. Be sure to skin, therefore ensure you will not be using a cloth. • The batteries included with this projector may run out, as leaving them in place. Part Names and Functions (Continued) Inserting the Batteries 1 Pull down in a short period, depending on the cover...

Operation Manual
Page 19
... signal may malfunction under a fluorescent lamp. When using the remote control • Ensure that you do not drop it or expose it to control the projector within the ranges shown in the illustration. flected off a screen for easy operation. Introduction Usable Range The remote control can be used to moisture or... sensor Note • The signal from the fluorescent lamp. 30° 23n (7 m) Remote control Remote control signal transmitters 15 How- In this case, move the projector away from the remote control can be re-
... signal may malfunction under a fluorescent lamp. When using the remote control • Ensure that you do not drop it or expose it to control the projector within the ranges shown in the illustration. flected off a screen for easy operation. Introduction Usable Range The remote control can be used to moisture or... sensor Note • The signal from the fluorescent lamp. 30° 23n (7 m) Remote control Remote control signal transmitters 15 How- In this case, move the projector away from the remote control can be re-

Operation Manual
Page 20
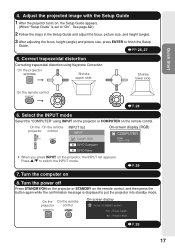
... a wall or a screen _P. 18 2. Quick Start This section shows the basic operation (projector connecting with the computer). Connect the projector to the computer and plug the power cord into the AC socket of the projector and the computer is explained using one example. 3 STANDBY/ON 8 button 6 INPUT buttons 4 ENTER button 5 Adjustment buttons...
... a wall or a screen _P. 18 2. Quick Start This section shows the basic operation (projector connecting with the computer). Connect the projector to the computer and plug the power cord into the AC socket of the projector and the computer is explained using one example. 3 STANDBY/ON 8 button 6 INPUT buttons 4 ENTER button 5 Adjustment buttons...
Operation Manual
Page 21
... to finish the Setup Guide. _PP. 26, 27 5. Turn the computer on the projector, the INPUT list appears. Adjust the projected image with the Setup Guide 1 After the projector turns on the remote control, and then press the button again while the confirmation message is... set to put the projector into standby mode. Shrinks lower side. On the projector Shrinks upper side. Correct trapezoidal distortion Correcting trapezoidal distortion using INPUT on the projector or COMPUTER on the remote control. On the remote control _P...
... to finish the Setup Guide. _PP. 26, 27 5. Turn the computer on the projector, the INPUT list appears. Adjust the projected image with the Setup Guide 1 After the projector turns on the remote control, and then press the button again while the confirmation message is... set to put the projector into standby mode. Shrinks lower side. On the projector Shrinks upper side. Correct trapezoidal distortion Correcting trapezoidal distortion using INPUT on the projector or COMPUTER on the remote control. On the remote control _P...
Operation Manual
Page 22
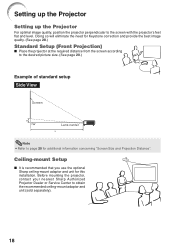
... Place the projector at the required distance from the screen according to the desired picture size. (See page 20.) Example of standard setup Side View Screen H Lens center L Note • Refer to page 20 for this installation. Before mounting the projector, contact your nearest Sharp Authorized Projector Dealer or ...Service Center to the screen with the projector's feet flat and level.
... Place the projector at the required distance from the screen according to the desired picture size. (See page 20.) Example of standard setup Side View Screen H Lens center L Note • Refer to page 20 for this installation. Before mounting the projector, contact your nearest Sharp Authorized Projector Dealer or ...Service Center to the screen with the projector's feet flat and level.

Operation Manual
Page 23
Projection (PRJ) Mode The projector can set the PRJ mode in "SCR-ADJ" menu. Select the mode most appropriate for the projection setting in the diagram below. See page 42.) &#...
Projection (PRJ) Mode The projector can set the PRJ mode in "SCR-ADJ" menu. Select the mode most appropriate for the projection setting in the diagram below. See page 42.) &#...
Operation Manual
Page 24
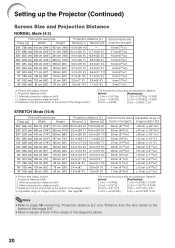
Setting up the Projector (Continued) Screen Size and Projection Distance NORMAL Mode (4:3) Picture (Screen) size Diag. [χ] Width Height Projection distance [L] Minimum [L1] Maximum [L2] 300Љ (762 cm) ...
Setting up the Projector (Continued) Screen Size and Projection Distance NORMAL Mode (4:3) Picture (Screen) size Diag. [χ] Width Height Projection distance [L] Minimum [L1] Maximum [L2] 300Љ (762 cm) ...
Operation Manual
Page 25
... to not work. • A Macintosh adaptor may be required for a list of computer signals compatible with the projector. IMPORTANT: Ensure that the appropriate input mode has been selected on the projector before you are using a SHARP notebook computer). Refer to the specific instructions in your computer's operation manual to enable your nearest Macintosh...
... to not work. • A Macintosh adaptor may be required for a list of computer signals compatible with the projector. IMPORTANT: Ensure that the appropriate input mode has been selected on the projector before you are using a SHARP notebook computer). Refer to the specific instructions in your computer's operation manual to enable your nearest Macintosh...
Operation Manual
Page 26
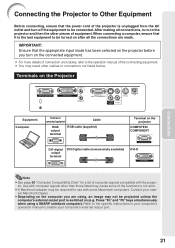
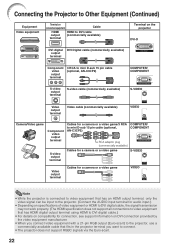
...Other Equipment (Continued) Equipment Video equipment Terminal on connected equipment Cable HDMI output terminal HDMI to DVI cable (commercially available) Terminal on the projector DVI-D DVI digital DVI Digital cable (commercially available) output terminal Component video output terminal 3 RCA to mini D-sub 15 pin cable (... camera or a video game COMPUTER/ COMPONENT S-VIDEO Video output terminal Cables for a camera or a video game VIDEO Note • While the projector is connected to video equipment that has an HDMI output terminal, only the video signal can be input to the...
...Other Equipment (Continued) Equipment Video equipment Terminal on connected equipment Cable HDMI output terminal HDMI to DVI cable (commercially available) Terminal on the projector DVI-D DVI digital DVI Digital cable (commercially available) output terminal Component video output terminal 3 RCA to mini D-sub 15 pin cable (... camera or a video game COMPUTER/ COMPONENT S-VIDEO Video output terminal Cables for a camera or a video game VIDEO Note • While the projector is connected to video equipment that has an HDMI output terminal, only the video signal can be input to the...


