
Operation Manual
Page 6
... removing peripheral devices (except when connecting USB devices and PC cards, etc.). • Check the AC power cord and power connectors periodically for an extended period during operation or charging to avoid injury from any part of your computer to sudden shocks or extreme vibration. They may touch dangerous voltage points or short parts that could result in this manual, refer all cautions and instructions...
... removing peripheral devices (except when connecting USB devices and PC cards, etc.). • Check the AC power cord and power connectors periodically for an extended period during operation or charging to avoid injury from any part of your computer to sudden shocks or extreme vibration. They may touch dangerous voltage points or short parts that could result in this manual, refer all cautions and instructions...
Operation Manual
Page 10
... rights are trademarks or registered trademarks of SHARP Corporation. Copying or other reproduction of Microsoft Corporation in virtually any of improper use, repairs, defects, battery replacement, use of this document is a trademark of International Business Machines Corporation. IBM is protected by copyright. Microsoft and Windows are registered trademarks of this product and any electronic memory product under certain circumstances.
... rights are trademarks or registered trademarks of SHARP Corporation. Copying or other reproduction of Microsoft Corporation in virtually any of improper use, repairs, defects, battery replacement, use of this document is a trademark of International Business Machines Corporation. IBM is protected by copyright. Microsoft and Windows are registered trademarks of this product and any electronic memory product under certain circumstances.

Operation Manual
Page 12
... Enter to hardware, software or data. c:\windows\system Words/Texts on Screen, such as window titles or possible parameters, are separated by a plus (+) sign: Run Task Manager by pressing Ctrl+Alt+Delete. x Section Titles in other parts of Chapter 1. Manual Conventions This manual uses a set of different typeface. Set the item to display the Power Options Properties dialog box. Sample Entries are italicized: Refer to Installing Battery Pack...
... Enter to hardware, software or data. c:\windows\system Words/Texts on Screen, such as window titles or possible parameters, are separated by a plus (+) sign: Run Task Manager by pressing Ctrl+Alt+Delete. x Section Titles in other parts of Chapter 1. Manual Conventions This manual uses a set of different typeface. Set the item to display the Power Options Properties dialog box. Sample Entries are italicized: Refer to Installing Battery Pack...
Operation Manual
Page 24
... Windows manual. Be sure that the power indicator turns off your computer until Windows setup completes. An undercharged battery may not be able to complete the Windows XP setup . • Do not connect any key to your computer until completing Windows setup. In this case, press any peripheral devices to resume your computer from the power management. • If you cannot operate the keyboard or the touch pad, press the power button for Wireless LAN...
... Windows manual. Be sure that the power indicator turns off your computer until Windows setup completes. An undercharged battery may not be able to complete the Windows XP setup . • Do not connect any key to your computer until completing Windows setup. In this case, press any peripheral devices to resume your computer from the power management. • If you cannot operate the keyboard or the touch pad, press the power button for Wireless LAN...

Operation Manual
Page 26
Click start menu 1. In the Turn off computer dialog box, click Turn Off. • With the power button Before using your computer, turn off or reset your computer while the hard disk indicator or the indicator on the optional external floppy disk drive unit or the external CD-ROM drive unit is selected in When I press the power button on my computer in rapid succession can damage your computer. Turning the power off and on...
Click start menu 1. In the Turn off computer dialog box, click Turn Off. • With the power button Before using your computer, turn off or reset your computer while the hard disk indicator or the indicator on the optional external floppy disk drive unit or the external CD-ROM drive unit is selected in When I press the power button on my computer in rapid succession can damage your computer. Turning the power off and on...

Operation Manual
Page 32
... Increases the LCD screen brightness. Using Keyboard Your computer, equipped with Fn key. Decreases the LCD screen brightness. See Power Management of a full-sized desktop keyboard. Special Keys Windows Key Opens the Windows start button on the screen. 2 Application Key Opens short-cut menus for more information. 2-6 Fn + F1 Turns the wireless LAN antenna on and off. This key functions the same as the right mouse button. Fn + F12 Forces your computer into System standby, hibernate, or powered off Fn...
... Increases the LCD screen brightness. Using Keyboard Your computer, equipped with Fn key. Decreases the LCD screen brightness. See Power Management of a full-sized desktop keyboard. Special Keys Windows Key Opens the Windows start button on the screen. 2 Application Key Opens short-cut menus for more information. 2-6 Fn + F1 Turns the wireless LAN antenna on and off. This key functions the same as the right mouse button. Fn + F12 Forces your computer into System standby, hibernate, or powered off Fn...

Operation Manual
Page 38
... or off string in Log Off Windows dialog box, click Change the way users log on to another user account.) 4. Select Create a password string. • If the password has been already set the password, you cannot see Switch User in User Accounts dialog box, and check Use Fast User Switching and click Apply Options. then, the Control Panel window. 2-12 3. If you need to enter it . 7. Setting Password 1. Close the User Accounts dialog box;
... or off string in Log Off Windows dialog box, click Change the way users log on to another user account.) 4. Select Create a password string. • If the password has been already set the password, you cannot see Switch User in User Accounts dialog box, and check Use Fast User Switching and click Apply Options. then, the Control Panel window. 2-12 3. If you need to enter it . 7. Setting Password 1. Close the User Accounts dialog box;

Operation Manual
Page 60
... Remove Hardware 4 dialog appears. 3. Click Safely remove USB Mass Storage Device; Keep them through the audio out jack of the CD-ROM drive unit. Mode Switches There are for technical services. Audio Out Jack Disconnecting Optional External CD-ROM Drive Unit To remove the unit, you need to the audio out jack. Remove the USB cable from the computer. Mode Switches Cleaning Optional External CD-ROM Drive Unit • Do not use solvents such as a default setting, OFF. These switches are the mode switches on the taskbar. 2. Click Safely Remove Hardware...
... Remove Hardware 4 dialog appears. 3. Click Safely remove USB Mass Storage Device; Keep them through the audio out jack of the CD-ROM drive unit. Mode Switches There are for technical services. Audio Out Jack Disconnecting Optional External CD-ROM Drive Unit To remove the unit, you need to the audio out jack. Remove the USB cable from the computer. Mode Switches Cleaning Optional External CD-ROM Drive Unit • Do not use solvents such as a default setting, OFF. These switches are the mode switches on the taskbar. 2. Click Safely Remove Hardware...

Operation Manual
Page 62
... and the external monitor. 2. Press the button on the external monitor; Button Switching Display 1. If the display cable has screws, be sure to your computer. Disconnecting External Monitor 1. In the Display Properties dialog box, select Settings tab; 3. Turn off your computer. then, remove it ; then, click Advanced button. 4-12 Connect the display converter cable to the display connector, then, the other end of the display converter cable, and hold it from your external monitor. Turn on...
... and the external monitor. 2. Press the button on the external monitor; Button Switching Display 1. If the display cable has screws, be sure to your computer. Disconnecting External Monitor 1. In the Display Properties dialog box, select Settings tab; 3. Turn off your computer. then, remove it ; then, click Advanced button. 4-12 Connect the display converter cable to the display connector, then, the other end of the display converter cable, and hold it from your external monitor. Turn on...
Operation Manual
Page 66
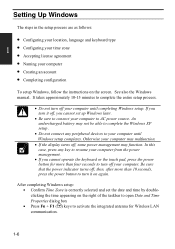
... interface called Universal Serial Bus (USB) and its two USB ports support USB1.1 and USB2.0. When a new device is automatically installed. Click Safely Remove Hardware icon ( ) on the screen. 4 USB Port USB Port To remove USB devices, you may need to perform the following instructions before you remove them: 1. Remove the device from your computer, the appropriate driver is correctly connected to show all kinds of icons. With a USB connection, you will be installed automatically. then, Safe To Remove Hardware dialog appears...
... interface called Universal Serial Bus (USB) and its two USB ports support USB1.1 and USB2.0. When a new device is automatically installed. Click Safely Remove Hardware icon ( ) on the screen. 4 USB Port USB Port To remove USB devices, you may need to perform the following instructions before you remove them: 1. Remove the device from your computer, the appropriate driver is correctly connected to show all kinds of icons. With a USB connection, you will be installed automatically. then, Safe To Remove Hardware dialog appears...
Operation Manual
Page 71
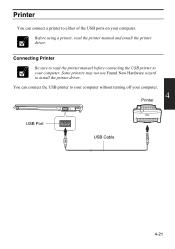
You can connect a printer to either of the USB ports on your computer. Some printers may not use Found New Hardware wizard to read the printer manual and install the printer driver. Printer You can connect the USB printer to your computer without turning off your computer. 4 Printer USB Port USB Cable 4-21 Before using a printer, read the printer manual before connecting the USB printer to your computer. Connecting Printer Be sure to install the printer driver.
You can connect a printer to either of the USB ports on your computer. Some printers may not use Found New Hardware wizard to read the printer manual and install the printer driver. Printer You can connect the USB printer to your computer without turning off your computer. 4 Printer USB Port USB Cable 4-21 Before using a printer, read the printer manual before connecting the USB printer to your computer. Connecting Printer Be sure to install the printer driver.

Operation Manual
Page 88
... a password you have to the Setup Utility. Hard Disk boot Sector defines whether the boot sector of the hard disk is set to eight characters). If you will never forget, or write it down and protect it on . Password on the connection cradle. When formatting the hard disk or reinstalling software, set , the system requires the password when entering to contact your computer against unauthorized access. Advanced Menu Internal Pointing Device enables or disables the...
... a password you have to the Setup Utility. Hard Disk boot Sector defines whether the boot sector of the hard disk is set to eight characters). If you will never forget, or write it down and protect it on . Password on the connection cradle. When formatting the hard disk or reinstalling software, set , the system requires the password when entering to contact your computer against unauthorized access. Advanced Menu Internal Pointing Device enables or disables the...

Operation Manual
Page 90
... settings you have changed. To exit, select one ; then press Enter 6. Press Enter to move ; If the system cannot find the drive, it up and down. Exit Discarding Changes exits the Setup Utility without saving the settings you have changed and exits the Setup Utility. then, third one of the above two items. 6-6 then, use minus key or space bar to open the sub menu. Load Setup Defaults...
... settings you have changed. To exit, select one ; then press Enter 6. Press Enter to move ; If the system cannot find the drive, it up and down. Exit Discarding Changes exits the Setup Utility without saving the settings you have changed and exits the Setup Utility. then, third one of the above two items. 6-6 then, use minus key or space bar to open the sub menu. Load Setup Defaults...

Operation Manual
Page 97
Limitation You cannot use MM series as an external hard disk when it is powered on/ in the CD drive of the host computer. 2. And Use the installed program when you log on to the computer as a member of the Computer administrators group. Connecting to Host Computer MM series can be sure to the computer as an external hard disk of the computer with a limited...
Limitation You cannot use MM series as an external hard disk when it is powered on/ in the CD drive of the host computer. 2. And Use the installed program when you log on to the computer as a member of the Computer administrators group. Connecting to Host Computer MM series can be sure to the computer as an external hard disk of the computer with a limited...
Operation Manual
Page 104
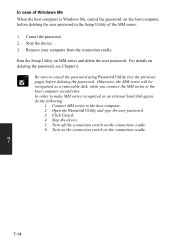
... the user password. Turn on the connection switch on the connection cradle. 6. Run the Setup Utility on deleting the password, see the previous page) before deleting the user password in the Setup Utility of the MM series. 1. Stop the device. 5. Stop the device. 3. Cancel the password. 2. Be sure to cancel the password using Password Utility (see Chapter 6. Click Cancel. 4. Open the Password Utility and type the user password. 3. Otherwise, the MM series will be recognized as an external hard disk again...
... the user password. Turn on the connection switch on the connection cradle. 6. Run the Setup Utility on deleting the password, see the previous page) before deleting the user password in the Setup Utility of the MM series. 1. Stop the device. 5. Stop the device. 3. Cancel the password. 2. Be sure to cancel the password using Password Utility (see Chapter 6. Click Cancel. 4. Open the Password Utility and type the user password. 3. Otherwise, the MM series will be recognized as an external hard disk again...

Operation Manual
Page 107
... a software error, try to determine if the error message is blank, or your computer. If you encounter a problem, begin by something as minor as an unplugged power cord or as major as a damaged hard disk drive. If no lights are lit, check the battery charge or power outlet, the plug and power cord, and any peripheral devices, look for example, the screen is from your operating...
... a software error, try to determine if the error message is blank, or your computer. If you encounter a problem, begin by something as minor as an unplugged power cord or as major as a damaged hard disk drive. If no lights are lit, check the battery charge or power outlet, the plug and power cord, and any peripheral devices, look for example, the screen is from your operating...

Operation Manual
Page 108
... Setup Utility. Be sure to Enabled in Boot menu of the Setup Utility. Trouble when Starting Question: Why doesn't the power indicator or the battery indicator turn on? • Make sure the AC adapter is correctly connected to the AC adapter jack of your computer. • Check whether the floppy disk set to the optional external floppy disk drive unit contains a system disk. • Check whether Floppy Disk Drive is set to the first in Boot Sequence and USB Boot is set to set...
... Setup Utility. Be sure to Enabled in Boot menu of the Setup Utility. Trouble when Starting Question: Why doesn't the power indicator or the battery indicator turn on? • Make sure the AC adapter is correctly connected to the AC adapter jack of your computer. • Check whether the floppy disk set to the optional external floppy disk drive unit contains a system disk. • Check whether Floppy Disk Drive is set to the first in Boot Sequence and USB Boot is set to set...

Operation Manual
Page 109
... external monitor is turned on it . (Refer to change the display with Display See the Display section in Why doesn't the keyboard or the glide pad function? Question: Why can't I change it distorted? • Confirm the monitor is selected as the output display by pressing Fn+F11. • If you use Display Properties dialog box to change it is correctly installed and has a charge remaining. • Make sure the LCD screen...
... external monitor is turned on it . (Refer to change the display with Display See the Display section in Why doesn't the keyboard or the glide pad function? Question: Why can't I change it distorted? • Confirm the monitor is selected as the output display by pressing Fn+F11. • If you use Display Properties dialog box to change it is correctly installed and has a charge remaining. • Make sure the LCD screen...

Operation Manual
Page 119
...-ROM drive (external) connecting, 4-7 mode switch, 4-10 removing, 4-9 Connection Cradle charging battery, 7-4 connecting to hostcomputer, 7-8 overview, 7-4 password, 7-13 precautions, 7-1 removing, 7-12 setting up,7-3 stopping connection,7-11 using as external hard disk,7-6 D Display changing brightness, 2-8 changing resolution, 2-8 changing number of colors, 2-8 switching the display, 2-6 troubleshooting, T-3 turning off, 2-6 E External monitor connecting,4-11 disconnecting,4-12 switching the display, 2-6, 4-12 F Floppy disk ejecting,4-4 handling, 4-3 inserting, 4-4 removing, 4-5 formatting...
...-ROM drive (external) connecting, 4-7 mode switch, 4-10 removing, 4-9 Connection Cradle charging battery, 7-4 connecting to hostcomputer, 7-8 overview, 7-4 password, 7-13 precautions, 7-1 removing, 7-12 setting up,7-3 stopping connection,7-11 using as external hard disk,7-6 D Display changing brightness, 2-8 changing resolution, 2-8 changing number of colors, 2-8 switching the display, 2-6 troubleshooting, T-3 turning off, 2-6 E External monitor connecting,4-11 disconnecting,4-12 switching the display, 2-6, 4-12 F Floppy disk ejecting,4-4 handling, 4-3 inserting, 4-4 removing, 4-5 formatting...

Operation Manual
Page 120
..., 2-5 scroll, 2-5 troubleshooting, T-4 H Hard disk drive troubleshooting, T-5 I Indicators antenna,5-4 power,1-5, 2-1 battery status, 2-1,3-3 status, xv K Keyboard function keys, 2-6 special keys, 2-6 troubleshooting, T-4 windows key, 2-6 L LAN configuring, 5-3 connecting to wired network, 5-2 troubleshooting, T-6 N Network Setup Utility changing, 5-9 deleting, 5-9 loading, 5-8 switching, 5-8 Index-2 P Passwords changing, 2-13, 6-5 deleting, 2-13, 6-5 setting, 2-12, 6-5 PC cards ejecting, 4-18 inserting, 4-17 Peripherals audio equipment, 4-14 connecting guidelines, 4-1 external monitor, 4-11...
..., 2-5 scroll, 2-5 troubleshooting, T-4 H Hard disk drive troubleshooting, T-5 I Indicators antenna,5-4 power,1-5, 2-1 battery status, 2-1,3-3 status, xv K Keyboard function keys, 2-6 special keys, 2-6 troubleshooting, T-4 windows key, 2-6 L LAN configuring, 5-3 connecting to wired network, 5-2 troubleshooting, T-6 N Network Setup Utility changing, 5-9 deleting, 5-9 loading, 5-8 switching, 5-8 Index-2 P Passwords changing, 2-13, 6-5 deleting, 2-13, 6-5 setting, 2-12, 6-5 PC cards ejecting, 4-18 inserting, 4-17 Peripherals audio equipment, 4-14 connecting guidelines, 4-1 external monitor, 4-11...


