MX-6201N | MX-7001N Operation Manual Suite
Page 2
... 58 • LOADING PAPER 59 • MANUALLY OPERATING THE INSERTER. . . . . 60 SHARP OSA 62 • APPLICATION COMMUNICATION MODULE (MX-AMX2 62 • EXTERNAL ACCOUNT MODULE (MX-AMX3) . . 63 5 MAINTENANCE REGULAR MAINTENANCE 65 • CLEANING THE DOCUMENT GLASS AND AUTOMATIC ...DOCUMENT FEEDER 65 • CLEANING THE MAIN CHARGER OF THE PHOTOCONDUCTIVE DRUM 68 • CLEANING THE BYPASS FEED ROLLER . . . . . 69 • CLEANING THE LASER UNIT 70 REPLACING THE TONER CARTRIDGES...
... 58 • LOADING PAPER 59 • MANUALLY OPERATING THE INSERTER. . . . . 60 SHARP OSA 62 • APPLICATION COMMUNICATION MODULE (MX-AMX2 62 • EXTERNAL ACCOUNT MODULE (MX-AMX3) . . 63 5 MAINTENANCE REGULAR MAINTENANCE 65 • CLEANING THE DOCUMENT GLASS AND AUTOMATIC ...DOCUMENT FEEDER 65 • CLEANING THE MAIN CHARGER OF THE PHOTOCONDUCTIVE DRUM 68 • CLEANING THE BYPASS FEED ROLLER . . . . . 69 • CLEANING THE LASER UNIT 70 REPLACING THE TONER CARTRIDGES...
MX-6201N | MX-7001N Operation Manual Suite
Page 5
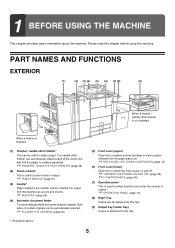
... MODULE (page 57) (3) Inserter* Paper loaded in the inserter can be inserted into output from the paper pass unit. ☞ REPLACING THE TONER CARTRIDGES (page 74) (6) Front cover (lower) Open this to this tray. (9) Output tray (center tray) Output is used to staple output. The ...9758; PLACING THE ORIGINAL (page 44) (5) Front cover (upper) Open this chapter before using the machine. Please read this to replace a toner cartridge or clear a paper misfeed from the machine as covers and inserts. ☞ INSERTER (page 58) (4) Automatic document feeder This automatically feeds and ...
... MODULE (page 57) (3) Inserter* Paper loaded in the inserter can be inserted into output from the paper pass unit. ☞ REPLACING THE TONER CARTRIDGES (page 74) (6) Front cover (lower) Open this to this tray. (9) Output tray (center tray) Output is used to staple output. The ...9758; PLACING THE ORIGINAL (page 44) (5) Front cover (upper) Open this chapter before using the machine. Please read this to replace a toner cartridge or clear a paper misfeed from the machine as covers and inserts. ☞ INSERTER (page 58) (4) Automatic document feeder This automatically feeds and ...

MX-6201N | MX-7001N Operation Manual Suite
Page 7
...* This transfers output to power on the transfer belt. This may cause a defective image. (20) Right side cover Open this switch in a cartridge, the cartridge of the photoconductive drums are combined together on the machine. When loading paper larger than 8-1/2" x 11"R or A4R, be replaced. ☞ REPLACING...page 38) (23) Main power switch This is used when 2-sided printing is used to the finisher or saddle stitch finisher. (17) Toner cartridges These contain toner for printing. Open this cover to remove a paper misfeed. (22) Bypass tray Use this lever up to feed paper manually...
...* This transfers output to power on the transfer belt. This may cause a defective image. (20) Right side cover Open this switch in a cartridge, the cartridge of the photoconductive drums are combined together on the machine. When loading paper larger than 8-1/2" x 11"R or A4R, be replaced. ☞ REPLACING...page 38) (23) Main power switch This is used when 2-sided printing is used to the finisher or saddle stitch finisher. (17) Toner cartridges These contain toner for printing. Open this cover to remove a paper misfeed. (22) Bypass tray Use this lever up to feed paper manually...

MX-6201N | MX-7001N Operation Manual Suite
Page 49
..." x 17", 8-1/2" x 14", 8-1/2" x 13", A3W, A3, B4), extend the tray. (3) Saddle stitch tray Stapled and folded output is delivered to this cover to replace the staple cartridge or remove a staple jam. • A paper pass unit is delivered to punch holes in the appropriate position below for the paper size to be stapled...
..." x 17", 8-1/2" x 14", 8-1/2" x 13", A3W, A3, B4), extend the tray. (3) Saddle stitch tray Stapled and folded output is delivered to this cover to replace the staple cartridge or remove a staple jam. • A paper pass unit is delivered to punch holes in the appropriate position below for the paper size to be stapled...

MX-6201N | MX-7001N Operation Manual Suite
Page 50
SUPPLIES The finisher and saddle stitch finisher require the following staple cartridge: • Staple cartridge (approx. 5000 staples x 3 cartridges) (for both the finisher and saddle stitch finisher) AR-SC2 The saddle stitch finisher also requires the following special staple cartridge for the saddle stitch unit. • Staple cartridge (approx. 2000 staples per cartridge x 3 cartridges) AR-SC3 50
SUPPLIES The finisher and saddle stitch finisher require the following staple cartridge: • Staple cartridge (approx. 5000 staples x 3 cartridges) (for both the finisher and saddle stitch finisher) AR-SC2 The saddle stitch finisher also requires the following special staple cartridge for the saddle stitch unit. • Staple cartridge (approx. 2000 staples per cartridge x 3 cartridges) AR-SC3 50

MX-6201N | MX-7001N Operation Manual Suite
Page 51
...lock button to replace the staple cartridge. Replacing the cartridge in the finisher Open the front cover. 1 Squeeze the green parts of staples, a message will appear in until it clicks into place. 4 Do not remove the seal from the cartridge before inserting the cartridge into the staple case. Push... the staple cartridge in the operation panel. FINISHER / SADDLE STITCH FINISHER MAINTENANCE When the staple cartridge runs out of the staple case and pull the case up and...
...lock button to replace the staple cartridge. Replacing the cartridge in the finisher Open the front cover. 1 Squeeze the green parts of staples, a message will appear in until it clicks into place. 4 Do not remove the seal from the cartridge before inserting the cartridge into the staple case. Push... the staple cartridge in the operation panel. FINISHER / SADDLE STITCH FINISHER MAINTENANCE When the staple cartridge runs out of the staple case and pull the case up and...

MX-6201N | MX-7001N Operation Manual Suite
Page 53
Replacing the staple cartridges in the saddle stitch unit Open the front cover. 1 Grasp the handle on the saddle stitch unit and pull it slowly out until it stops. 2 ... right side of the saddle stitch finisher forward and then rotate it back 6 to its original position. 53 Pull the staple unit of each staple cartridge and then install the cartridge. Replace both staple cartridges. 5 Remove the cover from each empty staple...
Replacing the staple cartridges in the saddle stitch unit Open the front cover. 1 Grasp the handle on the saddle stitch unit and pull it slowly out until it stops. 2 ... right side of the saddle stitch finisher forward and then rotate it back 6 to its original position. 53 Pull the staple unit of each staple cartridge and then install the cartridge. Replace both staple cartridges. 5 Remove the cover from each empty staple...

MX-6201N | MX-7001N Operation Manual Suite
Page 55
Remove the leading staple if it is bent. If bent staples remain, a staple jam will occur again. 1 Return the lever to verify that stapling takes place correctly. 55 Removing a staple jam from the finisher To remove a staple jam, remove the staple case from the finisher unit and then follow the steps below. To remove or reinsert the staple case of the staple case and remove the jammed staple. Lower the lever at the front end of the finisher unit, see "Replacing the cartridge in staple sort mode to its original position. 2 Make a test print or copy in the finisher" (page 51).
Remove the leading staple if it is bent. If bent staples remain, a staple jam will occur again. 1 Return the lever to verify that stapling takes place correctly. 55 Removing a staple jam from the finisher To remove a staple jam, remove the staple case from the finisher unit and then follow the steps below. To remove or reinsert the staple case of the staple case and remove the jammed staple. Lower the lever at the front end of the finisher unit, see "Replacing the cartridge in staple sort mode to its original position. 2 Make a test print or copy in the finisher" (page 51).

MX-6201N | MX-7001N Operation Manual Suite
Page 56
...saddle stitch unit or replace the saddle stitch unit, see "Replacing the staple cartridges in the saddle stitch unit" (page 53). To remove the staple cartridge from the saddle stitch unit, remove the staple cartridge and then follow the steps below. Remove the jammed staples and then return ...knob (B) to its original position. 3 (B) Replace the staple cartridge. 4 Make a test print or copy using the...
...saddle stitch unit or replace the saddle stitch unit, see "Replacing the staple cartridges in the saddle stitch unit" (page 53). To remove the staple cartridge from the saddle stitch unit, remove the staple cartridge and then follow the steps below. Remove the jammed staples and then return ...knob (B) to its original position. 3 (B) Replace the staple cartridge. 4 Make a test print or copy using the...

MX-6201N | MX-7001N Operation Manual Suite
Page 65
... these parts clean. Document glass Document backplate sheet 65 REGULAR MAINTENANCE To ensure that the machine continues to clean the machine and replace the toner cartridges and the waste toner box. Warning Do not use thinner, benzene, or similar volatile cleaning agents to clean the machine. After wiping with the moistened...
... these parts clean. Document glass Document backplate sheet 65 REGULAR MAINTENANCE To ensure that the machine continues to clean the machine and replace the toner cartridges and the waste toner box. Warning Do not use thinner, benzene, or similar volatile cleaning agents to clean the machine. After wiping with the moistened...

MX-6201N | MX-7001N Operation Manual Suite
Page 74
... be replaced while the machine is low.) Ready to replace the toner cartridge when the message "Change the toner cartridge." appears. In copy mode Ready to scan for the indicated color. Change the toner cartridge. ( ) OK Colors that are running low or have run out of... will not be possible. • Be sure to install 5 toner cartridges (Y/M/C/Bk1/Bk2). 74 REPLACING THE TONER CARTRIDGES Be sure to scan for copy. ( Change the toner cartridge.) When the message appears in the message display, replace the toner cartridge for copy. ( Toner supply is in ( ). If Y, M, or...
... be replaced while the machine is low.) Ready to replace the toner cartridge when the message "Change the toner cartridge." appears. In copy mode Ready to scan for the indicated color. Change the toner cartridge. ( ) OK Colors that are running low or have run out of... will not be possible. • Be sure to install 5 toner cartridges (Y/M/C/Bk1/Bk2). 74 REPLACING THE TONER CARTRIDGES Be sure to scan for copy. ( Change the toner cartridge.) When the message appears in the message display, replace the toner cartridge for copy. ( Toner supply is in ( ). If Y, M, or...

MX-6201N | MX-7001N Operation Manual Suite
Page 75
If the cartridge is not installed, open the toner cover as shown. 3 75 Pull the toner cartridge toward you . Open the front cover (upper). Remove a new toner cartridge and shake it level. Locations of color toner cartridges (A) (B) (C) (D) (E) 1 (A): Yellow (B): Magenta (C): Cyan (D): Black 1 (E): Black 2 If a finisher / saddle stitch finisher is pulled out abruptly, toner may spill out. 2 Caution When pulling out the toner cartridge, do not touch the toner fill hole. Pull the cartridge slowly toward you , keeping it 5 or 6 times as shown.
If the cartridge is not installed, open the toner cover as shown. 3 75 Pull the toner cartridge toward you . Open the front cover (upper). Remove a new toner cartridge and shake it level. Locations of color toner cartridges (A) (B) (C) (D) (E) 1 (A): Yellow (B): Magenta (C): Cyan (D): Black 1 (E): Black 2 If a finisher / saddle stitch finisher is pulled out abruptly, toner may spill out. 2 Caution When pulling out the toner cartridge, do not touch the toner fill hole. Pull the cartridge slowly toward you , keeping it 5 or 6 times as shown.

MX-6201N | MX-7001N Operation Manual Suite
Page 76
... (upper) during printing or when the machine is touched. Be sure to "25-0%", obtain a new toner cartridge and keep it ready for replacement. • Depending on their side. • If a toner cartridge other than a SHARP-recommended toner cartridge is a risk of toner remaining, continually touch the [COPY] key during this time. After the toner...
... (upper) during printing or when the machine is touched. Be sure to "25-0%", obtain a new toner cartridge and keep it ready for replacement. • Depending on their side. • If a toner cartridge other than a SHARP-recommended toner cartridge is a risk of toner remaining, continually touch the [COPY] key during this time. After the toner...

MX-6201N | MX-7001N Operation Manual Suite
Page 218
.... (2) Mode icon The icon appears when the job is out of the job in the key of copies (sets) completed. "Toner Empty" The toner cartridge is a copy job. "Error" An error occurred while the job was canceled.) (3) Job name "Copy" appears for the job has run out. "000... display the above screen. When user authentication is waiting in the job queue. To cancel, touch the [Yes] key. 137 Check with a new cartridge. "Limit" The copy page limit has been exceeded. The following screen will be executed. "Paper Empty" The paper used document filing or in the...
.... (2) Mode icon The icon appears when the job is out of the job in the key of copies (sets) completed. "Toner Empty" The toner cartridge is a copy job. "Error" An error occurred while the job was canceled.) (3) Job name "Copy" appears for the job has run out. "000... display the above screen. When user authentication is waiting in the job queue. To cancel, touch the [Yes] key. 137 Check with a new cartridge. "Limit" The copy page limit has been exceeded. The following screen will be executed. "Paper Empty" The paper used document filing or in the...


