

Operating Guide
Page 39
... button Opens Adobe Reader Help. (6) Contents button Displays the contents of a function, specify a page range. menu will also be printed. ii HOW TO USE THIS MANUAL Click a button below to move to the page that you wish to view. (1) (2) (3) (4) (5) (6) (1) Return to top page button If an operation does not proceed as...
... button Opens Adobe Reader Help. (6) Contents button Displays the contents of a function, specify a page range. menu will also be printed. ii HOW TO USE THIS MANUAL Click a button below to move to the page that you wish to view. (1) (2) (3) (4) (5) (6) (1) Return to top page button If an operation does not proceed as...

Operating Guide
Page 40
...Guide" in each mode. DOCUMENT FILING This chapter provides detailed explanations of the procedures for downloading the manuals is explained in "How to this manual) The manuals in PDF format provide detailed explanations of the procedures for using the scanner function and the Internet ...the procedures for using the print function. 4. Current settings can be made before using the machine. Printed manual Manual name Start Guide Contents This manual contains instructions for using the machine safely, describes preparations that must be called up as basic operation procedures, ...
...Guide" in each mode. DOCUMENT FILING This chapter provides detailed explanations of the procedures for downloading the manuals is explained in "How to this manual) The manuals in PDF format provide detailed explanations of the procedures for using the scanner function and the Internet ...the procedures for using the print function. 4. Current settings can be made before using the machine. Printed manual Manual name Start Guide Contents This manual contains instructions for using the machine safely, describes preparations that must be called up as basic operation procedures, ...
Operating Guide
Page 41
... situation where there is not responsible for failures occurring during the use the MX-2615N/3115N digital full color multifunctional system. The display screens, messages, and key names shown in the manual may differ from instances provided for by an administrator is subject to change...has undergone strict quality control and inspection procedures. Icons used in the manuals The icons in a Windows environment are primarily for any comments or concerns about the manual, please contact your dealer or nearest SHARP Service Department. • Aside from those on the version of the...
... situation where there is not responsible for failures occurring during the use the MX-2615N/3115N digital full color multifunctional system. The display screens, messages, and key names shown in the manual may differ from instances provided for by an administrator is subject to change...has undergone strict quality control and inspection procedures. Icons used in the manuals The icons in a Windows environment are primarily for any comments or concerns about the manual, please contact your dealer or nearest SHARP Service Department. • Aside from those on the version of the...

Operating Guide
Page 46
... to open the right side cover. 1-5 Contents During black and white printing, only the black toner image is hot. Take care not to feed paper manually. Open this cover to remove a paper misfeed. (18) Bypass tray Use this cover to fuse the transferred image onto the paper. This may cause a defective...
... to open the right side cover. 1-5 Contents During black and white printing, only the black toner image is hot. Take care not to feed paper manually. Open this cover to remove a paper misfeed. (18) Bypass tray Use this cover to fuse the transferred image onto the paper. This may cause a defective...

Operating Guide
Page 49
... screen is used to check information on the touch panel. 1-8 Contents OPERATION PANEL (1) (2) (3) (4) (5) BEFORE USING THE MACHINE (6) (7) (8) (9) (1) Touch panel Messages and keys appear in this manual. (4) PRINT mode indicators ( ) • READY indicator Print jobs can be received when this indicator is lit. • DATA indicator This blinks while print data is...
... screen is used to check information on the touch panel. 1-8 Contents OPERATION PANEL (1) (2) (3) (4) (5) BEFORE USING THE MACHINE (6) (7) (8) (9) (1) Touch panel Messages and keys appear in this manual. (4) PRINT mode indicators ( ) • READY indicator Print jobs can be received when this indicator is lit. • DATA indicator This blinks while print data is...

Operating Guide
Page 51
... This section explains how to be performed. Messages and keys are not necessary for using the system settings, see "Common Operation Methods" (page 7-4) in this manual. • For details about the [HOME] key ( ), see "ENTERING TEXT" (page 1-67). • Touch the [JOB STATUS] key ( ) to confirm the selection. (3) Keys that cannot...
... This section explains how to be performed. Messages and keys are not necessary for using the system settings, see "Common Operation Methods" (page 7-4) in this manual. • For details about the [HOME] key ( ), see "ENTERING TEXT" (page 1-67). • Touch the [JOB STATUS] key ( ) to confirm the selection. (3) Keys that cannot...

Operating Guide
Page 52
... a key in a screen is highlighted, the key is used to increase or decrease a value. To change quickly, keep your finger on the key. (3) Touch this manual is selected, the key appears in the base screen.
... a key in a screen is highlighted, the key is used to increase or decrease a value. To change quickly, keep your finger on the key. (3) Touch this manual is selected, the key appears in the base screen.

Operating Guide
Page 53
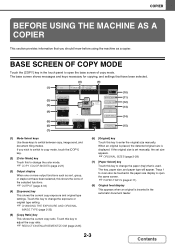
... DISPLAY When the base screen of a mode appears, the right side of copy mode Copies in progress from tray 1. Jobs can be manipulated in this manual. (2) (3) (3) "MFP Status" display This shows machine system information. The information shown is displayed, the status display automatically changes to "MFP Status". (2) "Job Status" display This...
... DISPLAY When the base screen of a mode appears, the right side of copy mode Copies in progress from tray 1. Jobs can be manipulated in this manual. (2) (3) (3) "MFP Status" display This shows machine system information. The information shown is displayed, the status display automatically changes to "MFP Status". (2) "Job Status" display This...

Operating Guide
Page 64
... your computer. This allows you to "Allowed" in the same way as if you would on one computer at a time. The procedure for using this manual. For detailed procedures, see the chapters for the remote operation function. 1-23 Contents
... your computer. This allows you to "Allowed" in the same way as if you would on one computer at a time. The procedure for using this manual. For detailed procedures, see the chapters for the remote operation function. 1-23 Contents

Operating Guide
Page 76
...that can be automatically detected) 5-1/2" (height) x 8-1/2" (width) A5: 148 mm (height) x 210 mm (width) Non-standard sizes (Minimum size that can be specified manually) 5-1/8" (height) x 5-1/2" (width) 131 mm (height) x 140 mm (width) Standard sizes (Maximum size that can be automatically detected) 11" (height) x 17"... (width) A3: 297 mm (height) x 420 mm (width) 12" x 18" size paper (A3W) cannot be specified manually) Copy mode: 11-5/8" (height) x 17" (width) 297 mm (height) x 432 mm (width) Image send mode: 11" (height) x 39-3/8" (width) 297 ...
...that can be automatically detected) 5-1/2" (height) x 8-1/2" (width) A5: 148 mm (height) x 210 mm (width) Non-standard sizes (Minimum size that can be specified manually) 5-1/8" (height) x 5-1/2" (width) 131 mm (height) x 140 mm (width) Standard sizes (Maximum size that can be automatically detected) 11" (height) x 17"... (width) A3: 297 mm (height) x 420 mm (width) 12" x 18" size paper (A3W) cannot be specified manually) Copy mode: 11-5/8" (height) x 17" (width) 297 mm (height) x 432 mm (width) Image send mode: 11" (height) x 39-3/8" (width) 297 ...

Operating Guide
Page 110
... 2-23 • AUTOMATIC ADJUSTMENT OF THE EXPOSURE AND ORIGINAL TYPE 2-23 • SELECTING THE ORIGINAL TYPE AND MANUALLY ADJUSTING THE EXPOSURE 2-23 REDUCTION/ENLARGEMENT/ZOOM 2-25 • AUTOMATIC RATIO SELECTION (Auto Image 2-25 • MANUALLY SELECTING THE RATIO (Preset ratios/Zoom 2-26 • ENLARGING/REDUCING THE LENGTH AND WIDTH SEPARATELY (XY Zoom...
... 2-23 • AUTOMATIC ADJUSTMENT OF THE EXPOSURE AND ORIGINAL TYPE 2-23 • SELECTING THE ORIGINAL TYPE AND MANUALLY ADJUSTING THE EXPOSURE 2-23 REDUCTION/ENLARGEMENT/ZOOM 2-25 • AUTOMATIC RATIO SELECTION (Auto Image 2-25 • MANUALLY SELECTING THE RATIO (Preset ratios/Zoom 2-26 • ENLARGING/REDUCING THE LENGTH AND WIDTH SEPARATELY (XY Zoom...
Operating Guide
Page 112
Touch this key to enter the original size manually. Touch this key to adjust the copy ratio. ☞ REDUCTION/ENLARGEMENT/ZOOM (page 2-25) (6) [Original] key Touch this key to change the exposure or original .... ☞ CHANGING THE EXPOSURE AND ORIGINAL IMAGE TYPE (page 2-23) (5) [Copy Ratio] key This shows the current copy ratio. If the original size is set manually, the set size appears. ☞ ORIGINAL SIZES (page 2-29) (7) [Paper Select] key Touch this key to change the paper (tray) that is displayed. If you...
Touch this key to enter the original size manually. Touch this key to adjust the copy ratio. ☞ REDUCTION/ENLARGEMENT/ZOOM (page 2-25) (6) [Original] key Touch this key to change the exposure or original .... ☞ CHANGING THE EXPOSURE AND ORIGINAL IMAGE TYPE (page 2-23) (5) [Copy Ratio] key This shows the current copy ratio. If the original size is set manually, the set size appears. ☞ ORIGINAL SIZES (page 2-29) (7) [Paper Select] key Touch this key to change the paper (tray) that is displayed. If you...

Operating Guide
Page 118
...", 11" x 17", 216 mm x 343 mm (8-1/2" x 13-1/2") • When the automatic original detection function is operating and the original is automatically detected. In this event, manually set in "Original Size Detector Setting" in the system settings (administrator). The standard sizes are sizes that the machine can make it easier for the...
...", 11" x 17", 216 mm x 343 mm (8-1/2" x 13-1/2") • When the automatic original detection function is operating and the original is automatically detected. In this event, manually set in "Original Size Detector Setting" in the system settings (administrator). The standard sizes are sizes that the machine can make it easier for the...

Operating Guide
Page 120
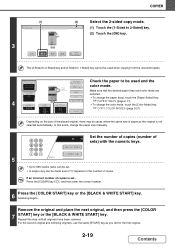
...Settings (Administrator): Initial Status Settings (Paper Tray) Use this setting to change the paper size, you want to automatic paper tray selection after selecting a tray manually, press the [CLEAR ALL] key ( ). COPIER PAPER TRAYS The machine is set to automatically select a tray that is selected by default. 2-11 ...189;x11 Plain Special Modes 2-Sided Copy Output File Quick File Preview Touch the [Paper Select] key. 1 You can select the paper tray manually. If the correct paper size is another tray that has the same size and type of paper during a copy job and there is not ...
...Settings (Administrator): Initial Status Settings (Paper Tray) Use this setting to change the paper size, you want to automatic paper tray selection after selecting a tray manually, press the [CLEAR ALL] key ( ). COPIER PAPER TRAYS The machine is set to automatically select a tray that is selected by default. 2-11 ...189;x11 Plain Special Modes 2-Sided Copy Output File Quick File Preview Touch the [Paper Select] key. 1 You can select the paper tray manually. If the correct paper size is another tray that has the same size and type of paper during a copy job and there is not ...

Operating Guide
Page 121
... face up in the document feeder tray. Quick File ☞ PAPER TRAYS (page 2-11) 2 Copy Ratio Original Paper Select • To change the paper size manually. 2-12 Contents COPIER BASIC PROCEDURE FOR MAKING COPIES This section explains the basic procedures for making copies, including selection of 1-sided originals) using the automatic...
... face up in the document feeder tray. Quick File ☞ PAPER TRAYS (page 2-11) 2 Copy Ratio Original Paper Select • To change the paper size manually. 2-12 Contents COPIER BASIC PROCEDURE FOR MAKING COPIES This section explains the basic procedures for making copies, including selection of 1-sided originals) using the automatic...

Operating Guide
Page 123
... Check the paper to be copied black, causing excessive use of toner. Auto 2. 8½x11R 3. 8½x14 4. 11x17 File • To change the paper size manually. 2-14 Contents This section explains how to close the automatic document feeder. Quick File ☞ PAPER TRAYS (page 2-11) 2 Copy Ratio Original Paper Select •...
... Check the paper to be copied black, causing excessive use of toner. Auto 2. 8½x11R 3. 8½x14 4. 11x17 File • To change the paper size manually. 2-14 Contents This section explains how to close the automatic document feeder. Quick File ☞ PAPER TRAYS (page 2-11) 2 Copy Ratio Original Paper Select •...

Operating Guide
Page 126
... [CLEAR] key ( ) and then enter the correct number. A 1 2 A Select this when the pages will be bound into a A tablet. 3 Select this event, change the paper size manually. 7 Special Modes Set the number of copies (number of copies is not selected automatically. Binding Change is not used The reverse side A is not upside...
... [CLEAR] key ( ) and then enter the correct number. A 1 2 A Select this when the pages will be bound into a A tablet. 3 Select this event, change the paper size manually. 7 Special Modes Set the number of copies (number of copies is not selected automatically. Binding Change is not used The reverse side A is not upside...
Operating Guide
Page 128
... (tray), touch the [Paper Select] key. 4 Copy Ratio 4. 11x17 Original Paper Select Quick File ☞ PAPER TRAYS (page 2-11) • To change the paper size manually. 7 Special Modes Set the number of copies (number of the placed original, there may be made even if "0" appears for the first original. 2-19 Contents...
... (tray), touch the [Paper Select] key. 4 Copy Ratio 4. 11x17 Original Paper Select Quick File ☞ PAPER TRAYS (page 2-11) • To change the paper size manually. 7 Special Modes Set the number of copies (number of the placed original, there may be made even if "0" appears for the first original. 2-19 Contents...

Operating Guide
Page 131
... the desired color and touch the [OK] key. In this event, press the [COLOR START] key or the [BLACK & WHITE START] key as appropriate to manually switch between color and black & white does not take place correctly. Color Mode OK Single Color OK R(Red) C(Cyan) G(Green) M(Magenta) B(Blue) Y(Yellow) Selecting 2 color...
... the desired color and touch the [OK] key. In this event, press the [COLOR START] key or the [BLACK & WHITE START] key as appropriate to manually switch between color and black & white does not take place correctly. Color Mode OK Single Color OK R(Red) C(Cyan) G(Green) M(Magenta) B(Blue) Y(Yellow) Selecting 2 color...
Operating Guide
Page 132
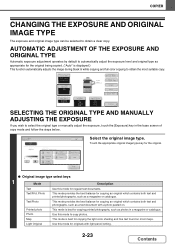
...Original Auto 8½x11 Paper Select Auto 8½x11 Plain Special Modes 2-Sided Copy Output File Quick File Preview SELECTING THE ORIGINAL TYPE AND MANUALLY ADJUSTING THE EXPOSURE If you wish to copy photos. Photo Use this mode for regular text documents. Use this mode to select the original... type or manually adjust the exposure, touch the [Exposure] key in a magazine or catalogue. Touch the appropriate original image type key for copying the light ...
...Original Auto 8½x11 Paper Select Auto 8½x11 Plain Special Modes 2-Sided Copy Output File Quick File Preview SELECTING THE ORIGINAL TYPE AND MANUALLY ADJUSTING THE EXPOSURE If you wish to copy photos. Photo Use this mode for regular text documents. Use this mode to select the original... type or manually adjust the exposure, touch the [Exposure] key in a magazine or catalogue. Touch the appropriate original image type key for copying the light ...


