Operation Manual
Page 13
... registered trademarks of International Business Machines Corporation. SHARP Corporation and its sales subsidies shall not be liable for data lost or altered in this manual is prohibited without notice and does not represent a commitment on the part of SHARP Corporation and its functions, such as stolen credit card numbers, the loss of or alteration of Inter Video, Inc. All...
... registered trademarks of International Business Machines Corporation. SHARP Corporation and its sales subsidies shall not be liable for data lost or altered in this manual is prohibited without notice and does not represent a commitment on the part of SHARP Corporation and its functions, such as stolen credit card numbers, the loss of or alteration of Inter Video, Inc. All...

Operation Manual
Page 17
Peripherals Using Peripherals...4-1 Optional External Floppy Disk Drive Unit 4-3 Display...4-5 Audio System ...4-7 USB Device ...4-11 PC Card...4-12 Printer ...4-14 IEEE 1394 Device 4-16 Communication Functions Built-in Modem ...5-1 LAN unit...5-4 Wireless LAN ...5-7 Network Setup Utility 5-11 Setup Utility Running the Setup Utility 6-1 Main Menu ...6-3 Advanced Menu...6-4 Security Menu...6-5 Boot Menu ...6-7 Exit Menu ...6-8 Appendixes Memory Module ...A-1 Installing the Weight Saver A-4 Maintenance and Care A-6 Troubleshooting Index xvi
Peripherals Using Peripherals...4-1 Optional External Floppy Disk Drive Unit 4-3 Display...4-5 Audio System ...4-7 USB Device ...4-11 PC Card...4-12 Printer ...4-14 IEEE 1394 Device 4-16 Communication Functions Built-in Modem ...5-1 LAN unit...5-4 Wireless LAN ...5-7 Network Setup Utility 5-11 Setup Utility Running the Setup Utility 6-1 Main Menu ...6-3 Advanced Menu...6-4 Security Menu...6-5 Boot Menu ...6-7 Exit Menu ...6-8 Appendixes Memory Module ...A-1 Installing the Weight Saver A-4 Maintenance and Care A-6 Troubleshooting Index xvi
Operation Manual
Page 25
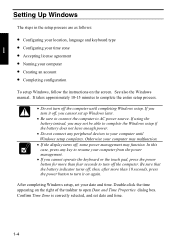
... sure to connect the computer to AC power source. Otherwise your computer may malfunction. • If the display turns off the computer. After completing Windows setup, set date and time. 1-4 If using the battery instead, you cannot operate the keyboard or the touch pad, press the power button for more than four seconds to turn off ; Be sure that the battery indicator turns off the computer until Windows setup completes. Confirm...
... sure to connect the computer to AC power source. Otherwise your computer may malfunction. • If the display turns off the computer. After completing Windows setup, set date and time. 1-4 If using the battery instead, you cannot operate the keyboard or the touch pad, press the power button for more than four seconds to turn off ; Be sure that the battery indicator turns off the computer until Windows setup completes. Confirm...
Operation Manual
Page 33
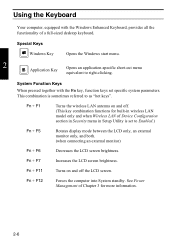
... the LCD screen brightness. Special Keys Windows Key Opens the Windows start menu. 2 Application Key Opens an application-specific short-cut menu equivalent to as "hot keys". Forces the computer into System standby. Using the Keyboard Your computer, equipped with the Fn key, function keys set to Enabled.) Rotates display mode between the LCD only, an external monitor only, and both. (when connecting an external monitor) Decreases the LCD screen brightness. Turns on and off the LCD screen. See Power Management of Chapter 3 for built-in wireless LAN model only and when Wireless LAN...
... the LCD screen brightness. Special Keys Windows Key Opens the Windows start menu. 2 Application Key Opens an application-specific short-cut menu equivalent to as "hot keys". Forces the computer into System standby. Using the Keyboard Your computer, equipped with the Fn key, function keys set to Enabled.) Rotates display mode between the LCD only, an external monitor only, and both. (when connecting an external monitor) Decreases the LCD screen brightness. Turns on and off the LCD screen. See Power Management of Chapter 3 for built-in wireless LAN model only and when Wireless LAN...

Operation Manual
Page 38
... or disassembly is limited. Watching DVD-ROM Videos You can be changed any applications which prevents playback of the disk in some areas). InterVideo WinDVD4. • Before watching DVD-ROM video, follow the instructions below: • Connect the AC adapter. Your DVD drive region code can enjoy watching DVD-ROM video on the next page to Using Parental Control section on your DVD-ROM drive is discharged, the operation will stop. • Disable the power management. Code change is...
... or disassembly is limited. Watching DVD-ROM Videos You can be changed any applications which prevents playback of the disk in some areas). InterVideo WinDVD4. • Before watching DVD-ROM video, follow the instructions below: • Connect the AC adapter. Your DVD drive region code can enjoy watching DVD-ROM video on the next page to Using Parental Control section on your DVD-ROM drive is discharged, the operation will stop. • Disable the power management. Code change is...

Operation Manual
Page 59
... the current condition of the hard disk and turns off . To resume from System standby/System hibernate if the battery capacity is a very useful power management tool. In this case, connect the AC adapter to a restart, after a normal shutdown operation. Your system enters and resumes from System standby per the conditions mentioned later. Set all but re-installation to resume them when the...
... the current condition of the hard disk and turns off . To resume from System standby/System hibernate if the battery capacity is a very useful power management tool. In this case, connect the AC adapter to a restart, after a normal shutdown operation. Your system enters and resumes from System standby per the conditions mentioned later. Set all but re-installation to resume them when the...

Operation Manual
Page 66
...-up menu. 4-5 Removing the External Floppy Disk Drive Unit To remove the unit, you need to perform the following steps before you format a floppy disk, all kinds of icons. 2. Click start formatting. • When you remove it into the floppy disk drive. 2. My Computer. 3. Click Start to show all data previously stored on Safely Remove Mitsumi USB Floppy - If you often see the expression "Display Properties dialog box." Safe To Remove Hardware...
...-up menu. 4-5 Removing the External Floppy Disk Drive Unit To remove the unit, you need to perform the following steps before you format a floppy disk, all kinds of icons. 2. Click start formatting. • When you remove it into the floppy disk drive. 2. My Computer. 3. Click Start to show all data previously stored on Safely Remove Mitsumi USB Floppy - If you often see the expression "Display Properties dialog box." Safe To Remove Hardware...
Operation Manual
Page 72
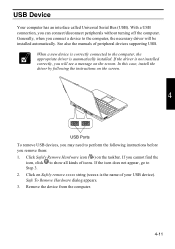
... your USB device). See also the manuals of icons. Remove the device from the computer. 4-11 If you may need to perform the following the instructions on the taskbar. Safe To Remove Hardware dialog appears. 3. In this case, install the driver by following instructions before you can connect/disconnect peripherals without turning off the computer. When a new device is correctly connected to show all kinds of peripheral devices supporting USB. USB Device Your...
... your USB device). See also the manuals of icons. Remove the device from the computer. 4-11 If you may need to perform the following the instructions on the taskbar. Safe To Remove Hardware dialog appears. 3. In this case, install the driver by following instructions before you can connect/disconnect peripherals without turning off the computer. When a new device is correctly connected to show all kinds of peripheral devices supporting USB. USB Device Your...
Operation Manual
Page 73
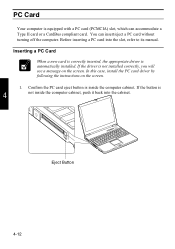
... Card When a new card is correctly inserted, the appropriate driver is equipped with a PC card (PCMCIA) slot, which can insert/eject a PC card without turning off the computer. PC Card Your computer is automatically installed. Eject Button 4-12 You can accommodate a Type II card or a CardBus compliant card. In this case, install the PC card driver by following the instructions on the screen. Confirm the PC card eject button is not installed...
... Card When a new card is correctly inserted, the appropriate driver is equipped with a PC card (PCMCIA) slot, which can insert/eject a PC card without turning off the computer. PC Card Your computer is automatically installed. Eject Button 4-12 You can accommodate a Type II card or a CardBus compliant card. In this case, install the PC card driver by following the instructions on the screen. Confirm the PC card eject button is not installed...
Operation Manual
Page 75
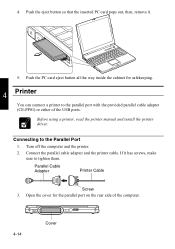
... USB ports. Connecting to the parallel port with the provided parallel cable adapter (CE-PP01) or either of the computer. 4-14 Cover Connect the parallel cable adapter and the printer cable. Open the cover for safekeeping. 4 Printer You can connect a printer to the Parallel Port 1. Push the eject button so that the inserted PC card pops out, then, remove it has screws, make sure to tighten them. If it . 5. Turn...
... USB ports. Connecting to the parallel port with the provided parallel cable adapter (CE-PP01) or either of the computer. 4-14 Cover Connect the parallel cable adapter and the printer cable. Open the cover for safekeeping. 4 Printer You can connect a printer to the Parallel Port 1. Push the eject button so that the inserted PC card pops out, then, remove it has screws, make sure to tighten them. If it . 5. Turn...
Operation Manual
Page 76
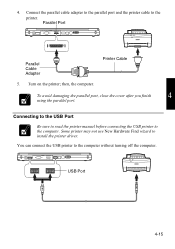
... connect the USB printer to the printer. then, the computer. Connecting to the USB Port Be sure to read the printer manual before connecting the USB printer to install the printer driver. USB Port 4-15 To avoid damaging the parallel port, close the cover after you finish 4 using the parallel port. Some printer may not use New Hardware Find wizard to the computer. Turn on the printer; Parallel Port Parallel Cable Adapter Printer Cable...
... connect the USB printer to the printer. then, the computer. Connecting to the USB Port Be sure to read the printer manual before connecting the USB printer to install the printer driver. USB Port 4-15 To avoid damaging the parallel port, close the cover after you finish 4 using the parallel port. Some printer may not use New Hardware Find wizard to the computer. Turn on the printer; Parallel Port Parallel Cable Adapter Printer Cable...

Operation Manual
Page 85
..., double-click Network Connections icon. 3. then, Network Connections. In the Local Area Connection Properties dialog box, set or change some settings for computing equipment. Click Hardware tab; From the pop-up menu, select Properties. 5. If your LAN cable has no core attached, please attach the provided core before use. • Make sure to insure compliance with a LAN cable, always use that LAN cable. Click OK and close the Control Panel window. 5-6 If...
..., double-click Network Connections icon. 3. then, Network Connections. In the Local Area Connection Properties dialog box, set or change some settings for computing equipment. Click Hardware tab; From the pop-up menu, select Properties. 5. If your LAN cable has no core attached, please attach the provided core before use. • Make sure to insure compliance with a LAN cable, always use that LAN cable. Click OK and close the Control Panel window. 5-6 If...

Operation Manual
Page 94
...-in keyboard are always disabled or not. (Num lock indicator will be numlocked if connected. ) USB key/Mouse Emulation defines whether USB devices (keyboard or mouse) can be used in MS-DOS mode. Quick Boot defines whether the system skips the check of the system. BIOS Version shows the BIOS version of the internal memory while booting, to shorten the boot time. 6 Quiet Boot defines whether the SHARP logo appears on the CPU. Press Enter to...
...-in keyboard are always disabled or not. (Num lock indicator will be numlocked if connected. ) USB key/Mouse Emulation defines whether USB devices (keyboard or mouse) can be used in MS-DOS mode. Quick Boot defines whether the system skips the check of the system. BIOS Version shows the BIOS version of the internal memory while booting, to shorten the boot time. 6 Quiet Boot defines whether the SHARP logo appears on the CPU. Press Enter to...

Operation Manual
Page 95
... Menu LPT port sets the printer port, selecting the LPT port mode, the base I/O address, IRQ, and DMA channel. Disabled means that the screen is 640x480 or 800x600. Enabled means that you can be set the items by yourself. Auto means the Mode can set as default. 6 6-4 Plug&Play O/S enables or disables plug & play function. Enabled means that you cannot use the port. Normally this option has to be as default...
... Menu LPT port sets the printer port, selecting the LPT port mode, the base I/O address, IRQ, and DMA channel. Disabled means that the screen is 640x480 or 800x600. Enabled means that you can be set the items by yourself. Auto means the Mode can set as default. 6 6-4 Plug&Play O/S enables or disables plug & play function. Enabled means that you cannot use the port. Normally this option has to be as default...

Operation Manual
Page 102
Notched Parts Projected Part 5. Tighten the screws. 7. A-3 Appendixes Press the memory module slowly to place it into the memory socket, matching the notched parts of the module with the notched parts of the socket, until you hear the clicking sound. 4. Replace the battery pack and connect the AC adapter. See Chapter 3 for replacing the battery pack. Replace the sheet and memory slot cover, matching the projected parts of the cover with the projected parts of the computer. 6.
Notched Parts Projected Part 5. Tighten the screws. 7. A-3 Appendixes Press the memory module slowly to place it into the memory socket, matching the notched parts of the module with the notched parts of the socket, until you hear the clicking sound. 4. Replace the battery pack and connect the AC adapter. See Chapter 3 for replacing the battery pack. Replace the sheet and memory slot cover, matching the projected parts of the cover with the projected parts of the computer. 6.
Operation Manual
Page 110
... a damaged hard disk drive. If you troubleshooting tips and an index. T-1 Troubleshooting Hardware problems can be caused by performing a careful visual inspection. If no lights are displayed, check the battery charge or power outlet, the plug and power cord, and any peripheral devices, look for example, the screen is blank, or the computer cannot recognize the disk drives. Troubleshooting This chapter describes how to troubleshoot computer problems. Common Problems Problems with your...
... a damaged hard disk drive. If you troubleshooting tips and an index. T-1 Troubleshooting Hardware problems can be caused by performing a careful visual inspection. If no lights are displayed, check the battery charge or power outlet, the plug and power cord, and any peripheral devices, look for example, the screen is blank, or the computer cannot recognize the disk drives. Troubleshooting This chapter describes how to troubleshoot computer problems. Common Problems Problems with your...

Operation Manual
Page 111
... disk. • Open the Setup Utility window and confirm that USB of Device Configuration in Security menu is set to Enabled. • Check in Boot Sequence and USB FDD is discharged, connect the AC adapter. • If all the steps above failed, follow the instructions on ? • Make sure the AC adapter is correctly connected to the AC adapter jack of your computer. • Make sure the AC power cable is deleted. T-2 Troubleshooting Trouble when Starting Question...
... disk. • Open the Setup Utility window and confirm that USB of Device Configuration in Security menu is set to Enabled. • Check in Boot Sequence and USB FDD is discharged, connect the AC adapter. • If all the steps above failed, follow the instructions on ? • Make sure the AC adapter is correctly connected to the AC adapter jack of your computer. • Make sure the AC power cable is deleted. T-2 Troubleshooting Trouble when Starting Question...
Operation Manual
Page 112
... the message Operating system not found? • Run the Setup Utility and get default value of the external monitor. • Make sure the external monitor is not near any power management feature has turned off the screen to save power. • See the power indicator to check whether the computer is turned on. • If you are using a battery pack, make sure it distorted? • Confirm the monitor is turned on by...
... the message Operating system not found? • Run the Setup Utility and get default value of the external monitor. • Make sure the external monitor is not near any power management feature has turned off the screen to save power. • See the power indicator to check whether the computer is turned on. • If you are using a battery pack, make sure it distorted? • Confirm the monitor is turned on by...

Operation Manual
Page 123
... setup utility changing, 5-12 deleting, 5-12 loading, 5-11 switching, 5-11 O Optical drive troubleshooting, T-5 P Passwords changing, 2-19, 6-6 deleting, 2-20, 6-6 setting, 2-19, 6-6 PC cards ejecting, 4-13 inserting, 4-12 Peripherals audio equipment, 4-7 connecting guidelines, 4-1 external floppy disk drive, 4-3 external monitor, 4-5 headphones, 4-9 IEEE 1394 device, 4-16 microphone, 4-10 PC cards, 4-12 printer, 4-14 speakers, 4-7 television set, 2-13 troubleshooting, T-9 USB device, 4-11 Power choosing AC or battery, 2-1 indicator, 2-1 Power management controlling CPU speed, 3-11 disabling...
... setup utility changing, 5-12 deleting, 5-12 loading, 5-11 switching, 5-11 O Optical drive troubleshooting, T-5 P Passwords changing, 2-19, 6-6 deleting, 2-20, 6-6 setting, 2-19, 6-6 PC cards ejecting, 4-13 inserting, 4-12 Peripherals audio equipment, 4-7 connecting guidelines, 4-1 external floppy disk drive, 4-3 external monitor, 4-5 headphones, 4-9 IEEE 1394 device, 4-16 microphone, 4-10 PC cards, 4-12 printer, 4-14 speakers, 4-7 television set, 2-13 troubleshooting, T-9 USB device, 4-11 Power choosing AC or battery, 2-1 indicator, 2-1 Power management controlling CPU speed, 3-11 disabling...
Operation Manual
Page 124
...power switch, 2-3 reset switch, 2-3 S Screen Saver, 2-17 Setup utility advanced menu, 6-4 boot menu, 6-7 entering and exiting, 6-2 exit menu, 6-8 main menu, 6-3 running, 6-1 security menu, 6-5 Security cable, A-9 S/PDIF compliant digital audio,4-8 Status indicators, xvii System hibernate about, 3-12 generating conditions, 3-13 resuming from, 3-12 supporting, 3-13 System standby about, 3-12 generating conditions, 3-13 resuming from, 3-12 * For built-in wireless LAN model only T Television set, 2-13 Troubleshooting common problems, T-1 communications, T-7 display, T-3 external floppy disk drive...
...power switch, 2-3 reset switch, 2-3 S Screen Saver, 2-17 Setup utility advanced menu, 6-4 boot menu, 6-7 entering and exiting, 6-2 exit menu, 6-8 main menu, 6-3 running, 6-1 security menu, 6-5 Security cable, A-9 S/PDIF compliant digital audio,4-8 Status indicators, xvii System hibernate about, 3-12 generating conditions, 3-13 resuming from, 3-12 supporting, 3-13 System standby about, 3-12 generating conditions, 3-13 resuming from, 3-12 * For built-in wireless LAN model only T Television set, 2-13 Troubleshooting common problems, T-1 communications, T-7 display, T-3 external floppy disk drive...


