
Operation Manual
Page 2
... CABLE 10-11 RECORDING USING THE OPTICAL DIGITAL CABLE 12 RECORDING FROM THE MICROPHONE 13-14 CONVENIENT RECORDING FUNCTION 15-18 Page ABOUT TRACK NUMBERS 19 ABOUT THE TOC 20 PLAYING A MiniDisCc 21-22 CONVENIENT PLAYBACK FUNCTIONS 23-25 EDITING 26-31 USING WITH OTHER EQUIPMENT . . 32 CONVENIENT OPERATION OF THE UNIT 33-35 WHAT IS A MINIDISC 36 TROUBLESHOOTING 36-37 MINIDISC SYSTEM LIMITATIONS.. ... 38 ERROR MESSAGES 39 MAINTENANCE 40 SPECIFICATIONS 40-41 0 Remote Control Unit x 1 0 Battery...
... CABLE 10-11 RECORDING USING THE OPTICAL DIGITAL CABLE 12 RECORDING FROM THE MICROPHONE 13-14 CONVENIENT RECORDING FUNCTION 15-18 Page ABOUT TRACK NUMBERS 19 ABOUT THE TOC 20 PLAYING A MiniDisCc 21-22 CONVENIENT PLAYBACK FUNCTIONS 23-25 EDITING 26-31 USING WITH OTHER EQUIPMENT . . 32 CONVENIENT OPERATION OF THE UNIT 33-35 WHAT IS A MINIDISC 36 TROUBLESHOOTING 36-37 MINIDISC SYSTEM LIMITATIONS.. ... 38 ERROR MESSAGES 39 MAINTENANCE 40 SPECIFICATIONS 40-41 0 Remote Control Unit x 1 0 Battery...
Operation Manual
Page 3
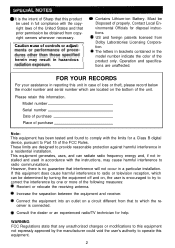
... a particular installation. Contact Local Environmental Officials for a Class B digital device, pursuant to radio communications. US and foreign patents licensed from copyright owners whenever necessary. If this equipment not expressly approved by one or more of the FCC Rules. herein may cause harmful interference to Part 15 of the following measures: Reorient or relocate the receiving antenna. Model number Serial number Date of purchase...
... a particular installation. Contact Local Environmental Officials for a Class B digital device, pursuant to radio communications. US and foreign patents licensed from copyright owners whenever necessary. If this equipment not expressly approved by one or more of the FCC Rules. herein may cause harmful interference to Part 15 of the following measures: Reorient or relocate the receiving antenna. Model number Serial number Date of purchase...

Operation Manual
Page 5
... Recording Indicator 2. Random Indicator 6. Track Number Indicator 9. Headphones Jack 11. Stop/Power Off/Bass/Play Mode Shuttle Switch The rechargeable battery can be shortened or it within an ambient temperature range of 41 "F(5"C) to charge the battery. Since the rechargeable battery is vulnerable to shock. Do not dip the battery in your pocket or a bag together with metal objects (keys, coins, jewelry, etc.). Character/Time Information Indicator 3. Repeat Indicator 5. Display/Volume Shuttle Switch 12...
... Recording Indicator 2. Random Indicator 6. Track Number Indicator 9. Headphones Jack 11. Stop/Power Off/Bass/Play Mode Shuttle Switch The rechargeable battery can be shortened or it within an ambient temperature range of 41 "F(5"C) to charge the battery. Since the rechargeable battery is vulnerable to shock. Do not dip the battery in your pocket or a bag together with metal objects (keys, coins, jewelry, etc.). Character/Time Information Indicator 3. Repeat Indicator 5. Display/Volume Shuttle Switch 12...

Operation Manual
Page 6
...5 Record Indicator 3. Battery Indicator 7. Track Number Indicator 9. Enter/Fast Play/Synchro Button 20. ing Level Control/Name Select Shuttle Switch 25. Repeat Indicator 5. Character/Time Information Indicator 10. Synchro Recording Indicator 11. Open Lever 28. Disc Name Indicator 13. Track Name Indicator 14. Stop/Power Off Button 26. Bass/Delete Button 19. 16 17 18 19 20 21 W Main unit 1. Optical/Line Input Jack 30. Record/Track Mark Button h 17. Handstrap Holder 31. Edit/Auto Mark/Time Mark Button 23. Display/Character Select button 24. Hold Switch...
...5 Record Indicator 3. Battery Indicator 7. Track Number Indicator 9. Enter/Fast Play/Synchro Button 20. ing Level Control/Name Select Shuttle Switch 25. Repeat Indicator 5. Character/Time Information Indicator 10. Synchro Recording Indicator 11. Open Lever 28. Disc Name Indicator 13. Track Name Indicator 14. Stop/Power Off Button 26. Bass/Delete Button 19. 16 17 18 19 20 21 W Main unit 1. Optical/Line Input Jack 30. Record/Track Mark Button h 17. Handstrap Holder 31. Edit/Auto Mark/Time Mark Button 23. Display/Character Select button 24. Hold Switch...

Operation Manual
Page 9
... recording". Usinq an optical signal to transfer the music to a Minidisc allows very high quality recording. 0 Main equipment: CD player, MD player, DSS tuner, etc. 0 Cable required: Optical digital cable included with this unit (2) Digital recording Connect the unit to equipment that has an optical output jack using the analog cable i n cluded with this unit. 0 Main equipment: CD player, MD player, radio cassette player, etc. 0 Cable required: Analog cable included with this unit. To the line output jacks on a stereo Optical digital cable included with this unit I Playback...
... recording". Usinq an optical signal to transfer the music to a Minidisc allows very high quality recording. 0 Main equipment: CD player, MD player, DSS tuner, etc. 0 Cable required: Optical digital cable included with this unit (2) Digital recording Connect the unit to equipment that has an optical output jack using the analog cable i n cluded with this unit. 0 Main equipment: CD player, MD player, radio cassette player, etc. 0 Cable required: Analog cable included with this unit. To the line output jacks on a stereo Optical digital cable included with this unit I Playback...
Operation Manual
Page 12
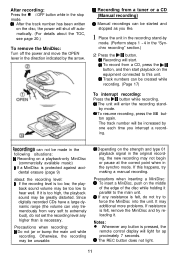
... mode. The track number will start. 0 To record from a CD, press the )I1 button, and then start playback on a playback-only MiniDisc (commercially available music) D If a MiniDisc is protected against acci- If it is necessary. W Recording from very soft to force the MiniDisc into the unit. Since digitally recorded CDs have a large dynamic range (the volume can vary tremendously from a tuner or a CD (Manual recording) 0 Manual recordings can be started and stopped as you interrupt a record...
... mode. The track number will start. 0 To record from a CD, press the )I1 button, and then start playback on a playback-only MiniDisc (commercially available music) D If a MiniDisc is protected against acci- If it is necessary. W Recording from very soft to force the MiniDisc into the unit. Since digitally recorded CDs have a large dynamic range (the volume can vary tremendously from a tuner or a CD (Manual recording) 0 Manual recordings can be started and stopped as you interrupt a record...

Operation Manual
Page 13
This is not necessary to adjust the recording level. fFGj%aq Digital cable -1 E=5 CD player, MD Digitally recorded MiniDisc 0 When recording from digital inputs,it at the beginning (1) Insert a recordable MiniDisc, and then press the REC button. (2) Press the ENTER/SYNC button. (3) Start the playback on a MiniDisc. 0 MiniDiscs are cases where digital recording may be made . (The sampling frequency of this unit is 44.1 kHz.) 0 When making a digital recording from analog inputs, digital recordings have extremely high-quality sound. 1 Connect the external equipment. (See page...
This is not necessary to adjust the recording level. fFGj%aq Digital cable -1 E=5 CD player, MD Digitally recorded MiniDisc 0 When recording from digital inputs,it at the beginning (1) Insert a recordable MiniDisc, and then press the REC button. (2) Press the ENTER/SYNC button. (3) Start the playback on a MiniDisc. 0 MiniDiscs are cases where digital recording may be made . (The sampling frequency of this unit is 44.1 kHz.) 0 When making a digital recording from analog inputs, digital recordings have extremely high-quality sound. 1 Connect the external equipment. (See page...

Operation Manual
Page 14
... function is normal. 13 Stereo microphone (commercially available) To the MIC IN jack 1 Connect the stereo microphone to the MIC IN jack on the main unit. 0 When a microphone is connected to this unit, the unit will automatically switch to input from the microphone. 2 Insert a recordable MiniDisc. (See page 10.) 3 Press the REC button. 0 A monaural, long-play recording mode is available. (Page 17) 0 Timed identification marks can be created while recording. (Page 15) 4 Move the t++ REC LEVEL w shuttle switch to "MIC SYNC H", recording will...
... function is normal. 13 Stereo microphone (commercially available) To the MIC IN jack 1 Connect the stereo microphone to the MIC IN jack on the main unit. 0 When a microphone is connected to this unit, the unit will automatically switch to input from the microphone. 2 Insert a recordable MiniDisc. (See page 10.) 3 Press the REC button. 0 A monaural, long-play recording mode is available. (Page 17) 0 Timed identification marks can be created while recording. (Page 15) 4 Move the t++ REC LEVEL w shuttle switch to "MIC SYNC H", recording will...
Operation Manual
Page 16
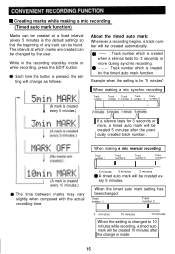
... When the setting is changed by mode or while recording, press the EDIT button. While in the recording stand-by the user. ery 5 minutes. When making a mic synchro recording 1 Track number 1 I 5 minutes 5 minutes 5 minutes 0 A timed auto mark will be created automatically. 0 - : Track number which is the default setting) so that the beginning of any track can be created ev- number 2 number 3 number 4 number 5 I > A A 1 If a silence lasts for 3 seconds or 1 more during synchro recording. 0 - - - : Track number which...
... When the setting is changed by mode or while recording, press the EDIT button. While in the recording stand-by the user. ery 5 minutes. When making a mic synchro recording 1 Track number 1 I 5 minutes 5 minutes 5 minutes 0 A timed auto mark will be created automatically. 0 - : Track number which is the default setting) so that the beginning of any track can be created ev- number 2 number 3 number 4 number 5 I > A A 1 If a silence lasts for 3 seconds or 1 more during synchro recording. 0 - - - : Track number which...

Operation Manual
Page 17
... Note: 0 When making digital recordings using a CD player or an MD player, track numbers will be blanked out immediately.) 2 Press the )II button. 0 Recording will be erased. 1 During playback, press the )II button at the point where you want to be displayed. Number of the track to begin rerecording. 2 Press the REC button. 0 To cancel the operation, press the U:OFF button. 3 Press the ENTER/SYNC button. 0 All of the tracks and track names will...
... Note: 0 When making digital recordings using a CD player or an MD player, track numbers will be blanked out immediately.) 2 Press the )II button. 0 Recording will be erased. 1 During playback, press the )II button at the point where you want to be displayed. Number of the track to begin rerecording. 2 Press the REC button. 0 To cancel the operation, press the U:OFF button. 3 Press the ENTER/SYNC button. 0 All of the tracks and track names will...

Operation Manual
Page 18
... the normal playback speed. (Page 24) When the unit is in stereo, recording will be written on other MD players. play will switch between the stereo mode and the monaural long-play mode. At any point where you want to create a track number while recording, press the REC button (Remote control : move the shuttle switch to the initial display. Notes: If input is pressed again, the unit will return to BASS). 0 The track number will...
... the normal playback speed. (Page 24) When the unit is in stereo, recording will be written on other MD players. play will switch between the stereo mode and the monaural long-play mode. At any point where you want to create a track number while recording, press the REC button (Remote control : move the shuttle switch to the initial display. Notes: If input is pressed again, the unit will return to BASS). 0 The track number will...
Operation Manual
Page 21
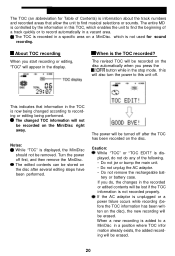
... the track numbers and recorded areas that information in the TOC is now being changed according to recording or editing being performed. 0 The changed TOC information will not be removed. w When is displayed, the MiniDisc should not be recorded on the MiniDisc right away. Turn the power off . Notes: 0 While "TOC" is the TOC recorded? which enables the unit to find musical selections or sounds. If...
... the track numbers and recorded areas that information in the TOC is now being changed according to recording or editing being performed. 0 The changed TOC information will not be removed. w When is displayed, the MiniDisc should not be recorded on the MiniDisc right away. Turn the power off . Notes: 0 While "TOC" is the TOC recorded? which enables the unit to find musical selections or sounds. If...

Operation Manual
Page 23
... auto-play function will shut off , depending on the cord, it . If you resume playback, it will start from the beginning of car. , 22 Otherwise, the auto-play function). Resume auto play function. However, if the unit is turned off automatically. To stop mode. When using the unit with this happens, decrease the bass level or lower the volume level. 0 If the volume is resumed, playback will resume at least 2 minutes while in direct...
... auto-play function will shut off , depending on the cord, it . If you resume playback, it will start from the beginning of car. , 22 Otherwise, the auto-play function). Resume auto play function. However, if the unit is turned off automatically. To stop mode. When using the unit with this happens, decrease the bass level or lower the volume level. 0 If the volume is resumed, playback will resume at least 2 minutes while in direct...
Operation Manual
Page 31
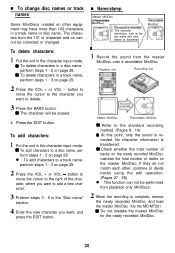
... character and on page 28. 0 To delete characters in a track name or disc name. Playback unit Recording unit Master MiniDisc Recordable MiniDisc 0 Refer to a disc name, perform steps 1 - 2 on page 28. n To change disc names or track names Some MiniDiscs created on other , combine or divide tracks using the edit operation. (Pages 27 - 28) l This function can not be erased. 4 Press the EDIT button. button to move the cursor to the character...
... character and on page 28. 0 To delete characters in a track name or disc name. Playback unit Recording unit Master MiniDisc Recordable MiniDisc 0 Refer to a disc name, perform steps 1 - 2 on page 28. n To change disc names or track names Some MiniDiscs created on other , combine or divide tracks using the edit operation. (Pages 27 - 28) l This function can not be erased. 4 Press the EDIT button. button to move the cursor to the character...

Operation Manual
Page 33
... volume on the MiniDisc unit to the main unit. Analog cable included with this unit w To the c1 jack 0 The separately available cassette adaptor may not work, depending on your car's stereo. 4 Listening through a stereo or a radio cassette player or recording on the impedance of the headphones used. 0 Headphones can be different, depending on a cassette tape To the right (R). 0 Before connecting any other equipment, turn off the power to all units. 0 Connect the plugs...
... volume on the MiniDisc unit to the main unit. Analog cable included with this unit w To the c1 jack 0 The separately available cassette adaptor may not work, depending on your car's stereo. 4 Listening through a stereo or a radio cassette player or recording on the impedance of the headphones used. 0 Headphones can be different, depending on a cassette tape To the right (R). 0 Before connecting any other equipment, turn off the power to all units. 0 Connect the plugs...
Operation Manual
Page 38
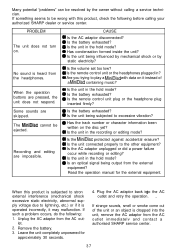
... low? 0 Is the remote control unit or the headphones plugged in the hold mode? 0 Is the battery exhausted? 0 Is the remote control unit plug or the headphone plug inserted firmly? 0 Is the battery exhausted? 0 Is the unit being output from the AC outlet immediatelv and contact a authorised SHARP service center. 37 Unplug the AC adaptor from the headphones. Many potential "problems" can be ejected. When the operation buttons are skipped. Recording...
... low? 0 Is the remote control unit or the headphones plugged in the hold mode? 0 Is the battery exhausted? 0 Is the remote control unit plug or the headphone plug inserted firmly? 0 Is the battery exhausted? 0 Is the unit being output from the AC outlet immediatelv and contact a authorised SHARP service center. 37 Unplug the AC adaptor from the headphones. Many potential "problems" can be ejected. When the operation buttons are skipped. Recording...

Operation Manual
Page 39
..., some sounds may be less than the remaining time displayed. Therefore, the time actually available for cassette tapes or DAT recordings. If there are scratches on a MiniDisc, the track numbers following conditions may be combined in the middle of a track. When recorded tracks are played back using a different system than is normally the minimum unit of recording. Even if the maximum recording time of a MiniDisc has not been reached, "DISC FULL...
..., some sounds may be less than the remaining time displayed. Therefore, the time actually available for cassette tapes or DAT recordings. If there are scratches on a MiniDisc, the track numbers following conditions may be combined in the middle of a track. When recorded tracks are played back using a different system than is normally the minimum unit of recording. Even if the maximum recording time of a MiniDisc has not been reached, "DISC FULL...
Operation Manual
Page 40
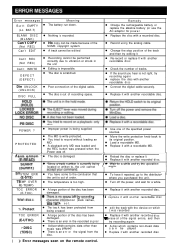
... digital cable securely. l A playback-only MD was loaded and the REC button was pressed when the Power was played l There is currently being supplied. l Move the write protection knob back to record without loading an MD. ce IV, "u"'""'y ation (track names, e ect. l Replace it with another recorded d i s c l Wait for p o w e r l Replace the disc with the device on the remote control. 39 l To have come to , the unit cannot l Use...
... digital cable securely. l A playback-only MD was loaded and the REC button was pressed when the Power was played l There is currently being supplied. l Move the write protection knob back to record without loading an MD. ce IV, "u"'""'y ation (track names, e ect. l Replace it with another recorded d i s c l Wait for p o w e r l Replace the disc with the device on the remote control. 39 l To have come to , the unit cannot l Use...

Operation Manual
Page 42
... 1 Output level: Dimensions: Weight: Input jack: Output jack: Width: 3-l/4" (82.5 mm) Height: 13/16" (20.7 mm) Depth: 3-l/16" (77.9 mm) 0.39 Ibs. (177 g ) with rechargeable battery Line/optical digital, microphone (powered by the main unit) Headphones (impedance: 19 ohms)/remote control unit n MiniDisc Recorder Type: Signal readout: Audio channels: Frequency response: Rotation speed: Error correction: Coding: Recording method: Sampling frequency: Wow and flutter: Portable MiniDisc recorder Non-contact, 3-beam semi-conductor laser pick-up Stereo 2 channels/monaural (long-play time shows...
... 1 Output level: Dimensions: Weight: Input jack: Output jack: Width: 3-l/4" (82.5 mm) Height: 13/16" (20.7 mm) Depth: 3-l/16" (77.9 mm) 0.39 Ibs. (177 g ) with rechargeable battery Line/optical digital, microphone (powered by the main unit) Headphones (impedance: 19 ohms)/remote control unit n MiniDisc Recorder Type: Signal readout: Audio channels: Frequency response: Rotation speed: Error correction: Coding: Recording method: Sampling frequency: Wow and flutter: Portable MiniDisc recorder Non-contact, 3-beam semi-conductor laser pick-up Stereo 2 channels/monaural (long-play time shows...
Operation Manual
Page 44
... repairs performed by law. Model Specific Section Your Product Model Number & Description: Warranty Period for this Product: Additional Item(s) Excluded from defective workmanship and materials, and agrees that this Sharp brand product (the "Product"). ALL IMPLIED WARRANTIES INCLUDING THE WARRANTIES OF MERCHANTABILITY AND FITNESS FOR USE ARE LIMITED TO THE PERIOD(S) FROM THE DATE OF PURCHASE SET FORTH BELOW. Non-functional accessories At a Sharp Authorized Servicer...
... repairs performed by law. Model Specific Section Your Product Model Number & Description: Warranty Period for this Product: Additional Item(s) Excluded from defective workmanship and materials, and agrees that this Sharp brand product (the "Product"). ALL IMPLIED WARRANTIES INCLUDING THE WARRANTIES OF MERCHANTABILITY AND FITNESS FOR USE ARE LIMITED TO THE PERIOD(S) FROM THE DATE OF PURCHASE SET FORTH BELOW. Non-functional accessories At a Sharp Authorized Servicer...
