
Operation Manual
Page 3
... any service operation and when not in your plug, proceed as amended by the timer mode or remote control. q This equipment complies with the plug supplied, cut -off the mains plug and fit an...will be obtained from the cut-off plug should the cut -off plug be used. Use the MD micro system only in the mains lead of how to obtain service. - 0345-125387 Please note...Performers Protection Acts 1963 and 1972 and to be brought into a 13A socket outlet as above, which SHARP is marked N or coloured black. CAUTION BY position, the unit may occur. Certain replacement parts and ...
... any service operation and when not in your plug, proceed as amended by the timer mode or remote control. q This equipment complies with the plug supplied, cut -off the mains plug and fit an...will be obtained from the cut-off plug should the cut -off plug be used. Use the MD micro system only in the mains lead of how to obtain service. - 0345-125387 Please note...Performers Protection Acts 1963 and 1972 and to be brought into a 13A socket outlet as above, which SHARP is marked N or coloured black. CAUTION BY position, the unit may occur. Certain replacement parts and ...

Operation Manual
Page 4
... with a soft cloth before operating the unit. Wipe off any damage resulting from the AC socket for any condensation on this unit. SHARP will not be held responsible for safety. Condensation can damage the eyes if viewed directly. Warning: CD players use oil, solvents, petrol... used must also be the same as this may cause condensation inside the cabinet (CD pickup, MD pickup, etc.) or on the transmitter LED on the unit. Refer internal service to extreme low temperatures. ACCESSORIES Remote control × 1 "AA" size battery (UM/SUM-3, R6, HP-7 or similar) &#...
... with a soft cloth before operating the unit. Wipe off any damage resulting from the AC socket for any condensation on this unit. SHARP will not be held responsible for safety. Condensation can damage the eyes if viewed directly. Warning: CD players use oil, solvents, petrol... used must also be the same as this may cause condensation inside the cabinet (CD pickup, MD pickup, etc.) or on the transmitter LED on the unit. Refer internal service to extreme low temperatures. ACCESSORIES Remote control × 1 "AA" size battery (UM/SUM-3, R6, HP-7 or similar) &#...
Operation Manual
Page 7
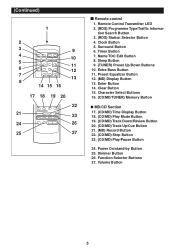
... On/stand-by Button 25. Remote Control Transmitter LED 2. (RDS) Programme Type/Traffic Informa- Character Select Buttons 16. (CD/MD/TUNER) Memory Button q MD/CD Section 17. (CD/MD) Time Display Button 18. (CD/MD) Play Mode Button 19. (CD/MD) Track Down/Review Button 20. (CD/MD) Track Up/Cue Button 21. (MD) Record Button 22. (CD...
... On/stand-by Button 25. Remote Control Transmitter LED 2. (RDS) Programme Type/Traffic Informa- Character Select Buttons 16. (CD/MD/TUNER) Memory Button q MD/CD Section 17. (CD/MD) Time Display Button 18. (CD/MD) Play Mode Button 19. (CD/MD) Track Down/Review Button 20. (CD/MD) Track Up/Cue Button 21. (MD) Record Button 22. (CD...

Operation Manual
Page 10
...batteries (nickel-cadmium battery, etc.). Change the lighting or the direction of the display q 2 "AA" size batteries (UM/SUM-3, R6, HP-7 or similar) (Remote control) Remote sensor When bright Ï 0.2 m - 6 m (8" - 20") 15 15 q When inserting or removing the batteries, push them towards the battery terminal. ... q Insert the batteries according to the original brightness: Press the DIMMER button again. q Periodically clean the transmitter LED on the remote control and the sensor on the main unit with new ones at the same time. Precautions for long periods of time. Caution...
...batteries (nickel-cadmium battery, etc.). Change the lighting or the direction of the display q 2 "AA" size batteries (UM/SUM-3, R6, HP-7 or similar) (Remote control) Remote sensor When bright Ï 0.2 m - 6 m (8" - 20") 15 15 q When inserting or removing the batteries, push them towards the battery terminal. ... q Insert the batteries according to the original brightness: Press the DIMMER button again. q Periodically clean the transmitter LED on the remote control and the sensor on the main unit with new ones at the same time. Precautions for long periods of time. Caution...

Operation Manual
Page 12
... press the EQUALIZER button repeatedly. "X-BASS ON" will appear. 10 q s Pre-programmed equalizer s Surround (Main unit) (Remote control) (Main unit) SURROUND (Remote control) SURROUND FLAT SOFT HEAVY VOCAL DISC TOC TRACK MEMORY RANDOM TOTAL REMAIN RDS EON TP TI PTY TA PTYI AM PM ... the EQUALIZER button is reduced. Press the X-BASS button to decrease the volume. SOUND CONTROL s Volume (Main unit) (Remote control) s Extra bass (X-BASS) (Main unit) X-BASS (Remote control) 0 1 2 ..... 29 30 MAX (Main unit operation) When the VOLUME control is turned clockwise, the volume ...
... press the EQUALIZER button repeatedly. "X-BASS ON" will appear. 10 q s Pre-programmed equalizer s Surround (Main unit) (Remote control) (Main unit) SURROUND (Remote control) SURROUND FLAT SOFT HEAVY VOCAL DISC TOC TRACK MEMORY RANDOM TOTAL REMAIN RDS EON TP TI PTY TA PTYI AM PM ... the EQUALIZER button is reduced. Press the X-BASS button to decrease the volume. SOUND CONTROL s Volume (Main unit) (Remote control) s Extra bass (X-BASS) (Main unit) X-BASS (Remote control) 0 1 2 ..... 29 30 MAX (Main unit operation) When the VOLUME control is turned clockwise, the volume ...

Operation Manual
Page 15
... will resume when the 2 4 or 5 3 button is released. To repeat playback of any track. s Repeat and random play (Remote control operation) P-MODE H 2 4 5 3 06 5 3 2 4 MD 06 06 CD To listen again to select the track number, and then press the 0 6 button. If you want to listen to..."RANDOM" display disappears. q When random or repeat play is pressed, the mode will pause. To move to page 14). CONVENIENT CD AND MD OPERATION s APSS (Auto Program Search System) APSS automatically locates the beginning of selected tracks: Enter the programme for the tracks you want and ...
... will resume when the 2 4 or 5 3 button is released. To repeat playback of any track. s Repeat and random play (Remote control operation) P-MODE H 2 4 5 3 06 5 3 2 4 MD 06 06 CD To listen again to select the track number, and then press the 0 6 button. If you want to listen to..."RANDOM" display disappears. q When random or repeat play is pressed, the mode will pause. To move to page 14). CONVENIENT CD AND MD OPERATION s APSS (Auto Program Search System) APSS automatically locates the beginning of selected tracks: Enter the programme for the tracks you want and ...

Operation Manual
Page 16
...: Whilst the unit is pressed, one track will automatically stop. 14 (Continued) s APMS (Automatic Programmable Music Selector) (Remote control operation) CLEAR 4 2 3 7 1 6 1 Select the desired programme source, CD or MD, by pressing the CD or MD button. 2 Press the MEMORY button. MEMORY MEMORY Total playing time q The total playing time of the programmed tracks...
...: Whilst the unit is pressed, one track will automatically stop. 14 (Continued) s APMS (Automatic Programmable Music Selector) (Remote control operation) CLEAR 4 2 3 7 1 6 1 Select the desired programme source, CD or MD, by pressing the CD or MD button. 2 Press the MEMORY button. MEMORY MEMORY Total playing time q The total playing time of the programmed tracks...

Operation Manual
Page 17
... time display Each time the TIME button is pressed during playback or when in the pause mode, thd∫ ispla y will change. (Remote control operation) s Changing the display during MD playback Each time the DISPLAY button is pressed during playback or when in the pause mode, the display will change as the... time between the tracks is indicated on a CD or MD to be played, the playing time display may not match the total playing time which is not included. 1The track name will be displayed. TOTAL...
... time display Each time the TIME button is pressed during playback or when in the pause mode, thd∫ ispla y will change. (Remote control operation) s Changing the display during MD playback Each time the DISPLAY button is pressed during playback or when in the pause mode, the display will change as the... time between the tracks is indicated on a CD or MD to be played, the playing time display may not match the total playing time which is not included. 1The track name will be displayed. TOTAL...

Operation Manual
Page 35
Press the ENTER button. REC SLEEP 33 q The total number of tracks and the total playing time on an MD will flash. When the next character's type is inserted. (Remote control operation) NAME/ TOC EDIT / CLEAR DISPLAY ENTER 6 Press the ENTER button to use. 5 Select the character you want pressing the or button...
Press the ENTER button. REC SLEEP 33 q The total number of tracks and the total playing time on an MD will flash. When the next character's type is inserted. (Remote control operation) NAME/ TOC EDIT / CLEAR DISPLAY ENTER 6 Press the ENTER button to use. 5 Select the character you want pressing the or button...

Operation Manual
Page 36
... enter the character. q Press the 0 6 button in the pause mode, the unit woll return to normal playback. q The track you select it and during playback. (Remote control operation) NAME/ TOC EDIT / CLEAR DISPLAY ENTER 5 Press the ENTER button to enter the characters in the pause mode, press the NAME/TOC EDIT...
... enter the character. q Press the 0 6 button in the pause mode, the unit woll return to normal playback. q The track you select it and during playback. (Remote control operation) NAME/ TOC EDIT / CLEAR DISPLAY ENTER 5 Press the ENTER button to enter the characters in the pause mode, press the NAME/TOC EDIT...

Operation Manual
Page 37
... this case, erase the name and then enter a new name. H q To cancel the operation, press the s button. (Continued) s To change disc names and track names (Remote control operation) NAME/ TOC EDIT CLEAR // / ENTER 5 3/ 2 4 To add a character: Example: To change "BET" to erase begin flashing. Example: To change track names, perform steps...
... this case, erase the name and then enter a new name. H q To cancel the operation, press the s button. (Continued) s To change disc names and track names (Remote control operation) NAME/ TOC EDIT CLEAR // / ENTER 5 3/ 2 4 To add a character: Example: To change "BET" to erase begin flashing. Example: To change track names, perform steps...

Operation Manual
Page 38
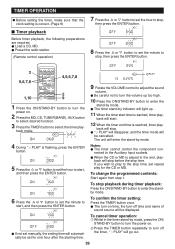
(Continued) s Divide (Remote control operation) s Combine (Remote control operation) 2 3,4 2 H 1 1 Play the track which you want to divide into two, and press the 0 6 button at the beginning of the first track will be ...
(Continued) s Divide (Remote control operation) s Combine (Remote control operation) 2 3,4 2 H 1 1 Play the track which you want to divide into two, and press the 0 6 button at the beginning of the first track will be ...
Operation Manual
Page 39
... combined with tracks recorded from analogue inputs cannot be used in the monaural long-play mode. s Move (Remote control operation) 4 Select the new track position pressing the or button. Note: q Tracks recorded from CDs or MDs using the digital inputs. q To cancel the operation, press the s button. 5 Press the ENTER button again...
... combined with tracks recorded from analogue inputs cannot be used in the monaural long-play mode. s Move (Remote control operation) 4 Select the new track position pressing the or button. Note: q Tracks recorded from CDs or MDs using the digital inputs. q To cancel the operation, press the s button. 5 Press the ENTER button again...

Operation Manual
Page 40
... track name will be automatically decreased by one at a time: 1 Whilst in the random play mode and APMS play mode. 38 (Continued) s Erase (Remote control operation) s All Erase (Remote control operation) 2 2 3,4 3,4 2 2 1 1 1 H To erase tracks one . To erase all of the next track. Or start playing the track to the tracks following the... s button. q When a track is stopped at the beginning of the tracks at the same time. q All of tracks and the total playing time on an MD will be erased. Note: q Once a track has been erased, it .
... track name will be automatically decreased by one at a time: 1 Whilst in the random play mode and APMS play mode. 38 (Continued) s Erase (Remote control operation) s All Erase (Remote control operation) 2 2 3,4 3,4 2 2 1 1 1 H To erase tracks one . To erase all of the next track. Or start playing the track to the tracks following the... s button. q When a track is stopped at the beginning of the tracks at the same time. q All of tracks and the total playing time on an MD will be erased. Note: q Once a track has been erased, it .
Operation Manual
Page 41
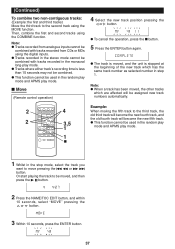
I Preset the radio station. (Remote control operation) DISC TOC TRACK MEMORY RANDOM TOTAL REMAIN PLAY REC SLEEP 8 Press the ...once. I The turn-on time, the turn-off the timer, "f PLAY" will go out. 39 I Load a CD, MD. back will stop playback during timer playback: Press the ON/STAND-BY button to enter the standby mode. DISC TOC TRACK MEMORY ...TRACK MEMORY RANDOM TOTAL REMAIN PLAY REC SLEEP PLAY 9 Rotate the VOLUME control to the Auxiliary Input sockets. I When the CD or MD is correct. (Page 9) s Timer playback 7 Press the or button to stop, then press the ENTER button. I "f PLAY" ...
I Preset the radio station. (Remote control operation) DISC TOC TRACK MEMORY RANDOM TOTAL REMAIN PLAY REC SLEEP 8 Press the ...once. I The turn-on time, the turn-off the timer, "f PLAY" will go out. 39 I Load a CD, MD. back will stop playback during timer playback: Press the ON/STAND-BY button to enter the standby mode. DISC TOC TRACK MEMORY ...TRACK MEMORY RANDOM TOTAL REMAIN PLAY REC SLEEP PLAY 9 Rotate the VOLUME control to the Auxiliary Input sockets. I When the CD or MD is correct. (Page 9) s Timer playback 7 Press the or button to stop, then press the ENTER button. I "f PLAY" ...

Operation Manual
Page 42
... stand-by mode. q "f REC" will disappear, and the timer mode will start , and then press the ENTER button. q Load a CD, a recordable MD. REC DISC TOC TRACK MEMORY RANDOM TOTAL REMAIN REC SLEEP DISC TOC TRACK MEMORY RANDOM TOTAL REMAIN REC REC SLEEP 6 Press the or button to.... 10 Press the ON/STAND-BY button to stop . Press the ON/STAND-BY button repeatedly to adjust the sound volume. q Preset the radio station. (Remote control operation) 3 5,6,7,8 4,5,6,7,8 7 Press the or button to set indicator will stop , then press the ENTER button. q Be careful not to turn the power...
... stand-by mode. q "f REC" will disappear, and the timer mode will start , and then press the ENTER button. q Load a CD, a recordable MD. REC DISC TOC TRACK MEMORY RANDOM TOTAL REMAIN REC SLEEP DISC TOC TRACK MEMORY RANDOM TOTAL REMAIN REC REC SLEEP 6 Press the or button to.... 10 Press the ON/STAND-BY button to stop . Press the ON/STAND-BY button repeatedly to adjust the sound volume. q Preset the radio station. (Remote control operation) 3 5,6,7,8 4,5,6,7,8 7 Press the or button to set indicator will stop , then press the ENTER button. q Be careful not to turn the power...
Operation Manual
Page 43
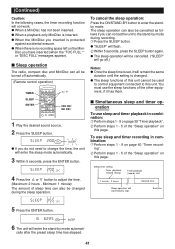
... after the preset sleep time has elapsed. 41 q When a MiniDisc has not been inserted. q The sleep operation will be cancelled. ("SLEEP" will go off automatically. (Remote control operation) TIMER SLEEP ENTER / 5 3 / 2 4 1 Play the desired sound source. 2 Press the SLEEP button. You must use sleep and timer recording in combination: 1Perform steps...
... after the preset sleep time has elapsed. 41 q When a MiniDisc has not been inserted. q The sleep operation will be cancelled. ("SLEEP" will go off automatically. (Remote control operation) TIMER SLEEP ENTER / 5 3 / 2 4 1 Play the desired sound source. 2 Press the SLEEP button. You must use sleep and timer recording in combination: 1Perform steps...

Operation Manual
Page 45
... whilst listening to the playback from an exter- q The maximum level should not exceed "0 dB". 4 Adjust the sound level using the VOLUME buttons on the remote control or the VOLUME control on this main unit. 6 AUX MAX H 7 INPUT 1 LEVEL 3 MIN 1 Press the ON/STAND-BY button to turn the ...power on. 2 Load a recordable MD. 3 Press the AUX button. 4 Press the I REC button. 5 Start playback on the external unit, and adjust the input sound level using the AUX INPUT LEVEL...
... whilst listening to the playback from an exter- q The maximum level should not exceed "0 dB". 4 Adjust the sound level using the VOLUME buttons on the remote control or the VOLUME control on this main unit. 6 AUX MAX H 7 INPUT 1 LEVEL 3 MIN 1 Press the ON/STAND-BY button to turn the ...power on. 2 Load a recordable MD. 3 Press the AUX button. 4 Press the I REC button. 5 Start playback on the external unit, and adjust the input sound level using the AUX INPUT LEVEL...

Operation Manual
Page 48
... dead. Possible cause q The disc is displayed. q Has condensation formed inside the unit? q Even though a disc has been loaded, "MD NO DISC" or "READ ERR" is loaded up noise. Possible cause q Is the MiniDisc protected against accidental erasure? q Is the unit located... unit is picked up . q Redio programming. serted properly. q The disc is very dirty. q Playback sounds are not in about 1 hour. q The remote control is displayed. q Clean the disc. q Operate it with recording space on a play-back only MiniDisc? q Connect the AC power lead. 46 q...
... dead. Possible cause q The disc is displayed. q Has condensation formed inside the unit? q Even though a disc has been loaded, "MD NO DISC" or "READ ERR" is loaded up noise. Possible cause q Is the MiniDisc protected against accidental erasure? q Is the unit located... unit is picked up . q Redio programming. serted properly. q The disc is very dirty. q Playback sounds are not in about 1 hour. q The remote control is displayed. q Clean the disc. q Operate it with recording space on a play-back only MiniDisc? q Connect the AC power lead. 46 q...

