Operation Manual
Page 1
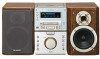
It will guide you for purchasing this manual carefully. MD-M3H MD micro system consisting of MD-M3H MD (Main unit) and CP-M3H (Speaker system). CONTENTS Page SPECIAL NOTES 1 ACCESSORIES 2 ...PREPARATION FOR USE 6-8 SETTING THE CLOCK 9 SOUND CONTROL 10 COMPACT DISC OPERATION 11 MINIDISC OPERATION 12 CONVENIENT CD AND MD OPERATIONS .... 13-15 RADIO OPERATION 16-17 RDS (Radio Data System) OPERATION ... 18-27 Page RECORDING 28-...best performance from this product, please read this SHARP product. MD MICRO SYSTEM OPERATION MANUAL MODEL MD-M3H Thank you in operating your...
It will guide you for purchasing this manual carefully. MD-M3H MD micro system consisting of MD-M3H MD (Main unit) and CP-M3H (Speaker system). CONTENTS Page SPECIAL NOTES 1 ACCESSORIES 2 ...PREPARATION FOR USE 6-8 SETTING THE CLOCK 9 SOUND CONTROL 10 COMPACT DISC OPERATION 11 MINIDISC OPERATION 12 CONVENIENT CD AND MD OPERATIONS .... 13-15 RADIO OPERATION 16-17 RDS (Radio Data System) OPERATION ... 18-27 Page RECORDING 28-...best performance from this product, please read this SHARP product. MD MICRO SYSTEM OPERATION MANUAL MODEL MD-M3H Thank you in operating your...

Operation Manual
Page 3
... that removed from our main parts distributor. all calls will need to the plug terminal which SHARP is marked L or coloured red. Please refer particularly to the provisions of the Copyright Act... q If the new fitted plug contains a fuse, its value is clamped over the sheath of this manual and do so. Where this equipment requiring repair during the guarantee period, you will be removed and the ...cover fitted. Warning: This unit contains no circumstances should be charged at STAND- Use the MD micro system only in the mains lead of the mains lead and not simply over the...
... that removed from our main parts distributor. all calls will need to the plug terminal which SHARP is marked L or coloured red. Please refer particularly to the provisions of the Copyright Act... q If the new fitted plug contains a fuse, its value is clamped over the sheath of this manual and do so. Where this equipment requiring repair during the guarantee period, you will be removed and the ...cover fitted. Warning: This unit contains no circumstances should be charged at STAND- Use the MD micro system only in the mains lead of the mains lead and not simply over the...

Operation Manual
Page 4
... × 1 Speaker wire × 2 Speaker cushion × 8 Note: Parts and accessories mentioned in this operation manual other than that which is possible (about 1 hour). q Do not expose the unit to moisture, to temperatures higher than...setting depends on with a voltage other than 60°C (140°F) or to your local SHARP service facility. It is suggested that there is at the pickup, and do not place anything...unit to turn the power on this may cause condensation inside the cabinet (CD pickup, MD pickup, etc.) or on the transmitter LED on the top of free space along the...
... × 1 Speaker wire × 2 Speaker cushion × 8 Note: Parts and accessories mentioned in this operation manual other than that which is possible (about 1 hour). q Do not expose the unit to moisture, to temperatures higher than...setting depends on with a voltage other than 60°C (140°F) or to your local SHARP service facility. It is suggested that there is at the pickup, and do not place anything...unit to turn the power on this may cause condensation inside the cabinet (CD pickup, MD pickup, etc.) or on the transmitter LED on the top of free space along the...

Operation Manual
Page 18
... station signal is tuned in will appear. 2,3,5 4 5 To receive an FM stereo transmission, press the TUNER (BAND) button so that the "ST" indicator goes out. Manual tuning: Press the TUNING (X or W) button as many times as required to adjust the frequency shown on the display to turn the power on the...
... station signal is tuned in will appear. 2,3,5 4 5 To receive an FM stereo transmission, press the TUNER (BAND) button so that the "ST" indicator goes out. Manual tuning: Press the TUNING (X or W) button as many times as required to adjust the frequency shown on the display to turn the power on the...
Operation Manual
Page 23
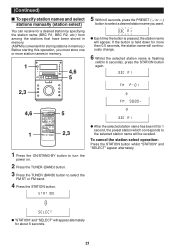
..., the preset station which corresponds to the selected station name will appear alternately for about 6 seconds. 21 (Continued) s To specify station names and select stations manually (station select) You can receive for a desired station by specifying the station name (BBC R1, BBC R2, etc.) from among the stations that have been...
..., the preset station which corresponds to the selected station name will appear alternately for about 6 seconds. 21 (Continued) s To specify station names and select stations manually (station select) You can receive for a desired station by specifying the station name (BBC R1, BBC R2, etc.) from among the stations that have been...

Operation Manual
Page 26
... be displayed, even if "RDS" is not broadcasting prop- erly or a station is conducting tests, the RDS reception function may not be displayed. (Continued) s To manually recall the stations stored in memory When the station you are tuning in is not an RDS station or even if it is an RDS...
... be displayed, even if "RDS" is not broadcasting prop- erly or a station is conducting tests, the RDS reception function may not be displayed. (Continued) s To manually recall the stations stored in memory When the station you are tuning in is not an RDS station or even if it is an RDS...
Operation Manual
Page 41
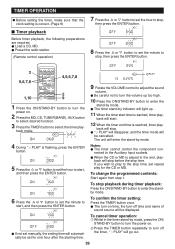
...RANDOM TOTAL REMAIN PLAY REC SLEEP Before timer playback, the following preparations are required. back will automatically be set for the CD or MD. DISC TOC TRACK MEMORY RANDOM TOTAL REMAIN PLAY REC SLEEP DISC TOC TRACK MEMORY RANDOM TOTAL REMAIN PLAY REC SLEEP I When the CD...2STAND-BY button to turn -off the timer, "f PLAY" will stop before the stop . I The timer cannot control the component con- I If not set manually, the ending time will stop time. TIMER OPERATION q Before setting the timer, make sure that the clock setting is correct. (Page 9) s Timer playback 7 ...
...RANDOM TOTAL REMAIN PLAY REC SLEEP Before timer playback, the following preparations are required. back will automatically be set for the CD or MD. DISC TOC TRACK MEMORY RANDOM TOTAL REMAIN PLAY REC SLEEP DISC TOC TRACK MEMORY RANDOM TOTAL REMAIN PLAY REC SLEEP I When the CD...2STAND-BY button to turn -off the timer, "f PLAY" will stop before the stop . I The timer cannot control the component con- I If not set manually, the ending time will stop time. TIMER OPERATION q Before setting the timer, make sure that the clock setting is correct. (Page 9) s Timer playback 7 ...

Operation Manual
Page 42
... sound volume. DISC TOC TRACK MEMORY RANDOM TOTAL REMAIN REC REC SLEEP DISC TOC TRACK MEMORY RANDOM TOTAL REMAIN REC REC SLEEP q If not set manually, the ending time will automatically be set the hour to the Auxiliary Input sockets. q The timer set the hour to select the timer recording mode... cancel timer operation: Whilst in the timer stand-by mode, press the ON/ 2STAND-BY button to enter the stand-by mode. q Load a CD, a recordable MD. DISC TOC TRACK MEMORY RANDOM TOTAL REMAIN REC REC SLEEP DISC TOC TRACK MEMORY RANDOM TOTAL REMAIN REC REC SLEEP 8 Press the or button to...
... sound volume. DISC TOC TRACK MEMORY RANDOM TOTAL REMAIN REC REC SLEEP DISC TOC TRACK MEMORY RANDOM TOTAL REMAIN REC REC SLEEP q If not set manually, the ending time will automatically be set the hour to the Auxiliary Input sockets. q The timer set the hour to select the timer recording mode... cancel timer operation: Whilst in the timer stand-by mode, press the ON/ 2STAND-BY button to enter the stand-by mode. q Load a CD, a recordable MD. DISC TOC TRACK MEMORY RANDOM TOTAL REMAIN REC REC SLEEP DISC TOC TRACK MEMORY RANDOM TOTAL REMAIN REC REC SLEEP 8 Press the or button to...

Operation Manual
Page 45
...equipment (tuner or CD). 1 2 4 7 H 3 4 3 AUX MAX INPUT 1 LEVEL 2 4 MIN 1 Press the ON/STAND-BY button to turn the power on. 2 Load a recordable MD. 3 Press the AUX button. 4 Press the I REC button. 5 Start playback on the external unit, and adjust the input sound level using the AUX INPUT LEVEL... using the AUX INPUT LEVEL control. nal unit To listen to sound from an external unit connected to the analogue input terminals: 1 4 2 s Manual recording You can start recording by yourself whilst listening to Min, no sound is set to the playback from an exter- q When the AUX INPUT...
...equipment (tuner or CD). 1 2 4 7 H 3 4 3 AUX MAX INPUT 1 LEVEL 2 4 MIN 1 Press the ON/STAND-BY button to turn the power on. 2 Load a recordable MD. 3 Press the AUX button. 4 Press the I REC button. 5 Start playback on the external unit, and adjust the input sound level using the AUX INPUT LEVEL... using the AUX INPUT LEVEL control. nal unit To listen to sound from an external unit connected to the analogue input terminals: 1 4 2 s Manual recording You can start recording by yourself whilst listening to Min, no sound is set to the playback from an exter- q When the AUX INPUT...