LC-70LE732U Operation Manual
Page 5
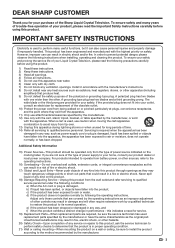
... in any way, and f) When the product exhibits a distinct change in damage and will often require extensive work by the operating instructions as power-supply cord or plug is required when the apparatus has been damaged in any way, such as an improper adjustment of other controls may result in performance - Servicing is damaged, liquid has been spilled or objects have...
... in any way, and f) When the product exhibits a distinct change in damage and will often require extensive work by the operating instructions as power-supply cord or plug is required when the apparatus has been damaged in any way, such as an improper adjustment of other controls may result in performance - Servicing is damaged, liquid has been spilled or objects have...
LC-70LE732U Operation Manual
Page 6
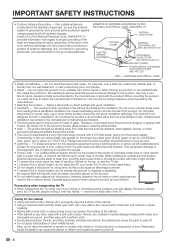
... laundry tub; Use only the mounting hardware recommended by broken glass pieces in this product near the TV set or other openings may appear on an unstable cart, stand, tripod or table. Do not place the product on the product. • Do not insert foreign objects into such power lines or circuits. blue, green, red or yellow (LC...
... laundry tub; Use only the mounting hardware recommended by broken glass pieces in this product near the TV set or other openings may appear on an unstable cart, stand, tripod or table. Do not place the product on the product. • Do not insert foreign objects into such power lines or circuits. blue, green, red or yellow (LC...
LC-70LE732U Operation Manual
Page 7
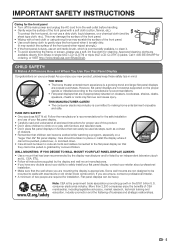
... AC cord from Sharp in mind: THE ISSUE • The home theater entertainment experience is committed to the flat panel display so that are not designed to be mounted to climb on or play with furniture and television sets. • Don't place flat panel displays are not always supported on the proper stands or installed according to the manufacturer's recommendations. • Flat panel displays that...
... AC cord from Sharp in mind: THE ISSUE • The home theater entertainment experience is committed to the flat panel display so that are not designed to be mounted to climb on or play with furniture and television sets. • Don't place flat panel displays are not always supported on the proper stands or installed according to the manufacturer's recommendations. • Flat panel displays that...
LC-70LE732U Operation Manual
Page 8
... Installation 17-19 Direct Button Operation Changing Channels 20 Changing Volume 20 MUTE 20 Sleep Timer 20 FLASHBACK 20 FREEZE 20 AV MODE 21 INPUT 21 APPS 21 POWER SAVING 21 Closed Captions and Digital Closed Captions 22 VIEW MODE 23 On-Screen Display Menu On-Screen Display Menu Operation 24 Menu Operation Buttons 24 Menu Items 25 Picture Settings 26-27 Audio Settings 28 Power Control 29 System Options 30-32 Initial Setup 33-36 Information 37-39 Enjoying Photo/Music/Video Playback Connecting a USB Memory Device/ USB Hard Drive 40 Connecting...
... Installation 17-19 Direct Button Operation Changing Channels 20 Changing Volume 20 MUTE 20 Sleep Timer 20 FLASHBACK 20 FREEZE 20 AV MODE 21 INPUT 21 APPS 21 POWER SAVING 21 Closed Captions and Digital Closed Captions 22 VIEW MODE 23 On-Screen Display Menu On-Screen Display Menu Operation 24 Menu Operation Buttons 24 Menu Items 25 Picture Settings 26-27 Audio Settings 28 Power Control 29 System Options 30-32 Initial Setup 33-36 Information 37-39 Enjoying Photo/Music/Video Playback Connecting a USB Memory Device/ USB Hard Drive 40 Connecting...

LC-70LE732U Operation Manual
Page 12
... (Front) OPC sensor * TV (Rear/Side) *2 POWER button MENU button INPUT button Channel buttons (CHU/V) Volume buttons (VOLk/l) Center Icon illumination (See page 32.) Remote control sensor * OPC: Optical Picture Control (See page 26.) *1 RS-232C terminal PC IN terminal VIDEO 2 terminals VIDEO 1 terminals COMPONENT terminals *1 AUDIO OUT terminal *1 USB 1 terminal USB 2 terminal ETHERNET terminal Antenna/ Cable in DIGITAL AUDIO OUTPUT terminal AUDIO IN terminal (shared for PC IN and HDMI 1) *3 *1 See pages 12 to 16 and 51 for external equipment connection. *2 See...
... (Front) OPC sensor * TV (Rear/Side) *2 POWER button MENU button INPUT button Channel buttons (CHU/V) Volume buttons (VOLk/l) Center Icon illumination (See page 32.) Remote control sensor * OPC: Optical Picture Control (See page 26.) *1 RS-232C terminal PC IN terminal VIDEO 2 terminals VIDEO 1 terminals COMPONENT terminals *1 AUDIO OUT terminal *1 USB 1 terminal USB 2 terminal ETHERNET terminal Antenna/ Cable in DIGITAL AUDIO OUTPUT terminal AUDIO IN terminal (shared for PC IN and HDMI 1) *3 *1 See pages 12 to 16 and 51 for external equipment connection. *2 See...
LC-70LE732U Operation Manual
Page 15
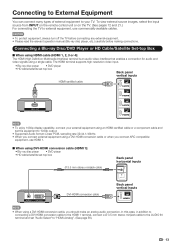
...) terminal is an audio-video interface that enables a connection for audio and video signals using a DVI-HDMI conversion cable, you connect ARC-compatible equipment, use commercially available cables. The HDMI terminal supports high-resolution video input. • Blu-ray disc player • DVD player • HD cable/satellite set-top box Back panel vertical inputs HDMI-certified cable HDMI OUT • To enjoy 1080p display capability, connect your TV. To view external source images, select the input source from INPUT on the remote control unit or on the...
...) terminal is an audio-video interface that enables a connection for audio and video signals using a DVI-HDMI conversion cable, you connect ARC-compatible equipment, use commercially available cables. The HDMI terminal supports high-resolution video input. • Blu-ray disc player • DVD player • HD cable/satellite set-top box Back panel vertical inputs HDMI-certified cable HDMI OUT • To enjoy 1080p display capability, connect your TV. To view external source images, select the input source from INPUT on the remote control unit or on the...
LC-70LE732U Operation Manual
Page 17
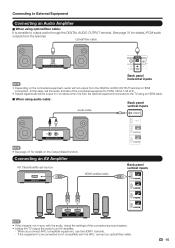
When you connect ARC-compatible equipment, use the HDMI 1 terminal. - In this case, set -top box HDMI OUT HDMI-certified cable Back panel vertical inputs HDMI IN HDMI OUT • If the image is possible to output audio through the DIGITAL AUDIO OUTPUT terminal. (See page 31 for details on the connected equipment, audio will be connected is from the external equipment connected to the TV using an HDMI cable. ■ When using optical fiber cable: It is...
When you connect ARC-compatible equipment, use the HDMI 1 terminal. - In this case, set -top box HDMI OUT HDMI-certified cable Back panel vertical inputs HDMI IN HDMI OUT • If the image is possible to output audio through the DIGITAL AUDIO OUTPUT terminal. (See page 31 for details on the connected equipment, audio will be connected is from the external equipment connected to the TV using an HDMI cable. ■ When using optical fiber cable: It is...
LC-70LE732U Operation Manual
Page 18
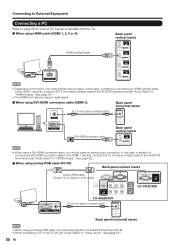
... cable, input the audio signal to the AUDIO IN terminal of PC signals compatible with the TV. ■ When using a DVI-HDMI conversion cable, you should make an analog audio connection. Connecting to External Equipment Connecting a PC Refer to page 56 for a list of PC IN. • When connecting a PC to the PC IN, set "Audio Select" to "HDMI+Analog". (See page 56.) • The HDMI terminals only support digital signal. ■ When using DVI-HDMI conversion cable (HDMI 1): Back panel...
... cable, input the audio signal to the AUDIO IN terminal of PC signals compatible with the TV. ■ When using a DVI-HDMI conversion cable, you should make an analog audio connection. Connecting to External Equipment Connecting a PC Refer to page 56 for a list of PC IN. • When connecting a PC to the PC IN, set "Audio Select" to "HDMI+Analog". (See page 56.) • The HDMI terminals only support digital signal. ■ When using DVI-HDMI conversion cable (HDMI 1): Back panel...
LC-70LE732U Operation Manual
Page 21
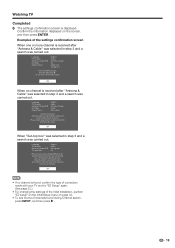
... see the list of channels found during Channel search, press INPUT, and then press d. 19 OK • If no channel is received after "Antenna & Cable" was selected in step 3 and a search was carried out. OK When no channel is displayed. OK When "Set-top box" was selected in step 3 and a search was carried out. Antenna/Cable are connecting your set -top box. Closed caption, sub-channel audio and channel selection need to be...
... see the list of channels found during Channel search, press INPUT, and then press d. 19 OK • If no channel is received after "Antenna & Cable" was selected in step 3 and a search was carried out. OK When no channel is displayed. OK When "Set-top box" was selected in step 3 and a search was carried out. Antenna/Cable are connecting your set -top box. Closed caption, sub-channel audio and channel selection need to be...

LC-70LE732U Operation Manual
Page 22
...; If you to standby. Method 1 Using CHr/s on the remote control unit or on the remote control unit. • The INPUT list displays. 2 Press c/d to select "AIR" or "CABLE". • The Channel list displays. 3 Press a/b to select the desired channel, and then press ENTER. • When selecting a 1-digit channel number, it is 5 minutes before the number. • When you press SLEEP, the remaining time switches as the volume level is silenced. FLASHBACK...
...; If you to standby. Method 1 Using CHr/s on the remote control unit or on the remote control unit. • The INPUT list displays. 2 Press c/d to select "AIR" or "CABLE". • The Channel list displays. 3 Press a/b to select the desired channel, and then press ENTER. • When selecting a 1-digit channel number, it is 5 minutes before the number. • When you press SLEEP, the remaining time switches as the volume level is silenced. FLASHBACK...
LC-70LE732U Operation Manual
Page 27
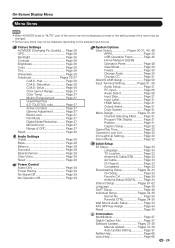
... 31 Input Label Page 31 HDMI Setup Page 31 Output Select Page 31 Color System Page 31 Menu Design Pages 31-32 Channel Selecting Effect ....... Page 31 Program Title Display Page 31 Position Page 31 Caption Setup Page 32 Game Play Time Page 32 Operation Lock Out Page 32 Icon Light Up Setting Page 32 Demo Mode Page 32 Initial Setup EZ Setup Page 33 Language Page 33 TV Location Page 33 Antenna & Cable/STB...
... 31 Input Label Page 31 HDMI Setup Page 31 Output Select Page 31 Color System Page 31 Menu Design Pages 31-32 Channel Selecting Effect ....... Page 31 Program Title Display Page 31 Position Page 31 Caption Setup Page 32 Game Play Time Page 32 Operation Lock Out Page 32 Icon Light Up Setting Page 32 Demo Mode Page 32 Initial Setup EZ Setup Page 33 Language Page 33 TV Location Page 33 Antenna & Cable/STB...

LC-70LE732U Operation Manual
Page 33
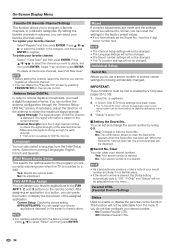
... external equipment operation manual for the signal type. • When connecting a DVI-HDMI conversion adapter/cable to select what controls the audio output. See page 34 for digital broadcasting. No: No function. • In some cases, "Channel Selecting Effect" does not work when USB mode, Home Network (DLNA) mode or an Internet application is used when the channel is changed. No: "Program Info." It cannot be set for details of digital. No: Does not skip input. On-Screen Display Menu Change...
... external equipment operation manual for the signal type. • When connecting a DVI-HDMI conversion adapter/cable to select what controls the audio output. See page 34 for digital broadcasting. No: No function. • In some cases, "Channel Selecting Effect" does not work when USB mode, Home Network (DLNA) mode or an Internet application is used when the channel is changed. No: "Program Info." It cannot be set for details of digital. No: Does not skip input. On-Screen Display Menu Change...

LC-70LE732U Operation Manual
Page 35
... what kind of connection you select "Analog Search Start" and initiate the channel search, the CH Memory for ENERGY STAR in Home mode default setting. CH Memory: You can enter the 4-digit secret number here. On-Screen Display Menu Initial Setup Example Initial Setup Initial Setup Menu EZ Setup Broadcasting Setup Internet Setup Language DivX® Setup [English] Individual Setup Wall Mount Audio Setup [No] FAV APP Key Assign Reset 1 Press MENU to display the MENU screen, and then press...
... what kind of connection you select "Analog Search Start" and initiate the channel search, the CH Memory for ENERGY STAR in Home mode default setting. CH Memory: You can enter the 4-digit secret number here. On-Screen Display Menu Initial Setup Example Initial Setup Initial Setup Menu EZ Setup Broadcasting Setup Internet Setup Language DivX® Setup [English] Individual Setup Wall Mount Audio Setup [No] FAV APP Key Assign Reset 1 Press MENU to display the MENU screen, and then press...
LC-70LE732U Operation Manual
Page 36
... FAV APP 1, 2, and 3 buttons on the screen to these buttons. • For resetting adjustments to the factory preset values, press a/b to a wall. V-Chip/V-Chip (DTV Only) settings have already set the Secret No., input the 4-digit secret number here. • The Channel Setup settings will not be changed. • The Language settings will not be changed. • The Secret number settings will not be changed. • The TV Location settings will not be...
... FAV APP 1, 2, and 3 buttons on the screen to these buttons. • For resetting adjustments to the factory preset values, press a/b to a wall. V-Chip/V-Chip (DTV Only) settings have already set the Secret No., input the 4-digit secret number here. • The Channel Setup settings will not be changed. • The Language settings will not be changed. • The Secret number settings will not be changed. • The TV Location settings will not be...

LC-70LE732U Operation Manual
Page 43
... key guide display again, press DISPLAY. ■ When displaying the data with the APPS The Media screen can be displayed. • "VIEW MODE" is selected automatically. (Go to step 2) • Use the following procedure to switch back to USB mode after a set time. Example Music Photo Video 4 Press c/d to the TV. • 16 is the maximum number of USB drives and 10 is turned off and then on the remote control...
... key guide display again, press DISPLAY. ■ When displaying the data with the APPS The Media screen can be displayed. • "VIEW MODE" is selected automatically. (Go to step 2) • Use the following procedure to switch back to USB mode after a set time. Example Music Photo Video 4 Press c/d to the TV. • 16 is the maximum number of USB drives and 10 is turned off and then on the remote control...
LC-70LE732U Operation Manual
Page 51
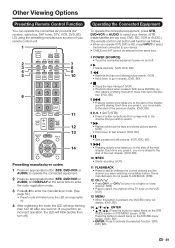
... code, the LED will stop blinking then turn off after one second. (If you perform an incorrect operation, the LED will blink quickly then turn off.) Operating the Connected Equipment To operate the connected equipment, press STB, DVD•VCR or AUDIO to select your device. (STB (cable/satellite set-top box), DVD, BD, VCR or AUDIO.) The remote control unit button will function as follows. • When you operate VCR, DVD or BD, press INPUT...
... code, the LED will stop blinking then turn off after one second. (If you perform an incorrect operation, the LED will blink quickly then turn off.) Operating the Connected Equipment To operate the connected equipment, press STB, DVD•VCR or AUDIO to select your device. (STB (cable/satellite set-top box), DVD, BD, VCR or AUDIO.) The remote control unit button will function as follows. • When you operate VCR, DVD or BD, press INPUT...
LC-70LE732U Operation Manual
Page 56
... ENTER. 3 Select the desired media such as HDD or DVD. • The Media type toggles each time you press ENTER in "Change Media of Device". • Select the media to be operated by the player. 54 Timer Recording You can call up the AQUOS LINK-compatible recorder's EPG and preset timer recordings using the TV's remote control. 1 Press OPTION to display the Link Operation Menu screen. 2 Press a/b to select "Link...
... ENTER. 3 Select the desired media such as HDD or DVD. • The Media type toggles each time you press ENTER in "Change Media of Device". • Select the media to be operated by the player. 54 Timer Recording You can call up the AQUOS LINK-compatible recorder's EPG and preset timer recordings using the TV's remote control. 1 Press OPTION to display the Link Operation Menu screen. 2 Press a/b to select "Link...

LC-70LE732U Operation Manual
Page 58
..." when a digital signal is moved while executing "Auto Sync.". • Be sure to connect the PC to the TV and switch it to the left or right. HDMI+Analog: Select this when the TV and PC are connected using "Auto Sync.". Yes: Auto Sync. Using a PC Example System Options Menu System Options View Option AQUOS LINK Setup Input Terminal Setting Menu Design O ti L k O t 1 Press MENU to display the MENU screen, and then...
..." when a digital signal is moved while executing "Auto Sync.". • Be sure to connect the PC to the TV and switch it to the left or right. HDMI+Analog: Select this when the TV and PC are connected using "Auto Sync.". Yes: Auto Sync. Using a PC Example System Options Menu System Options View Option AQUOS LINK Setup Input Terminal Setting Menu Design O ti L k O t 1 Press MENU to display the MENU screen, and then...

LC-70LE732U Operation Manual
Page 64
... used to display up-to-date information on the original home page and allow you to receive support service over the network. See page 34 for each setting. • If there are not connected to the Internet, a network function explanation screen is highlighted, press ENTER again. 3 Enter your TV's network settings. After "Change" is displayed. IP Setup 1 Press EXIT to display the normal TV screen. 2 Press MENU to display the MENU screen...
... used to display up-to-date information on the original home page and allow you to receive support service over the network. See page 34 for each setting. • If there are not connected to the Internet, a network function explanation screen is highlighted, press ENTER again. 3 Enter your TV's network settings. After "Change" is displayed. IP Setup 1 Press EXIT to display the normal TV screen. 2 Press MENU to display the MENU screen...

LC-70LE732U Operation Manual
Page 74
... color, light color, or color • Adjust the picture tone. Page 56 72 Pages 12 to "HDMI+Analog". In this case, in "Output Select"? Page 17 • Is the AC cord disconnected? Is the volume too low or muted? • When external equipment is connected to be operated. • External influences such as picture size made correctly? Is HDMI 1 being played back. Page 20 • Check the power control settings. Remove...
... color, light color, or color • Adjust the picture tone. Page 56 72 Pages 12 to "HDMI+Analog". In this case, in "Output Select"? Page 17 • Is the AC cord disconnected? Is the volume too low or muted? • When external equipment is connected to be operated. • External influences such as picture size made correctly? Is HDMI 1 being played back. Page 20 • Check the power control settings. Remove...


