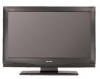
LC42BT10U Operation Manual
Page 27
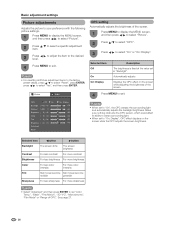
... the screen brightness. OPC Off On Backlight [b12] a16 Contrast [b30] 0 Brightness [ 0] a30 Color [ 0] a30 Tint [ 0] a30 Sharpness [ b2] a10 Advanced Reset On : Display b16 b40 b30 b30 b30 b10 NOTE • When set "Color Temp.", "Black", "Fine Motion", "3D-Y/C", "Monochrome", "... become reddish greenish Sharpness For less sharpness For more sharpness NOTE • Select "Advanced" and then press ENTER to set to select "Yes", and then press ENTER. NOTE • For resetting all Picture adjustment items to the factory preset values, press a/b to select "Reset", press ENTER, ...
... the screen brightness. OPC Off On Backlight [b12] a16 Contrast [b30] 0 Brightness [ 0] a30 Color [ 0] a30 Tint [ 0] a30 Sharpness [ b2] a10 Advanced Reset On : Display b16 b40 b30 b30 b30 b10 NOTE • When set "Color Temp.", "Black", "Fine Motion", "3D-Y/C", "Monochrome", "... become reddish greenish Sharpness For less sharpness For more sharpness NOTE • Select "Advanced" and then press ENTER to set to select "Yes", and then press ENTER. NOTE • For resetting all Picture adjustment items to the factory preset values, press a/b to select "Reset", press ENTER, ...
LC42BT10U Operation Manual
Page 29
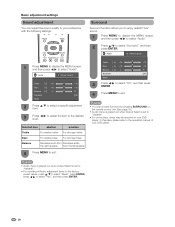
... adjustment item. 3 Press c/d to adjust the item to exit. Treble [ 0] a15 b15 Bass [ 0] a15 b15 Balance [ 0] L R Surround [Off] Reset 3 Press c/d to select "On", and then press ENTER. 4 Press MENU to the desired level. NOTE • Audio menu is grayed out when Output Select is...page 19.) • Audio menu is grayed out when Output Select is set to "Variable". • For resetting all Audio adjustment items to the factory preset values, press a/b to select "Reset", press ENTER, press c/d to select "Audio". NOTE • You can adjust the sound quality to the ...
... adjustment item. 3 Press c/d to adjust the item to exit. Treble [ 0] a15 b15 Bass [ 0] a15 b15 Balance [ 0] L R Surround [Off] Reset 3 Press c/d to select "On", and then press ENTER. 4 Press MENU to the desired level. NOTE • Audio menu is grayed out when Output Select is...page 19.) • Audio menu is grayed out when Output Select is set to "Variable". • For resetting all Audio adjustment items to the factory preset values, press a/b to select "Reset", press ENTER, press c/d to select "Audio". NOTE • You can adjust the sound quality to the ...
LC42BT10U Operation Manual
Page 34
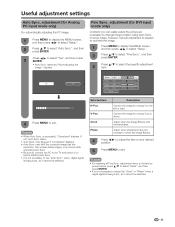
...and "Now adjusting the image." when digital signal is moved while executing Auto Sync. • Be sure to connect the PC to the TV and switch it to the left or right. Selected item H-Pos. Useful adjustment settings Auto Sync. adjustment (for DVI input mode only) ... and then press ENTER. 3 Press c/d to exit. NOTE • When Auto Sync. failed. • Auto Sync. adjustment items to the factory preset values, press a/b to select "Reset", and then press ENTER. • It is not necessary to adjust the "Clock" or "Phase" when a digital signal is not necessary to ...
...and "Now adjusting the image." when digital signal is moved while executing Auto Sync. • Be sure to connect the PC to the TV and switch it to the left or right. Selected item H-Pos. Useful adjustment settings Auto Sync. adjustment (for DVI input mode only) ... and then press ENTER. 3 Press c/d to exit. NOTE • When Auto Sync. failed. • Auto Sync. adjustment items to the factory preset values, press a/b to select "Reset", and then press ENTER. • It is not necessary to adjust the "Clock" or "Phase" when a digital signal is not necessary to ...
LC42BT10U Operation Manual
Page 35
...42 for setting a secret number. • "Return to the factory preset values" displays on the screen. 3 Press c/d to select "Yes", and then press ENTER. • "Now, TV will have returned to its original settings. OK?" The screen will restart automatically. H-Pos. [ 0] a10 b10 V-Pos. [ 0] a20 b20 Reset Now initializing... Example Reset...on the screen. 4 Press c/d to select "H-Pos." V-Pos. NOTE • For resetting adjustments to the factory preset values, press a/b to select "Reset", and then press ENTER. • Adjustments are made and the settings cannot be changed....
...42 for setting a secret number. • "Return to the factory preset values" displays on the screen. 3 Press c/d to select "Yes", and then press ENTER. • "Now, TV will have returned to its original settings. OK?" The screen will restart automatically. H-Pos. [ 0] a10 b10 V-Pos. [ 0] a20 b20 Reset Now initializing... Example Reset...on the screen. 4 Press c/d to select "H-Pos." V-Pos. NOTE • For resetting adjustments to the factory preset values, press a/b to select "Reset", and then press ENTER. • Adjustments are made and the settings cannot be changed....
LC42BT10U Operation Manual
Page 42
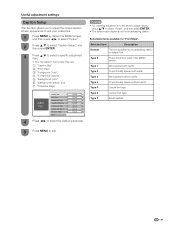
... 123 Caption Size Font Style Foreground Color Foreground Opacity Background Color Background Opacity Character Edge Reset Default Default Default Default Default Default Default 4 Press c/d to select "Reset", and then press ENTER. • The default value depends on the broadcasting station.... Proportional font used in the MENU screen. Type 2 Proportionally spaced with serifs. Casual font type. NOTE • For resetting adjustments to the factory preset values, press a/b to select the desired parameter. Type 1 Monospaced with serifs. Type 6 Type 7 Cursive font type...
... 123 Caption Size Font Style Foreground Color Foreground Opacity Background Color Background Opacity Character Edge Reset Default Default Default Default Default Default Default 4 Press c/d to select "Reset", and then press ENTER. • The default value depends on the broadcasting station.... Proportional font used in the MENU screen. Type 2 Proportionally spaced with serifs. Casual font type. NOTE • For resetting adjustments to the factory preset values, press a/b to select the desired parameter. Type 1 Monospaced with serifs. Type 6 Type 7 Cursive font type...


