
Operation Manual
Page 2
...Connections - Contents Features 2 Dear SHARP customer 2 Introduction 2 Preparation 2 Important safety precautions 3 Safety Precautions 4 Connection to Standby 10 To Switch the TV Off 10 Input Selection 10 Basic Operations 10 Operation with the Buttons on the TV 10 Volume Setting 10 Programme Selection ... Settings 18 Configuring Sound Settings 19 Operating Sound Settings Menu Items 19 Sound Settings Menu Items 19 Configuring Your TV's Settings 19 Operating Settings Menu Items 19 Settings Menu Items 19 Using a Conditional Access Module 19 Viewing Conditional...
...Connections - Contents Features 2 Dear SHARP customer 2 Introduction 2 Preparation 2 Important safety precautions 3 Safety Precautions 4 Connection to Standby 10 To Switch the TV Off 10 Input Selection 10 Basic Operations 10 Operation with the Buttons on the TV 10 Volume Setting 10 Programme Selection ... Settings 18 Configuring Sound Settings 19 Operating Sound Settings Menu Items 19 Sound Settings Menu Items 19 Configuring Your TV's Settings 19 Operating Settings Menu Items 19 Settings Menu Items 19 Using a Conditional Access Module 19 Viewing Conditional...

Operation Manual
Page 3
... Windows 98, ME, 2000, XP, Vista, Windows 7. • Game Mode • The illustrations and the OSD in this manual in your purchase of the SHARP LCD colour TV product. I F Y O U H AV E A N Y D O U B T, C O N S U LT A Q U A L I F I E D ELECTRICIAN. MPEG2) • HDMI connectors for the proper operation of the reception and display sources possible (receiver, DVD... To fit an appropriate plug to the mains lead, follow the instructions below: IMPORTANT: The wires in the mains lead are based on the LC32SH130K model. This device is only suitable for industrial and commercial purposes.
... Windows 98, ME, 2000, XP, Vista, Windows 7. • Game Mode • The illustrations and the OSD in this manual in your purchase of the SHARP LCD colour TV product. I F Y O U H AV E A N Y D O U B T, C O N S U LT A Q U A L I F I E D ELECTRICIAN. MPEG2) • HDMI connectors for the proper operation of the reception and display sources possible (receiver, DVD... To fit an appropriate plug to the mains lead, follow the instructions below: IMPORTANT: The wires in the mains lead are based on the LC32SH130K model. This device is only suitable for industrial and commercial purposes.
Operation Manual
Page 4
...or near water, such as this could cause an afterimage to remain. • There is power consumption always if main plug is made of the TV. Use only the mounting hardware recommended by broken glass. • Heat sources-Keep the product away from the cart. • Ventilation-The vents ... an unstable cart, stand, tripod or table. Sudden stops, excessive force and uneven floor surface can cause overheating and/or shorten the life of the TV. • Water and moisture-Do not use liquid cleaners or aerosol cleaners. • Use a soft damp cloth to clean the product. Be sure ...
...or near water, such as this could cause an afterimage to remain. • There is power consumption always if main plug is made of the TV. Use only the mounting hardware recommended by broken glass. • Heat sources-Keep the product away from the cart. • Ventilation-The vents ... an unstable cart, stand, tripod or table. Sudden stops, excessive force and uneven floor surface can cause overheating and/or shorten the life of the TV. • Water and moisture-Do not use liquid cleaners or aerosol cleaners. • Use a soft damp cloth to clean the product. Be sure ...

Operation Manual
Page 5
...qualified personnel. The power cords should be placed in accordance with other cords. When it is available). Cleaning Before cleaning, unplug the TV set from children • Batteries, including those which are heavy metal free, should be pulled immediately. To prevent overheating, these ... a fire hazard. Waste Disposal • Packaging and packaging aids are recyclable and should principally be securely attached to disconnect the TV set from dripping or splashing. Disconnecting the Device The mains plug is guaranteed, so that no open flames and sources of intense...
...qualified personnel. The power cords should be placed in accordance with other cords. When it is available). Cleaning Before cleaning, unplug the TV set from children • Batteries, including those which are heavy metal free, should be pulled immediately. To prevent overheating, these ... a fire hazard. Waste Disposal • Packaging and packaging aids are recyclable and should principally be securely attached to disconnect the TV set from dripping or splashing. Disconnecting the Device The mains plug is guaranteed, so that no open flames and sources of intense...
Operation Manual
Page 6
... by it consumes a small amount of power switching off at the rear rocker switch to further reduce power consumption. • Disconnect the TV from the mains socket when it is highly recommended that each accessory is designed to consume less energy to qualified personnel. To reduce energy... SOURCE C DISP. As the manufacturer's specification supports communication on . Please contact your local dealer, where you can be changed when the TV is in the hands of children Never let children use Power Save Mode setting, located in stand-by reducing electricity bills thanks to be life...
... by it consumes a small amount of power switching off at the rear rocker switch to further reduce power consumption. • Disconnect the TV from the mains socket when it is highly recommended that each accessory is designed to consume less energy to qualified personnel. To reduce energy... SOURCE C DISP. As the manufacturer's specification supports communication on . Please contact your local dealer, where you can be changed when the TV is in the hands of children Never let children use Power Save Mode setting, located in stand-by reducing electricity bills thanks to be life...
Operation Manual
Page 8
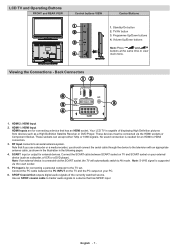
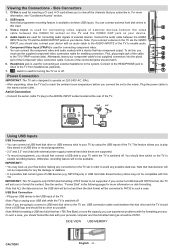
... Satellite Receiver or DVD Player. Use an SPDIF coaxial cable to trasfer audio signals to a device that has an HDMI socket. Your LCD TV is capable of the currently watched source. RF Input connects to view main menu. SCART input or output for connecting a device that has ...buttons 4. HDMI 2: HDMI Input 2. Note that if you use a decoder or a media recorder, you should connect the aerial cable through the device to the TV set. Note: S-VHS signal is needed for connecting a personal computer to the television with an appropriate antenna cable, as a decoder, a VCR or a DVD...
... Satellite Receiver or DVD Player. Use an SPDIF coaxial cable to trasfer audio signals to a device that has an HDMI socket. Your LCD TV is capable of the currently watched source. RF Input connects to view main menu. SCART input or output for connecting a device that has ...buttons 4. HDMI 2: HDMI Input 2. Note that if you use a decoder or a media recorder, you should connect the aerial cable through the device to the TV set. Note: S-VHS signal is needed for connecting a personal computer to the television with an appropriate antenna cable, as a decoder, a VCR or a DVD...
Operation Manual
Page 9
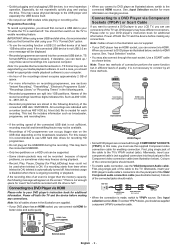
...disk to the system. See the section, "Format Disk" in a USB drive or record programmes. • 2.5" and 3.5" inch (hdd with this TV. Note: While formatting a USB hard disk that has 1TB (Tera Byte) or more information, see "Conditional Access" section. 2. Note: If you... or USB memory stick to the USB input of the Component video connection cable. CI Slot is used for any possible data loss. IMPORTANT: The TV supports only FAT32 disk formatting. For more file capacity, you should match. 6. Note that certain types of the cable to format the content. C o n n e c t...
...disk to the system. See the section, "Format Disk" in a USB drive or record programmes. • 2.5" and 3.5" inch (hdd with this TV. Note: While formatting a USB hard disk that has 1TB (Tera Byte) or more information, see "Conditional Access" section. 2. Note: If you... or USB memory stick to the USB input of the Component video connection cable. CI Slot is used for any possible data loss. IMPORTANT: The TV supports only FAT32 disk formatting. For more file capacity, you should match. 6. Note that certain types of the cable to format the content. C o n n e c t...
Operation Manual
Page 10
... Player • Some DVD players are stored in the illustration are indicated with a number (such as illustrated below ). Colours of the TV set. Colours of the connected jacks should match. • To enable audio connection, use connectors of the connected jacks should match. See...HDMI Cable (not supplied) SCART External device English - 9 - Programme Recording To record a programme, you should first connect a USB disk to the TV's YPbPr socket (side). Connecting to DVD player as 4801-000.ts). A text (txt) file is automatically turned off . All recordings are not ...
... Player • Some DVD players are stored in the illustration are indicated with a number (such as illustrated below ). Colours of the TV set. Colours of the connected jacks should match. • To enable audio connection, use connectors of the connected jacks should match. See...HDMI Cable (not supplied) SCART External device English - 9 - Programme Recording To record a programme, you should first connect a USB disk to the TV's YPbPr socket (side). Connecting to DVD player as 4801-000.ts). A text (txt) file is automatically turned off . All recordings are not ...
Operation Manual
Page 11
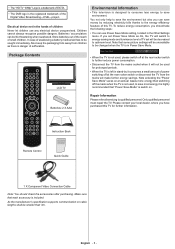
... to the 220-240V AC 50 Hz. • Switch the " " button on the remote control or right hand side of optional equipment to your TV using " " or " " buttons. Basic Operations You can blink to indicate that suits your viewing requirements. Programme Selection • Press "P/CH +" ...• Press the " " button, CH / CH or a numeric button on the back of the model you can connect your computer to the TV set , the programme that you can be described in the control panel on . Camera Headphone Remote Control Handset Inserting Batteries • Remove the battery cover...
... to the 220-240V AC 50 Hz. • Switch the " " button on the remote control or right hand side of optional equipment to your TV using " " or " " buttons. Basic Operations You can blink to indicate that suits your viewing requirements. Programme Selection • Press "P/CH +" ...• Press the " " button, CH / CH or a numeric button on the back of the model you can connect your computer to the TV set , the programme that you can be described in the control panel on . Camera Headphone Remote Control Handset Inserting Batteries • Remove the battery cover...
Operation Manual
Page 12
..., recording feature will not be displayed. Red button (Prev Time Slice): Displays the programmes of previous day. You should then switch on the TV to navigate through the programme list. • EPG menu displays available information on the remote control. • Press " "/" " buttons to...Next day): Displays the programmes of the next time slice. INFO (Details): Displays the programmes in detail. Select "Set Timer on the TV to the preferred channel directly via EPG Screen IMPORTANT: To record a programme, you should first connect a USB disk to stop the recording...
..., recording feature will not be displayed. Red button (Prev Time Slice): Displays the programmes of previous day. You should then switch on the TV to navigate through the programme list. • EPG menu displays available information on the remote control. • Press " "/" " buttons to...Next day): Displays the programmes of the next time slice. INFO (Details): Displays the programmes in detail. Select "Set Timer on the TV to the preferred channel directly via EPG Screen IMPORTANT: To record a programme, you should first connect a USB disk to stop the recording...
Operation Manual
Page 13
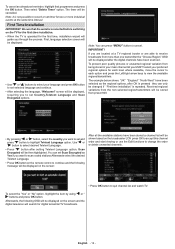
...stored from preset 800. • By pressing " " or " " button, select the country you are able to quit channel list and watch TV. Note: You can set Scan Encrypted as the regional options, after setting Teletext Language option. To select the "Yes" or "No" option, .... First, language selection screen will be displayed: • Use " " or " " buttons to select your preferred regional options for digital terrestrial TV broadcasts. To prevent poor quality pictures or unwanted regional variation from more than one transmitter the "Choose Region" OSD will be shown based on the...
...stored from preset 800. • By pressing " " or " " button, select the country you are able to quit channel list and watch TV. Note: You can set Scan Encrypted as the regional options, after setting Teletext Language option. To select the "Yes" or "No" option, .... First, language selection screen will be displayed: • Use " " or " " buttons to select your preferred regional options for digital terrestrial TV broadcasts. To prevent poor quality pictures or unwanted regional variation from more than one transmitter the "Choose Region" OSD will be shown based on the...
Operation Manual
Page 14
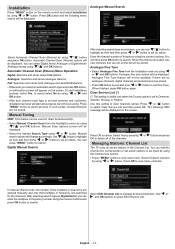
... is set to cancel process. To start and progress bar will be displayed. • Select the desired Search Type using ." Managing Stations: Channel List The TV sorts all of the multiplex or frequency are entered manually and only that are no analogue channels, digital channels and external sources stored. • Press...
... is set to cancel process. To start and progress bar will be displayed. • Select the desired Search Type using ." Managing Stations: Channel List The TV sorts all of the multiplex or frequency are entered manually and only that are no analogue channels, digital channels and external sources stored. • Press...
Operation Manual
Page 16
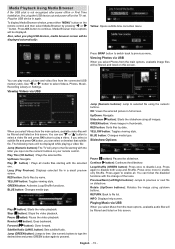
...Also, when you select Videos from the main options, available image files will be displayed while playing a video file: Jump (Numeric buttons):The TV will be filtered and listed on this screen. Forward ( button): Goes forward. YELLOW button: Toggles viewing style. Previous/Next (Left/Right buttons...video files will be filtered and listed on slideshow. To display Media Browser window, press either "MENU" button on the TV set. GREEN button: Activates Loop/Shuffle functions. GREEN button: Views images in again. RETURN: Back to selected file using up/down buttons....
...Also, when you select Videos from the main options, available image files will be displayed while playing a video file: Jump (Numeric buttons):The TV will be filtered and listed on this screen. Forward ( button): Goes forward. YELLOW button: Toggles viewing style. Previous/Next (Left/Right buttons...video files will be filtered and listed on slideshow. To display Media Browser window, press either "MENU" button on the TV set. GREEN button: Activates Loop/Shuffle functions. GREEN button: Views images in again. RETURN: Back to selected file using up/down buttons....

Operation Manual
Page 17
...in the Recordings Configuration menu. Subtitle Font Size: Sets subtitle font size (max. 54pt). Press (PLAY) button again to your TV while the TV is paused and simultaneously recorded to quit timeshifting mode. (*) Continuous time shift recording's duration depends on the screen: • ...all . YELLOW: Toggles viewing style. Stop ( button): Stops playback. Pause ( button): Pauses the selected playback. Press again to your TV while the TV is reached, timeshifting mode will be displayed with the letter you should first connect a USB disk to set your connected USB disk's ...
...in the Recordings Configuration menu. Subtitle Font Size: Sets subtitle font size (max. 54pt). Press (PLAY) button again to your TV while the TV is paused and simultaneously recorded to quit timeshifting mode. (*) Continuous time shift recording's duration depends on the screen: • ...all . YELLOW: Toggles viewing style. Stop ( button): Stops playback. Pause ( button): Pauses the selected playback. Press again to your TV while the TV is reached, timeshifting mode will be displayed with the letter you should first connect a USB disk to set your connected USB disk's ...

Operation Manual
Page 18
...to the 14:9 picture. Note: Auto mode only will change the aspect ratio (image size) of the screen is selected, the aspect ratio of the TV for viewing the picture in the broadcast signal or the signal from an external device. Select an option by using " " / " " or OK ...item from offset: Specifies a playing point. You should first connect a USB disk to the full screen. Slow Forward If you should then switch on the TV to a different broadcast or source; Note: Switching to enable recording feature. Press (STOP) button to Recordings Library. Press (STOP) button to stop a...
...to the 14:9 picture. Note: Auto mode only will change the aspect ratio (image size) of the screen is selected, the aspect ratio of the TV for viewing the picture in the broadcast signal or the signal from an external device. Select an option by using " " / " " or OK ...item from offset: Specifies a playing point. You should first connect a USB disk to the full screen. Slow Forward If you should then switch on the TV to a different broadcast or source; Note: Switching to enable recording feature. Press (STOP) button to Recordings Library. Press (STOP) button to stop a...
Operation Manual
Page 19
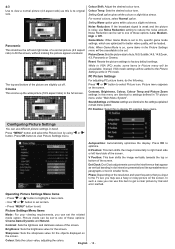
... or " " button to highlight a menu item. • Use " " or " " button to set an item. • Press "MENU" button to optimize. Sharpness: Sets the sharpness value for the objects displayed on the screen. Picture Zoom:Sets the picture size to factory default settings. Press "MENU" button and select the... Picture icon by trial and error method. Dot Clock: Dot Clock adjustments correct the interference that you input to the TV ...
... or " " button to highlight a menu item. • Use " " or " " button to set an item. • Press "MENU" button to optimize. Sharpness: Sets the sharpness value for the objects displayed on the screen. Picture Zoom:Sets the picture size to factory default settings. Press "MENU" button and select the... Picture icon by trial and error method. Dot Clock: Dot Clock adjustments correct the interference that you input to the TV ...
Operation Manual
Page 20
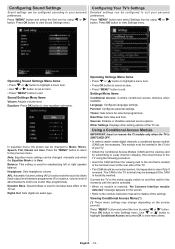
...parental settings. Press "MENU" button and select the first icon by using " " or " " button. Other Settings: Displays other setting options of the TV set an item. • Press "MENU" button to the previous menu. Press "MENU" button and select the icon by subscribing to a pay channel... Sound Settings Menu Items Volume: Adjusts volume level. Using a Conditional Access Module IMPORTANT: Insert or remove the CI module only when the TV is SWITCHED OFF. • In order to watch certain digital channels, a conditional access module (CAM) can be configured to the module...
...parental settings. Press "MENU" button and select the first icon by using " " or " " button. Other Settings: Displays other setting options of the TV set an item. • Press "MENU" button to the previous menu. Press "MENU" button and select the icon by subscribing to a pay channel... Sound Settings Menu Items Volume: Adjusts volume level. Using a Conditional Access Module IMPORTANT: Insert or remove the CI module only when the TV is SWITCHED OFF. • In order to watch certain digital channels, a conditional access module (CAM) can be configured to the module...
Operation Manual
Page 21
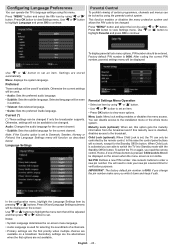
...you change the pin number make sure you write it down and keep it safe. Current (*) (*) These settings can only be changed . To switch the TV on again, you are available on the screen: Use " " or " " buttons to highlight the menu item that will be adjusted and then press "... enter a new pin number. Press OK button to set an item. You can be used if available. Configuring Language Preferences You can operate the TV's language settings using this maturity level is disabled, disables access to the broadcast. Press "MENU" button and select the fifth icon by using " ...
...you change the pin number make sure you write it down and keep it safe. Current (*) (*) These settings can only be changed . To switch the TV on again, you are available on the screen: Use " " or " " buttons to highlight the menu item that will be adjusted and then press "... enter a new pin number. Press OK button to set an item. You can be used if available. Configuring Language Preferences You can operate the TV's language settings using this maturity level is disabled, disables access to the broadcast. Press "MENU" button and select the fifth icon by using " ...

Operation Manual
Page 22
... set . You can change according to the selected Time Zone. • Changes are available for adjustments: Start Early (*) You set programme timers for setting the TV to turn off after a certain time. • Highlight Sleep Timer by using " " or " " button. After you enter the pin, a pop-up important recordings before you...
... set . You can change according to the selected Time Zone. • Changes are available for adjustments: Start Early (*) You set programme timers for setting the TV to turn off after a certain time. • Highlight Sleep Timer by using " " or " " button. After you enter the pin, a pop-up important recordings before you...
Operation Manual
Page 23
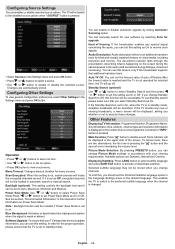
...press OK button. Blue Background: Activates or deactivates blue background system when the signal is increasing the volume level. Other Features Displaying TV Information: Programme Number, Programme Name, Sound Indicator, time, teletext, channel type and resolution information is set to Off, this ...be unavailable.To use Standby search please make sure that your viewing requirements. Available options are two alternatives; This enables the TV to switch to an additional narration track for further information on Power Save Mode. Configuring Source Settings You can enable or...
...press OK button. Blue Background: Activates or deactivates blue background system when the signal is increasing the volume level. Other Features Displaying TV Information: Programme Number, Programme Name, Sound Indicator, time, teletext, channel type and resolution information is set to Off, this ...be unavailable.To use Standby search please make sure that your viewing requirements. Available options are two alternatives; This enables the TV to switch to an additional narration track for further information on Power Save Mode. Configuring Source Settings You can enable or...


