
Operation Manual
Page 4
...an independent laboratory (such as UL, CSA, ETL). • ALWAYS follow the manufacturer's recommendations for a wall or ceiling mount installation. Call 1-800-BE-SHARP for its size and weight. • NEVER place your older CRT television on dressers, bookcases, shelves, desks, speakers, chests, carts, etc., may ... IMPORTANT SAFETY INSTRUCTIONS • To prevent fire or shock hazard, do not place the AC cord under the TV set or other heavy items. • Do not display a still picture for a long time, as this could cause an afterimage to remain. • To prevent fire or shock hazard,...
...an independent laboratory (such as UL, CSA, ETL). • ALWAYS follow the manufacturer's recommendations for a wall or ceiling mount installation. Call 1-800-BE-SHARP for its size and weight. • NEVER place your older CRT television on dressers, bookcases, shelves, desks, speakers, chests, carts, etc., may ... IMPORTANT SAFETY INSTRUCTIONS • To prevent fire or shock hazard, do not place the AC cord under the TV set or other heavy items. • Do not display a still picture for a long time, as this could cause an afterimage to remain. • To prevent fire or shock hazard,...
Operation Manual
Page 5
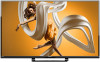
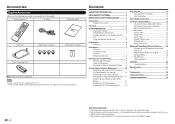
...with the TV. • The illustrations above are provided with the product. Contents IMPORTANT INFORMATION 1 DEAR SHARP CUSTOMER 2 IMPORTANT SAFETY INSTRUCTIONS 3 Accessories 4 Supplied Accessories 4 Contents 4 QUICK REFERENCE 5 Attaching the Stand...On-Screen Display Menu Operation 18 Menu Operation Buttons 18 Menu Items 19 Picture menu 20 Audio menu 21 Setup menu 22 Closed Caption menu 24 ... WARRANTY 33 Dimensional Drawings • The dimensional drawings for the LCD TV set are shown on the inside back cover. • The illustrations and on... based on the LC-55LE643U model. 4
...with the TV. • The illustrations above are provided with the product. Contents IMPORTANT INFORMATION 1 DEAR SHARP CUSTOMER 2 IMPORTANT SAFETY INSTRUCTIONS 3 Accessories 4 Supplied Accessories 4 Contents 4 QUICK REFERENCE 5 Attaching the Stand...On-Screen Display Menu Operation 18 Menu Operation Buttons 18 Menu Items 19 Picture menu 20 Audio menu 21 Setup menu 22 Closed Caption menu 24 ... WARRANTY 33 Dimensional Drawings • The dimensional drawings for the LCD TV set are shown on the inside back cover. • The illustrations and on... based on the LC-55LE643U model. 4

Operation Manual
Page 7
...UNIT DOES NOT POWER ON - IF YOU STILL ENCOUNTER NO POWER, PLEASE CONTACT US AT 1-800-BE-SHARP. A 300-ohm system is under direct sunlight. If you will not be attached to a 75-...with this product may not work properly if the remote control sensor on the TV. If your TV set. (The breaking of different types. NOTICE F-type connector should be attached to a terminal without a CATV... the remote control unit under direct sunlight or strong lighting. Antennas To enjoy a clearer picture, use commercially available cables. If tools are used , it in contact with skin can easily...
...UNIT DOES NOT POWER ON - IF YOU STILL ENCOUNTER NO POWER, PLEASE CONTACT US AT 1-800-BE-SHARP. A 300-ohm system is under direct sunlight. If you will not be attached to a 75-...with this product may not work properly if the remote control sensor on the TV. If your TV set. (The breaking of different types. NOTICE F-type connector should be attached to a terminal without a CATV... the remote control unit under direct sunlight or strong lighting. Antennas To enjoy a clearer picture, use commercially available cables. If tools are used , it in contact with skin can easily...
Operation Manual
Page 9
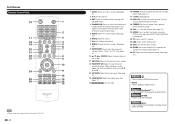
... GJ221-R NOTE • When using the remote control unit, point it at the TV. 8 1 INPUT: Select a TV input source. (See page 9.) 2 0-9: Set the channel. 3 ENT: Jump to a channel after selecting with the 0-9 buttons. 4 FLASHBACK: Press to switch to ROKU home screen. While watching, you can toggle ...the selected channels by pressing A, B, C and D. 13 AV MODE: Select the picture mode. (See page 20.) 14 VIEW MODE: Select the aspect ratio. (See page 17.) 15 : Only for USB. 16 POWER: Switch the power on...
... GJ221-R NOTE • When using the remote control unit, point it at the TV. 8 1 INPUT: Select a TV input source. (See page 9.) 2 0-9: Set the channel. 3 ENT: Jump to a channel after selecting with the 0-9 buttons. 4 FLASHBACK: Press to switch to ROKU home screen. While watching, you can toggle ...the selected channels by pressing A, B, C and D. 13 AV MODE: Select the picture mode. (See page 20.) 14 VIEW MODE: Select the aspect ratio. (See page 17.) 15 : Only for USB. 16 POWER: Switch the power on...
Operation Manual
Page 17
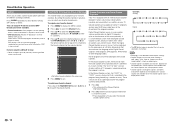
...of the last service selected in advance, you can be indicated by manually switching to select desired setting: SAP, Mono, or Stereo. Closed Caption are also superimposed over the program's picture. FAVORITE CH (Favorite Channel Setting) This function allows you to view conversations, narration and sound effects as subtitles on digital TV ... AUDIO Allows you to select a preset audio option optimized for the selected button. 16 19 21 24 25 26 27 28 29 30 • Set other favorite channels the same way. 5 Press MENU to exit. Not all programs and VHS videotapes offer closed caption...
...of the last service selected in advance, you can be indicated by manually switching to select desired setting: SAP, Mono, or Stereo. Closed Caption are also superimposed over the program's picture. FAVORITE CH (Favorite Channel Setting) This function allows you to view conversations, narration and sound effects as subtitles on digital TV ... AUDIO Allows you to select a preset audio option optimized for the selected button. 16 19 21 24 25 26 27 28 29 30 • Set other favorite channels the same way. 5 Press MENU to exit. Not all programs and VHS videotapes offer closed caption...

Operation Manual
Page 18
Stretches a 4:3 aspect ratio picture to fill the screen. TV screen. Expands the display image to the edges of the display image. Direct Button Operation VIEW MODE You can have the same settings by choosing "View Mode" on the menu items. (See page 17.) ■■For 4:3 programs Normal Wide ...the screen. The original 4:3 aspect ratio (1.33:1 source) is displayed to select a desired item on the menu. 3 Press ENTER to confirm the setting. If you are added to the left and right sides to fit the screen. NOTE • Selectable screen size may vary with black bars to...
Stretches a 4:3 aspect ratio picture to fill the screen. TV screen. Expands the display image to the edges of the display image. Direct Button Operation VIEW MODE You can have the same settings by choosing "View Mode" on the menu items. (See page 17.) ■■For 4:3 programs Normal Wide ...the screen. The original 4:3 aspect ratio (1.33:1 source) is displayed to select a desired item on the menu. 3 Press ENTER to confirm the setting. If you are added to the left and right sides to fit the screen. NOTE • Selectable screen size may vary with black bars to...
Operation Manual
Page 19
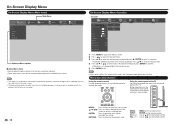
... Example Audio Setup Closed Caption Surround Auto Volume Control Bass Treble Balance Lip Sync TV Speakers Audio Only Digital Audio Out Analog Audio Out Equalizer Settings Reset Audio Mode [Movie] [On] 0 0 0 0 [On] [PCM] [Fixed] Off Movie News View Mode Channel Sleep Timer 1 Press MENU to display the MENU.... On-Screen Display Menu On-Screen Display Menu (Main menu) Main Menu Input TV AV IN Component HDMI-1 HDMI-2 HDMI-3(Side) Picture Audio Setup Closed Caption View Mode Submenu/Menu options ■■About Menu Items • Item displayed in gray indicates that the item...
... Example Audio Setup Closed Caption Surround Auto Volume Control Bass Treble Balance Lip Sync TV Speakers Audio Only Digital Audio Out Analog Audio Out Equalizer Settings Reset Audio Mode [Movie] [On] 0 0 0 0 [On] [PCM] [Fixed] Off Movie News View Mode Channel Sleep Timer 1 Press MENU to display the MENU.... On-Screen Display Menu On-Screen Display Menu (Main menu) Main Menu Input TV AV IN Component HDMI-1 HDMI-2 HDMI-3(Side) Picture Audio Setup Closed Caption View Mode Submenu/Menu options ■■About Menu Items • Item displayed in gray indicates that the item...
Operation Manual
Page 20
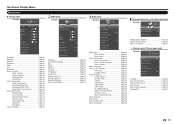
... 21 Audio menu Example Audio Surround Auto Volume Control Bass Treble Balance Lip Sync TV Speakers Audio Only Digital Audio Out Analog Audio Out Equalizer Settings Reset Audio Mode [Movie] [On] 0 0 0 0 [On] [PCM] [Fixed] Surround Page 21 Auto Volume Control Page 21 Bass ... Analog MTS Page 24 19 On-Screen Display Menu Menu Items Picture menu Example Picture AV Mode [Standard (Energy Star)] Backlight 80 Contrast 52 Brightness 50 Color 60 Tint 0 Sharpness 2 Size & Position Color Temperature Advanced Picture Reset AV Mode AV Mode Page 20 Backlight Page 20 Contrast...
... 21 Audio menu Example Audio Surround Auto Volume Control Bass Treble Balance Lip Sync TV Speakers Audio Only Digital Audio Out Analog Audio Out Equalizer Settings Reset Audio Mode [Movie] [On] 0 0 0 0 [On] [PCM] [Fixed] Surround Page 21 Auto Volume Control Page 21 Bass ... Analog MTS Page 24 19 On-Screen Display Menu Menu Items Picture menu Example Picture AV Mode [Standard (Energy Star)] Backlight 80 Contrast 52 Brightness 50 Color 60 Tint 0 Sharpness 2 Size & Position Color Temperature Advanced Picture Reset AV Mode AV Mode Page 20 Backlight Page 20 Contrast...

Operation Manual
Page 21
... operating the on the input source. • You can configure the settings according to the type of the color temperature settings. • Cool: Produces a blue-hued picture. • Normal: Optimized for more sharpness. Contrast Adjusts the contrast level. Select from the following picture settings. You can set the mode for each of the game. • DYNAMIC: For...
... operating the on the input source. • You can configure the settings according to the type of the color temperature settings. • Cool: Produces a blue-hued picture. • Normal: Optimized for more sharpness. Contrast Adjusts the contrast level. Select from the following picture settings. You can set the mode for each of the game. • DYNAMIC: For...
Operation Manual
Page 22
...TV provides various advanced functions for stronger treble. Reset AV Mode Restores the Picture settings to "Movie" or "News". (See page 21.) Treble Adjusts the treble level. NOTE • For operating the on . In this case, please refer to enhance picture fluency. • Off: No adjustment. • High/Medium/Low:...] [On] [Low] [Low] [Auto] Echance Color Reduces over saturation of some discs, setup may be turned off enven though the TV speaker is set in the picture. Film Mode Optimizes the picture for viewing a clearer video image. Press any key to your BD/ DVD player.
...TV provides various advanced functions for stronger treble. Reset AV Mode Restores the Picture settings to "Movie" or "News". (See page 21.) Treble Adjusts the treble level. NOTE • For operating the on . In this case, please refer to enhance picture fluency. • Off: No adjustment. • High/Medium/Low:...] [On] [Low] [Low] [Auto] Echance Color Reduces over saturation of some discs, setup may be turned off enven though the TV speaker is set in the picture. Film Mode Optimizes the picture for viewing a clearer video image. Press any key to your BD/ DVD player.

Operation Manual
Page 30
... extremely high level of technology. The TV has pixels (dots) that are securely attached. See "Advanced Picture Settings" on page 21. • Check all cables to ensure they are always dark or always lit. ... your TV's display capabilities. Devices differ; The display image does not cover the entire screen. • Set the TV image mode so that are connected to the TV. • Ensure all cables are using digital... On. See "Auto Channel Scan" on page 20. • Reset the picture settings. see "noise" or static on page 21. • Ensure the speakers are only pressing one ...
... extremely high level of technology. The TV has pixels (dots) that are securely attached. See "Advanced Picture Settings" on page 21. • Check all cables to ensure they are always dark or always lit. ... your TV's display capabilities. Devices differ; The display image does not cover the entire screen. • Set the TV image mode so that are connected to the TV. • Ensure all cables are using digital... On. See "Auto Channel Scan" on page 20. • Reset the picture settings. see "noise" or static on page 21. • Ensure the speakers are only pressing one ...

Operation Manual
Page 43
Troubleshooting Having trouble completing setup? Don't worry: it's usually an easy fix. If you cannot see a picture on your TV: đ Make sure your TV is set to change video inputs. Most TVs have an Input button on your TV or home theater receiver is turned on. (This tip could save you some embarrassment.) đ Make sure the video input on the remote control to match the output (usually HDMI or MHL) used with the Roku Streaming Stick.
Troubleshooting Having trouble completing setup? Don't worry: it's usually an easy fix. If you cannot see a picture on your TV: đ Make sure your TV is set to change video inputs. Most TVs have an Input button on your TV or home theater receiver is turned on. (This tip could save you some embarrassment.) đ Make sure the video input on the remote control to match the output (usually HDMI or MHL) used with the Roku Streaming Stick.


