
LC-32D59U | LC42D69U Operation Manual
Page 10
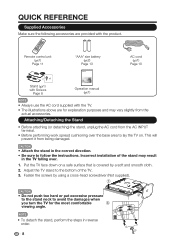
...detaching) the stand, unplug the AC cord from being damaged. This will prevent it from the AC INPUT terminal. • Before performing work spread cushioning over . 1. Incorrect installation of the TV. 3. CAUTION • Do not push too hard or put excessive pressure 2 to the stand neck ... battery ( X2) Page 13 Operation manual ( X1) AC cord ( X1) Page 10 • Always use the AC cord supplied with the TV. • The illustrations above are provided with the product. QUICK REFERENCE Supplied Accessories Make sure the following accessories are for the most comfortable 3 viewing...
...detaching) the stand, unplug the AC cord from being damaged. This will prevent it from the AC INPUT terminal. • Before performing work spread cushioning over . 1. Incorrect installation of the TV. 3. CAUTION • Do not push too hard or put excessive pressure 2 to the stand neck ... battery ( X2) Page 13 Operation manual ( X1) AC cord ( X1) Page 10 • Always use the AC cord supplied with the TV. • The illustrations above are provided with the product. QUICK REFERENCE Supplied Accessories Make sure the following accessories are for the most comfortable 3 viewing...
LC-32D59U | LC42D69U Operation Manual
Page 12
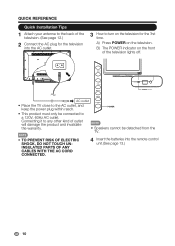
...; Speakers cannot be connected to the AC outlet, and POWER keep the power plug within reach. • This product must only be detached from the TV. • TO PREVENT RISK OF ELECTRIC SHOCK, DO NOT TOUCH UNINSULATED PARTS OF ANY CABLES WITH THE AC CORD CONNECTED. 4 Insert the batteries into the... AC outlet. 3 How to turn on the television. CH + VOL MENU POWER indicator INPUT AC outlet POWER • Place the TV close to a 120V, 60Hz AC outlet. A) Press POWER on the television for the ?rst time.
...; Speakers cannot be connected to the AC outlet, and POWER keep the power plug within reach. • This product must only be detached from the TV. • TO PREVENT RISK OF ELECTRIC SHOCK, DO NOT TOUCH UNINSULATED PARTS OF ANY CABLES WITH THE AC CORD CONNECTED. 4 Insert the batteries into the... AC outlet. 3 How to turn on the television. CH + VOL MENU POWER indicator INPUT AC outlet POWER • Place the TV close to a 120V, 60Hz AC outlet. A) Press POWER on the television for the ?rst time.
LC-32D59U | LC42D69U Operation Manual
Page 13
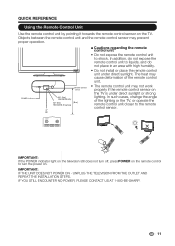
... REPEAT THE INSTALLATION STEPS. IF YOU STILL ENCOUNLTCDTEV R NO POWER, PLEASE CONTACT US AT 1-800-BE-SHARP. QUICK REFERENCE Using the Remote Control Unit Use the remote control unit by pointing it towards the remote ... P LCDGTJV221 4 2 7 5 DISPLAY 8 6 + FREEZE 0 AUDIO 9 ENT VOL MUTE FLASHBACK TV SURROUND USB CH PC MENU INPUT A SLEEP CCBFAVVIEOWRMITOCEDECAHV D MODE GLJC2D21TV 4 7 2 INPUT 5 8 0 FREEZE DISPLAY + 6 VOL 9 ENFTLASHBACK AUDIO MUTE SURROUND TV USB CH MENU PC A SLE E FAV P ORITE B CC CH C VIEW MODEADV MODE LCDGTJV221 IMPORTANT...
... REPEAT THE INSTALLATION STEPS. IF YOU STILL ENCOUNLTCDTEV R NO POWER, PLEASE CONTACT US AT 1-800-BE-SHARP. QUICK REFERENCE Using the Remote Control Unit Use the remote control unit by pointing it towards the remote ... P LCDGTJV221 4 2 7 5 DISPLAY 8 6 + FREEZE 0 AUDIO 9 ENT VOL MUTE FLASHBACK TV SURROUND USB CH PC MENU INPUT A SLEEP CCBFAVVIEOWRMITOCEDECAHV D MODE GLJC2D21TV 4 7 2 INPUT 5 8 0 FREEZE DISPLAY + 6 VOL 9 ENFTLASHBACK AUDIO MUTE SURROUND TV USB CH MENU PC A SLE E FAV P ORITE B CC CH C VIEW MODEADV MODE LCDGTJV221 IMPORTANT...
LC-32D59U | LC42D69U Operation Manual
Page 17
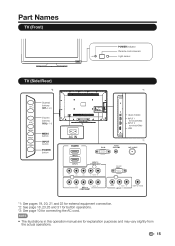
.... 15 AUDIO -R RS-232C IOIOI VIDEO L- AUDIO -R Y PB PR L- Part Names TV (Front) POWER indicator Remote control sensor Light sensor TV (Side/Rear) *2 Channel buttons CH (CH / ) + VOL MENU INPUT POWER Volume buttons (VOL+ / _) MENU button INPUT button POWER button *3 AC IN *1 HEAD PHONE HEAD PHONE INPUT 1 INPUT 1 INPUT 2 terminal (HDMI) INPUT 2 terminal (HDMI) USB USB *1 Y PB PR L-
.... 15 AUDIO -R RS-232C IOIOI VIDEO L- AUDIO -R Y PB PR L- Part Names TV (Front) POWER indicator Remote control sensor Light sensor TV (Side/Rear) *2 Channel buttons CH (CH / ) + VOL MENU INPUT POWER Volume buttons (VOL+ / _) MENU button INPUT button POWER button *3 AC IN *1 HEAD PHONE HEAD PHONE INPUT 1 INPUT 1 INPUT 2 terminal (HDMI) INPUT 2 terminal (HDMI) USB USB *1 Y PB PR L-
LC-32D59U | LC42D69U Operation Manual
Page 18
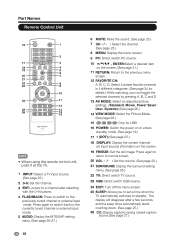
...0-9 buttons. 4 FLASHBACK: Press to switch to standby. Part Names Remote Control Unit POWER 16 INPUT 1 1 2 3 4 5 6 2 17 /7 8 0 9 ENT 3 18 19 DIS P LAY F RE E Z E AUDIO FLASHBACK 4 MUTE + 5 6 20 21 `VOL SURROUND CH 7 TV USB PC MENU 22 8 23 9 24 25 26 EXIT ENTER RETURN A SLEEP FAVORITE CH ...D CC VIEW MODE AV MODE 10 11 12 13 14 15 LCDTV GJ221 • When using the remote control unit, point it at the TV. 1 INPUT: Select a TV input source. (See page 25.) 2 0-9: Set the channel. 3 ENT: Jumps to a channel after a few seconds, and the sleep timer ...
...0-9 buttons. 4 FLASHBACK: Press to switch to standby. Part Names Remote Control Unit POWER 16 INPUT 1 1 2 3 4 5 6 2 17 /7 8 0 9 ENT 3 18 19 DIS P LAY F RE E Z E AUDIO FLASHBACK 4 MUTE + 5 6 20 21 `VOL SURROUND CH 7 TV USB PC MENU 22 8 23 9 24 25 26 EXIT ENTER RETURN A SLEEP FAVORITE CH ...D CC VIEW MODE AV MODE 10 11 12 13 14 15 LCDTV GJ221 • When using the remote control unit, point it at the TV. 1 INPUT: Select a TV input source. (See page 25.) 2 0-9: Set the channel. 3 ENT: Jumps to a channel after a few seconds, and the sleep timer ...
LC-32D59U | LC42D69U Operation Manual
Page 19
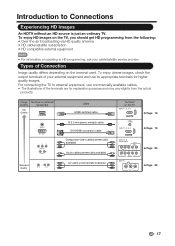
... cable (commercially available) Terminal on updating to Connections Experiencing HD Images An HDTV without an HD source is just an ordinary TV. AUDIO -R INPUT 7 VIDEO L- Types of your cable/satellite service provider. To enjoy clearer images, check the output terminals of Connection Image quality... HD quality antenna • HD cable/satellite subscription • HD compatible external equipment • For information on the TV INPUT 1, 2, 3, 4 Page 19 INPUT 1, 2, 3, 4 Page 19 INPUT 5, 6 (COMPONENT) Y PB PR L- AUDIO -R Page 20 Page 20 17 To enjoy HD images on the...
... cable (commercially available) Terminal on updating to Connections Experiencing HD Images An HDTV without an HD source is just an ordinary TV. AUDIO -R INPUT 7 VIDEO L- Types of your cable/satellite service provider. To enjoy clearer images, check the output terminals of Connection Image quality... HD quality antenna • HD cable/satellite subscription • HD compatible external equipment • For information on the TV INPUT 1, 2, 3, 4 Page 19 INPUT 1, 2, 3, 4 Page 19 INPUT 5, 6 (COMPONENT) Y PB PR L- AUDIO -R Page 20 Page 20 17 To enjoy HD images on the...
LC-32D59U | LC42D69U Operation Manual
Page 20
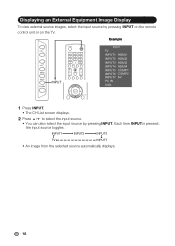
... INPUT5 COMP1 INPUT6 COMP2 INPUT7 AV PC IN USB 1 Press INPUT. • The CH List screen displays. 2 Press / to select the input source. • You can also select the input source by pressing INPUT on the remote control unit or on the TV. INPUT1 INPUT2 INPUT3 TV INPUT7 • An image from the selected source automatically...
... INPUT5 COMP1 INPUT6 COMP2 INPUT7 AV PC IN USB 1 Press INPUT. • The CH List screen displays. 2 Press / to select the input source. • You can also select the input source by pressing INPUT on the remote control unit or on the TV. INPUT1 INPUT2 INPUT3 TV INPUT7 • An image from the selected source automatically...
LC-32D59U | LC42D69U Operation Manual
Page 21
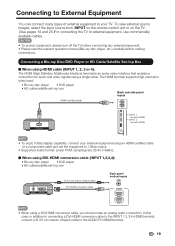
... • HD cable/satellite set-top box Back and side panel inputs HDMI-certified cable HDMI OUT INPUT 1 INPUT 1 INPUT 2 terminal (HDMI) INPUT 2 terminal (HDMI) USB • To enjoy 1080p display capability, connect your TV. In this case, in addition to connecting a DVI-HDMI conversion... OUT Ø 3.5 mm stereo minijack cable DVI-HDMI conversion cable Back panel vertical inputs • When using a single cable. CAUTION • To protect equipment, always turn off the TV before connecting any external equipment. • Please read the relevant operation manual (Blu-...
... • HD cable/satellite set-top box Back and side panel inputs HDMI-certified cable HDMI OUT INPUT 1 INPUT 1 INPUT 2 terminal (HDMI) INPUT 2 terminal (HDMI) USB • To enjoy 1080p display capability, connect your TV. In this case, in addition to connecting a DVI-HDMI conversion... OUT Ø 3.5 mm stereo minijack cable DVI-HDMI conversion cable Back panel vertical inputs • When using a single cable. CAUTION • To protect equipment, always turn off the TV before connecting any external equipment. • Please read the relevant operation manual (Blu-...
LC-32D59U | LC42D69U Operation Manual
Page 23
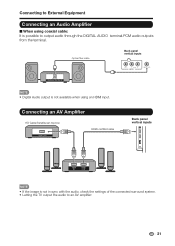
... box HDMI OUT HDMI-certified cable Back panel vertical inputs INPUT 1 INPUT 2 USB HDMI IN HDMI OUT • If the image is possible to an AV amplifier: 21 Optical fiber cable Back panel vertical inputs VIDEO L- Connecting to External Equipment Connecting an Audio Amplifi...er When using an HDMI input. AUDIO -R DIGITAL AUDIO OPTICAL DIGITAL AUDIO INPUT • Digital Audio output is not available when using coaxial cable: It is not in sync with the audio, check the settings of the connected surround system. • Letting the TV output the audio to ...
... box HDMI OUT HDMI-certified cable Back panel vertical inputs INPUT 1 INPUT 2 USB HDMI IN HDMI OUT • If the image is possible to an AV amplifier: 21 Optical fiber cable Back panel vertical inputs VIDEO L- Connecting to External Equipment Connecting an Audio Amplifi...er When using an HDMI input. AUDIO -R DIGITAL AUDIO OPTICAL DIGITAL AUDIO INPUT • Digital Audio output is not available when using coaxial cable: It is not in sync with the audio, check the settings of the connected surround system. • Letting the TV output the audio to ...
LC-32D59U | LC42D69U Operation Manual
Page 24
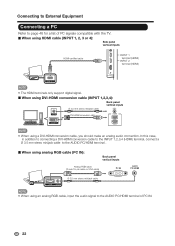
...this case, in addition to connecting a DVI-HDMI conversion cable to the INPUT 1,2,3,4 (HDMI) terminal, connect a Ø 3.5 mm stereo minijack cable to the AUDIO PC/HDMI terminal of PC signals compatible with the TV. When using a DVI-HDMI conversion cable, you should make an analog ...audio connection. When using DVI-HDMI conversion cable (INPUT 1,2,3,4): Back panel vertical inputs Ø 3.5 mm stereo minijack cable AUDIO DVI-HDMI conversion ...
...this case, in addition to connecting a DVI-HDMI conversion cable to the INPUT 1,2,3,4 (HDMI) terminal, connect a Ø 3.5 mm stereo minijack cable to the AUDIO PC/HDMI terminal of PC signals compatible with the TV. When using a DVI-HDMI conversion cable, you should make an analog ...audio connection. When using DVI-HDMI conversion cable (INPUT 1,2,3,4): Back panel vertical inputs Ø 3.5 mm stereo minijack cable AUDIO DVI-HDMI conversion ...
LC-32D59U | LC42D69U Operation Manual
Page 25
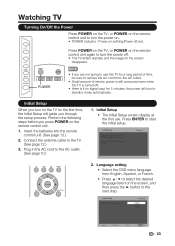
... the power off . • there is turned off . • The TV enters standby and the image on the remote control unit. 1. POWER POWER • Small amount of electric power is still consumed even when the TV is If no signal input for 5 minutes, the power will guide you are not going to... use this TV for the first time, the Initial Setup will turn on the screen, and then press the...
... the power off . • there is turned off . • The TV enters standby and the image on the remote control unit. 1. POWER POWER • Small amount of electric power is still consumed even when the TV is If no signal input for 5 minutes, the power will guide you are not going to... use this TV for the first time, the Initial Setup will turn on the screen, and then press the...
LC-32D59U | LC42D69U Operation Manual
Page 27
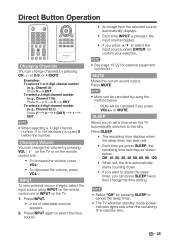
..., the time automatically starts counting down. • If you want to cancel the sleep timer. • The TV will be canceled by using INPUT on the remote control unit or INPUT on the remote control unit. • To increase the volume, press VOL, . • To decrease the...: To select a 1 or 2-digit channel number (e. on the TV or on the TV. 1. To select a 4-digit channel number (e. Press INPUT again to select the input source. • An image from the selected source automatically displays. • Each time INPUT is not necessary to confirm your selection. • See...
..., the time automatically starts counting down. • If you want to cancel the sleep timer. • The TV will be canceled by using INPUT on the remote control unit or INPUT on the remote control unit. • To increase the volume, press VOL, . • To decrease the...: To select a 1 or 2-digit channel number (e. on the TV or on the TV. 1. To select a 4-digit channel number (e. Press INPUT again to select the input source. • An image from the selected source automatically displays. • Each time INPUT is not necessary to confirm your selection. • See...
LC-32D59U | LC42D69U Operation Manual
Page 28
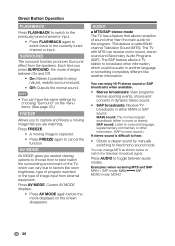
...; Obtain a clearer sound by choosing "Surround" on the screen disappears. AUDIO ■ MTS/SAP stereo mode The TV has a feature that allows reception of image input from external equipment. Current AV MODE displays. • Press AV MODE again before the mode displayed on the menu ...called Multichannel Television Sound (MTS). Press FREEZE. • A moving image that you several viewing options to the currently tuned channel or input. You can have the same settings by manually switching to a second language, supplementary commentary or other than the main audio for the...
...; Obtain a clearer sound by choosing "Surround" on the screen disappears. AUDIO ■ MTS/SAP stereo mode The TV has a feature that allows reception of image input from external equipment. Current AV MODE displays. • Press AV MODE again before the mode displayed on the menu ...called Multichannel Television Sound (MTS). Press FREEZE. • A moving image that you several viewing options to the currently tuned channel or input. You can have the same settings by manually switching to a second language, supplementary commentary or other than the main audio for the...
LC-32D59U | LC42D69U Operation Manual
Page 29
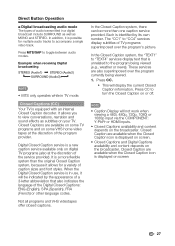
...the program being viewed. 1. The "CC1" to turn the Closed Caption on screen 27 Press CC to "CC4" services display subtitles of TV programs superimposed over the program currently being viewed (e.g., weather or news). Closed Caption are also superimposed over the program's picture. Press CC. ...~ This will not work when viewing a 480i, 480p, 720p, 1080i or 1080p input via the COMPONENT: Y-PbPr or HDMI inputs. Closed Caption are available on some VHS home video tapes at the discretion of the service provider). Not all programs ...
...the program being viewed. 1. The "CC1" to turn the Closed Caption on screen 27 Press CC to "CC4" services display subtitles of TV programs superimposed over the program currently being viewed (e.g., weather or news). Closed Caption are also superimposed over the program's picture. Press CC. ...~ This will not work when viewing a 480i, 480p, 720p, 1080i or 1080p input via the COMPONENT: Y-PbPr or HDMI inputs. Closed Caption are available on some VHS home video tapes at the discretion of the service provider). Not all programs ...
LC-32D59U | LC42D69U Operation Manual
Page 31
... Mode 32 DNR 32 VGA 32 Ambient Light Sensor 32 Audio Menu 33 Balance 33 Bass 33 Treble 33 Surround 33 Equalizer 33 Speaker 33 TV Menu 34 Tuner Mode 34 Auto CH Search 34 CH Skip 34 Audio Mode 34 Audio Language 34 Favorite Channels 34 Setup Menu 35 OSD... 36 Reset 36 Parental Menu 37 Channel Block 37 Program Block 37 Rating Enable 38 U.S. TV Ratings 38 U.S. Movie Ratings 39 Canadian English Ratings 39 Canadian French Ratings 40 Open V-Chip 40 Block Unrated 40 Input Block 40 Change Password 40 Clean All 40 USB 41 Browse the file folder 41 View...
... Mode 32 DNR 32 VGA 32 Ambient Light Sensor 32 Audio Menu 33 Balance 33 Bass 33 Treble 33 Surround 33 Equalizer 33 Speaker 33 TV Menu 34 Tuner Mode 34 Auto CH Search 34 CH Skip 34 Audio Mode 34 Audio Language 34 Favorite Channels 34 Setup Menu 35 OSD... 36 Reset 36 Parental Menu 37 Channel Block 37 Program Block 37 Rating Enable 38 U.S. TV Ratings 38 U.S. Movie Ratings 39 Canadian English Ratings 39 Canadian French Ratings 40 Open V-Chip 40 Block Unrated 40 Input Block 40 Change Password 40 Clean All 40 USB 41 Browse the file folder 41 View...
LC-32D59U | LC42D69U Operation Manual
Page 32
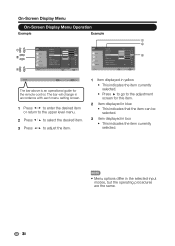
... Advanced Video Ambient Light Sensor User 50 50 50 0 10 On Enter Enter Select Return Exit 1 2 Video AV Mode User Brightness 50 Audio TV Setup Contrast Saturation Hue Sharpness Color Temperature Advanced Video 50 50 3 0 10 Parental Ambient Light Sensor On Video Enter Enter Select Return Exit ▼▲ ▼ Video Enter... indicates that the item can be selected. 3 Item displayed in box • This indicates the item currently selected. • Menu options differ in the selected input modes, but the operating procedures are the same. 30
... Advanced Video Ambient Light Sensor User 50 50 50 0 10 On Enter Enter Select Return Exit 1 2 Video AV Mode User Brightness 50 Audio TV Setup Contrast Saturation Hue Sharpness Color Temperature Advanced Video 50 50 3 0 10 Parental Ambient Light Sensor On Video Enter Enter Select Return Exit ▼▲ ▼ Video Enter... indicates that the item can be selected. 3 Item displayed in box • This indicates the item currently selected. • Menu options differ in the selected input modes, but the operating procedures are the same. 30
LC-32D59U | LC42D69U Operation Manual
Page 33
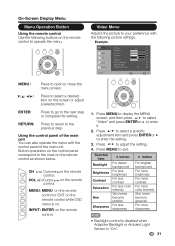
... + VOL - ENTER: Press to go to exit. Button operations on the control panel correspond to operate the menu. Example Video Audio TV Setup Parental AV Mode Brightness Contrast Saturation Hue Sharpness Color Temperature Advanced Video Ambient Light Sensor User 50 50 50 0 10 On Video Enter Enter Select Return Exit... picture settings. MENU: MENU on the remote control or EXIT on the MENU remote control while OSD INPUT menu is "On". 31 Press MENU to the next step or complete the setting. TV USB PC MENU EXIT ENTER RETURN MENU : Press to open or close the menu screen. ◄/&#...
... + VOL - ENTER: Press to go to exit. Button operations on the control panel correspond to operate the menu. Example Video Audio TV Setup Parental AV Mode Brightness Contrast Saturation Hue Sharpness Color Temperature Advanced Video Ambient Light Sensor User 50 50 50 0 10 On Video Enter Enter Select Return Exit... picture settings. MENU: MENU on the remote control or EXIT on the MENU remote control while OSD INPUT menu is "On". 31 Press MENU to the next step or complete the setting. TV USB PC MENU EXIT ENTER RETURN MENU : Press to open or close the menu screen. ◄/&#...
LC-32D59U | LC42D69U Operation Manual
Page 34
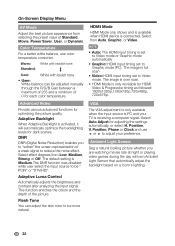
... day with bluish tone • User: White balance can adjust the skin color to adjust your TV is set to Video mode or Graphic mode automatically • Graphic: HDMI input timing set to reduce the noise effect. Select Auto Adjust for optimizing the picture quality. Position, ... that automtically adjust the backlight based on a room's lighting. 32 Select from Auto, Graphic, or Video. • Auto: The HDMI input timing is receiving a computer signal. Advanced Video Provide various advanced functions for adjusting the settings automatically, or select H. Flesh Tone You can ...
... day with bluish tone • User: White balance can adjust the skin color to adjust your TV is set to Video mode or Graphic mode automatically • Graphic: HDMI input timing set to reduce the noise effect. Select Auto Adjust for optimizing the picture quality. Position, ... that automtically adjust the backlight based on a room's lighting. 32 Select from Auto, Graphic, or Video. • Auto: The HDMI input timing is receiving a computer signal. Advanced Video Provide various advanced functions for adjusting the settings automatically, or select H. Flesh Tone You can ...
LC-32D59U | LC42D69U Operation Manual
Page 39
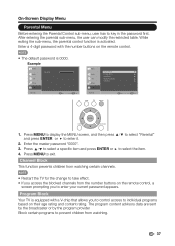
...select a specific item and press ENTER or ► to individual programs based on their age rating and content rating. Program Block Your TV is equipped with the number buttons on the remote control, a screen prompting you to control access to select the item. 4. Press MENU to..., user has to exit. Example Video Audio Password TV Setup Parental Parental Enter Enter Select Return Exit Video Audio TV Setup Parental Parental Channel Block Program Block Input Block Change Password Clean ALL Enter Enter Select Return Exit TV USB PC MENU EXIT ENTER RETURN 1. Enter the ...
...select a specific item and press ENTER or ► to individual programs based on their age rating and content rating. Program Block Your TV is equipped with the number buttons on the remote control, a screen prompting you to control access to select the item. 4. Press MENU to..., user has to exit. Example Video Audio Password TV Setup Parental Parental Enter Enter Select Return Exit Video Audio TV Setup Parental Parental Channel Block Program Block Input Block Change Password Clean ALL Enter Enter Select Return Exit TV USB PC MENU EXIT ENTER RETURN 1. Enter the ...
LC-32D59U | LC42D69U Operation Manual
Page 43
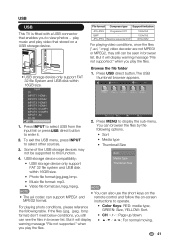
...3872x2952 For playing video conditions, once the files (*.avi, *.mpg) video decoder are not MPEG1 or MPEG2, they still can be supported to this function. 4. Input TV INPUT1 HDMI1 INPUT2 HDMI2 INPUT3 HDMI3 INPUT4 HDMI4 INPUT5 COMP1 INPUT6 COMP2 INPUT7 AV PC IN USB 1. remote control and follow the on a USB storage... the short keys on the • The avi codec can see the files in browser list. But it . 2. To exit the USB menu, press INPUT to display the sub-menu. when you play the files. • USB storage device only support FAT 32 file System and USB disk within...
...3872x2952 For playing video conditions, once the files (*.avi, *.mpg) video decoder are not MPEG1 or MPEG2, they still can be supported to this function. 4. Input TV INPUT1 HDMI1 INPUT2 HDMI2 INPUT3 HDMI3 INPUT4 HDMI4 INPUT5 COMP1 INPUT6 COMP2 INPUT7 AV PC IN USB 1. remote control and follow the on a USB storage... the short keys on the • The avi codec can see the files in browser list. But it . 2. To exit the USB menu, press INPUT to display the sub-menu. when you play the files. • USB storage device only support FAT 32 file System and USB disk within...


