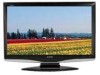
Operation Manual
Page 6
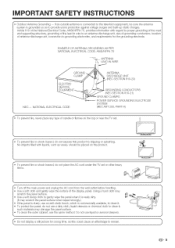
To prevent fire or shock hazard, do not place the AC cord under the TV set . _ j ,,To prevent fire or shock hazard, do not use a dirty cloth, liquid cleaners or chemical cloth to clean it, such materials may scratch the panel ... CODE /:_ I "_ IN WIRE ANTENNA DISCHARGE UNIT NEC -- if an outside antenna is connected to the television equipment, be placed on the top or near the TV set or other heavy items. f " Turn off the main power and unplug the AC cord from the wall outlet before handling. ,, Use a soft cloth and gently...
To prevent fire or shock hazard, do not place the AC cord under the TV set . _ j ,,To prevent fire or shock hazard, do not use a dirty cloth, liquid cleaners or chemical cloth to clean it, such materials may scratch the panel ... CODE /:_ I "_ IN WIRE ANTENNA DISCHARGE UNIT NEC -- if an outside antenna is connected to the television equipment, be placed on the top or near the TV set or other heavy items. f " Turn off the main power and unplug the AC cord from the wall outlet before handling. ,, Use a soft cloth and gently...
Operation Manual
Page 8
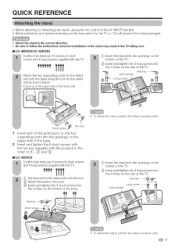
... sure to follow the instructions, incorrect installation of the stand may result in the "IV failing over tile base area to lay the TV on the rear of the TV. (_) Insert and tighten the 4 long screws into the 4 holes on . Thb will prevent it from the AC INPUT terminal. • Before... performing work spread cushioning over . [] LC-46D43U/LC-52D43U Confirm that there are 10 screws (6 short screws and 4 long screws) supplied with the TV, "'" TTTT 1_ Insert the stand into the openings on the bottom of the...
... sure to follow the instructions, incorrect installation of the stand may result in the "IV failing over tile base area to lay the TV on the rear of the TV. (_) Insert and tighten the 4 long screws into the 4 holes on . Thb will prevent it from the AC INPUT terminal. • Before... performing work spread cushioning over . [] LC-46D43U/LC-52D43U Confirm that there are 10 screws (6 short screws and 4 long screws) supplied with the TV, "'" TTTT 1_ Insert the stand into the openings on the bottom of the...
Operation Manual
Page 11
...LCD TV set are shown on the inside back cover. adjustment 32 Language setting 33 Image position 33 Reset 33 Input Label 34 Sleep Timer 34 View Mode for 4:3 Programs 35 View Mode for HD Programs 35 View Mode (for PC input mode 36 Advanced Option settings... ....... 31 Input Skip 31 Useful adjustment settings 32 Auto Sync. Contents iMPORTANT iNFORMATiON 1 Trademarks 2 DEAR SHARP CUSTOMER 3 iMPORTANT SAFETY INSTRUCTIONS 3 Supplied accessories 6 QUICK REFERENCE 6 Attaching the stand 6 Contents 10 Part names 1t TV (Front 11 TV (Rear/Top 11 Remote control unit 12...
...LCD TV set are shown on the inside back cover. adjustment 32 Language setting 33 Image position 33 Reset 33 Input Label 34 Sleep Timer 34 View Mode for 4:3 Programs 35 View Mode for HD Programs 35 View Mode (for PC input mode 36 Advanced Option settings... ....... 31 Input Skip 31 Useful adjustment settings 32 Auto Sync. Contents iMPORTANT iNFORMATiON 1 Trademarks 2 DEAR SHARP CUSTOMER 3 iMPORTANT SAFETY INSTRUCTIONS 3 Supplied accessories 6 QUICK REFERENCE 6 Attaching the stand 6 Contents 10 Part names 1t TV (Front 11 TV (Rear/Top 11 Remote control unit 12...
Operation Manual
Page 13
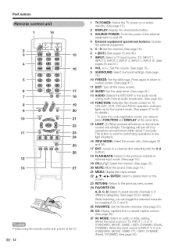
...a desired item on and eft. 4 External equipment operational buttons: Operate the external equipment. 5 0 - 9: Set the channel. (See page 18.) 6 {DOT): (See pages 18 and 49.) 7 INPUT: Sebct a TV input source. (TV, INPUT 1 INPUT 2, INPUT 3, INPUT 4, INPUT 5, INPUT 6) (See pages 30 and 31 .) 8 ...VOL +/- : Set the w)lume. (See page 19.) 9 SURROUND: Sebct Surround settings. (See page fg.) 10 FREEZE: Set the still image. Q- 12 1 TV POWER: Switch the TV power on or enters standby...
...a desired item on and eft. 4 External equipment operational buttons: Operate the external equipment. 5 0 - 9: Set the channel. (See page 18.) 6 {DOT): (See pages 18 and 49.) 7 INPUT: Sebct a TV input source. (TV, INPUT 1 INPUT 2, INPUT 3, INPUT 4, INPUT 5, INPUT 6) (See pages 30 and 31 .) 8 ...VOL +/- : Set the w)lume. (See page 19.) 9 SURROUND: Sebct Surround settings. (See page fg.) 10 FREEZE: Set the still image. Q- 12 1 TV POWER: Switch the TV power on or enters standby...
Operation Manual
Page 14
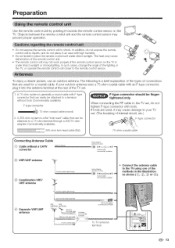
... cable to the remote control sensor. If tools are used , it into the antenna terminal at the rear of the TV set . (The breaking of internal circuit, etc.) 2. Separate VHF/UHF antenna VHF UHF ANTENNA ANTENNA 300/75_hm adapter (oommemially available) To...following is under direct sunlight. A 300-ohm system is generally a round cable with an F-type connector, plug it may prevent proper operation. If your TV set . _. F-type connector __- 75-ohm coaxial cable (round) f _ F=type connector should be finger= tightened only. Preparation Use the remote control...
... cable to the remote control sensor. If tools are used , it into the antenna terminal at the rear of the TV set . (The breaking of internal circuit, etc.) 2. Separate VHF/UHF antenna VHF UHF ANTENNA ANTENNA 300/75_hm adapter (oommemially available) To...following is under direct sunlight. A 300-ohm system is generally a round cable with an F-type connector, plug it may prevent proper operation. If your TV set . _. F-type connector __- 75-ohm coaxial cable (round) f _ F=type connector should be finger= tightened only. Preparation Use the remote control...
Operation Manual
Page 16
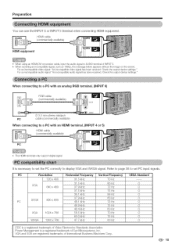
...terminals only support digital signal. Refer to page 38 to AUDIO terminal of Video Electronics Standards Association. Check the output device settings." For an incompatible audio signal: "An incompatible audio signal has been received. PC Resolution Horizontal Frequency Vertical Frequency VESA Standard ...when connecting HDMI cable (commercially available) HDMI equipment. • When using an HDMbDVI conversion cable, input the audio signal to set the PC correctly to a PC with an NDMI terminal. For an incompatible video signal: "An incompatible video signal has been received...
...terminals only support digital signal. Refer to page 38 to AUDIO terminal of Video Electronics Standards Association. Check the output device settings." For an incompatible audio signal: "An incompatible audio signal has been received. PC Resolution Horizontal Frequency Vertical Frequency VESA Standard ...when connecting HDMI cable (commercially available) HDMI equipment. • When using an HDMbDVI conversion cable, input the audio signal to set the PC correctly to a PC with an NDMI terminal. For an incompatible video signal: "An incompatible video signal has been received...
Operation Manual
Page 17
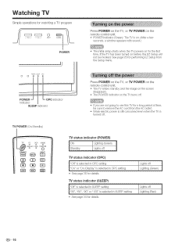
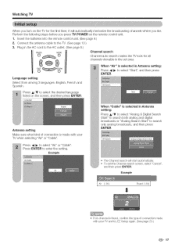
... indicator ndicator Press POWER on the TV, or TV POWER on the remote control unit. TV status indicator (SLEEP) i "Off" is selected in OPC setting ., See page 26 for details. The TV enters standby and the image on the screen disappears. Watching TV Simple operations for watching a W program...Weak electric power is still consumed even when the TV is selected in SLEEP setting ., See page 34 for details. TV POWER (On/Standby) O%:!o:o SOURCE LIGHT GE) (3D REC (3D (3] (E9 (E9 @ TV status indicator (POWER) ON Standby Lighting (Green) 1 m _ TV status indicator (OPC) I ""OOfnf"" iosr ...
... indicator ndicator Press POWER on the TV, or TV POWER on the remote control unit. TV status indicator (SLEEP) i "Off" is selected in OPC setting ., See page 26 for details. The TV enters standby and the image on the screen disappears. Watching TV Simple operations for watching a W program...Weak electric power is still consumed even when the TV is selected in SLEEP setting ., See page 34 for details. TV POWER (On/Standby) O%:!o:o SOURCE LIGHT GE) (3D REC (3D (3] (E9 (E9 @ TV status indicator (POWER) ON Standby Lighting (Green) 1 m _ TV status indicator (OPC) I ""OOfnf"" iosr ...
Operation Manual
Page 18
...the AC cord to select "Start", and then press ENTER. Language Antenna setting Make sure what kind of connection made with your TV when selecting "Air" or "Cable". OH Search When "Cable" is selected in Antenna setting: Press 4/1_ to the AC outlet. (See page 8.) Channel search Channel... the broadcasting channels where you live. Watching TV When you turn on the TV for all channels viewable in the set area. Connect the antenna cable to enter the setting. Press ENTER to the TV. (See page 13.) 3. When "Air" is selected in Antenna setting: Press A/Y to select "Analog & Digital...
...the AC cord to select "Start", and then press ENTER. Language Antenna setting Make sure what kind of connection made with your TV when selecting "Air" or "Cable". OH Search When "Cable" is selected in Antenna setting: Press 4/1_ to the AC outlet. (See page 8.) Channel search Channel... the broadcasting channels where you live. Watching TV When you turn on the TV for all channels viewable in the set area. Connect the antenna cable to enter the setting. Press ENTER to the TV. (See page 13.) 3. When "Air" is selected in Antenna setting: Press A/Y to select "Analog & Digital...
Operation Manual
Page 20
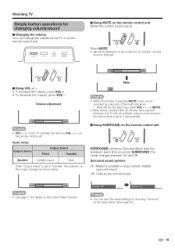
...can be displayed oil tile screen for details on the remote control unit. Audio status Speaker Variable sound Mute * When "Output Select" is set to "Variable", the indicator on the menu items. (See page 28.) Q- 19 Mute 1 Within 30 minutes of the methods below . ...WatchingTV [] Changing the volume You can have passed. j voL + • °INPUT L POWE_ [] Using MUTE on the TV operates the same as the volume level is set to enjoy natural, realistic surround sound. on the remote control unit !:v° 0c SUR_N SURROUND produces Surround effect from the speakers.
...can be displayed oil tile screen for details on the remote control unit. Audio status Speaker Variable sound Mute * When "Output Select" is set to "Variable", the indicator on the menu items. (See page 28.) Q- 19 Mute 1 Within 30 minutes of the methods below . ...WatchingTV [] Changing the volume You can have passed. j voL + • °INPUT L POWE_ [] Using MUTE on the TV operates the same as the volume level is set to enjoy natural, realistic surround sound. on the remote control unit !:v° 0c SUR_N SURROUND produces Surround effect from the speakers.
Operation Manual
Page 22
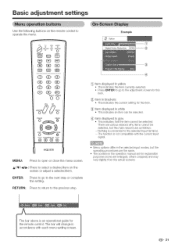
Item displayed in brackets This indicates the current setting for the item. Nothing is not compatible with each menu setting screen. ENTER: Press to go to open or close the menu screen. A/T/_I/_: Press to the previous step. RETURN: Press to return to select a desired ... indicates the item currently selected. ., Press ENTER to go to the selected input terminal. --The function is connected to the next step or complete the setting. Q- 21 Basic adjustment settings Use the following buttons on the screen or adjust a selected item.
Item displayed in brackets This indicates the current setting for the item. Nothing is not compatible with each menu setting screen. ENTER: Press to go to open or close the menu screen. A/T/_I/_: Press to the previous step. RETURN: Press to return to select a desired ... indicates the item currently selected. ., Press ENTER to go to the selected input terminal. --The function is connected to the next step or complete the setting. Q- 21 Basic adjustment settings Use the following buttons on the screen or adjust a selected item.
Operation Manual
Page 23
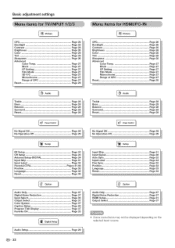
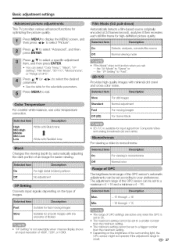
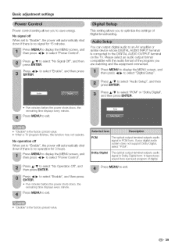
... Basic adjustment settings I _ Picture OPC Backlight Contrast Brightness Color Tint Sharpness Advanced Color Temp Black I/P Setting Film Mode 3D...-Y/C Monochrome Range of OPC Reset Page 26 Page 26 Page 26 Page 26 Page 26 Page 26 Page 26 Page 27 Page 27 Page 27 Page 27 Page 27 Page 27 Page 27 Page 26 ,+o I /P Setting...displayed depending on the selected input source. OPC Backiight Contrast Brightness Color Tint Sharpness Advanced Color Temp Black I Treble Baas Balance Surround Reset Page 28 Page 28...
... Basic adjustment settings I _ Picture OPC Backlight Contrast Brightness Color Tint Sharpness Advanced Color Temp Black I/P Setting Film Mode 3D...-Y/C Monochrome Range of OPC Reset Page 26 Page 26 Page 26 Page 26 Page 26 Page 26 Page 26 Page 27 Page 27 Page 27 Page 27 Page 27 Page 27 Page 27 Page 26 ,+o I /P Setting...displayed depending on the selected input source. OPC Backiight Contrast Brightness Color Tint Sharpness Advanced Color Temp Black I Treble Baas Balance Surround Reset Page 28 Page 28...

Operation Manual
Page 24
...select "Setup". then press _/_ to display the MENU screen, and then press _11/1_to select "Setup". Press _/1_ to enter the setting. Repeat steps 1 and 2 in Antenna setting in your TV when selecting "Air" or "Cable". If initial setup does not memorize all channels viewable in Antenna...to select the desired language listed on the screen, and then press ENTER. When "Air" is made with your TV and try channel search again. When "Cable" is selected in Antenna setting: Press &/T to select "Analog & Digital Search Start" to search both analog and digital broadcasts or "Analog ...
...select "Setup". then press _/_ to display the MENU screen, and then press _11/1_to select "Setup". Press _/1_ to enter the setting. Repeat steps 1 and 2 in Antenna setting in your TV when selecting "Air" or "Cable". If initial setup does not memorize all channels viewable in Antenna...to select the desired language listed on the screen, and then press ENTER. When "Air" is made with your TV and try channel search again. When "Cable" is selected in Antenna setting: Press &/T to select "Analog & Digital Search Start" to search both analog and digital broadcasts or "Analog ...
Operation Manual
Page 25
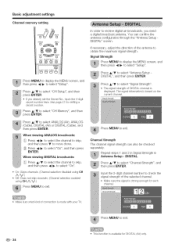
...Strength". - OhanneJStrength Make sure what kind of the antenna to check the signal strength of DIGITAL channel is made with your TV. If necessary, adjust the direction of connection is displayed. Channel Strength The channel signal strength can confirm the antenna configuration ... off: Does not skip channels.(Channelselectionenabled using OH A/V.) Press MENU to select "Setup". You can also be checked separately. Basic adjustment settings Channel memory setting vo OH FREEZE 0 MENU @ m FAVORITECH m ®®@@ SL_:EP AUDIO AV_0D_ CC Press MENU to select "On", and then...
...Strength". - OhanneJStrength Make sure what kind of the antenna to check the signal strength of DIGITAL channel is made with your TV. If necessary, adjust the direction of connection is displayed. Channel Strength The channel signal strength can confirm the antenna configuration ... off: Does not skip channels.(Channelselectionenabled using OH A/V.) Press MENU to select "Setup". You can also be checked separately. Basic adjustment settings Channel memory setting vo OH FREEZE 0 MENU @ m FAVORITECH m ®®@@ SL_:EP AUDIO AV_0D_ CC Press MENU to select "On", and then...
Operation Manual
Page 26
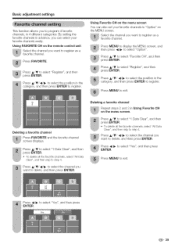
... "Yes", and then press ENTER. Press _1/_ to select "Favorite CH", and then press ENTER. Press _1/1_ to register. By setting the favorite channels in advance, you can also set your favorite channels easily. Press A/Y/_I/_ to select the position in Using Favorite CN on the menu screen. Press _./Y to select... "1 Data Clear", and then press ENTER. ,_ To delete all the favodtechannels,select "All Data Clear", and then skip to step 4. Basic adjustment settings This function allows you want to register as a favorite channel.
... "Yes", and then press ENTER. Press _1/_ to select "Favorite CH", and then press ENTER. Press _1/1_ to register. By setting the favorite channels in advance, you can also set your favorite channels easily. Press A/Y/_I/_ to select the position in Using Favorite CN on the menu screen. Press _./Y to select... "1 Data Clear", and then press ENTER. ,_ To delete all the favodtechannels,select "All Data Clear", and then skip to step 4. Basic adjustment settings This function allows you want to register as a favorite channel.
Operation Manual
Page 27
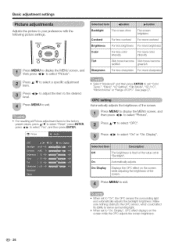
...For more brightness For less color intensity For more color intensity Skin tones become reddish Skin tones become greenish For less sharpness For more sharpness Press J,/Y to the desired level. Press _11/_ to adjust the item to select a specific adjustment item. Automatically ...Off On On: Display The brightness is fixed at the value set to "On", the ()PC senses the surrounding light and automatically adjusts the backlight brightness. When set in "Backlight". See page 27. When set "Color Temp.", "Black", "I/P Setting", "Film Mode", "3D-Y/C", "Monochrome" or "Range of ...
...For more brightness For less color intensity For more color intensity Skin tones become reddish Skin tones become greenish For less sharpness For more sharpness Press J,/Y to the desired level. Press _11/_ to adjust the item to select a specific adjustment item. Automatically ...Off On On: Display The brightness is fixed at the value set to "On", the ()PC senses the surrounding light and automatically adjusts the backlight brightness. When set in "Backlight". See page 27. When set "Color Temp.", "Black", "I/P Setting", "Film Mode", "3D-Y/C", "Monochrome" or "Range of ...
Operation Manual
Page 28
...Slow Standard Fast Off (2D) For still images Normal adjustment For moving images Suitable for easier viewing. Max. Basic adjustment settings This TV provides various advanced functions for high-definition picture quality. For viewing a video in black portions Off No adjustment Converts input ...signals depending on the brightness of OPC settings are active only when the OPC is not selectable when channel display shows an...
...Slow Standard Fast Off (2D) For still images Normal adjustment For moving images Suitable for easier viewing. Max. Basic adjustment settings This TV provides various advanced functions for high-definition picture quality. For viewing a video in black portions Off No adjustment Converts input ...signals depending on the brightness of OPC settings are active only when the OPC is not selectable when channel display shows an...

Operation Manual
Page 29
...audio from Decrease audio the right speaker from the left speaker Press MENU to exit. • Audio menu is grayed out when Output Select is set to "Variable". ., For resetting all Audio adjustment items to the factory preset values, press A/T to select "Reset", press ENTER, press 4/1_... select "On", and then press ENTER. Press 4/_ to select "Audio". In this case, please refer to your preference with the following settings. Basic adjustment settings You can choose Surround by pressing SURROUND on the remote control unit. (See page 19.) ., Audio menu is grayed out when Output Select...
...audio from Decrease audio the right speaker from the left speaker Press MENU to exit. • Audio menu is grayed out when Output Select is set to "Variable". ., For resetting all Audio adjustment items to the factory preset values, press A/T to select "Reset", press ENTER, press 4/1_... select "On", and then press ENTER. Press 4/_ to select "Audio". In this case, please refer to your preference with the following settings. Basic adjustment settings You can choose Surround by pressing SURROUND on the remote control unit. (See page 19.) ., Audio menu is grayed out when Output Select...
Operation Manual
Page 30
... to select "Enable", and then press ENTER. PCM The optical output terminal outputs audio signal in Dolby Digitalform. Basic adjustment settings Power control setting allows you are watching and the equipment connected. Press A/Y to select "No Signal Off", and then press ENTER, Press ...broadcasting. This setting allows you to select "Enable", and then press ENTER, ,_ Five minutes before the power shuts down , tile remainingtime displays every minute. Press A/Y to select "Audio Setup", and then press ENTER, Press A/Y to the DIGITAL AUDIO OUTPUT terminal on the TV. Press A/Y ...
... to select "Enable", and then press ENTER. PCM The optical output terminal outputs audio signal in Dolby Digitalform. Basic adjustment settings Power control setting allows you are watching and the equipment connected. Press A/Y to select "No Signal Off", and then press ENTER, Press ...broadcasting. This setting allows you to select "Enable", and then press ENTER, ,_ Five minutes before the power shuts down , tile remainingtime displays every minute. Press A/Y to select "Audio Setup", and then press ENTER, Press A/Y to the DIGITAL AUDIO OUTPUT terminal on the TV. Press A/Y ...
Operation Manual
Page 31
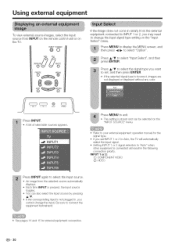
If the selected signal type is pressed, the input source toggles. - o The setting is stored and can also select the input souree by pressing A/_'. - Setting INPUT 1 or 2 signal selection to Auto, the TV will result in the following connection priority. You can be selected on the "Input Select" menu. v cRA ...°reaennd, ;i then press _/_ to select the input source. • An image from INPUT on the remote control unit or on the TV. Press ,_/Y to select "Input Select", and then press ENTER, Press A/V to select the signal type you cannot change the input signal type...
If the selected signal type is pressed, the input source toggles. - o The setting is stored and can also select the input souree by pressing A/_'. - Setting INPUT 1 or 2 signal selection to Auto, the TV will result in the following connection priority. You can be selected on the "Input Select" menu. v cRA ...°reaennd, ;i then press _/_ to select the input source. • An image from INPUT on the remote control unit or on the TV. Press ,_/Y to select "Input Select", and then press ENTER, Press A/V to select the signal type you cannot change the input signal type...
Operation Manual
Page 32
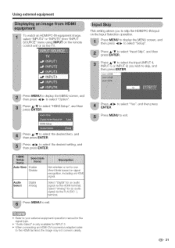
... the MENU screen, and then press _11/_-to select "HDMI Setup", and then press ENTER. Press A/Y to select "Option". Press A/Y to select the desired setting, and then press ENTER. Press _/_ to select the desired item, and then press ENTER. Select "Analog" for an audio signal via the R-AUDIO -L terminal...an HDMI/PC-IN equipment image, select "INPUT4" or "INPUTS" from "INPUT SOURCE" menu using iNPUT on the remote control unit or on the TV. _I_ INPUT4 This setting allows you wish to skip, and then press ENTER. Press A/T to select the Input (INPUT 4, INPUT 5 or INPUT 6) you to select "Yes...
... the MENU screen, and then press _11/_-to select "HDMI Setup", and then press ENTER. Press A/Y to select "Option". Press A/Y to select the desired setting, and then press ENTER. Press _/_ to select the desired item, and then press ENTER. Select "Analog" for an audio signal via the R-AUDIO -L terminal...an HDMI/PC-IN equipment image, select "INPUT4" or "INPUTS" from "INPUT SOURCE" menu using iNPUT on the remote control unit or on the TV. _I_ INPUT4 This setting allows you wish to skip, and then press ENTER. Press A/T to select the Input (INPUT 4, INPUT 5 or INPUT 6) you to select "Yes...


