

Operation Manual
Page 1
OPERATION MANUAL MODEL KB-6015K Followed by indicating color: K = black, W = white, S = stainless steel MICROWAVE DRAWER CONTENTS 2 CUSTOMER ASSISTANCE 3 PRECAUTIONS TO AVOID POSSIBLE EXPOSURE TO EXCESSIVE MICROWAVE ENERGY 3 CONSUMER LIMITED WARRANTY 4 IMPORTANT SAFETY INSTRUCTIONS 5 INFORMATION YOU NEED TO KNOW 6-8 PART NAMES 9 BEFORE OPERATING 10 MICROWAVE DRAWER™ COOKING 11-15 OTHER FEATURES 16-17 CLEANING AND CARE 18 BEFORE YOU CALL FOR SERVICE 19 AUTO-TOUCH GUIDE 23-BACK COVER
OPERATION MANUAL MODEL KB-6015K Followed by indicating color: K = black, W = white, S = stainless steel MICROWAVE DRAWER CONTENTS 2 CUSTOMER ASSISTANCE 3 PRECAUTIONS TO AVOID POSSIBLE EXPOSURE TO EXCESSIVE MICROWAVE ENERGY 3 CONSUMER LIMITED WARRANTY 4 IMPORTANT SAFETY INSTRUCTIONS 5 INFORMATION YOU NEED TO KNOW 6-8 PART NAMES 9 BEFORE OPERATING 10 MICROWAVE DRAWER™ COOKING 11-15 OTHER FEATURES 16-17 CLEANING AND CARE 18 BEFORE YOU CALL FOR SERVICE 19 AUTO-TOUCH GUIDE 23-BACK COVER

Operation Manual
Page 2
... EXCESSIVE MICROWAVE ENERGY 3 CONSUMER LIMITED WARRANTY 4 PRODUCT INFORMATION CARD 4 IMPORTANT SAFETY INSTRUCTIONS 5 INFORMATION YOU NEED TO KNOW 6-8 PART NAMES 9 BEFORE OPERATING 10 TO SET THE CLOCK 10 TIMER 10 STOP/CLEAR 10 OPEN OR CLOSE MICROWAVE DRAWER 10 MICROWAVE DRAWER COOKING 11-15 TIME COOKING 11 TO SET POWER LEVEL 11 SENSOR SETTINGS 11 SENSOR POPCORN / SENSOR REHEAT 12 SENSOR COOKING 13 DEFROST 14 MANUAL DEFROST 14 REHEAT...
... EXCESSIVE MICROWAVE ENERGY 3 CONSUMER LIMITED WARRANTY 4 PRODUCT INFORMATION CARD 4 IMPORTANT SAFETY INSTRUCTIONS 5 INFORMATION YOU NEED TO KNOW 6-8 PART NAMES 9 BEFORE OPERATING 10 TO SET THE CLOCK 10 TIMER 10 STOP/CLEAR 10 OPEN OR CLOSE MICROWAVE DRAWER 10 MICROWAVE DRAWER COOKING 11-15 TIME COOKING 11 TO SET POWER LEVEL 11 SENSOR SETTINGS 11 SENSOR POPCORN / SENSOR REHEAT 12 SENSOR COOKING 13 DEFROST 14 MANUAL DEFROST 14 REHEAT...
Operation Manual
Page 3
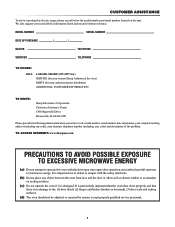
... attempt to operate this electric range, please record below the model number and serial number located on sealing surfaces. (c) Do not operate the oven if it is no damage to the: (1) door (bent), (2) hinges and latches (broken or loosened), (3) door seals and sealing surfaces. (d) The oven should not be adjusted or repaired by anyone except properly qualified service personnel. 3 CUSTOMER ASSISTANCE To aid in...
... attempt to operate this electric range, please record below the model number and serial number located on sealing surfaces. (c) Do not operate the oven if it is no damage to the: (1) door (bent), (2) hinges and latches (broken or loosened), (3) door seals and sealing surfaces. (d) The oven should not be adjusted or repaired by anyone except properly qualified service personnel. 3 CUSTOMER ASSISTANCE To aid in...

Operation Manual
Page 4
... you need service for your Microwave Drawer. 4 ALL IMPLIED WARRANTIES INCLUDING THE WARRANTIES OF MERCHANTABILITY AND FITNESS FOR USE ARE LIMITED TO THE PERIOD(S) FROM THE DATE OF PURCHASE SET FORTH BELOW. TO OBTAIN SUPPLY, ACCESSORY OR PRODUCT INFORMATION, CALL 1-800-BE-SHARP or visit www.sharpusa.com. We will keep it will, at its original container, will be free...
... you need service for your Microwave Drawer. 4 ALL IMPLIED WARRANTIES INCLUDING THE WARRANTIES OF MERCHANTABILITY AND FITNESS FOR USE ARE LIMITED TO THE PERIOD(S) FROM THE DATE OF PURCHASE SET FORTH BELOW. TO OBTAIN SUPPLY, ACCESSORY OR PRODUCT INFORMATION, CALL 1-800-BE-SHARP or visit www.sharpusa.com. We will keep it will, at its original container, will be free...

Operation Manual
Page 5
... is not designed for industrial or laboratory use as water, coffee or tea are placed inside the Microwave Drawer ignite, keep Microwave Drawer door closed, turn microwave off and shut off power at least for grounding instructions. 4 Install or locate this appliance only in this manual. Contact nearest Sharp Authorized Servicer for storage purposes. See cleaning instructions on closing it. Carefully attend appliance when paper, plastic or other...
... is not designed for industrial or laboratory use as water, coffee or tea are placed inside the Microwave Drawer ignite, keep Microwave Drawer door closed, turn microwave off and shut off power at least for grounding instructions. 4 Install or locate this appliance only in this manual. Contact nearest Sharp Authorized Servicer for storage purposes. See cleaning instructions on closing it. Carefully attend appliance when paper, plastic or other...

Operation Manual
Page 6
.... • Turn foods over at power levels below 100%, you may hear the magnetron cycling on page 18. Cook for safe microwave cooking and reheating: • glass ceramic (Pyroceram®), such as uncovered ones. ABOUT UTENSILS AND COVERINGS It is a normal part of aluminum foil any damage, do not operate the Microwave Drawer and contact your new Microwave Drawer. Condensation...
.... • Turn foods over at power levels below 100%, you may hear the magnetron cycling on page 18. Cook for safe microwave cooking and reheating: • glass ceramic (Pyroceram®), such as uncovered ones. ABOUT UTENSILS AND COVERINGS It is a normal part of aluminum foil any damage, do not operate the Microwave Drawer and contact your new Microwave Drawer. Condensation...

Operation Manual
Page 7
... 7 should anyone be used . White meat of poultry. Sharp is approved for cooking and reheating. ABOUT CHILDREN AND THE MICROWAVE Children below the age of a dishʼs covering and carefully open popcorn and oven cooking bags away from the food can be allowed to lean or swing on the control panel to safe temperatures. Children need tenderizing. For leftover...
... 7 should anyone be used . White meat of poultry. Sharp is approved for cooking and reheating. ABOUT CHILDREN AND THE MICROWAVE Children below the age of a dishʼs covering and carefully open popcorn and oven cooking bags away from the food can be allowed to lean or swing on the control panel to safe temperatures. Children need tenderizing. For leftover...

Operation Manual
Page 10
... Drawer. OPEN OR CLOSE MICROWAVE DRAWER Always press the OPEN or CLOSE pad on the control panel to your new Microwave Drawer make a mistake during programming. 2 Cancel timer. 3 Stop the Microwave Drawer temporarily during timed cooking. 4 Return the time of day and touch Timer/Clock pad again. If this operation manual completely. • Before the Microwave Drawer can be used, follow these steps: 1 Plug in the display...
... Drawer. OPEN OR CLOSE MICROWAVE DRAWER Always press the OPEN or CLOSE pad on the control panel to your new Microwave Drawer make a mistake during programming. 2 Cancel timer. 3 Stop the Microwave Drawer temporarily during timed cooking. 4 Return the time of day and touch Timer/Clock pad again. If this operation manual completely. • Before the Microwave Drawer can be used, follow these steps: 1 Plug in the display...
Operation Manual
Page 11
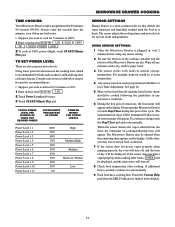
... Low/Defrost Low MICROWAVE DRAWER COOKING SENSOR SETTINGS Sharp's Sensor is lighted in any sensor setting. 2 Be sure the exterior of the cooking container and the interior of cooking/reheating time will be displayed. If this occurs, an error message will be interrupted. Wipe off . 8 Check food temperature after the minutes, even if they are eleven preset power levels. Touch the Custom Help...
... Low/Defrost Low MICROWAVE DRAWER COOKING SENSOR SETTINGS Sharp's Sensor is lighted in any sensor setting. 2 Be sure the exterior of the cooking container and the interior of cooking/reheating time will be displayed. If this occurs, an error message will be interrupted. Wipe off . 8 Check food temperature after the minutes, even if they are eleven preset power levels. Touch the Custom Help...

Operation Manual
Page 12
...hints by touching the Custom Help pad. Place in dish or casserole slightly larger than paper, overlap two pieces at a time PROCEDURE Use only popcorn packaged for microwave cooking. Use the cover recommended in the display to heat with variable power and time. 12 After...power level. Follow directions in the charts for these foods. Note: • The Sensor Popcorn setting has 2 choices. If not, continue to choose desired option. You may refer to 3 minutes. When the sensor detects the vapor emitted from you like. MICROWAVE DRAWER COOKING COVERING FOODS: Some foods work...
...hints by touching the Custom Help pad. Place in dish or casserole slightly larger than paper, overlap two pieces at a time PROCEDURE Use only popcorn packaged for microwave cooking. Use the cover recommended in the display to heat with variable power and time. 12 After...power level. Follow directions in the charts for these foods. Note: • The Sensor Popcorn setting has 2 choices. If not, continue to choose desired option. You may refer to 3 minutes. When the sensor detects the vapor emitted from you like. MICROWAVE DRAWER COOKING COVERING FOODS: Some foods work...

Operation Manual
Page 14
... stage, open the Microwave Drawer. Let stand, covered, for 5 to defrost manually. You can be programmed with small flat pieces of thumb is defrosted. Let stand to 10 minutes. Turn steak over and shield any warm portions. Remove any frozen food, either raw or previously cooked frozen food the rule of aluminum foil. Estimate defrosting time and press Power Level pad...
... stage, open the Microwave Drawer. Let stand, covered, for 5 to defrost manually. You can be programmed with small flat pieces of thumb is defrosted. Let stand to 10 minutes. Turn steak over and shield any warm portions. Remove any frozen food, either raw or previously cooked frozen food the rule of aluminum foil. Estimate defrosting time and press Power Level pad...

Operation Manual
Page 16
... Microwave Drawer can be displayed. • If 100% is selected as the final sequence, it is not necessary to touch the Power Level pad. • If you wish to check, touch Custom Help whenever HELP is deactivated or locked. DIRECT USE 1 Touch Keep Warm pad. MORE OR LESS TIME ADJUSTMENT Should you discover that the control panel is lighted in...
... Microwave Drawer can be displayed. • If 100% is selected as the final sequence, it is not necessary to touch the Power Level pad. • If you wish to check, touch Custom Help whenever HELP is deactivated or locked. DIRECT USE 1 Touch Keep Warm pad. MORE OR LESS TIME ADJUSTMENT Should you discover that the control panel is lighted in...

Operation Manual
Page 18
... Drawer until cool. STAINLESS STEEL SURFACE (SELECT MODELS) The exterior should be easier to remove any type of products designed especially for turning Control Lock off. There are also a variety of household or abrasive cleaner. See the Control Lock information on to set in a 2-cup glass measuring cup. Wipe the panel with a cloth dampened slightly with a soft cloth. Dry with water only. wipe clean...
... Drawer until cool. STAINLESS STEEL SURFACE (SELECT MODELS) The exterior should be easier to remove any type of products designed especially for turning Control Lock off. There are also a variety of household or abrasive cleaner. See the Control Lock information on to set in a 2-cup glass measuring cup. Wipe the panel with a cloth dampened slightly with a soft cloth. Dry with water only. wipe clean...

Operation Manual
Page 19
... Drawer does not operate. If the Microwave Drawer was in Demo Mode. PROBLEM 1 Part or all of Microwave Drawer is not completely connected to the electrical outlet. • Power outage. • Fuse/circuit breaker at home doesnʼt work . 4 Touch controls will not operate. 5 Display flashes. 6 Steam from the vent • No power to the appliance. • Drawer controls improperly set . • See page 17. • Call for service...
... Drawer does not operate. If the Microwave Drawer was in Demo Mode. PROBLEM 1 Part or all of Microwave Drawer is not completely connected to the electrical outlet. • Power outage. • Fuse/circuit breaker at home doesnʼt work . 4 Touch controls will not operate. 5 Display flashes. 6 Steam from the vent • No power to the appliance. • Drawer controls improperly set . • See page 17. • Call for service...

Operation Manual
Page 23
... stop to allow food to your ENJOY YOUR range should be turned over, shielded and/or removed. NUMBER 3 Touch the number pad to your Operation Manual. DEFROST Use this feature to cook foods on the Menu Label. 1 Touch Defrost pad. Select desired STEAKS CHOPS food by touching number pads. (Ex: 5 minutes) 2 Touch START/Minute Plus pad. 5.00 START TOUCH LEVEL TOUCH OR POWER...
... stop to allow food to your ENJOY YOUR range should be turned over, shielded and/or removed. NUMBER 3 Touch the number pad to your Operation Manual. DEFROST Use this feature to cook foods on the Menu Label. 1 Touch Defrost pad. Select desired STEAKS CHOPS food by touching number pads. (Ex: 5 minutes) 2 Touch START/Minute Plus pad. 5.00 START TOUCH LEVEL TOUCH OR POWER...

Operation Manual
Page 24
... Use 1 Touch Keep Warm pad. To enter 30 minutes, touch 3000. 3 Touch START/Minute Plus pad. 30:00 TOUCH START With Manual Cooking 1 Enter desired cooking time and power level. 2 Touch Keep Warm pad. 3 Enter desired warming time up to touch for additional minutes. The Microwave Drawer can be set so that the control panel is deactivated or locked. AUTO-TOUCH GUIDE...
... Use 1 Touch Keep Warm pad. To enter 30 minutes, touch 3000. 3 Touch START/Minute Plus pad. 30:00 TOUCH START With Manual Cooking 1 Enter desired cooking time and power level. 2 Touch Keep Warm pad. 3 Enter desired warming time up to touch for additional minutes. The Microwave Drawer can be set so that the control panel is deactivated or locked. AUTO-TOUCH GUIDE...
Installation Manual
Page 1
...AND DIMENSIONS 2 MICROWAVE DRAWER MEASUREMENTS 3 ANTI-TIP BLOCK 3 ELECTRICAL OUTLET 4 GROUNDING INSTRUCTIONS 4 DRAWER INSTALLATION 4 MODEL AND SERIAL NUMBER LOCATION 4 CARE, CLEANING AND MAINTENANCE 4 1 CLEARANCES AND DIMENSIONS For SAFETY CONSIDERATIONS do not install drawer in any combustible cabinetry, which is not in accord with the stated clearances and dimensions on pages 2 and 3. Microwave Drawer INSTALLATION MANUAL SPECIAL WARNING INSTALLATION AND SERVICE MUST BE PERFORMED BY A QUALIFIED INSTALLER. IMPORTANT: SAVE THIS INSTALLATION MANUAL FOR LOCAL ELECTRICAL INSPECTOR...
...AND DIMENSIONS 2 MICROWAVE DRAWER MEASUREMENTS 3 ANTI-TIP BLOCK 3 ELECTRICAL OUTLET 4 GROUNDING INSTRUCTIONS 4 DRAWER INSTALLATION 4 MODEL AND SERIAL NUMBER LOCATION 4 CARE, CLEANING AND MAINTENANCE 4 1 CLEARANCES AND DIMENSIONS For SAFETY CONSIDERATIONS do not install drawer in any combustible cabinetry, which is not in accord with the stated clearances and dimensions on pages 2 and 3. Microwave Drawer INSTALLATION MANUAL SPECIAL WARNING INSTALLATION AND SERVICE MUST BE PERFORMED BY A QUALIFIED INSTALLER. IMPORTANT: SAVE THIS INSTALLATION MANUAL FOR LOCAL ELECTRICAL INSPECTOR...
Installation Manual
Page 2
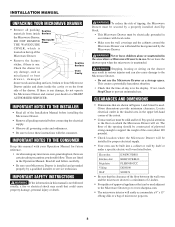
... of 2-inches. • For updates of the opening should follow carefully. • Be sure your dealer or a SHARP AUTHORIZED SERVICER. Electrolux E30EW75DSS1 Kitchen Aid KEBC107KBLO Frigidaire PLEB30S8CCC Viking DES0100 Wolf S030F/S • Be sure that the clearance of tipping, the Microwave Drawer must be secured by a properly installed Anti-Tip block. • This Microwave Drawer must be built into a cabinet...
... of 2-inches. • For updates of the opening should follow carefully. • Be sure your dealer or a SHARP AUTHORIZED SERVICER. Electrolux E30EW75DSS1 Kitchen Aid KEBC107KBLO Frigidaire PLEB30S8CCC Viking DES0100 Wolf S030F/S • Be sure that the clearance of tipping, the Microwave Drawer must be secured by a properly installed Anti-Tip block. • This Microwave Drawer must be built into a cabinet...

Installation Manual
Page 3
... do not penetrate electrical wiring or plumbing. 3 NOTE: Open Top Cabinet illustrated Figures 1 and 2 contain many Microwave Drawer measurements for reference when planning the drawerʼs location. 4 11/16" 2" 28 1/8" 15" 15" auto drawer opening 14 19/32" 23 3/8" Figure 3 1 13/16" door thickness 30" ANTI-TIP BLOCK (6") 5" Figure 4 2x4 AntiTip block NORMAL INSTALLATION STEPS ANTI-TIP BLOCK INSTALLATION INSTRUCTIONS To reduce...
... do not penetrate electrical wiring or plumbing. 3 NOTE: Open Top Cabinet illustrated Figures 1 and 2 contain many Microwave Drawer measurements for reference when planning the drawerʼs location. 4 11/16" 2" 28 1/8" 15" 15" auto drawer opening 14 19/32" 23 3/8" Figure 3 1 13/16" door thickness 30" ANTI-TIP BLOCK (6") 5" Figure 4 2x4 AntiTip block NORMAL INSTALLATION STEPS ANTI-TIP BLOCK INSTALLATION INSTRUCTIONS To reduce...
Installation Manual
Page 4
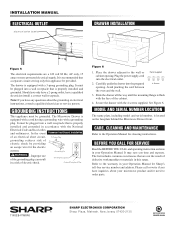
... CALL and operating instruction sections in your Operation Manual for Sharpʼs toll-free service number and address. Please call or write if you time and expense. The drawer is properly installed and grounded in accordance with the National Electrical Code and local codes and ordinances. Plug the power supply cord into a wall receptacle that is located on the faceplate behind the Microwave Drawer front. INSTALLATION MANUAL ELECTRICAL OUTLET electrical outlet location 5" DRAWER INSTALLATION (6") 2x4...
... CALL and operating instruction sections in your Operation Manual for Sharpʼs toll-free service number and address. Please call or write if you time and expense. The drawer is properly installed and grounded in accordance with the National Electrical Code and local codes and ordinances. Plug the power supply cord into a wall receptacle that is located on the faceplate behind the Microwave Drawer front. INSTALLATION MANUAL ELECTRICAL OUTLET electrical outlet location 5" DRAWER INSTALLATION (6") 2x4...


