
Operation Manual
Page 4
... received, including interference that interference will not occur in a residential installation. This equipment generates, uses and can be determined by the manufacturer could void the user's authority to insure compliance with FCC regulation for help. ONLY Declaration of Conformity SHARP LCD Color Monitor IT-23M1U This device complies with the instructions, may be connected to the grounding system of cable entry as close...
... received, including interference that interference will not occur in a residential installation. This equipment generates, uses and can be determined by the manufacturer could void the user's authority to insure compliance with FCC regulation for help. ONLY Declaration of Conformity SHARP LCD Color Monitor IT-23M1U This device complies with the instructions, may be connected to the grounding system of cable entry as close...

Operation Manual
Page 5
... mode Watching TV or video on the computer screen (MULTI SCREEN E29 Selecting the video and audio sources E29 Listening to the TV or another audio source while viewing the computer screen (SOUND E30 Using the menus in PC mode E31 How to a power source E20 Adjusting the computer display automatically (for analog signals E21 Setting TV channels E22 Selecting broadcast (AIR) or cable TV (CABLE) for Channel Setting E23 Saving broadcast TV channels in the memory (CHANNEL...
... mode Watching TV or video on the computer screen (MULTI SCREEN E29 Selecting the video and audio sources E29 Listening to the TV or another audio source while viewing the computer screen (SOUND E30 Using the menus in PC mode E31 How to a power source E20 Adjusting the computer display automatically (for analog signals E21 Setting TV channels E22 Selecting broadcast (AIR) or cable TV (CABLE) for Channel Setting E23 Saving broadcast TV channels in the memory (CHANNEL...

Operation Manual
Page 6
... length of time (SLEEP E49 Using the menus in TV/AV mode E50 How to adjust E50 Menu setting items E50 Other features Other features E53 Changing the screen size (VIEW MODE E53 Checking the current channel and audio mode on screen (DISPLAY E53 Muting the sound (MUTE E54 Changing BRIGHT MODE E54 Preventing changes to adjusted values (ADJUSTMENT LOCK E54 Resetting all adjustment values (ALL RESET E54 Appendix Instructions for attaching a VESA-compliant mount E55 Monitor care E56 Troubleshooting E56 Monitor care...
... length of time (SLEEP E49 Using the menus in TV/AV mode E50 How to adjust E50 Menu setting items E50 Other features Other features E53 Changing the screen size (VIEW MODE E53 Checking the current channel and audio mode on screen (DISPLAY E53 Muting the sound (MUTE E54 Changing BRIGHT MODE E54 Preventing changes to adjusted values (ADJUSTMENT LOCK E54 Resetting all adjustment values (ALL RESET E54 Appendix Instructions for attaching a VESA-compliant mount E55 Monitor care E56 Troubleshooting E56 Monitor care...
Operation Manual
Page 7
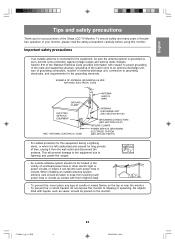
... antenna discharge unit, size of grounding conductors, location of antenna-discharge unit, connection to grounding electrodes, and requirements for long periods of the Sharp LCD TV Monitor. When installing an outside antenna system should not be sure the antenna system is left unattended and unused for the grounding electrode. An outside antenna system, extreme care should be taken to keep from the wall...
... antenna discharge unit, size of grounding conductors, location of antenna-discharge unit, connection to grounding electrodes, and requirements for long periods of the Sharp LCD TV Monitor. When installing an outside antenna system should not be sure the antenna system is left unattended and unused for the grounding electrode. An outside antenna system, extreme care should be taken to keep from the wall...

Operation Manual
Page 11
... 5. Antenna input terminal 7. Audio input terminal - Right AV-IN1 10. Video input terminal 12. Audio input terminal - Power input terminal 2. The security slot works in malfunction. POWER button 2. CC (Closed Caption) button 8. Input buttons (PC, TV, AV1, and AV2) 11. Audio input terminal - DISPLAY button 7. VIEW MODE button 12. BRIGHT button 15. English Français Deutsch Italiano Product description Main unit Rear view/left view A Remote control POWER 7 1 Virtual 9 8 PC TV AV1 AV2 10 9 2 10 FREEZE MULTI VIEW MODE 11 SLEEP...
... 5. Antenna input terminal 7. Audio input terminal - Right AV-IN1 10. Video input terminal 12. Audio input terminal - Power input terminal 2. The security slot works in malfunction. POWER button 2. CC (Closed Caption) button 8. Input buttons (PC, TV, AV1, and AV2) 11. Audio input terminal - DISPLAY button 7. VIEW MODE button 12. BRIGHT button 15. English Français Deutsch Italiano Product description Main unit Rear view/left view A Remote control POWER 7 1 Virtual 9 8 PC TV AV1 AV2 10 9 2 10 FREEZE MULTI VIEW MODE 11 SLEEP...

Operation Manual
Page 14
... enjoy watching DVDs or playing games. Follow these steps to connect the monitor to connect and set up your monitor. If your computer has a digital RGB output terminal, see Analog connection on page E15. (When using the monitor with a digital connection.) Setting TV channels (See pages E22 through E24.) IT-23M1U_gb_01.P65 12 E12 2004/08/20, 10:41 If your computer has an analog RGB output terminal, see Digital connection on...
... enjoy watching DVDs or playing games. Follow these steps to connect the monitor to connect and set up your monitor. If your computer has a digital RGB output terminal, see Analog connection on page E15. (When using the monitor with a digital connection.) Setting TV channels (See pages E22 through E24.) IT-23M1U_gb_01.P65 12 E12 2004/08/20, 10:41 If your computer has an analog RGB output terminal, see Digital connection on...

Operation Manual
Page 15
...Refer to this manual use primarily the remote control. (Operations requiring the use of monitor control buttons are specifically identified using monitor control buttons. Corresponding monitor control buttons MENU* INPUT MENU* VOL/BRIGHT< > ENTER/BRIGHT MODE * On the adjustment screen, moves down...adjustment screen operation The explanations in this table when using the word "monitor".) The following table shows the remote control buttons and their corresponding monitor control buttons. Remote control buttons MENU ENTER Function Displays the MENU screen. Exits the MENU screen. ...
...Refer to this manual use primarily the remote control. (Operations requiring the use of monitor control buttons are specifically identified using monitor control buttons. Corresponding monitor control buttons MENU* INPUT MENU* VOL/BRIGHT< > ENTER/BRIGHT MODE * On the adjustment screen, moves down...adjustment screen operation The explanations in this table when using the word "monitor".) The following table shows the remote control buttons and their corresponding monitor control buttons. Remote control buttons MENU ENTER Function Displays the MENU screen. Exits the MENU screen. ...

Operation Manual
Page 16
... install the set so that only the monitor is displaying. After having changed the system settings during use. - Power Macintosh Macintosh conversion adapter IT-23M1U_gb_01.P65 14 E14 2004/08/20, 10:41 Be careful not to display properly. Analog connection Connect the supplied PC analog signal cable to the analog signal cable. When using the monitor with an analog connection, perform an automatic screen adjustment (page E21) under the following conditions: - PC analog signal cable (supplied) Analog RGB output terminal - If connecting...
... install the set so that only the monitor is displaying. After having changed the system settings during use. - Power Macintosh Macintosh conversion adapter IT-23M1U_gb_01.P65 14 E14 2004/08/20, 10:41 Be careful not to display properly. Analog connection Connect the supplied PC analog signal cable to the analog signal cable. When using the monitor with an analog connection, perform an automatic screen adjustment (page E21) under the following conditions: - PC analog signal cable (supplied) Analog RGB output terminal - If connecting...
Operation Manual
Page 23
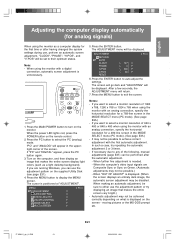
... be displayed. POWER Virtual PC TV AV1 AV2 FREEZE MULTI VIEW MODE SLEEP MENU BRIGHT MODE ENTER BRIGHT 1. Automatic adjustment may not be sure to achieve correct adjustment with an analog connection, specify the horizontal resolution for a 768-line screen in the MODE SELECT menu (PC mode). (See page E35.) - If necessary due to turn on the remote control. 2. When using the monitor as a light desktop background). Press the PC button to auto-adjust the settings...
... be displayed. POWER Virtual PC TV AV1 AV2 FREEZE MULTI VIEW MODE SLEEP MENU BRIGHT MODE ENTER BRIGHT 1. Automatic adjustment may not be sure to achieve correct adjustment with an analog connection, specify the horizontal resolution for a 768-line screen in the MODE SELECT menu (PC mode). (See page E35.) - If necessary due to turn on the remote control. 2. When using the monitor as a light desktop background). Press the PC button to auto-adjust the settings...
Operation Manual
Page 24
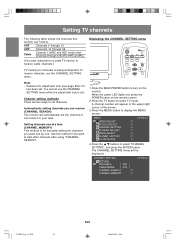
...When the power LED lights red, press the POWER button on the monitor. Press the MENU button to select TV mode. To receive channels, use the CHANNEL SETTING menu while the adjustment lock is empty at shipment. Press the MAIN POWER button to add other channels after using "CHANNEL SEARCH". 1. Press the TV button to display the MENU screen. A channel number will be displayed. Press the buttons to receive cable channels.) Displaying the CHANNEL SETTING menu POWER Virtual PC TV AV1 AV2 FREEZE MULTI VIEW MODE SLEEP MENU TV memory for manually setting the channels you...
...When the power LED lights red, press the POWER button on the monitor. Press the MENU button to select TV mode. To receive channels, use the CHANNEL SETTING menu while the adjustment lock is empty at shipment. Press the MAIN POWER button to add other channels after using "CHANNEL SEARCH". 1. Press the TV button to display the MENU screen. A channel number will be displayed. Press the buttons to receive cable channels.) Displaying the CHANNEL SETTING menu POWER Virtual PC TV AV1 AV2 FREEZE MULTI VIEW MODE SLEEP MENU TV memory for manually setting the channels you...

Operation Manual
Page 27
... before the screen displays an image. - P C ANALOG Display modes PC PC mode Displays the computer's (analog/digital) image. Turn on . Always wait at least 5 seconds between switching power off the power immediately after changing various settings on the monitor. The number is lit red (standby): 1. When the power LED is the channel being received. The power LED will go out. Turn on the remote control. AV2 AV2 mode Displays the image from the equipment connected to analog. Notes: - Press the POWER button on power for...
... before the screen displays an image. - P C ANALOG Display modes PC PC mode Displays the computer's (analog/digital) image. Turn on . Always wait at least 5 seconds between switching power off the power immediately after changing various settings on the monitor. The number is lit red (standby): 1. When the power LED is the channel being received. The power LED will go out. Turn on the remote control. AV2 AV2 mode Displays the image from the equipment connected to analog. Notes: - Press the POWER button on power for...
Operation Manual
Page 39
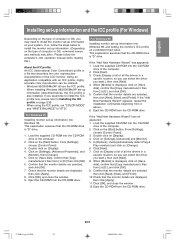
... click [Apply]. 8. If so, follow the computer's own operation manual while reading this.) About the ICC profile An ICC (International Color Consortium) profile is [D:], and click [OK]. 9. In [Options], check [Automatically detect Plug & Play monitors] and click on [Display]. 4. For Windows 98 Installing monitor set "COLOR MODE" and "WHITE BALANCE" to Installing the ICC profile on [Display]. 4. If the "Add New Hardware Wizard" has appeared...
... click [Apply]. 8. If so, follow the computer's own operation manual while reading this.) About the ICC profile An ICC (International Color Consortium) profile is [D:], and click [OK]. 9. In [Options], check [Automatically detect Plug & Play monitors] and click on [Display]. 4. For Windows 98 Installing monitor set "COLOR MODE" and "WHITE BALANCE" to Installing the ICC profile on [Display]. 4. If the "Add New Hardware Wizard" has appeared...
Operation Manual
Page 40
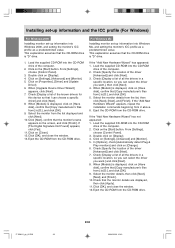
... click [OK]. 5. Click on [Settings], [Advanced] and [Monitor]. 5. Check [Display a list of all the drivers in a specific location, so you can select the driver you want .], then click [Next]. 4. If the "Add New Hardware Wizard" appears, repeat the installation commands beginning from the list, then click [Next], [Next], and [Finish]. Click on [Properties], [Driver] and [Update Driver]. 6. When [Models] is displayed, click on [Have disk...
... click [OK]. 5. Click on [Settings], [Advanced] and [Monitor]. 5. Check [Display a list of all the drivers in a specific location, so you can select the driver you want .], then click [Next]. 4. If the "Add New Hardware Wizard" appears, repeat the installation commands beginning from the list, then click [Next], [Next], and [Finish]. Click on [Properties], [Driver] and [Update Driver]. 6. When [Models] is displayed, click on [Have disk...
Operation Manual
Page 41
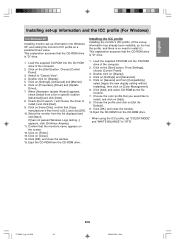
... [Hardware Update Wizard] appears, check [Install from [Compatibility] select [Apply the new display setting without restarting], then click on [General] and from a list or specific location [Advanced]] and click [Next]. 8. Click [OK], and close the window. 10. Click on [Color Management]. 6. Click on the [Start] button. Load the supplied CD-ROM into the CD-ROM drive of the computer. 2. Choose [Control Panel]. 3. Switch to "STD...
... [Hardware Update Wizard] appears, check [Install from [Compatibility] select [Apply the new display setting without restarting], then click on [General] and from a list or specific location [Advanced]] and click [Next]. 8. Click [OK], and close the window. 10. Click on [Color Management]. 6. Click on the [Start] button. Load the supplied CD-ROM into the CD-ROM drive of the computer. 2. Choose [Control Panel]. 3. Switch to "STD...

Operation Manual
Page 45
... sound effects in TV programs and home videos to be viewed in 2 modes: Caption (CAPTION) and Text (TEXT). If a broadcast has Closed Caption and the MUTE button is equipped with an internal Closed Caption decoder. For each mode, two channels are problems at the broadcast source. - Here we will describe the procedure using the remote control. (See page E52 for CH2 data Notes: - CC/TEXT : OFF FREEZE MULTI VIEW MODE SLEEP MENU BRIGHT MODE...
... sound effects in TV programs and home videos to be viewed in 2 modes: Caption (CAPTION) and Text (TEXT). If a broadcast has Closed Caption and the MUTE button is equipped with an internal Closed Caption decoder. For each mode, two channels are problems at the broadcast source. - Here we will describe the procedure using the remote control. (See page E52 for CH2 data Notes: - CC/TEXT : OFF FREEZE MULTI VIEW MODE SLEEP MENU BRIGHT MODE...
Operation Manual
Page 53
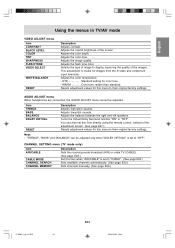
.../AV mode VIDEO ADJUST menu Item CONTRAST BLACK LEVEL COLOR TINT SHARPNESS FLESH TONE VIDEO SELECT WHITE BALANCE RESET Description Adjusts contrast. Adjusts the flesh tone color. WARM Color tone redder than standard. Adjusts the color depth. STD Standard setting for images from the S-video and component input terminals. Turns the Virtual Dolby Surround function "ON" or "OFF". Adjusts the image quality. Adjusts low-pitch sounds. CHANNEL SETTING menu (TV mode only) Item AIR/CABLE CABLE MODE CHANNEL SEARCH CHANNEL MEMORY Description Sets the receiving mode...
.../AV mode VIDEO ADJUST menu Item CONTRAST BLACK LEVEL COLOR TINT SHARPNESS FLESH TONE VIDEO SELECT WHITE BALANCE RESET Description Adjusts contrast. Adjusts the flesh tone color. WARM Color tone redder than standard. Adjusts the color depth. STD Standard setting for images from the S-video and component input terminals. Turns the Virtual Dolby Surround function "ON" or "OFF". Adjusts the image quality. Adjusts low-pitch sounds. CHANNEL SETTING menu (TV mode only) Item AIR/CABLE CABLE MODE CHANNEL SEARCH CHANNEL MEMORY Description Sets the receiving mode...

Operation Manual
Page 56
... output. 1. The changing of this procedure on the screen. 3. INPUT button - CH buttons E54 IT-23M1U_gb_02.P65 54 2004/08/20, 10:44 "MUTE" will be turned on the remote control. If "OFF" is selected, images will disappear and only sound will be displayed. VOL buttons - Channel buttons (0-9 and 100) - Turn off the monitor power. 2. turn the power on the screen. 3. turn the power on the monitor. 1. Continue to press the buttons until "UNLOCK ADJUSTMENT?" Changing BRIGHT MODE...
... output. 1. The changing of this procedure on the screen. 3. INPUT button - CH buttons E54 IT-23M1U_gb_02.P65 54 2004/08/20, 10:44 "MUTE" will be turned on the remote control. If "OFF" is selected, images will disappear and only sound will be displayed. VOL buttons - Channel buttons (0-9 and 100) - Turn off the monitor power. 2. turn the power on the screen. 3. turn the power on the monitor. 1. Continue to press the buttons until "UNLOCK ADJUSTMENT?" Changing BRIGHT MODE...

Operation Manual
Page 58
... the monitor connected to Check - Have you set TV channels properly? (Pages E22 to "OFF"? (Page E54) - Is there interference from automobiles, trains, neon signs, computers, or other sources? - The remote control does not work , please contact the shop where you are using the analog signal, perform automatic screen adjustment. (Page E21) - The TV picture is facing the right direction? Is the adjustment lock set "BRIGHT MODE" to...
... the monitor connected to Check - Have you set TV channels properly? (Pages E22 to "OFF"? (Page E54) - Is there interference from automobiles, trains, neon signs, computers, or other sources? - The remote control does not work , please contact the shop where you are using the analog signal, perform automatic screen adjustment. (Page E21) - The TV picture is facing the right direction? Is the adjustment lock set "BRIGHT MODE" to...

Operation Manual
Page 59
.... Have you turned on the connected equipment? - If they are connected. - CAUTION! - Control buttons do not work. Storage If the monitor will not be sure to color change or change in shape. Have you switched to color change or change in shape. - Adjust the volume. (Page E27) - Is the adjustment lock set "BRIGHT MODE" to lightly wipe away any grime from the AC outlet when cleaning the monitor. Cabinet and control panel section Use a soft...
.... Have you turned on the connected equipment? - If they are connected. - CAUTION! - Control buttons do not work. Storage If the monitor will not be sure to color change or change in shape. Have you switched to color change or change in shape. - Adjust the volume. (Page E27) - Is the adjustment lock set "BRIGHT MODE" to lightly wipe away any grime from the AC outlet when cleaning the monitor. Cabinet and control panel section Use a soft...
Operation Manual
Page 60
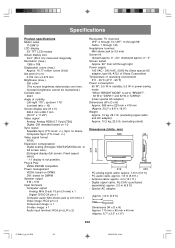
...; Screen swivel Approx. 90° from left through 13; Special AC adapter: Approx. 1.8 m (5.9 ft.) Dimensions (W x D x H) Approx. 170 mm x 85 mm x 40 mm (Approx. 6.7" x 3.3" x 1.6") E58 IT-23M1U_gb_02.P65 58 2004/08/20, 10:44 PC audio cable: approx. 1.8 m (5.9 ft.) - PC analog signal cable: approx. 1.8 m (5.9 ft.) - Plug & Play VESA DDC2B compatible Power management VESA: based on DPMS DVI: based on Green, Composite Sync (TTL level: +/-) Video signal format NTSC Expansion compensation Digital scaling...
...; Screen swivel Approx. 90° from left through 13; Special AC adapter: Approx. 1.8 m (5.9 ft.) Dimensions (W x D x H) Approx. 170 mm x 85 mm x 40 mm (Approx. 6.7" x 3.3" x 1.6") E58 IT-23M1U_gb_02.P65 58 2004/08/20, 10:44 PC audio cable: approx. 1.8 m (5.9 ft.) - PC analog signal cable: approx. 1.8 m (5.9 ft.) - Plug & Play VESA DDC2B compatible Power management VESA: based on DPMS DVI: based on Green, Composite Sync (TTL level: +/-) Video signal format NTSC Expansion compensation Digital scaling...


