DT-100 Operation Manual
Page 2
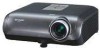
...or recall that SHARP may be required to persons. WARRANTY This is intended to alert the user to your assistance in the literature accompanying the product. Do not stare into the beam of light. See bottom of projector. CAUTION RISK OF ELECTRIC SHOCK. Model No.: DT-100 Serial No.:... the projector, please read this equipment. ONLY WARNING: High brightness light source. WARNING: To reduce the risk of fire or electric shock, do not stare directly into the beam of light, or view directly. NO USER-SERVICEABLE PARTS EXCEPT LAMP UNIT. U.S.A. ENGLISH Before using the ...
...or recall that SHARP may be required to persons. WARRANTY This is intended to alert the user to your assistance in the literature accompanying the product. Do not stare into the beam of light. See bottom of projector. CAUTION RISK OF ELECTRIC SHOCK. Model No.: DT-100 Serial No.:... the projector, please read this equipment. ONLY WARNING: High brightness light source. WARNING: To reduce the risk of fire or electric shock, do not stare directly into the beam of light, or view directly. NO USER-SERVICEABLE PARTS EXCEPT LAMP UNIT. U.S.A. ENGLISH Before using the ...
DT-100 Operation Manual
Page 3
.... ONLY Declaration of conformity SHARP PROJECTOR, MODEL DT-100 This device complies with the operation manual, may cause harmful interference to Part 15 of the following conditions: (1) This device may cause undesired operation. Responsible Party: SHARP ELECTRONICS CORPORATION Sharp Plaza, Mahwah, New Jersey...occur in accordance with Part 15 of America, the Electronic Industries Alliance: www.eiae.org . Caution Concerning Lamp Replacement See "Replacing the Lamp" on the picture screen. As with the limits for help. Disposal of mercury. This equipment generates, uses...
.... ONLY Declaration of conformity SHARP PROJECTOR, MODEL DT-100 This device complies with the operation manual, may cause harmful interference to Part 15 of the following conditions: (1) This device may cause undesired operation. Responsible Party: SHARP ELECTRONICS CORPORATION Sharp Plaza, Mahwah, New Jersey...occur in accordance with Part 15 of America, the Electronic Industries Alliance: www.eiae.org . Caution Concerning Lamp Replacement See "Replacing the Lamp" on the picture screen. As with the limits for help. Disposal of mercury. This equipment generates, uses...

DT-100 Operation Manual
Page 4
...for explanation, and may differ slightly from the actual display. Picture SCR - However, you can also be performed by using the projector. Note .........Indicates additional information for the selected input mode is displayed. Menu Selections (Adjustments) Example: Adjusting "Bright". • This...Indicates safeguards for using the buttons on the model. ADJ PRJ - ADJ Help Picture Mode Contrast Bright Color Tint Sharp CLR Temp Bright Boost Progressive Lamp Setting Reset SEL./ADJ. 0 0 0 0 0 7500K 1 Standard 3D Progressive Bright ENTER END Useful Features Buttons ...
...for explanation, and may differ slightly from the actual display. Picture SCR - However, you can also be performed by using the projector. Note .........Indicates additional information for the selected input mode is displayed. Menu Selections (Adjustments) Example: Adjusting "Bright". • This...Indicates safeguards for using the buttons on the model. ADJ PRJ - ADJ Help Picture Mode Contrast Bright Color Tint Sharp CLR Temp Bright Boost Progressive Lamp Setting Reset SEL./ADJ. 0 0 0 0 0 7500K 1 Standard 3D Progressive Bright ENTER END Useful Features Buttons ...

DT-100 Operation Manual
Page 5
...Picture Adjustment ("Picture" menu) .. 41 Selecting the Picture Mode 41 Adjusting the Image 42 Adjusting the Color Temperature ......... 42 Progressive 42 Lamp Setting 42 Adjusting the Projected Image ("SCR - Contents Preparing Introduction How to Read this Operation Manual .... 3 Contents 4 IMPORTANT SAFEGUARDS 6 ... Names and Functions 11 Inserting the Batteries 14 Usable Range 15 Quick Start Quick Start 16 Setup Setting up the Projector 18 Setting up the Projector 18 Standard Setup (Front Projection) ....... 18 Ceiling-mount Setup 18 Projection (PRJ) Mode 19 Screen Size and ...
...Picture Adjustment ("Picture" menu) .. 41 Selecting the Picture Mode 41 Adjusting the Image 42 Adjusting the Color Temperature ......... 42 Progressive 42 Lamp Setting 42 Adjusting the Projected Image ("SCR - Contents Preparing Introduction How to Read this Operation Manual .... 3 Contents 4 IMPORTANT SAFEGUARDS 6 ... Names and Functions 11 Inserting the Batteries 14 Usable Range 15 Quick Start Quick Start 16 Setup Setting up the Projector 18 Setting up the Projector 18 Standard Setup (Front Projection) ....... 18 Ceiling-mount Setup 18 Projection (PRJ) Mode 19 Screen Size and ...

DT-100 Operation Manual
Page 6
Introduction Reference Appendix Maintenance 47 Maintenance Indicators 48 Regarding the Lamp 50 Lamp 50 Caution Concerning the Lamp 50 Replacing the Lamp 50 Removing and Installing the Lamp Unit 51 Resetting the Lamp Timer 52 Connecting Pin Assignments 53 Computer Compatibility Chart 54 Troubleshooting 55 Service Information (For the U.S.) ..... 56 Specifications 57 Dimensions 58 Index 59 CONSUMER LIMITED WARRANTY (VALID IN USA ONLY 60 LIMITED WARRANTY (VALID IN CANADA ONLY 61 5
Introduction Reference Appendix Maintenance 47 Maintenance Indicators 48 Regarding the Lamp 50 Lamp 50 Caution Concerning the Lamp 50 Replacing the Lamp 50 Removing and Installing the Lamp Unit 51 Resetting the Lamp Timer 52 Connecting Pin Assignments 53 Computer Compatibility Chart 54 Troubleshooting 55 Service Information (For the U.S.) ..... 56 Specifications 57 Dimensions 58 Index 59 CONSUMER LIMITED WARRANTY (VALID IN USA ONLY 60 LIMITED WARRANTY (VALID IN CANADA ONLY 61 5
DT-100 Operation Manual
Page 9
... 10 minutes. Do not block the exhaust and intake vents. I Potential hazard of the lens. Caution concerning the lamp unit I Protect the lens so as the projector is subjected to these environments will return the projector to occasionally rest your nearest Sharp Authorized Service Center or Dealer for long hours will automatically put the...
... 10 minutes. Do not block the exhaust and intake vents. I Potential hazard of the lens. Caution concerning the lamp unit I Protect the lens so as the projector is subjected to these environments will return the projector to occasionally rest your nearest Sharp Authorized Service Center or Dealer for long hours will automatically put the...
DT-100 Operation Manual
Page 10
... or place next to be connected. visual equipment to the projector, make the connections. I Please read the operation manuals of the projector from the wall outlet, and disconnect any other cables connected to it to rise, the lamp will vary, depending on page 48 for details. dicators" ...on the circumstances and the internal temperature. The sound of the fan may change during projection or cooling fan operation. When using the projector overseas, be connected for instructions on...
... or place next to be connected. visual equipment to the projector, make the connections. I Please read the operation manuals of the projector from the wall outlet, and disconnect any other cables connected to it to rise, the lamp will vary, depending on page 48 for details. dicators" ...on the circumstances and the internal temperature. The sound of the fan may change during projection or cooling fan operation. When using the projector overseas, be connected for instructions on...

DT-100 Operation Manual
Page 11
Please check with your nearest Sharp Authorized Service Center or Dealer. 10 and Canada, etc. (6' (1.8 m)) QACCDA007WJPZ Optional accessory I Lamp unit AN-100LP Note • This optional accessory may not be available depending on the region. Accessories Supplied accessories Remote control Two R-6 batteries RRMCGA430WJSA ("AA" size, UM/SUM-3, HP-7 or similar) 3 RCA to 15-pin D-sub adaptor (11.8" (30 cm)) QCNWGA075WJPZ Lens cap (attached) CCAPHA024WJSA • Operation manual (this manual (TINS-B999WJZZ)) Power cord for U.S.
Please check with your nearest Sharp Authorized Service Center or Dealer. 10 and Canada, etc. (6' (1.8 m)) QACCDA007WJPZ Optional accessory I Lamp unit AN-100LP Note • This optional accessory may not be available depending on the region. Accessories Supplied accessories Remote control Two R-6 batteries RRMCGA430WJSA ("AA" size, UM/SUM-3, HP-7 or similar) 3 RCA to 15-pin D-sub adaptor (11.8" (30 cm)) QCNWGA075WJPZ Lens cap (attached) CCAPHA024WJSA • Operation manual (this manual (TINS-B999WJZZ)) Power cord for U.S.
DT-100 Operation Manual
Page 12
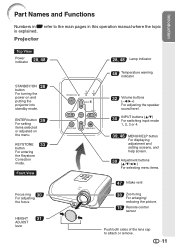
... and Functions Numbers in Z refer to attach or remove. 11 Front View Focus ring 30 For adjusting the focus. HEIGHT 31 ADJUST lever 28, 48 Lamp indicator 48 Temperature warning indicator 32 Volume buttons (-O/Q+) For adjusting the speaker sound level. 30 INPUT buttons (P/R) For switching input mode 1, 2, 3 or 4....15 Remote control sensor Push both sides of the lens cap to the main pages in this operation manual where the topic is explained. Projector Top View Power indicator 28, 48 STANDBY/ON 28 button For turning the power on the menu. ENTER button 39 For setting items ...
... and Functions Numbers in Z refer to attach or remove. 11 Front View Focus ring 30 For adjusting the focus. HEIGHT 31 ADJUST lever 28, 48 Lamp indicator 48 Temperature warning indicator 32 Volume buttons (-O/Q+) For adjusting the speaker sound level. 30 INPUT buttons (P/R) For switching input mode 1, 2, 3 or 4....15 Remote control sensor Push both sides of the lens cap to the main pages in this operation manual where the topic is explained. Projector Top View Power indicator 28, 48 STANDBY/ON 28 button For turning the power on the menu. ENTER button 39 For setting items ...

DT-100 Operation Manual
Page 16
... the ranges shown in the illustration. Introduction Usable Range The remote control can be used to mois- In this case, move the projector away from the remote control can be re- ture or high temperature. • The remote control may differ depending on the screen ...material. flected off a screen for easy operation. However, the effective distance of the signal may malfunction under a fluorescent lamp. Note • The signal from the fluorescent lamp. 30° Remote control signal transmitters 30° Remote control sensor 23n (7 m) Remote control 15
... the ranges shown in the illustration. Introduction Usable Range The remote control can be used to mois- In this case, move the projector away from the remote control can be re- ture or high temperature. • The remote control may differ depending on the screen ...material. flected off a screen for easy operation. However, the effective distance of the signal may malfunction under a fluorescent lamp. Note • The signal from the fluorescent lamp. 30° Remote control signal transmitters 30° Remote control sensor 23n (7 m) Remote control 15

DT-100 Operation Manual
Page 29
...change the language according to the procedure on the projector, a slight flickering of the lamp. This is normal operation as faulty operation. • If the projector is shut down . Info • English is on the remote control. Green: The lamp is the factory default language. Supplied accessory Power... cord AC socket Turning the Projector on Note that the connections to indicate the status of the image may take some time to 28.) Remove...
...change the language according to the procedure on the projector, a slight flickering of the lamp. This is normal operation as faulty operation. • If the projector is shut down . Info • English is on the remote control. Green: The lamp is the factory default language. Supplied accessory Power... cord AC socket Turning the Projector on Note that the connections to indicate the status of the image may take some time to 28.) Remove...

DT-100 Operation Manual
Page 38
...30 *1*2 Sharp -30 +30 *1 Red -30 +30 *3 Blue -30 +30 *3 Page 42 CLR Temp Page 42 5500K 6500K 7500K 8500K 9300K 10500K Bright Boost [0/1/2] Page 42 Progressive Page 42 *1 2D Progressive 3D Progressive Film Mode Lamp Setting Page 42 Bright Eco + Quiet Reset Sub menu Resize Page 43 Keystone -100 +100 Page ...43 Stretch Side Bar Cinema Zoom OSD Display [On/Off] Page 43 Background Page 43 Logo Blue None SEL./ADJ. There is basically no need to those input signals). ADJ PRJ - ADJ PRJ - ENTER END • You can be set in the projector. Menu Items...
...30 *1*2 Sharp -30 +30 *1 Red -30 +30 *3 Blue -30 +30 *3 Page 42 CLR Temp Page 42 5500K 6500K 7500K 8500K 9300K 10500K Bright Boost [0/1/2] Page 42 Progressive Page 42 *1 2D Progressive 3D Progressive Film Mode Lamp Setting Page 42 Bright Eco + Quiet Reset Sub menu Resize Page 43 Keystone -100 +100 Page ...43 Stretch Side Bar Cinema Zoom OSD Display [On/Off] Page 43 Background Page 43 Logo Blue None SEL./ADJ. There is basically no need to those input signals). ADJ PRJ - ADJ PRJ - ENTER END • You can be set in the projector. Menu Items...

DT-100 Operation Manual
Page 39
ADJ Off On On Off On 9600 bps Normal Help Main menu PRJ - ADJ Page 44 Lamp Timer(Life) SEL./ADJ. 0h ENTER 100% END Sub menu Auto Search [On/Off] Page 44 Auto Sync [On/Off] Page 44 Auto Power Off [On/Off] Page 45 System Sound [On/...Off] Page 45 Speaker [On/Off] Page 45 RS-232C 9600 bps *1 115200 bps Fan Mode Page 45 Lamp Timer(Life) Page 45...
ADJ Off On On Off On 9600 bps Normal Help Main menu PRJ - ADJ Page 44 Lamp Timer(Life) SEL./ADJ. 0h ENTER 100% END Sub menu Auto Search [On/Off] Page 44 Auto Sync [On/Off] Page 44 Auto Power Off [On/Off] Page 45 System Sound [On/...Off] Page 45 Speaker [On/Off] Page 45 RS-232C 9600 bps *1 115200 bps Fan Mode Page 45 Lamp Timer(Life) Page 45...

DT-100 Operation Manual
Page 40
Menu Selections (Adjustments) Example: Adjusting "Bright". • This operation can also be performed by using the buttons on the projector. 1 Press BMENU. • The "Picture" menu screen for INPUT 1 (Component) mode Menu item 2 Press Q or O and select "Picture" to ...the previous screen when the menu is displayed. ADJ PRJ - ADJ Help Picture Mode Contrast Bright Color Tint Sharp CLR Temp Bright Boost Progressive Lamp Setting Reset SEL./ADJ. 0 0 0 0 0 7500K 1 Standard 3D Progressive Bright ENTER END Useful Features 39 Example: "Picture" screen menu...
Menu Selections (Adjustments) Example: Adjusting "Bright". • This operation can also be performed by using the buttons on the projector. 1 Press BMENU. • The "Picture" menu screen for INPUT 1 (Component) mode Menu item 2 Press Q or O and select "Picture" to ...the previous screen when the menu is displayed. ADJ PRJ - ADJ Help Picture Mode Contrast Bright Color Tint Sharp CLR Temp Bright Boost Progressive Lamp Setting Reset SEL./ADJ. 0 0 0 0 0 7500K 1 Standard 3D Progressive Bright ENTER END Useful Features 39 Example: "Picture" screen menu...

DT-100 Operation Manual
Page 41
ADJ Help Picture Mode Contrast Bright Color Tint Sharp CLR Temp Bright Boost Progressive Lamp Setting Reset SEL./ADJ. 0 0 0 0 0 7500K 1 Standard 3D Progressive Bright Single ADJ END Items to be displayed. ADJ Stretch 0 On Logo The item displayed...Picture SCR - ADJ PRJ - ADJ Help Picture Mode Contrast Bright Color Tint Sharp CLR Temp Bright Boost Progressive Lamp Setting Reset SEL./ADJ. 0 15 0 0 0 7500K 1 Standard 3D Progressive Bright ENTER END Note • Menu buttons do not function while the projector is operating the "Auto Sync", "FREEZE", or "AV MUTE" functions. ...
ADJ Help Picture Mode Contrast Bright Color Tint Sharp CLR Temp Bright Boost Progressive Lamp Setting Reset SEL./ADJ. 0 0 0 0 0 7500K 1 Standard 3D Progressive Bright Single ADJ END Items to be displayed. ADJ Stretch 0 On Logo The item displayed...Picture SCR - ADJ PRJ - ADJ Help Picture Mode Contrast Bright Color Tint Sharp CLR Temp Bright Boost Progressive Lamp Setting Reset SEL./ADJ. 0 15 0 0 0 7500K 1 Standard 3D Progressive Bright ENTER END Note • Menu buttons do not function while the projector is operating the "Auto Sync", "FREEZE", or "AV MUTE" functions. ...

DT-100 Operation Manual
Page 42
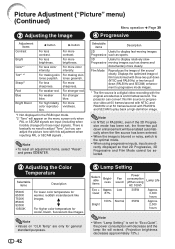
... to your preference. Note • You can set or adjust each item when selecting Picture Mode CLR Temp Bright Boost Lamp Setting 7500K 1 Bright 7500K 0 Bright 7500K 2 Bright Movie1 Movie2 Gives greater depth to select the picture mode. (See... Contrast Bright Red Blue CLR Temp Bright Boost Lamp Setting Reset 0 0 0 0 7500K 1 Standard Bright Help SEL./ADJ. ADJ Help 1 Picture Mode Standard Contrast 0 2 Bright 0 Color 0 Tint 0 Sharp 0 3 CLR Temp 7500K 2 Bright Boost 1 4 Progressive 3D Progressive 5 Lamp Setting Bright Reset SEL./ADJ. ENTER END Menu...
... to your preference. Note • You can set or adjust each item when selecting Picture Mode CLR Temp Bright Boost Lamp Setting 7500K 1 Bright 7500K 0 Bright 7500K 2 Bright Movie1 Movie2 Gives greater depth to select the picture mode. (See... Contrast Bright Red Blue CLR Temp Bright Boost Lamp Setting Reset 0 0 0 0 7500K 1 Standard Bright Help SEL./ADJ. ADJ Help 1 Picture Mode Standard Contrast 0 2 Bright 0 Color 0 Tint 0 Sharp 0 3 CLR Temp 7500K 2 Bright Boost 1 4 Progressive 3D Progressive 5 Lamp Setting Bright Reset SEL./ADJ. ENTER END Menu...
DT-100 Operation Manual
Page 43
...Progressive such as sports. 3D Useful to play back a high-definition image. The projector can adjust the picture tone with this film source to progressive video at 60 frames/... cooler, bluish, fluorescent-like images. For weaker red. For more contrast. For more sharpness. Quiet 87% 100% Bright Fan sound Low Normal Power consumption (When using progressive inputs, inputs are directly ...the optimal mode. • When using AC 100V) 305W 350W Lamp Life Approx. 3,000 hours Approx. 2,000 hours Note • When "Lamp Setting" is basically no need to "Eco+Quiet", the power ...
...Progressive such as sports. 3D Useful to play back a high-definition image. The projector can adjust the picture tone with this film source to progressive video at 60 frames/... cooler, bluish, fluorescent-like images. For weaker red. For more contrast. For more sharpness. Quiet 87% 100% Bright Fan sound Low Normal Power consumption (When using progressive inputs, inputs are directly ...the optimal mode. • When using AC 100V) 305W 350W Lamp Life Approx. 3,000 hours Approx. 2,000 hours Note • When "Lamp Setting" is basically no need to "Eco+Quiet", the power ...
DT-100 Operation Manual
Page 45
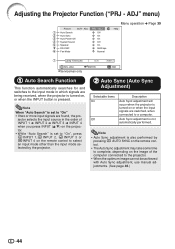
...are being received, when the projector is turned on the image of INPUT 1 n INPUT 2 n INPUT 3 n INPUT 4 when you press INPUT (P/R) on the projector. • While "Auto Search...Adjusting the Projector Function ("PRJ - ADJ" menu) Picture SCR - Note • Auto Sync adjustment is also performed by the projector. 2... Auto Sync (Auto Sync Adjustment) Selectable items On Off Description Auto Sync adjustment will occur when the projector is not ... the input signals are switched, when connected to the projector. • When the optimum image cannot be achieved ...
...are being received, when the projector is turned on the image of INPUT 1 n INPUT 2 n INPUT 3 n INPUT 4 when you press INPUT (P/R) on the projector. • While "Auto Search...Adjusting the Projector Function ("PRJ - ADJ" menu) Picture SCR - Note • Auto Sync adjustment is also performed by the projector. 2... Auto Sync (Auto Sync Adjustment) Selectable items On Off Description Auto Sync adjustment will occur when the projector is not ... the input signals are switched, when connected to the projector. • When the optimum image cannot be achieved ...

DT-100 Operation Manual
Page 46
...Fan Mode Setting This function changes the fan rotation speed. Lamp usage condition Remaining lamp life "Life" Operated exclusively with Lamp Setting set to "Eco + Quiet" Operated exclusively with Lamp Setting set to "On", 5 minutes before the projector enters standby mode, the message "Enter STANDBY mode in ...X min." When "Fan Mode" is set to "Bright" 100% Approx. 3,000 hours Approx. 2,000 hours 5% Approx. 150 hours Approx. 100 hours 5 Speaker...
...Fan Mode Setting This function changes the fan rotation speed. Lamp usage condition Remaining lamp life "Life" Operated exclusively with Lamp Setting set to "Eco + Quiet" Operated exclusively with Lamp Setting set to "On", 5 minutes before the projector enters standby mode, the message "Enter STANDBY mode in ...X min." When "Fan Mode" is set to "Bright" 100% Approx. 3,000 hours Approx. 2,000 hours 5% Approx. 150 hours Approx. 100 hours 5 Speaker...

DT-100 Operation Manual
Page 49
...See page 49.) Normal The internal temperature is warming up or shutting down. tor will enter standby mode. Indicators on the Projector Power indicator Lamp indicator Temperature warning indicator Red on Green on Red blinks Green blinks Green on Green blinks Red on Off Red on Normal (...procedures given below. If the temperature keeps on rising, the lamp will turn off and then the projector will automatically enter standby mode. I If you try to turn on the projector a fourth time without replacing the lamp, the projector will not turn off and the temperature warning indicator will ...
...See page 49.) Normal The internal temperature is warming up or shutting down. tor will enter standby mode. Indicators on the Projector Power indicator Lamp indicator Temperature warning indicator Red on Green on Red blinks Green blinks Green on Green blinks Red on Off Red on Normal (...procedures given below. If the temperature keeps on rising, the lamp will turn off and then the projector will automatically enter standby mode. I If you try to turn on the projector a fourth time without replacing the lamp, the projector will not turn off and the temperature warning indicator will ...

