
Operation Manual
Page 2
... or property damage. Special Precautions for purchasing a SHARP product. Please read the following these instructions could have it can be done. Meaning of this manual regarding the installation method and installation orientation. ENGLISH • Thank you for Safety Warning • Follow the instructions in the LCD color TV cabinet. Plugging the air passage holes could...
... or property damage. Special Precautions for purchasing a SHARP product. Please read the following these instructions could have it can be done. Meaning of this manual regarding the installation method and installation orientation. ENGLISH • Thank you for Safety Warning • Follow the instructions in the LCD color TV cabinet. Plugging the air passage holes could...
Operation Manual
Page 3
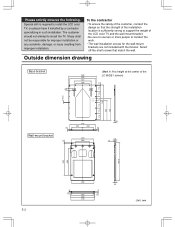
... a height at the center of the LCD color TV and the wall-mount bracket. • Be sure to use two or more people to install the LCD color TV, so please have it installed by a contractor specializing in such installation. Please strictly observe the following. Select off...the installation location is required to conduct the work. • The wall installation screws for improper installation or any accidents, damage, or injury resulting from improper installation. Special skill is sufficiently strong to install the TV. Sharp shall not be responsible for the wall-mount ...
... a height at the center of the LCD color TV and the wall-mount bracket. • Be sure to use two or more people to install the LCD color TV, so please have it installed by a contractor specializing in such installation. Please strictly observe the following. Select off...the installation location is required to conduct the work. • The wall installation screws for improper installation or any accidents, damage, or injury resulting from improper installation. Special skill is sufficiently strong to install the TV. Sharp shall not be responsible for the wall-mount ...

Operation Manual
Page 4
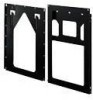
...: 30mm (4 screws) with the LCD color TV) • A plumb bob made by the LCD color TV falling due to the end of the screen. Caution • Sharp shall bear no responsibility for damages, etc., caused by tying a coin with the TV Base bracket: 1 Wall-mount bracket: 1 Angle setup bracket: 2 *Assembly completed for perpendicular installation. ENGLISH Accessories packaged with...
...: 30mm (4 screws) with the LCD color TV) • A plumb bob made by the LCD color TV falling due to the end of the screen. Caution • Sharp shall bear no responsibility for damages, etc., caused by tying a coin with the TV Base bracket: 1 Wall-mount bracket: 1 Angle setup bracket: 2 *Assembly completed for perpendicular installation. ENGLISH Accessories packaged with...
Operation Manual
Page 5
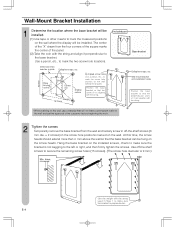
...sure the bracket is 9 mm.) Min. 4mm Use the weight with the string. Included part Base bracket Cellophane tape, etc. Wall-mount bracket unit installation hooks Position the base bracket so that the center of the customer before beginning the work. 2 Tighten the screws Temporarily remove the ... than 4 mm above the wall so that will be hung on the installed screws, check to make sure the bracket is perpendicular. E-4 Wall-Mount Bracket Installation 1 Determine the location where the base bracket will be installed. (1) Use tape or other means to mark the measured positions on the...
...sure the bracket is 9 mm.) Min. 4mm Use the weight with the string. Included part Base bracket Cellophane tape, etc. Wall-mount bracket unit installation hooks Position the base bracket so that the center of the customer before beginning the work. 2 Tighten the screws Temporarily remove the ... than 4 mm above the wall so that will be hung on the installed screws, check to make sure the bracket is perpendicular. E-4 Wall-Mount Bracket Installation 1 Determine the location where the base bracket will be installed. (1) Use tape or other means to mark the measured positions on the...

Operation Manual
Page 6
...Model 65 inch Separate Type) • Be sure to use at least two people to perform the wall-mount bracket installation work must be careful that it does not fall over. 1 Place the LCD color TV on a strong stand about 20 to 30 cm high and remove the two back terminal covers. Remove ...the terminal covers while the LCD color TV is standing upright, so be conducted while the LCD color TV is standing upright. (2 ...
...Model 65 inch Separate Type) • Be sure to use at least two people to perform the wall-mount bracket installation work must be careful that it does not fall over. 1 Place the LCD color TV on a strong stand about 20 to 30 cm high and remove the two back terminal covers. Remove ...the terminal covers while the LCD color TV is standing upright, so be conducted while the LCD color TV is standing upright. (2 ...

Operation Manual
Page 7
... cables Power cord 5 Use the cable holder at the center of the back of the LCD color TV. Screw hole plugs (4 plugs) Included part Allen wrench Hexagonal socket screws (M10 length: 30 mm) Wall-mount bracket Mark A Carefully keep the removed screw hole plugs. Included hexagonal socket screws (4 screws...socket screws, M10 length: 30 mm) that are included with the wall-mount bracket unit. Installing the wall-mount bracket (Continued) 4 Connect the system cables and power cord to the terminals on the back of the TV and then screw in the included hexagonal socket screws into the Mark A ...
... cables Power cord 5 Use the cable holder at the center of the back of the LCD color TV. Screw hole plugs (4 plugs) Included part Allen wrench Hexagonal socket screws (M10 length: 30 mm) Wall-mount bracket Mark A Carefully keep the removed screw hole plugs. Included hexagonal socket screws (4 screws...socket screws, M10 length: 30 mm) that are included with the wall-mount bracket unit. Installing the wall-mount bracket (Continued) 4 Connect the system cables and power cord to the terminals on the back of the TV and then screw in the included hexagonal socket screws into the Mark A ...

Operation Manual
Page 9
...this point onward. • Be very careful when holding the LCD color TV at a slant or when lifting it up. 1 Lift up the LCD color TV and remove the stand. Use the screws removed during Step 3 on a cushion or soft material and install the stand hole covers that are included with the stand insertion... locations. Remove the stands Caution • Be sure to use at least 3 people for the work from the stand while tipping it backward slightly. Hold the LCD color TV at a slant and align the ...
...this point onward. • Be very careful when holding the LCD color TV at a slant or when lifting it up. 1 Lift up the LCD color TV and remove the stand. Use the screws removed during Step 3 on a cushion or soft material and install the stand hole covers that are included with the stand insertion... locations. Remove the stands Caution • Be sure to use at least 3 people for the work from the stand while tipping it backward slightly. Hold the LCD color TV at a slant and align the ...
Operation Manual
Page 10
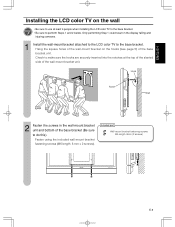
.... Check to make sure the hooks are securely inserted into the notches at least 4 people when installing the LCD color TV to the base bracket. • Be sure to do this). Included part Wall-mount bracket fastening screws M6 length: 8mm (2 screws) E-9 Hang the square holes of the wall...the base bracket. Fasten using the included wall-mount bracket fastening screws (M6 length: 8 mm × 2 screws). Hook Notch Wall 2 Fasten the screws in the display falling and injuring someone. 1 Install the wall-mount bracket attached to the LCD color TV to use at the top of the slanted side...
.... Check to make sure the hooks are securely inserted into the notches at least 4 people when installing the LCD color TV to the base bracket. • Be sure to do this). Included part Wall-mount bracket fastening screws M6 length: 8mm (2 screws) E-9 Hang the square holes of the wall...the base bracket. Fasten using the included wall-mount bracket fastening screws (M6 length: 8 mm × 2 screws). Hook Notch Wall 2 Fasten the screws in the display falling and injuring someone. 1 Install the wall-mount bracket attached to the LCD color TV to use at the top of the slanted side...