Operation Manual
Page 3
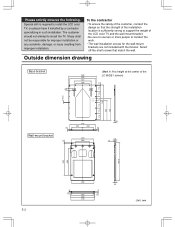
Sharp shall not be responsible for the wall-mount brackets are not included with the fixtures. Outside dimension drawing Base bracket (Mark A: At a height at the center of the LCD color TV and the wall-mount bracket. • Be sure to use two or more people to install the LCD color TV, so please have it installed by... the weight of the 558 LC-65GE1 screen) 528 343 280 40 9mm -A-B- 22 115 115 115 115 115 115 11 718 384 429 Wall-mount bracket 15 12 518 220 220 440 280 A B 18 26 14 23 766.8 560 650 460 35 10 440 468 478 Unit: mm E-2 The customer...
Sharp shall not be responsible for the wall-mount brackets are not included with the fixtures. Outside dimension drawing Base bracket (Mark A: At a height at the center of the LCD color TV and the wall-mount bracket. • Be sure to use two or more people to install the LCD color TV, so please have it installed by... the weight of the 558 LC-65GE1 screen) 528 343 280 40 9mm -A-B- 22 115 115 115 115 115 115 11 718 384 429 Wall-mount bracket 15 12 518 220 220 440 280 A B 18 26 14 23 766.8 560 650 460 35 10 440 468 478 Unit: mm E-2 The customer...

Operation Manual
Page 4
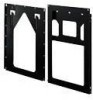
Caution • Sharp shall bear no responsibility for perpendicular installation. The best viewing position is 6 mm. *Please also store the screws that are not used. Weight table (Unit: kg) E-3 Allen wrench: 1 For fastening the wall-mount bracket Screws For the angle setup bracket For... when installing the TV. • Stand hole covers × 2 (Included with the LCD color TV) • A plumb bob made by tying a coin with the TV Base bracket: 1 Wall-mount bracket: 1 Angle setup bracket: 2 *Assembly completed for damages, etc., caused by the LCD color TV falling due to the...
Caution • Sharp shall bear no responsibility for perpendicular installation. The best viewing position is 6 mm. *Please also store the screws that are not used. Weight table (Unit: kg) E-3 Allen wrench: 1 For fastening the wall-mount bracket Screws For the angle setup bracket For... when installing the TV. • Stand hole covers × 2 (Included with the LCD color TV) • A plumb bob made by tying a coin with the TV Base bracket: 1 Wall-mount bracket: 1 Angle setup bracket: 2 *Assembly completed for damages, etc., caused by the LCD color TV falling due to the...
Operation Manual
Page 5
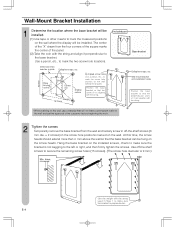
...center of it is aligned with the string. E-4 Position the base bracket so that the base bracket can be hung on the screw heads. Wall-mount bracket unit installation hooks Position the base bracket so that the perpendicular parts of it are parallel with the string. *When marking on the wall... on the installed screws, check to make sure the bracket is not sagging to the left or right, and then firmly tighten the screws. Wall-Mount Bracket Installation 1 Determine the location where the base bracket will be installed. (1) Use tape or other means to mark the measured positions on the ...
...center of it is aligned with the string. E-4 Position the base bracket so that the base bracket can be hung on the screw heads. Wall-mount bracket unit installation hooks Position the base bracket so that the perpendicular parts of it are parallel with the string. *When marking on the wall... on the installed screws, check to make sure the bracket is not sagging to the left or right, and then firmly tighten the screws. Wall-Mount Bracket Installation 1 Determine the location where the base bracket will be installed. (1) Use tape or other means to mark the measured positions on the ...

Operation Manual
Page 6
... standing upright, so be careful that it does not fall over. 1 Place the LCD color TV on a strong stand about 20 to perform the wall-mount bracket installation work must be conducted while the LCD color TV is standing upright. (2 covers top and bottom) Two terminal covers, top and bottom 2 Remove the 3... from each of the stand edge covers (total of 4 screws) as shown in the center of the LCD color TV. Caution • The installation work for the LCD color TV. ENGLISH Installing the wall-mount bracket (For Model 65 inch Separate Type) • Be sure to use at least two people to...
... standing upright, so be careful that it does not fall over. 1 Place the LCD color TV on a strong stand about 20 to perform the wall-mount bracket installation work must be conducted while the LCD color TV is standing upright. (2 covers top and bottom) Two terminal covers, top and bottom 2 Remove the 3... from each of the stand edge covers (total of 4 screws) as shown in the center of the LCD color TV. Caution • The installation work for the LCD color TV. ENGLISH Installing the wall-mount bracket (For Model 65 inch Separate Type) • Be sure to use at least two people to...

Operation Manual
Page 7
... holder at the center of the back of the LCD color TV and the cable holders holding the speaker cables to screw in the 4 wall-mount bracket unit screws (hexagonal socket screws, M10 length: 30 mm) that are included with the wall-mount bracket unit. Cable holders Surround the system cables. ...band. (2) Pull the band forward and catch it on the hook. 6 Remove the screw hole plugs (4 plugs) of the wall-mount bracket on the back of the LCD color TV. Included hexagonal socket screws (4 screws) Use an Allen wrench to connect the system cables. Screw hole plugs (4 plugs) Included part ...
... holder at the center of the back of the LCD color TV and the cable holders holding the speaker cables to screw in the 4 wall-mount bracket unit screws (hexagonal socket screws, M10 length: 30 mm) that are included with the wall-mount bracket unit. Cable holders Surround the system cables. ...band. (2) Pull the band forward and catch it on the hook. 6 Remove the screw hole plugs (4 plugs) of the wall-mount bracket on the back of the LCD color TV. Included hexagonal socket screws (4 screws) Use an Allen wrench to connect the system cables. Screw hole plugs (4 plugs) Included part ...
Operation Manual
Page 8
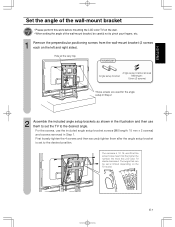
... at the screw holes mean that can be careful not to pinch your fingers, etc. 1 Remove the perpendicular positioning screws from the wall-mount bracket (2 screws each on the TV model. 0 20˃ 15˃ 10˃ 5˃ 20 0 20 15 10 5 15 10 5 E-7 The numbers 5, 10, 15, and 20... depending on the left and right sides). The angle that the higher the number, the more the LCD color TV slants downward. ENGLISH Set the angle of the wall-mount bracket Caution • Please perform this work before mounting the LCD color TV on the wall. • When setting the angle of the wall...
... at the screw holes mean that can be careful not to pinch your fingers, etc. 1 Remove the perpendicular positioning screws from the wall-mount bracket (2 screws each on the TV model. 0 20˃ 15˃ 10˃ 5˃ 20 0 20 15 10 5 15 10 5 E-7 The numbers 5, 10, 15, and 20... depending on the left and right sides). The angle that the higher the number, the more the LCD color TV slants downward. ENGLISH Set the angle of the wall-mount bracket Caution • Please perform this work before mounting the LCD color TV on the wall. • When setting the angle of the wall...
Operation Manual
Page 10
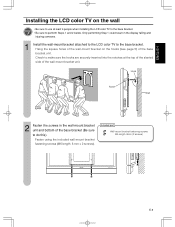
... the base bracket. • Be sure to the base bracket. Fasten using the included wall-mount bracket fastening screws (M6 length: 8 mm × 2 screws). ENGLISH Installing the LCD color TV on the hooks (see page 5) of the base bracket unit. Hook Notch Wall 2 Fasten the screws in the display ...falling and injuring someone. 1 Install the wall-mount bracket attached to the LCD color TV to perform Steps 1 and 2 below. Hang the square holes of the wall-mount bracket on the wall Caution • Be sure to use at the top of the slanted...
... the base bracket. • Be sure to the base bracket. Fasten using the included wall-mount bracket fastening screws (M6 length: 8 mm × 2 screws). ENGLISH Installing the LCD color TV on the hooks (see page 5) of the base bracket unit. Hook Notch Wall 2 Fasten the screws in the display ...falling and injuring someone. 1 Install the wall-mount bracket attached to the LCD color TV to perform Steps 1 and 2 below. Hang the square holes of the wall-mount bracket on the wall Caution • Be sure to use at the top of the slanted...


