
User Manual
Page 3
... to the presence of important operating and maintenance (servicing) instructions in the space provided. ENGLISH LC-60E77UN LC-65E77UM LIQUID CRYSTAL TELEVISION ENGLISH OPERATION MANUAL IMPORTANT: To aid reporting in case of loss or theft, please record the TV's model and serial numbers in the literature accompanying the product. CAUTION RISK OF ELECTRIC SHOCK...
... to the presence of important operating and maintenance (servicing) instructions in the space provided. ENGLISH LC-60E77UN LC-65E77UM LIQUID CRYSTAL TELEVISION ENGLISH OPERATION MANUAL IMPORTANT: To aid reporting in case of loss or theft, please record the TV's model and serial numbers in the literature accompanying the product. CAUTION RISK OF ELECTRIC SHOCK...
User Manual
Page 8
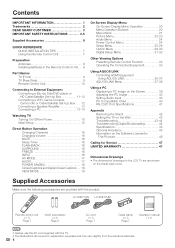
...; The illustrations above are for the LCD TV set are shown on the Software License for This Product 46 Calling for Service 47 LIMITED WARRANTY 47 Dimensional Drawings • The dimensional drawings for explanation purposes and may vary slightly from the actual accessories. 6 LC-60E77UN LC-65E77UM Remote control unit (g1) Page 7 "AAA" size...
...; The illustrations above are for the LCD TV set are shown on the Software License for This Product 46 Calling for Service 47 LIMITED WARRANTY 47 Dimensional Drawings • The dimensional drawings for explanation purposes and may vary slightly from the actual accessories. 6 LC-60E77UN LC-65E77UM Remote control unit (g1) Page 7 "AAA" size...
User Manual
Page 11
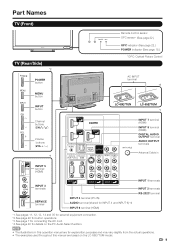
Part Names TV (Front) TV (Rear/Side) *2 POWER button MENU button INPUT button Remote control sensor OPC sensor* (See page 22.) OPC indicator (See page 22.) POWER indicator (See page 15.) * OPC: Optical Picture Control AC INPUT terminal *3 LC-60E77UN LC-65E77UM *1 Channel buttons (CHU/V) ...Volume buttons (VOLk/l) *1 INPUT 7 terminal (HDMI) INPUT 8 terminal (HDMI) DIGITAL AUDIO OUTPUT terminal AUDIO OUTPUT terminals Antenna/Cable in this manual are based on the PC Audio Select function....
Part Names TV (Front) TV (Rear/Side) *2 POWER button MENU button INPUT button Remote control sensor OPC sensor* (See page 22.) OPC indicator (See page 22.) POWER indicator (See page 15.) * OPC: Optical Picture Control AC INPUT terminal *3 LC-60E77UN LC-65E77UM *1 Channel buttons (CHU/V) ...Volume buttons (VOLk/l) *1 INPUT 7 terminal (HDMI) INPUT 8 terminal (HDMI) DIGITAL AUDIO OUTPUT terminal AUDIO OUTPUT terminals Antenna/Cable in this manual are based on the PC Audio Select function....

User Manual
Page 13
CAUTION • To protect equipment, always turn off the TV before connecting any external equipment. • Please read the relevant operation manual (Blu-ray disc player, etc.) carefully before making connections. The HDMI terminal supports high-resolution video input. • Blu-ray disc ...player • DVD player • HD Cable/Satellite set-top box Side Panel Rear of the TV HDMI-certified cable...
CAUTION • To protect equipment, always turn off the TV before connecting any external equipment. • Please read the relevant operation manual (Blu-ray disc player, etc.) carefully before making connections. The HDMI terminal supports high-resolution video input. • Blu-ray disc ...player • DVD player • HD Cable/Satellite set-top box Side Panel Rear of the TV HDMI-certified cable...

User Manual
Page 19
...multiple audio tracks to accompany a single video track. GAME: Lowers image brightness for each input mode. (For example, select STANDARD for TV input and DYNAMIC for INPUT 1.) • When you several viewing options to choose from external equipment. AUTO: Optimizes the image quality ... the user to toggle between audio modes. In addition, it is difficult to hear. • Obtain a clearer sound by manually switching to match the television broadcast signal. DYNAMIC (Fixed): Changes the image and sound settings to toggle between audio modes. DYNAMIC: For...
...multiple audio tracks to accompany a single video track. GAME: Lowers image brightness for each input mode. (For example, select STANDARD for TV input and DYNAMIC for INPUT 1.) • When you several viewing options to choose from external equipment. AUTO: Optimizes the image quality ... the user to toggle between audio modes. In addition, it is difficult to hear. • Obtain a clearer sound by manually switching to match the television broadcast signal. DYNAMIC (Fixed): Changes the image and sound settings to toggle between audio modes. DYNAMIC: For...
User Manual
Page 22
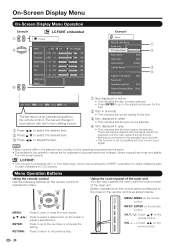
...This indicates that the item can also operate the menu with LC Font technology, which was developed by SHARP Corporation for clearly displaying easyto-read characters on the remote control...gray • This indicates that the item cannot be selected. 4 Item displayed in the operation manual are for the remote control. CHr/s: Cursor a/b on the remote control. MENU: a/b/c/d: ENTER...Press to operate the menu. Menu Operation Buttons Using the remote control Use the following buttons on LCD screens. Example Option AQUOS LINK Setup Audio Only PC Audio Select [Input 4 (PC)] Auto Volume...
...This indicates that the item can also operate the menu with LC Font technology, which was developed by SHARP Corporation for clearly displaying easyto-read characters on the remote control...gray • This indicates that the item cannot be selected. 4 Item displayed in the operation manual are for the remote control. CHr/s: Cursor a/b on the remote control. MENU: a/b/c/d: ENTER...Press to operate the menu. Menu Operation Buttons Using the remote control Use the following buttons on LCD screens. Example Option AQUOS LINK Setup Audio Only PC Audio Select [Input 4 (PC)] Auto Volume...
User Manual
Page 26
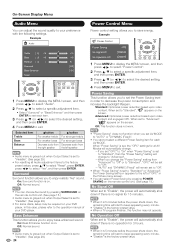
... out when Output Select is set to keep appearing every minute. • "Disable" is the factory preset value. • When a TV program finishes, this case, please refer to the operation manual of "OPC" in order to enjoy realistic "live" sound. No Operation Off When set to "Enable", the power will remain...
... out when Output Select is set to keep appearing every minute. • "Disable" is the factory preset value. • When a TV program finishes, this case, please refer to the operation manual of "OPC" in order to enjoy realistic "live" sound. No Operation Off When set to "Enable", the power will remain...

User Manual
Page 27
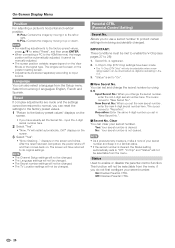
... reset to "DYNAMIC (Fixed)" if there is no operation for 30 minutes. If necessary, adjust the direction of connection is made with your TV when selecting "Air" or "Cable". When "Off" is selected, AV MODE will be deleted. Signal Strength: The signal strength of the selected...Fixed)". CH Setup If initial setup does not memorize all the settings are scrambled and so unavailable in your region, follow the instructions below to manually memorize the channels. Yes: Starts to exit. Feature Demo: When "On" is selected, after setting up the preset channels. On: Skips ...
... reset to "DYNAMIC (Fixed)" if there is no operation for 30 minutes. If necessary, adjust the direction of connection is made with your TV when selecting "Air" or "Cable". When "Off" is selected, AV MODE will be deleted. Signal Strength: The signal strength of the selected...Fixed)". CH Setup If initial setup does not memorize all the settings are scrambled and so unavailable in your region, follow the instructions below to manually memorize the channels. Yes: Starts to exit. Feature Demo: When "On" is selected, after setting up the preset channels. On: Skips ...
User Manual
Page 28
...digit number you set and change the secret number, enter the old 4-digit secret number here. This function will not be changed . • The TV Location settings will not be changed . Off: Disables Parental CTRL. 26 H-Pos.: Centers the image by moving it in a familiar place. •...; If the secret number is cleared. The screen will have been made and the settings cannot be manually adjusted. • The screen position variable ranges depend on the screen and blinks. IMPORTANT: Three conditions must be downloaded via digital broadcasting in...
...digit number you set and change the secret number, enter the old 4-digit secret number here. This function will not be changed . • The TV Location settings will not be changed . Off: Disables Parental CTRL. 26 H-Pos.: Centers the image by moving it in a familiar place. •...; If the secret number is cleared. The screen will have been made and the settings cannot be manually adjusted. • The screen position variable ranges depend on the screen and blinks. IMPORTANT: Three conditions must be downloaded via digital broadcasting in...

User Manual
Page 31
... press ENTER. 3 Press a/b (or c/d) to select the desired setting, and then press ENTER. 4 Press MENU to your external equipment operation manual for the signal type. • If you may not come in the following connection priority. Variable: Sound via speaker is muted. Sound via the...Audio is adjusted with VOLk/l on the remote control unit or VOLk/l on the TV. Fixed: Sound via the AUDIO OUTPUT terminal is output without any color. • Refer to your external equipment operation manual for audio adjustment, such as a program and its commercial breaks. Auto Volume ...
... press ENTER. 3 Press a/b (or c/d) to select the desired setting, and then press ENTER. 4 Press MENU to your external equipment operation manual for the signal type. • If you may not come in the following connection priority. Variable: Sound via speaker is muted. Sound via the...Audio is adjusted with VOLk/l on the remote control unit or VOLk/l on the TV. Fixed: Sound via the AUDIO OUTPUT terminal is output without any color. • Refer to your external equipment operation manual for audio adjustment, such as a program and its commercial breaks. Auto Volume ...

User Manual
Page 37
... HDMI device and starts recording. ˙ Single remote control The AQUOS LINK automatically recognizes the connected HDMI device and you can control the TV and the devices as if using a universal remote control. ˙ Control the AQUOS LINK-compatible audio system Set the volume of AQUOS ... cable (commercially available) HDMI-certified cable (commercially available) * You can be completed beforehand. • Refer to this operation manual and the operation manual of the AQUOS LINK device to 3 pieces of the remote control unit is in "AQUOS LINK Setup" on the type of HDMI cable...
... HDMI device and starts recording. ˙ Single remote control The AQUOS LINK automatically recognizes the connected HDMI device and you can control the TV and the devices as if using a universal remote control. ˙ Control the AQUOS LINK-compatible audio system Set the volume of AQUOS ... cable (commercially available) HDMI-certified cable (commercially available) * You can be completed beforehand. • Refer to this operation manual and the operation manual of the AQUOS LINK device to 3 pieces of the remote control unit is in "AQUOS LINK Setup" on the type of HDMI cable...
User Manual
Page 39
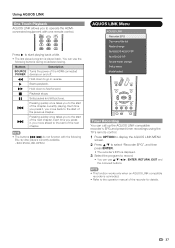
... off. You can use the following Blu-ray disc players currently available. - Each time you press it , you move back to the operation manual of the recorder for details. 37 BD-HP20U, BD-HP50U AQUOS LINK Menu AQUOS LINK Recorder EPG Top menu/title list Media change By AQUOS... Sound mode change Setup menu Model select Timer Recording You can call up the AQUOS LINK-compatible recorder's EPG and preset timer recordings using the TV's remote control. 1 Press OPTION to display the AQUOS LINK MENU screen. 2 Press a/b to select "Recorder EPG", and then press ENTER. • The recorder...
... off. You can use the following Blu-ray disc players currently available. - Each time you press it , you move back to the operation manual of the recorder for details. 37 BD-HP20U, BD-HP50U AQUOS LINK Menu AQUOS LINK Recorder EPG Top menu/title list Media change By AQUOS... Sound mode change Setup menu Model select Timer Recording You can call up the AQUOS LINK-compatible recorder's EPG and preset timer recordings using the TV's remote control. 1 Press OPTION to display the AQUOS LINK MENU screen. 2 Press a/b to select "Recorder EPG", and then press ENTER. • The recorder...

User Manual
Page 40
... is connected. compatible audio system for AQUOS LINKCompatible Recorder You can select to listen to the TV sound only from the AQUOS LINK-compatible audio system and manually change its sound mode. 1 Press OPTION to display the AQUOS LINK MENU screen. 2 Press a/b to select "Media change ". &#...-compatible equipment is muted and only the sound from the connected AQUOS LINK- Manually Changing AQUOS AUDIO Speaker System's Sound Mode 1 Press OPTION to display the AQUOS LINK MENU screen. 2 Press a/b to the TV sound. Using AQUOS LINK Playback of the equipment (recording or in standby mode...
... is connected. compatible audio system for AQUOS LINKCompatible Recorder You can select to listen to the TV sound only from the AQUOS LINK-compatible audio system and manually change its sound mode. 1 Press OPTION to display the AQUOS LINK MENU screen. 2 Press a/b to select "Media change ". &#...-compatible equipment is muted and only the sound from the connected AQUOS LINK- Manually Changing AQUOS AUDIO Speaker System's Sound Mode 1 Press OPTION to display the AQUOS LINK MENU screen. 2 Press a/b to the TV sound. Using AQUOS LINK Playback of the equipment (recording or in standby mode...
User Manual
Page 42
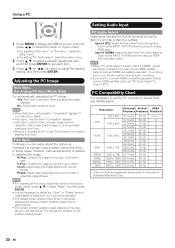
.... • The screen position variable ranges depend on before starting Auto Sync. In some cases, however, manual adjustment is necessary to set to "Input 6 (HDMI)", sound will not be produced if you want to... Resolution Horizontal Vertical VESA Frequency Frequency Standard 720 x 400 31.5 kHz 70 Hz VGA 31.5 kHz 60 Hz 640 x 480 37.9 kHz 72 Hz O O 37.5 kHz 75 Hz O 35.1 kHz 56 Hz O SVGA...values, press a/b to select "Reset", and then press ENTER. • It is not necessary to the TV and switch it cannot be selected. • The default cursor position may not be in the center, because...
.... • The screen position variable ranges depend on before starting Auto Sync. In some cases, however, manual adjustment is necessary to set to "Input 6 (HDMI)", sound will not be produced if you want to... Resolution Horizontal Vertical VESA Frequency Frequency Standard 720 x 400 31.5 kHz 70 Hz VGA 31.5 kHz 60 Hz 640 x 480 37.9 kHz 72 Hz O O 37.5 kHz 75 Hz O 35.1 kHz 56 Hz O SVGA...values, press a/b to select "Reset", and then press ENTER. • It is not necessary to the TV and switch it cannot be selected. • The default cursor position may not be in the center, because...
User Manual
Page 44
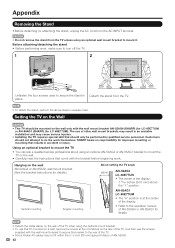
... unplug the AC cord from the TV. Before attaching/detaching the stand • Before performing work themselves. SHARP bears no responsibility for LC-65E77UM). CAUTION • Do not remove the stand from the TV unless using the optional mount bracket. • To use this TV mounted on the wall only with ... the covers at the center of the display. • Refer to the operation manual of AN-52AG4 or AN-65AG1 for details.) Vertical mounting Angular mounting About setting the TV angle 0/5/10° AN-52AG4 LC-60E77UN • The center of AN-65AG1. 42 Hanging on the wall AN-52AG4...
... unplug the AC cord from the TV. Before attaching/detaching the stand • Before performing work themselves. SHARP bears no responsibility for LC-65E77UM). CAUTION • Do not remove the stand from the TV unless using the optional mount bracket. • To use this TV mounted on the wall only with ... the covers at the center of the display. • Refer to the operation manual of AN-52AG4 or AN-65AG1 for details.) Vertical mounting Angular mounting About setting the TV angle 0/5/10° AN-52AG4 LC-60E77UN • The center of AN-65AG1. 42 Hanging on the wall AN-52AG4...

User Manual
Page 48
...LGPL, and other license agreement information, visit the following procedure. 1 Select an item from this manual, and keep it from the list below to display the secret number input screen. (For ...Software Update" on the Digital Setup menu. 2 Press and hold both CHr and VOLk on the TV simultaneously until the message appears on the screen. The secret number is not distributed. ■ Acknowledgements ...to provide the source code with this product that were developed or written by SHARP are owned by SHARP and are held by SHARP is . • As a precautionary measure, make a note of your...
...LGPL, and other license agreement information, visit the following procedure. 1 Select an item from this manual, and keep it from the list below to display the secret number input screen. (For ...Software Update" on the Digital Setup menu. 2 Press and hold both CHr and VOLk on the TV simultaneously until the message appears on the screen. The secret number is not distributed. ■ Acknowledgements ...to provide the source code with this product that were developed or written by SHARP are owned by SHARP and are held by SHARP is . • As a precautionary measure, make a note of your...
User Manual
Page 49
...be serviced, the Product must include the date of purchase. Contact your use of the Product by this Limited Warranty (see Operation Manual on contract, negligence, strict liability or otherwise. THIS WARRANTY GIVES YOU SPECIFIC LEGAL RIGHTS. Specifically ALL OTHER WARRANTIES OTHER ...LC-65E77UM LCD Color Television (Be sure to have Proof of , all claims, whether based on how to prevent this limited warranty, you should follow the steps set to you need service for your location and if necessary remove the unit for repair at no charge to Obtain Service: From a Sharp...
...be serviced, the Product must include the date of purchase. Contact your use of the Product by this Limited Warranty (see Operation Manual on contract, negligence, strict liability or otherwise. THIS WARRANTY GIVES YOU SPECIFIC LEGAL RIGHTS. Specifically ALL OTHER WARRANTIES OTHER ...LC-65E77UM LCD Color Television (Be sure to have Proof of , all claims, whether based on how to prevent this limited warranty, you should follow the steps set to you need service for your location and if necessary remove the unit for repair at no charge to Obtain Service: From a Sharp...


