
Operation Manual
Page 1
...; Supplied Accessories 5 • Before Operating Your Television 5 • Antenna Connections 5 ~ 6 • Quick Reference Control Operation 7 ~ 8 • EZ SETUP during First Use 9 • Demo Mode 10 • Accessing the MAIN MENU screen without Remote Control 10 • Language 11 • Sleep Timer 12 • Video Adjust 13 • Audio Adjust 14 • Audio Select 15 ~ 16 MTS (Multichannel TV Sound 15 SPEAKER (Internal Speaker Switch 15 FAO (Fixed Audio Output 15 This operating manual includes basic operating instructions...
...; Supplied Accessories 5 • Before Operating Your Television 5 • Antenna Connections 5 ~ 6 • Quick Reference Control Operation 7 ~ 8 • EZ SETUP during First Use 9 • Demo Mode 10 • Accessing the MAIN MENU screen without Remote Control 10 • Language 11 • Sleep Timer 12 • Video Adjust 13 • Audio Adjust 14 • Audio Select 15 ~ 16 MTS (Multichannel TV Sound 15 SPEAKER (Internal Speaker Switch 15 FAO (Fixed Audio Output 15 This operating manual includes basic operating instructions...
Operation Manual
Page 2
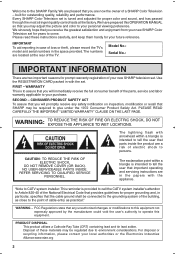
... SHARP Color Television set . The numbers are a risk of the TV. Model No.: Serial No.: IMPORTANT INFORMATION There are in with arrowhead within a triangle is intended to environment considerations. Use the REGISTRATION CARD packed in the papers with the appliance. FIRST - WARRANTY This is tuned and adjusted for prompt warranty registration of the National Electrical Code that important operating and servicing instructions are...
... SHARP Color Television set . The numbers are a risk of the TV. Model No.: Serial No.: IMPORTANT INFORMATION There are in with arrowhead within a triangle is intended to environment considerations. Use the REGISTRATION CARD packed in the papers with the appliance. FIRST - WARRANTY This is tuned and adjusted for prompt warranty registration of the National Electrical Code that important operating and servicing instructions are...

Operation Manual
Page 4
... such power lines or circuits as contact with respect to proper grounding of the mast and supporting structure, grounding of the lead-in the vicinity of overhead power lines or other hazards. 4 When installing an outside antenna is connected to the television equipment, be sure the service technician has used replacement parts specified by a qualified technician to restore the television equipment to an antenna discharge unit, size...
... such power lines or circuits as contact with respect to proper grounding of the mast and supporting structure, grounding of the lead-in the vicinity of overhead power lines or other hazards. 4 When installing an outside antenna is connected to the television equipment, be sure the service technician has used replacement parts specified by a qualified technician to restore the television equipment to an antenna discharge unit, size...
Operation Manual
Page 5
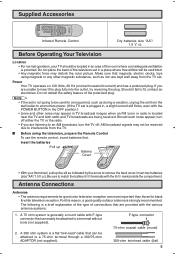
... those for good color television reception are kept well away from the TV. Supplied Accessories REC TV • CATV • VCR • DVD FWD ) 9VCR-CH 8 g SKIP f VOL + : PAUSE J L STOP : PLAY CH 9 8 CH PERSONAL PREFERENCE A BCD 9 ENTER 100 78 FLASHBACK 0 456 123 DISPLAY INPUT CATV TV DVD VCR REW ( POWER (DVD/VCR) MENU MUTE ; VOL - POWER Infrared Remote Control Dry batteries size "AA"/ 1.5 V cc Before Operating Your Television Location • For...
... those for good color television reception are kept well away from the TV. Supplied Accessories REC TV • CATV • VCR • DVD FWD ) 9VCR-CH 8 g SKIP f VOL + : PAUSE J L STOP : PLAY CH 9 8 CH PERSONAL PREFERENCE A BCD 9 ENTER 100 78 FLASHBACK 0 456 123 DISPLAY INPUT CATV TV DVD VCR REW ( POWER (DVD/VCR) MENU MUTE ; VOL - POWER Infrared Remote Control Dry batteries size "AA"/ 1.5 V cc Before Operating Your Television Location • For...
Operation Manual
Page 6
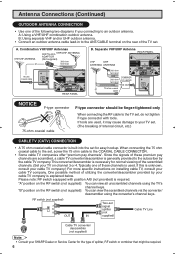
... set , do not tighten F-type connector with position A/B (not provided) is explained below. Combination VHF/UHF Antennas VHF/UHF ANTENNA or 300/75-ohm VHF/UHF ANTENNA ADAPTOR (Not supplied) 300-ohm twin-lead 75-ohm coaxial cable IN 1 COMPONENT Y PB PR R AUDIO L LINE OUT R VIDEO L REAR PANEL B. "A" position on the RF switch (not supplied): You can view all unscrambled channels using the converter's channel keys. Antenna Connections (Continued) OUTDOOR ANTENNA CONNECTION...
... set , do not tighten F-type connector with position A/B (not provided) is explained below. Combination VHF/UHF Antennas VHF/UHF ANTENNA or 300/75-ohm VHF/UHF ANTENNA ADAPTOR (Not supplied) 300-ohm twin-lead 75-ohm coaxial cable IN 1 COMPONENT Y PB PR R AUDIO L LINE OUT R VIDEO L REAR PANEL B. "A" position on the RF switch (not supplied): You can view all unscrambled channels using the converter's channel keys. Antenna Connections (Continued) OUTDOOR ANTENNA CONNECTION...
Operation Manual
Page 8
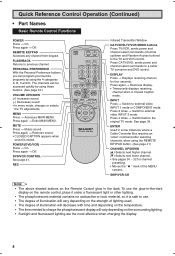
... depending on the Remote Control glow in Closed Caption mode. The channels can program your favorite programs by using these buttons. (See page 33.) VOLUME UP/DOWN (+) Increases sound. (-) Decreases sound. • In menu mode, changes or selects the TV adjustments. MUTE Press → Mutes sound. Press again → Removes display. • Temporarily displays receiving channel when in the dark. MENU Press → Accesses MAIN MENU. Press 3 times → Switch back to external video INPUT 2 mode. SKIP/VCR-CH Note...
... depending on the Remote Control glow in Closed Caption mode. The channels can program your favorite programs by using these buttons. (See page 33.) VOLUME UP/DOWN (+) Increases sound. (-) Decreases sound. • In menu mode, changes or selects the TV adjustments. MUTE Press → Mutes sound. Press again → Removes display. • Temporarily displays receiving channel when in the dark. MENU Press → Accesses MAIN MENU. Press 3 times → Switch back to external video INPUT 2 mode. SKIP/VCR-CH Note...
Operation Manual
Page 9
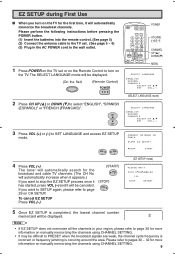
... 8 / 9 SE T : VOL + / - 3 Press VOL (+) or (-) to SET LANGUAGE and access EZ SETUP mode. Please perform the following instructions before pressing the POWER button. (1) Insert the batteries into the remote control. (See page 5) (2) Connect the antenna cable to the TV set. (See page 5 ~ 6) (3) Plug in your region, please refer to page 30 for more information on manually memorizing the channels using CHANNEL SETTING. • It may be canceled. To cancel...
... 8 / 9 SE T : VOL + / - 3 Press VOL (+) or (-) to SET LANGUAGE and access EZ SETUP mode. Please perform the following instructions before pressing the POWER button. (1) Insert the batteries into the remote control. (See page 5) (2) Connect the antenna cable to the TV set. (See page 5 ~ 6) (3) Plug in your region, please refer to page 30 for more information on manually memorizing the channels using CHANNEL SETTING. • It may be canceled. To cancel...

Operation Manual
Page 10
... of your Remote Control, contact a Sharp Service Center for more than three seconds both CH UP (8) and DOWN (9) or MENU on the TV set will not be accessible without Remote Control • If you misplaced your Remote Control you can still access most settings via the MAIN MENU screen when you lost your TV set . Example: DEMO mode display (On the Set) or CHANNEL UP (8)/ DOWN (9) buttons MENU button Accessing the MAIN MENU screen without the Remote Control. The TV set will...
... of your Remote Control, contact a Sharp Service Center for more than three seconds both CH UP (8) and DOWN (9) or MENU on the TV set will not be accessible without Remote Control • If you misplaced your Remote Control you can still access most settings via the MAIN MENU screen when you lost your TV set . Example: DEMO mode display (On the Set) or CHANNEL UP (8)/ DOWN (9) buttons MENU button Accessing the MAIN MENU screen without the Remote Control. The TV set will...

Operation Manual
Page 11
... P T I ON PARENT A L CONTROL CH SETUP SE TUP (MAIN MENU screen) MENU S L EE P T I MER V I DEO AD J UST AUD I O AD JUST AUD I O SE LECT C L OSED CA P T I ON PARENT A L CONTROL CH SETUP SE TUP SETUP L ANGUAGE ENERGY S AVE B L UE SCREEN AUTO I NPUT (SETUP mode) L ANGUAGE ENGL I SH E S P AÑOL FRANCA I S (LANGUAGE change mode. Language L The language for the ON SCREEN DISPLAY can be set to select "ENGLISH", "SPANISH (ESPA...
... P T I ON PARENT A L CONTROL CH SETUP SE TUP (MAIN MENU screen) MENU S L EE P T I MER V I DEO AD J UST AUD I O AD JUST AUD I O SE LECT C L OSED CA P T I ON PARENT A L CONTROL CH SETUP SE TUP SETUP L ANGUAGE ENERGY S AVE B L UE SCREEN AUTO I NPUT (SETUP mode) L ANGUAGE ENGL I SH E S P AÑOL FRANCA I S (LANGUAGE change mode. Language L The language for the ON SCREEN DISPLAY can be set to select "ENGLISH", "SPANISH (ESPA...
Operation Manual
Page 13
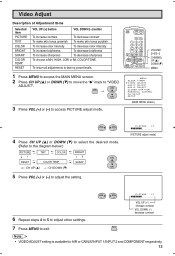
... the diagram below.) PICTURE TINT COLOR BRIGHT CH 8 RESET COLOR TEMP. CH → MENU 8 9 CH 3 Press VOL (+) or (-) to adjust the setting. P I ON PARENT A L CONTROL CH SETUP SE TUP (MAIN MENU screen) VOL - ; : VOL + 4 Press CH UP (8) or DOWN (9) to select the desired mode. (Refer to adjust other settings. Video Adjust Description of Adjustment Items Selected item PICTURE TINT COLOR BRIGHT SHARP COLOR TEMP. To return all adjustments to factory preset levels. 1 Press MENU to access the MAIN MENU screen...
... the diagram below.) PICTURE TINT COLOR BRIGHT CH 8 RESET COLOR TEMP. CH → MENU 8 9 CH 3 Press VOL (+) or (-) to adjust the setting. P I ON PARENT A L CONTROL CH SETUP SE TUP (MAIN MENU screen) VOL - ; : VOL + 4 Press CH UP (8) or DOWN (9) to select the desired mode. (Refer to adjust other settings. Video Adjust Description of Adjustment Items Selected item PICTURE TINT COLOR BRIGHT SHARP COLOR TEMP. To return all adjustments to factory preset levels. 1 Press MENU to access the MAIN MENU screen...
Operation Manual
Page 17
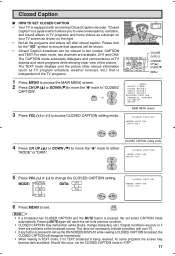
... mode displays over the picture other various information (such as TV program schedule, weather forecast, etc.) that captions will return the set to "OFF". 17 PERSONAL PREFERENCE A BCD CH 8 VOL - ; 9 CH MENU MUTE : VOL + g SKIP f POWER (DVD/VCR) 9 VCR-CH 8 VOLUME (+)/(-) CHANNEL UP (8)/ DOWN (9) MENU MENU S L EE P T I MER V I DEO AD J UST AUD I O AD JUST AUD I O SE LECT C L OSED CA P T I ON PARENT A L CONTROL CH SETUP SE TUP (MAIN MENU screen...
... mode displays over the picture other various information (such as TV program schedule, weather forecast, etc.) that captions will return the set to "OFF". 17 PERSONAL PREFERENCE A BCD CH 8 VOL - ; 9 CH MENU MUTE : VOL + g SKIP f POWER (DVD/VCR) 9 VCR-CH 8 VOLUME (+)/(-) CHANNEL UP (8)/ DOWN (9) MENU MENU S L EE P T I MER V I DEO AD J UST AUD I O AD JUST AUD I O SE LECT C L OSED CA P T I ON PARENT A L CONTROL CH SETUP SE TUP (MAIN MENU screen...

Operation Manual
Page 26
... MAIN MENU screen. 2 Press CH UP (8) or DOWN (9) to move the "a" mark to turn ON the "VIEW TIMER". (If STATUS is to prevent your children from 30M (30 minutes) to set from watching too much TV. CH → MENU 8 9 CH 3 Press VOL (+) or (-) to access PARENTAL CONTROL mode. 4 Press CH UP (8) or DOWN (9) to move the "a" mark to control TV usage. Enter a 4-digit...
... MAIN MENU screen. 2 Press CH UP (8) or DOWN (9) to move the "a" mark to turn ON the "VIEW TIMER". (If STATUS is to prevent your children from 30M (30 minutes) to set from watching too much TV. CH → MENU 8 9 CH 3 Press VOL (+) or (-) to access PARENTAL CONTROL mode. 4 Press CH UP (8) or DOWN (9) to move the "a" mark to control TV usage. Enter a 4-digit...
Operation Manual
Page 34
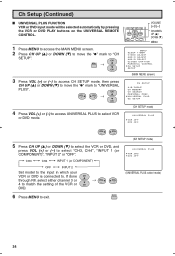
... VCR or DVD input mode will be selected automatically by pressing the VCR or DVD PLAY buttons on the UNIVERSAL REMOTE CONTROL. 1 Press MENU to access the MAIN MENU screen. 2 Press CH UP (8) or DOWN (9) to move the "a" mark to select "CH3, CH4", "INPUT 1 (or COMPONENT)", "INPUT 2" or "OFF". If done CH 8 through RF, select either channel 3 or 4 to match the setting of the VCR or 9 CH → VOL - ; : VOL + DVD. 6 Press MENU to "CH SETUP". MENU (EZ SETUP mode...
... VCR or DVD input mode will be selected automatically by pressing the VCR or DVD PLAY buttons on the UNIVERSAL REMOTE CONTROL. 1 Press MENU to access the MAIN MENU screen. 2 Press CH UP (8) or DOWN (9) to move the "a" mark to select "CH3, CH4", "INPUT 1 (or COMPONENT)", "INPUT 2" or "OFF". If done CH 8 through RF, select either channel 3 or 4 to match the setting of the VCR or 9 CH → VOL - ; : VOL + DVD. 6 Press MENU to "CH SETUP". MENU (EZ SETUP mode...
Operation Manual
Page 39
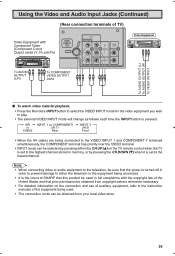
... 1 COMPONENT Y PB PR R AUDIO L LINE OUT R VIDEO L Video Equipment To AUDIO OUTPUT (L) To AUDIO OUTPUT (R) To VIDEO OUTPUT L To watch video material playback. • Press the Remote's INPUT button to select the VIDEO INPUT mode for the video equipment you wish to play. • The external VIDEO INPUT mode will change as follows each time the INPUT button is set to the lowest channel. Note: • When connecting video or audio equipment to the television, be sure that the power is turned...
... 1 COMPONENT Y PB PR R AUDIO L LINE OUT R VIDEO L Video Equipment To AUDIO OUTPUT (L) To AUDIO OUTPUT (R) To VIDEO OUTPUT L To watch video material playback. • Press the Remote's INPUT button to select the VIDEO INPUT mode for the video equipment you wish to play. • The external VIDEO INPUT mode will change as follows each time the INPUT button is set to the lowest channel. Note: • When connecting video or audio equipment to the television, be sure that the power is turned...

Operation Manual
Page 40
... 1 COMPONENT Y PB PR R AUDIO L LINE OUT R VIDEO L To the audio input terminals Stereo Amplifier Speaker System (1) Before connecting the cables, turn on the TV and adjust the VOLUME control on the TV to a moderate listening level. (2) Turn off the sound to the TV's internal speakers by acessing the TV's AUDIO SELECT mode. Using the Audio Output Jacks L These jacks are located on . (4) If you desire, you to keep the TV's audio output level high. The STEREO/MONO/SAP, VOLUME...
... 1 COMPONENT Y PB PR R AUDIO L LINE OUT R VIDEO L To the audio input terminals Stereo Amplifier Speaker System (1) Before connecting the cables, turn on the TV and adjust the VOLUME control on the TV to a moderate listening level. (2) Turn off the sound to the TV's internal speakers by acessing the TV's AUDIO SELECT mode. Using the Audio Output Jacks L These jacks are located on . (4) If you desire, you to keep the TV's audio output level high. The STEREO/MONO/SAP, VOLUME...
Operation Manual
Page 41
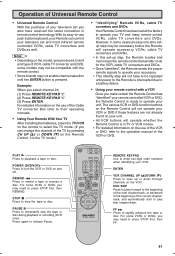
...; Universal Remote Control With the purchase of your television set you select channel 24, (1) Press REMOTE KEYPAD "2". (2) Press REMOTE KEYPAD "4". (3) Press ENTER. POWER CATV TV DVD VCR DISPLAY INPUT 123 456 78 FLASHBACK 0 9 ENTER 100 PERSONAL PREFERENCE A BCD CH 8 VOL - ; 9 CH MENU MUTE : VOL + g SKIP f POWER (DVD/VCR) 9 VCR-CH 8 PLAY : REC REW ( L STOP FWD ) PAUSE J TV • CATV • VCR • DVD REMOTE KEYPAD Use to release Pause. With its easy-to-use of the Cable TV converter Box...
...; Universal Remote Control With the purchase of your television set you select channel 24, (1) Press REMOTE KEYPAD "2". (2) Press REMOTE KEYPAD "4". (3) Press ENTER. POWER CATV TV DVD VCR DISPLAY INPUT 123 456 78 FLASHBACK 0 9 ENTER 100 PERSONAL PREFERENCE A BCD CH 8 VOL - ; 9 CH MENU MUTE : VOL + g SKIP f POWER (DVD/VCR) 9 VCR-CH 8 PLAY : REC REW ( L STOP FWD ) PAUSE J TV • CATV • VCR • DVD REMOTE KEYPAD Use to release Pause. With its easy-to-use of the Cable TV converter Box...
Operation Manual
Page 42
... Setting Method. (1) Press TV/VCR button. (2) Press and hold down DISPLAY and CH DOWN (9) on to the following steps and list to your VCR accepts. Then release both buttons. (3) Within ten seconds after releasing DISPLAY and CH DOWN (9), enter your VCR's two-digit remote control code number using the REMOTE KEYPAD (refer to list). • The remote control is ready to operate the VCR and no further steps are needed...
... Setting Method. (1) Press TV/VCR button. (2) Press and hold down DISPLAY and CH DOWN (9) on to the following steps and list to your VCR accepts. Then release both buttons. (3) Within ten seconds after releasing DISPLAY and CH DOWN (9), enter your VCR's two-digit remote control code number using the REMOTE KEYPAD (refer to list). • The remote control is ready to operate the VCR and no further steps are needed...
Operation Manual
Page 44
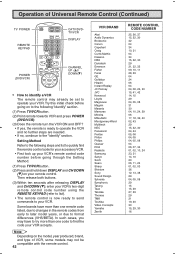
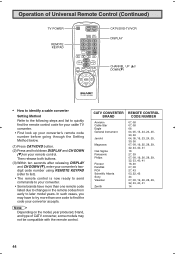
... of Universal Remote Control (Continued) TV POWER REMOTE KEYPAD POWER CATV TV DVD VCR DISPLAY INPUT 123 456 78 FLASHBACK 0 9 ENTER 100 PERSONAL PREFERENCE A BCD CH 8 VOL - ; 9 CH MENU MUTE : VOL + g SKIP f POWER (DVD/VCR) 9 VCR-CH 8 PLAY : REC REW ( L STOP FWD ) PAUSE J TV • CATV • VCR • DVD CATV/DVD-TV/VCR DISPLAY CHANNEL UP (,)/ DOWN(9) • How to identify a cable converter Setting Method Refer to the following steps and list to quickly find the code your remote control...
... of Universal Remote Control (Continued) TV POWER REMOTE KEYPAD POWER CATV TV DVD VCR DISPLAY INPUT 123 456 78 FLASHBACK 0 9 ENTER 100 PERSONAL PREFERENCE A BCD CH 8 VOL - ; 9 CH MENU MUTE : VOL + g SKIP f POWER (DVD/VCR) 9 VCR-CH 8 PLAY : REC REW ( L STOP FWD ) PAUSE J TV • CATV • VCR • DVD CATV/DVD-TV/VCR DISPLAY CHANNEL UP (,)/ DOWN(9) • How to identify a cable converter Setting Method Refer to the following steps and list to quickly find the code your remote control...
Operation Manual
Page 45
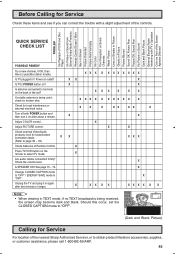
... antenna connected to select TV mode. X Press TV/VCR button on the remote to terminal on after two minutes or longer. X Are audio cables connected firmly? XX X X X XX X XXX Is TV plugged in TEXT mode, if no TEXT broadcast is being received, the screen may become dark and blank. Power at outlet? X X Adjust COLOR control. QUICK SERVICE CHECK LIST PROBLEM No Playback of VCR and Disc Player No Picture or Sound from External Video/Audio Products Remote Control Doesn't Work Bars...
... antenna connected to select TV mode. X Press TV/VCR button on the remote to terminal on after two minutes or longer. X Are audio cables connected firmly? XX X X X XX X XXX Is TV plugged in TEXT mode, if no TEXT broadcast is being received, the screen may become dark and blank. Power at outlet? X X Adjust COLOR control. QUICK SERVICE CHECK LIST PROBLEM No Playback of VCR and Disc Player No Picture or Sound from External Video/Audio Products Remote Control Doesn't Work Bars...

Operation Manual
Page 59
... replace the defective Product or part thereof with respect to the servicer. Labor and service are not provided free of the nearest Sharp Authorized Servicer, call Sharp toll free at its original container, will come to your Product.) One (1) year parts and 90 days labor. Neither the sales personnel of the seller nor any ): Where to Obtain Service: What to Do to Obtain Service: 20F650, 20 inch Color Television...
... replace the defective Product or part thereof with respect to the servicer. Labor and service are not provided free of the nearest Sharp Authorized Servicer, call Sharp toll free at its original container, will come to your Product.) One (1) year parts and 90 days labor. Neither the sales personnel of the seller nor any ): Where to Obtain Service: What to Do to Obtain Service: 20F650, 20 inch Color Television...


