Instruction Manual
Page 1
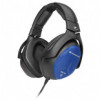
HDA 300 Audiometric headphones Instruction manual
HDA 300 Audiometric headphones Instruction manual
Instruction Manual
Page 3
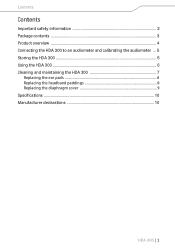
Contents Contents Important safety information 2 Package contents ...3 Product overview ...4 Connecting the HDA 300 to an audiometer and calibrating the audiometer ... 5 Storing the HDA 300 5 Using the HDA 300 ...6 Cleaning and maintaining the HDA 300 7 Replacing the ear pads 8 Replacing the headband paddings 8 Replacing the diaphragm cover 9 Specifications ...10 Manufacturer declarations 10 HDA 300 | 1
Contents Contents Important safety information 2 Package contents ...3 Product overview ...4 Connecting the HDA 300 to an audiometer and calibrating the audiometer ... 5 Storing the HDA 300 5 Using the HDA 300 ...6 Cleaning and maintaining the HDA 300 7 Replacing the ear pads 8 Replacing the headband paddings 8 Replacing the diaphragm cover 9 Specifications ...10 Manufacturer declarations 10 HDA 300 | 1
Instruction Manual
Page 4
... HDA 300 is a pair of hygiene, never use the headphones on to third parties. ̈ Do not use attachments/accessories/spare parts supplied or recommended by Sennheiser (see page 7). Important safety information Important safety information ̈ Read this instruction manual carefully and completely before using the product. ̈ Always include this instruction manual when passing the product on broken skin. ̈ Reduce the volume before using the headphones...
... HDA 300 is a pair of hygiene, never use the headphones on to third parties. ̈ Do not use attachments/accessories/spare parts supplied or recommended by Sennheiser (see page 7). Important safety information Important safety information ̈ Read this instruction manual carefully and completely before using the product. ̈ Always include this instruction manual when passing the product on broken skin. ̈ Reduce the volume before using the headphones...
Instruction Manual
Page 5
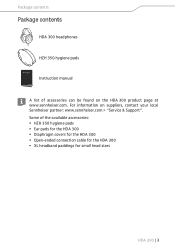
Some of accessories can be found on suppliers, contact your local Sennheiser partner: www.sennheiser.com > "Service & Support". Package contents Package contents HDA 300 headphones HZH 350 hygiene pads Manual Instruction manual A list of the available accessories: • HZH 350 hygiene pads • Ear pads for the HDA 300 • Diaphragm covers for the HDA 300 • Open-ended connection cable for the HDA 300 • XL headband paddings for small head sizes HDA 300 | 3 For information on the HDA 300 product page at www.sennheiser.com.
Some of accessories can be found on suppliers, contact your local Sennheiser partner: www.sennheiser.com > "Service & Support". Package contents Package contents HDA 300 headphones HZH 350 hygiene pads Manual Instruction manual A list of the available accessories: • HZH 350 hygiene pads • Ear pads for the HDA 300 • Diaphragm covers for the HDA 300 • Open-ended connection cable for the HDA 300 • XL headband paddings for small head sizes HDA 300 | 3 For information on the HDA 300 product page at www.sennheiser.com.
Instruction Manual
Page 6
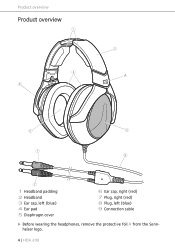
Product overview Product overview 1 4 6 2 A 5 3 7 9 8 1 Headband padding 2 Headband 3 Ear cap, left (blue) 4 Ear pad 5 Diaphragm cover 6 Ear cap, right (red) 7 Plug, right (red) 8 Plug, left (blue) 9 Connection cable ̈ Before wearing the headphones, remove the protective foil A from the Sennheiser logo. 4 | HDA 300
Product overview Product overview 1 4 6 2 A 5 3 7 9 8 1 Headband padding 2 Headband 3 Ear cap, left (blue) 4 Ear pad 5 Diaphragm cover 6 Ear cap, right (red) 7 Plug, right (red) 8 Plug, left (blue) 9 Connection cable ̈ Before wearing the headphones, remove the protective foil A from the Sennheiser logo. 4 | HDA 300
Instruction Manual
Page 7
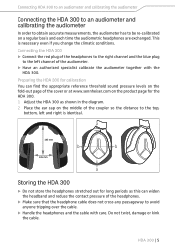
... over the cable. ̈ Handle the headphones and the cable with the HDA 300. Connecting the HDA 300 ̈ Connect the red plug of the headphones to the right channel and the blue plug to the left channel of the headphones. ̈ Make sure that the headphone cable does not cross any passageway to the top, bottom, left and right is necessary even if you change the climatic conditions. HDA 300 | 5 Do not...
... over the cable. ̈ Handle the headphones and the cable with the HDA 300. Connecting the HDA 300 ̈ Connect the red plug of the headphones to the right channel and the blue plug to the left channel of the headphones. ̈ Make sure that the headphone cable does not cross any passageway to the top, bottom, left and right is necessary even if you change the climatic conditions. HDA 300 | 5 Do not...
Instruction Manual
Page 8
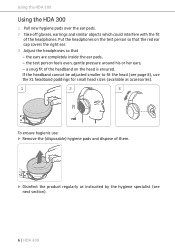
... head (see page 8), use the XL headband paddings for small head sizes (available as accessories). 1 2 3 R red To ensure hygienic use: ̈ Remove the (disposable) hygiene pads and dispose of the headband on the test person so that the red ear cap covers the right ear. 3 Adjust the headphones so that - a snug fit of them. ̈ Disinfect the product regularly as instructed by the hygiene specialist (see next section). 6 | HDA 300...
... head (see page 8), use the XL headband paddings for small head sizes (available as accessories). 1 2 3 R red To ensure hygienic use: ̈ Remove the (disposable) hygiene pads and dispose of the headband on the test person so that the red ear cap covers the right ear. 3 Adjust the headphones so that - a snug fit of them. ̈ Disinfect the product regularly as instructed by the hygiene specialist (see next section). 6 | HDA 300...

Instruction Manual
Page 9
Let the product dry before using it. ̈ Replace the diaphragm cover, the ear pads and the headband padding regularly as instructed by Sennheiser. ̈ Do not spray disinfectants directly on to a suitable cloth. ̈ Clean the ear pads and the headband padding with a cloth according to the instructions from the product. ̈ Only clean the headband paddings and the ear pads with cleansing agents recommended by the hygiene specialist (see next section). Recommended...
Let the product dry before using it. ̈ Replace the diaphragm cover, the ear pads and the headband padding regularly as instructed by Sennheiser. ̈ Do not spray disinfectants directly on to a suitable cloth. ̈ Clean the ear pads and the headband padding with a cloth according to the instructions from the product. ̈ Only clean the headband paddings and the ear pads with cleansing agents recommended by the hygiene specialist (see next section). Recommended...
Instruction Manual
Page 10
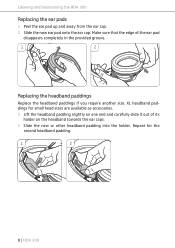
Cleaning and maintaining the HDA 300 Replacing the ear pads 1 Peel the ear pad up and away from the ear cap. 2 Slide the new ear pad onto the ear cap. XL headband paddings for the second headband padding. 1 2 1 2 8 | HDA 300 Repeat for small head sizes are available as accessories. 1 Lift the headband padding slightly on the headband towards the ear caps. 2 Slide the new or other headband padding into the holder. Make sure that the edge of its holder on...
Cleaning and maintaining the HDA 300 Replacing the ear pads 1 Peel the ear pad up and away from the ear cap. 2 Slide the new ear pad onto the ear cap. XL headband paddings for the second headband padding. 1 2 1 2 8 | HDA 300 Repeat for small head sizes are available as accessories. 1 Lift the headband padding slightly on the headband towards the ear caps. 2 Slide the new or other headband padding into the holder. Make sure that the edge of its holder on...
Instruction Manual
Page 11
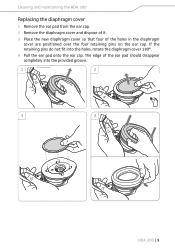
Cleaning and maintaining the HDA 300 Replacing the diaphragm cover 1 Remove the ear pad from the ear cap. 2 Remove the diaphragm cover and dispose of it. 3 Place the new diaphragm cover so that four of the ear pad should disappear completely into the holes, rotate the diaphragm cover 180°. 4 Pull the ear pad onto the ear cap. The edge of the holes in the diaphragm cover are positioned over the four retaining pins on the ear cap. If the retaining pins do not fit into the provided groove. 1 2 3 4 HDA 300 | 9
Cleaning and maintaining the HDA 300 Replacing the diaphragm cover 1 Remove the ear pad from the ear cap. 2 Remove the diaphragm cover and dispose of it. 3 Place the new diaphragm cover so that four of the ear pad should disappear completely into the holes, rotate the diaphragm cover 180°. 4 Pull the ear pad onto the ear cap. The edge of the holes in the diaphragm cover are positioned over the four retaining pins on the ear cap. If the retaining pins do not fit into the provided groove. 1 2 3 4 HDA 300 | 9
Instruction Manual
Page 12
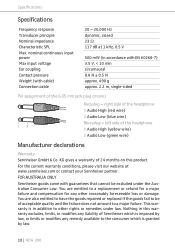
...) Red plug = right side of the headphone 1 Audio High (red wire) 2 Audio Low (blue wire) Blue plug = left side of the headphone 1 Audio High (yellow wire) 2 Audio Low (green wire) Manufacturer declarations Warranty Sennheiser GmbH & Co. Nothing in this warranty excludes, limits, or modifies any liability of Sennheiser which is in accordance with guarantees that cannot be of 24 months on this product. nominal continuous input power Max input voltage Ear coupling Contact pressure Weight (with cable) Connection cable...
...) Red plug = right side of the headphone 1 Audio High (red wire) 2 Audio Low (blue wire) Blue plug = left side of the headphone 1 Audio High (yellow wire) 2 Audio Low (green wire) Manufacturer declarations Warranty Sennheiser GmbH & Co. Nothing in this warranty excludes, limits, or modifies any liability of Sennheiser which is in accordance with guarantees that cannot be of 24 months on this product. nominal continuous input power Max input voltage Ear coupling Contact pressure Weight (with cable) Connection cable...
Instruction Manual
Page 13
... by Sennheiser Australia Pty Ltd (ABN 68 165 388 312), Unit 3, 31 Gibbes Street Chatswood NSW 2067 Australia. HDA 300 | 11 Before putting the product into operation, please observe the respective countryspecific regulations! Manufacturer declarations To make a claim under this warranty, contact Sennheiser Australia Pty Ltd, Unit 3, 31 Gibbes Street Chatswood NSW 2067, Australia; Phone: (02) 9910 6700, email: service@sennheiser...
... by Sennheiser Australia Pty Ltd (ABN 68 165 388 312), Unit 3, 31 Gibbes Street Chatswood NSW 2067 Australia. HDA 300 | 11 Before putting the product into operation, please observe the respective countryspecific regulations! Manufacturer declarations To make a claim under this warranty, contact Sennheiser Australia Pty Ltd, Unit 3, 31 Gibbes Street Chatswood NSW 2067, Australia; Phone: (02) 9910 6700, email: service@sennheiser...


