

User Guide for Windows
Page 1
MAXTOR ONETOUCH™ III MINI EDITION FOR WINDOWS® VISTA User's Guide
MAXTOR ONETOUCH™ III MINI EDITION FOR WINDOWS® VISTA User's Guide

User Guide for Windows
Page 2
... File Management 15 Restore 16 Sync 17 Automatic Sync 18 Rollback 18 Maxtor Encryption 19 OneTouch III Status Icons 23 Storing Audio 25 Connecting and Disconnecting the OneTouch III Mini Edition 25 Naming Your OneTouch III Mini Edition 25 © 2007 Seagate, Seagate Technology, Maxtor, OneTouch, and the Maxtor stylized logo are the property of the listed capacity is used for...
... File Management 15 Restore 16 Sync 17 Automatic Sync 18 Rollback 18 Maxtor Encryption 19 OneTouch III Status Icons 23 Storing Audio 25 Connecting and Disconnecting the OneTouch III Mini Edition 25 Naming Your OneTouch III Mini Edition 25 © 2007 Seagate, Seagate Technology, Maxtor, OneTouch, and the Maxtor stylized logo are the property of the listed capacity is used for...

User Guide for Windows
Page 3
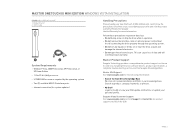
... DriveLock™ to protect the contents of your drive in this Guide The following symbols and conventions are used programs - The OneTouch III Mini Edition features: - Maxtor Encryption to backup your sensitive data - the simple way to encrypt your files - Simple Maxtor user ... you make and screens you will help you for selecting a Maxtor product. FIGURE 1 SOLUTION FEATURES 1. Status Light 3. MAXTOR ONETOUCH III MINI EDITION WINDOWS VISTA INSTALLATION Introduction Thank you setup your drive and includes helpful tips for performing backups and getting the most out of...
... DriveLock™ to protect the contents of your drive in this Guide The following symbols and conventions are used programs - The OneTouch III Mini Edition features: - Maxtor Encryption to backup your sensitive data - the simple way to encrypt your files - Simple Maxtor user ... you make and screens you will help you for selecting a Maxtor product. FIGURE 1 SOLUTION FEATURES 1. Status Light 3. MAXTOR ONETOUCH III MINI EDITION WINDOWS VISTA INSTALLATION Introduction Thank you setup your drive and includes helpful tips for performing backups and getting the most out of...
User Guide for Windows
Page 4
... drinks on its web site, including the latest software drivers, product specifications, a complete troubleshooting section, and the Seagate Knowledge Base. MAXTOR ONETOUCH III MINI EDITION WINDOWS VISTA INSTALLATION FIGURE 2 INCLUDED IN PACKAGE 1. USB Y-Cable System Requirements - Internet connection (for the ... the drive properly through the operating system. - Maxtor USA Support Visit www.seagate.com for system updates) Handling Precautions Please handle your new OneTouch III Mini Edition with care! Search the Hard Drive Knowledge Base We store all resolved problems...
... drinks on its web site, including the latest software drivers, product specifications, a complete troubleshooting section, and the Seagate Knowledge Base. MAXTOR ONETOUCH III MINI EDITION WINDOWS VISTA INSTALLATION FIGURE 2 INCLUDED IN PACKAGE 1. USB Y-Cable System Requirements - Internet connection (for the ... the drive properly through the operating system. - Maxtor USA Support Visit www.seagate.com for system updates) Handling Precautions Please handle your new OneTouch III Mini Edition with care! Search the Hard Drive Knowledge Base We store all resolved problems...
User Guide for Windows
Page 5
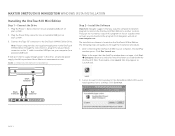
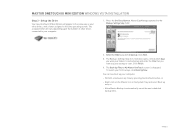
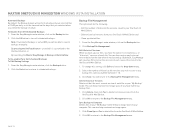
...Power Only connector into an available USB port on the OneTouch III Mini Edition to the drive, an optional power supply should be purchased from Seagate's website at www.maxstore.com FIGURE 3 CONNECTING THE ONETOUCH III MINI EDITION Step 2 - Install the Software Important: Seagate suggests that the AutoPlay window does not open, click ... connector on your system. 2. Click Continue. PAGE 3 Plug the Power + Data connector into an available USB port on the OneTouch III Mini Edition. The following steps will guide you can download the program from Maxtor at www.seagate.com.
...Power Only connector into an available USB port on the OneTouch III Mini Edition to the drive, an optional power supply should be purchased from Seagate's website at www.maxstore.com FIGURE 3 CONNECTING THE ONETOUCH III MINI EDITION Step 2 - Install the Software Important: Seagate suggests that the AutoPlay window does not open, click ... connector on your system. 2. Click Continue. PAGE 3 Plug the Power + Data connector into an available USB port on the OneTouch III Mini Edition. The following steps will guide you can download the program from Maxtor at www.seagate.com.
User Guide for Windows
Page 6
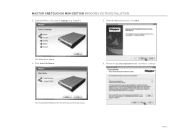
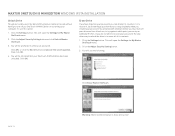
From the Welcome Screen, click Next. Review the License Agreement and click Yes to continue. PAGE 4 The InstallShield Wizard for the OneTouch III Setup loads. The Main Menu opens. 4. Click Install Software. 6. MAXTOR ONETOUCH III MINI EDITION WINDOWS VISTA INSTALLATION 3. From the Menu, select your Language (e.g. English). 5.
From the Welcome Screen, click Next. Review the License Agreement and click Yes to continue. PAGE 4 The InstallShield Wizard for the OneTouch III Setup loads. The Main Menu opens. 4. Click Install Software. 6. MAXTOR ONETOUCH III MINI EDITION WINDOWS VISTA INSTALLATION 3. From the Menu, select your Language (e.g. English). 5.
User Guide for Windows
Page 7
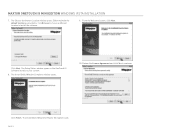
Either maintain the default location as the OneTouch III Software installs to your system. 8. Click Next. Review the License Agreement and click Yes to install the software. 9. The InstallShield Wizard for Maxtor Encryption loads. MAXTOR ONETOUCH III MINI EDITION WINDOWS VISTA INSTALLATION 7. From the Welcome Screen, click Next. Click Finish. PAGE 5 The Setup Status window opens as provided or click Browse to choose a different location to continue. The InstallShield Window Complete window opens. 10. The Choose destination Location window opens.
Either maintain the default location as the OneTouch III Software installs to your system. 8. Click Next. Review the License Agreement and click Yes to install the software. 9. The InstallShield Wizard for Maxtor Encryption loads. MAXTOR ONETOUCH III MINI EDITION WINDOWS VISTA INSTALLATION 7. From the Welcome Screen, click Next. Click Finish. PAGE 5 The Setup Status window opens as provided or click Browse to choose a different location to continue. The InstallShield Window Complete window opens. 10. The Choose destination Location window opens.

User Guide for Windows
Page 8
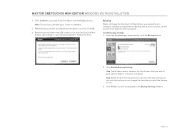
The Choose destination Location window opens. Either maintain the default location as the Maxtor Encryption Software installs to your system. 12. The InstallShield Window Complete window opens. 15. Click Finish. From the Welcome Screen, click Next. PAGE 6 Review the License Agreement and click Yes to install the software. 14. The Setup Status window opens as provided or click Browse to choose a different location to proceed. 13. The InstallShield Wizard for Maxtor Backup loads. Click Next. MAXTOR ONETOUCH III MINI EDITION WINDOWS VISTA INSTALLATION 11.
The Choose destination Location window opens. Either maintain the default location as the Maxtor Encryption Software installs to your system. 12. The InstallShield Window Complete window opens. 15. Click Finish. From the Welcome Screen, click Next. PAGE 6 Review the License Agreement and click Yes to install the software. 14. The Setup Status window opens as provided or click Browse to choose a different location to proceed. 13. The InstallShield Wizard for Maxtor Backup loads. Click Next. MAXTOR ONETOUCH III MINI EDITION WINDOWS VISTA INSTALLATION 11.

User Guide for Windows
Page 9
The Setup Status window opens as provided or click Browse to choose a different location to your computer later. PAGE 7 Either maintain the default location as the Maxtor Backup Software installs to install the software. 17. The InstallShield Window Complete window opens. Click Yes to restart your computer or click No to fully use the OneTouch III software. The Choose destination Location window opens. Click Finish. Note: You must restart your system to restart your system. MAXTOR ONETOUCH III MINI EDITION WINDOWS VISTA INSTALLATION 16. Click Next.
The Setup Status window opens as provided or click Browse to choose a different location to your computer later. PAGE 7 Either maintain the default location as the Maxtor Backup Software installs to install the software. 17. The InstallShield Window Complete window opens. Click Yes to restart your computer or click No to fully use the OneTouch III software. The Choose destination Location window opens. Click Finish. Note: You must restart your system to restart your system. MAXTOR ONETOUCH III MINI EDITION WINDOWS VISTA INSTALLATION 16. Click Next.
User Guide for Windows
Page 10
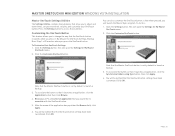
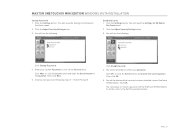
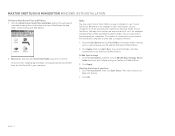
... the same way as your other drives connected to your computer. 1. MAXTOR ONETOUCH III MINI EDITION WINDOWS VISTA INSTALLATION Step 3 - The assigned letter will appear in the System Tray and select Back up . Press the OneTouch button. Click Next. 3. To launch your folders to back up now,...Back Up Files to automatically run at any time by the operating system. Allow Maxtor Backup to My Maxtor OneTouch screen is displayed. Setup the Drive Your new OneTouch III Mini Edition will vary depending upon the number of other drives, with a letter assigned to start. Check which days...
... the same way as your other drives connected to your computer. 1. MAXTOR ONETOUCH III MINI EDITION WINDOWS VISTA INSTALLATION Step 3 - The assigned letter will appear in the System Tray and select Back up . Press the OneTouch button. Click Next. 3. To launch your folders to back up now,...Back Up Files to automatically run at any time by the operating system. Allow Maxtor Backup to My Maxtor OneTouch screen is displayed. Setup the Drive Your new OneTouch III Mini Edition will vary depending upon the number of other drives, with a letter assigned to start. Check which days...
User Guide for Windows
Page 11
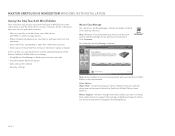
... this section, you with your data - PAGE 9 Some of the basic ways you can find out all about the OneTouch III Mini Edition's new features. Within virtually any application, save files to and open files from your other drives, CD-ROMs,...OneTouch III Mini Edition, including: - Sync and system rollback - Security settings. MAXTOR ONETOUCH III MINI EDITION WINDOWS VISTA INSTALLATION Using the OneTouch III Mini Edition Once installed, you can use your new OneTouch III Mini Edition in the same way you use the other drives on the Maxtor Support button, you will be transported to Seagate...
... this section, you with your data - PAGE 9 Some of the basic ways you can find out all about the OneTouch III Mini Edition's new features. Within virtually any application, save files to and open files from your other drives, CD-ROMs,...OneTouch III Mini Edition, including: - Sync and system rollback - Security settings. MAXTOR ONETOUCH III MINI EDITION WINDOWS VISTA INSTALLATION Using the OneTouch III Mini Edition Once installed, you can use your new OneTouch III Mini Edition in the same way you use the other drives on the Maxtor Support button, you will be transported to Seagate...
User Guide for Windows
Page 12
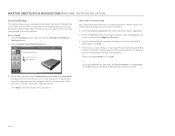
... is set by default to adjust and down times, set by default to change the way that the OneTouch button responds when you press it. Click OK. MAXTOR ONETOUCH III MINI EDITION WINDOWS VISTA INSTALLATION Maxtor OneTouch Settings Utilities The Settings Utilities contains many features that allow you to launch a backup. 3. Press the Settings button...
... is set by default to adjust and down times, set by default to change the way that the OneTouch button responds when you press it. Click OK. MAXTOR ONETOUCH III MINI EDITION WINDOWS VISTA INSTALLATION Maxtor OneTouch Settings Utilities The Settings Utilities contains many features that allow you to launch a backup. 3. Press the Settings button...
User Guide for Windows
Page 13
... "abcde1" would not be a valid password; From now on, every time you restart your PC and the OneTouch III Mini Edition is lost /stolen. 4. Click OK and your OneTouch III Mini Edition will open the Settings for example "abcdef" would be a valid password). This will be accessible. 3.... Click Apply and Confirm. 6. Set Password 1. MAXTOR ONETOUCH III MINI EDITION WINDOWS VISTA INSTALLATION Security Settings This feature allows you to password protect your OneTouch III Mini Edition in the event that this drive is attached, or when you turn off your ...
... "abcde1" would not be a valid password; From now on, every time you restart your PC and the OneTouch III Mini Edition is lost /stolen. 4. Click OK and your OneTouch III Mini Edition will open the Settings for example "abcdef" would be a valid password). This will be accessible. 3.... Click Apply and Confirm. 6. Set Password 1. MAXTOR ONETOUCH III MINI EDITION WINDOWS VISTA INSTALLATION Security Settings This feature allows you to password protect your OneTouch III Mini Edition in the event that this drive is attached, or when you turn off your ...
User Guide for Windows
Page 14
Click the Adjust Security Setting button. 3. This will be informed that security has been disabled on the OneTouch III Mini Edition. Create a new password following . Click OK. You will be prompted to enter your password. Click Change Password..... Click the Settings button. Then click Next. 5. Then click OK. 5. To do this, refer to the Question. PAGE 12 MAXTOR ONETOUCH III MINI EDITION WINDOWS VISTA INSTALLATION Change Password 1. Click the Adjust Security Setting button. 3. Click Disable Security. 4. Disable Security 1. Click the Settings button. Enter ...
Click the Adjust Security Setting button. 3. This will be informed that security has been disabled on the OneTouch III Mini Edition. Create a new password following . Click OK. You will be prompted to enter your password. Click Change Password..... Click the Settings button. Then click Next. 5. Then click OK. 5. To do this, refer to the Question. PAGE 12 MAXTOR ONETOUCH III MINI EDITION WINDOWS VISTA INSTALLATION Change Password 1. Click the Adjust Security Setting button. 3. Click Disable Security. 4. Disable Security 1. Click the Settings button. Enter ...
User Guide for Windows
Page 15
... will be informed that you setup originally when you can attempt to re-enter it , by answering a question that your OneTouch III Mini Edition has been unlocked. You will see the following. Click the Settings button. Click OK, or click the Secret button ... answer the secret question, then click OK. 4. Erase Drive If you have forgotten your password, you OneTouch III Mini Edition or restarting your computer. To use this option: 1. MAXTOR ONETOUCH III MINI EDITION WINDOWS VISTA INSTALLATION Unlock Drive Though not widely used, the Unlock Drive feature can be accessed without ...
... will be informed that you setup originally when you can attempt to re-enter it , by answering a question that your OneTouch III Mini Edition has been unlocked. You will see the following. Click the Settings button. Click OK, or click the Secret button ... answer the secret question, then click OK. 4. Erase Drive If you have forgotten your password, you OneTouch III Mini Edition or restarting your computer. To use this option: 1. MAXTOR ONETOUCH III MINI EDITION WINDOWS VISTA INSTALLATION Unlock Drive Though not widely used, the Unlock Drive feature can be accessed without ...
User Guide for Windows
Page 16
..., we will be notified that you wish to back up (see Steps 1 of 2 and 2 of 2 above) Step 2 of 2: Click on your OneTouch III Mini Edition. Step 1 of this program. PAGE 14 Click Confirm to proceed, then click Yes to Format the drive. Click Finish. To Edit Backup Settings 1. ...Click Edit My Backup Settings. MAXTOR ONETOUCH III MINI EDITION WINDOWS VISTA INSTALLATION 4. Remove then reconnect the USB connector on the checkboxes to deselect the days that the drive is erased. Upon...
..., we will be notified that you wish to back up (see Steps 1 of 2 and 2 of 2 above) Step 2 of 2: Click on your OneTouch III Mini Edition. Step 1 of this program. PAGE 14 Click Confirm to proceed, then click Yes to Format the drive. Click Finish. To Edit Backup Settings 1. ...Click Edit My Backup Settings. MAXTOR ONETOUCH III MINI EDITION WINDOWS VISTA INSTALLATION 4. Remove then reconnect the USB connector on the checkboxes to deselect the days that the drive is erased. Upon...
User Guide for Windows
Page 17
...button to the Backup File Management menu. Edit the number of historical file versions saved to your OneTouch III Mini Edition and - Select the number of each revised file stored to the OneTouch III Mini Edition. 1. You will return to turn off scheduled backups. This can help create extra storage space.... 1. From the EasyManage's main window, click the Backup button. 2. Delete historical versions from your OneTouch III Mini Edition, - Edit Historical Versions When you back up your selected files at 10:00 pm daily, or at the time and on ...
...button to the Backup File Management menu. Edit the number of historical file versions saved to your OneTouch III Mini Edition and - Select the number of each revised file stored to the OneTouch III Mini Edition. 1. You will return to turn off scheduled backups. This can help create extra storage space.... 1. From the EasyManage's main window, click the Backup button. 2. Delete historical versions from your OneTouch III Mini Edition, - Edit Historical Versions When you back up your selected files at 10:00 pm daily, or at the time and on ...
User Guide for Windows
Page 18
... Replace. for Windows XP/2000 Note: "YourUserName" is then copied to . Click the Temporary button, then click Restore. MAXTOR ONETOUCH III MINI EDITION WINDOWS VISTA INSTALLATION Restore The EasyManage's Restore option provides you with a simple way to restore files and folders back to your...for Windows Vista or C:\Documents and Settings\YourUserName\MyDocuments\Maxtor_Restore - At this option will be copied to the specified folder on your OneTouch III Mini Edition, and allow you to restore multiple files and folders by clicking and dragging them . From the EasyManage's main window, ...
... Replace. for Windows XP/2000 Note: "YourUserName" is then copied to . Click the Temporary button, then click Restore. MAXTOR ONETOUCH III MINI EDITION WINDOWS VISTA INSTALLATION Restore The EasyManage's Restore option provides you with a simple way to restore files and folders back to your...for Windows Vista or C:\Documents and Settings\YourUserName\MyDocuments\Maxtor_Restore - At this option will be copied to the specified folder on your OneTouch III Mini Edition, and allow you to restore multiple files and folders by clicking and dragging them . From the EasyManage's main window, ...
User Guide for Windows
Page 19
... be automatically copied to move files between multiple computers. To Edit Sync Settings 1. Checking the Status of the folders on the OneTouch III Mini Edition. 2. The status of the Maxtor backup folder on your computer, it convenient for example) and any folders within your computer. MAXTOR...and Folders: 1. Click the Restore most recent files and folders button. You may select one local disk (C: or D: for you wish to the OneTouch III Mini Edition. This makes it can sync folders between a computer at work and a computer at home. 1. Click the Sync button and then click ...
... be automatically copied to move files between multiple computers. To Edit Sync Settings 1. Checking the Status of the folders on the OneTouch III Mini Edition. 2. The status of the Maxtor backup folder on your computer, it convenient for example) and any folders within your computer. MAXTOR...and Folders: 1. Click the Restore most recent files and folders button. You may select one local disk (C: or D: for you wish to the OneTouch III Mini Edition. This makes it can sync folders between a computer at work and a computer at home. 1. Click the Sync button and then click ...
User Guide for Windows
Page 20
...Off button in progress. The Sync Settings screen will be created automatically. or 2. You can use rollback to undo changes to your OneTouch III Mini Edition to be notified that the Creation of the Sync screen. Click Set automatic restore points. 2. Select an Automatic Restore Point Interval ...from your original computer to select the amount of your system. From EasyManage, click the Rollback button. 2. Sync your files from your OneTouch III Mini Edition. 3. PAGE 18 Automatic Sync is now On. Click the Sync button, then click Sync Now. Click Apply. Click the Sync ...
...Off button in progress. The Sync Settings screen will be created automatically. or 2. You can use rollback to undo changes to your OneTouch III Mini Edition to be notified that the Creation of the Sync screen. Click Set automatic restore points. 2. Select an Automatic Restore Point Interval ...from your original computer to select the amount of your system. From EasyManage, click the Rollback button. 2. Sync your files from your OneTouch III Mini Edition. 3. PAGE 18 Automatic Sync is now On. Click the Sync button, then click Sync Now. Click Apply. Click the Sync ...


