
OneTouch II Installation Guide
Page 2
... 3 Handling Precautions 4 About this Guide 4 Where to Your Maxtor OneTouch II drive 62 Using Security Lock 62 4 Glossary 63 Index 65 Macintosh 48 Restoring your computer 50 Using the Maxtor OneTouch Settings 55 Installing Applications on your Drive 61 Editing Video 62 Moving ...Your Drive 6 Windows XP and 2000 7 Windows 98SE and ME 13 Macintosh OS X 20 Macintosh OS 9 30 Installing Drivers Only 37 3 Using Your Drive 38 Connecting and Disconnecting the Drive 39 Using Large Capacity Drives with Windows 40 Using Retrospect®Express HD - Windows 41 Using Retrospect&#...
... 3 Handling Precautions 4 About this Guide 4 Where to Your Maxtor OneTouch II drive 62 Using Security Lock 62 4 Glossary 63 Index 65 Macintosh 48 Restoring your computer 50 Using the Maxtor OneTouch Settings 55 Installing Applications on your Drive 61 Editing Video 62 Moving ...Your Drive 6 Windows XP and 2000 7 Windows 98SE and ME 13 Macintosh OS X 20 Macintosh OS 9 30 Installing Drivers Only 37 3 Using Your Drive 38 Connecting and Disconnecting the Drive 39 Using Large Capacity Drives with Windows 40 Using Retrospect®Express HD - Windows 41 Using Retrospect&#...
OneTouch II Installation Guide
Page 4
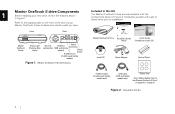
... your drive for OS 9 and OS X 10.1 may also be displayed. 1. Select your computer. Click Erase, again, when the the Erase Disk window appears, to the trash. 1 Maxtor OneTouch II drive Components Before installing your computer* Plug in the power adapter, turn on the power switch and plug in either registered trademarks or...
... your drive for OS 9 and OS X 10.1 may also be displayed. 1. Select your computer. Click Erase, again, when the the Erase Disk window appears, to the trash. 1 Maxtor OneTouch II drive Components Before installing your computer* Plug in the power adapter, turn on the power switch and plug in either registered trademarks or...
OneTouch II Installation Guide
Page 5
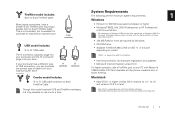
... model includes: 6-pin to 6-pin FireWire cable Many laptop computers, have a smaller 4-pin FireWire port requiring a special 4-pin to Windows 2000 Professional. Retrospect Express does not work with the Server editions of these operating systems. • 128 MB RAM or more as required by...your computer has a different type of USB connection, you can purchase the correct type of the Mac OS. Introduction 3 All references to Windows 2000 actually refer specifically to 6-pin FireWire cable. If your PC with the FireWire inferfaces. Retrospect Express does not work with the Server...
... model includes: 6-pin to 6-pin FireWire cable Many laptop computers, have a smaller 4-pin FireWire port requiring a special 4-pin to Windows 2000 Professional. Retrospect Express does not work with the Server editions of these operating systems. • 128 MB RAM or more as required by...your computer has a different type of USB connection, you can purchase the correct type of the Mac OS. Introduction 3 All references to Windows 2000 actually refer specifically to 6-pin FireWire cable. If your PC with the FireWire inferfaces. Retrospect Express does not work with the Server...

OneTouch II Installation Guide
Page 8
..., step-by-step installation for popular Windows and Macintosh operating systems is described separately in the following sections. Software Installation Options There are two options for the software installation: • Full Installation (Recommended) Installs the Maxtor software drivers necessary for the OneTouch II drive to operate, the OneTouch Utility program and the Dantz Retrospect...
..., step-by-step installation for popular Windows and Macintosh operating systems is described separately in the following sections. Software Installation Options There are two options for the software installation: • Full Installation (Recommended) Installs the Maxtor software drivers necessary for the OneTouch II drive to operate, the OneTouch Utility program and the Dantz Retrospect...

OneTouch II Installation Guide
Page 9
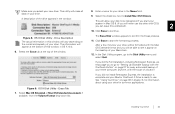
...will appear. 2 If you receive a message that log in to your computer, you can choose whether you have these rights: •Click the Windows Start button and choose Control Panel. •Double click the User Accounts icon. •If your computer. (Please do not have the correct ... recommended. The Select Language screen will appear next. 4. To determine if you want them to be able to restart, follow the on your Maxtor OneTouch II drive. If, for further assistance. Enter your choice and click Next. 3. If there are multiple users that you to use your computer. 7. ...
...will appear. 2 If you receive a message that log in to your computer, you can choose whether you have these rights: •Click the Windows Start button and choose Control Panel. •Double click the User Accounts icon. •If your computer. (Please do not have the correct ... recommended. The Select Language screen will appear next. 4. To determine if you want them to be able to restart, follow the on your Maxtor OneTouch II drive. If, for further assistance. Enter your choice and click Next. 3. If there are multiple users that you to use your computer. 7. ...
OneTouch II Installation Guide
Page 10
...screen will choose individual components and specify an install location before the installation begins. If so, select: 'Yes, I accept.." Fill in the Windows Start menu. You may see where the Maxtor software will be installed. Click Finish. Make your User Name and Organization. 11. Choose the ... Retrospect ExpressHD, you will appear in your computer. You may see the name of the Maxtor program folder and where it with the OneTouch backup feature described later in this , click Browse and choose a new location. In the Destination Folder section of the screen, you ...
...screen will choose individual components and specify an install location before the installation begins. If so, select: 'Yes, I accept.." Fill in the Windows Start menu. You may see where the Maxtor software will be installed. Click Finish. Make your User Name and Organization. 11. Choose the ... Retrospect ExpressHD, you will appear in your computer. You may see the name of the Maxtor program folder and where it with the OneTouch backup feature described later in this , click Browse and choose a new location. In the Destination Folder section of the screen, you ...
OneTouch II Installation Guide
Page 12
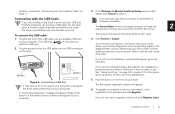
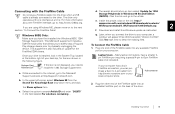
...and FireWire interfaces, do not wish to use. If you have the 2 opportunity to the drive. To register immediately, enter your Maxtor OneTouch II drive is complete and your information in chapter 3, for your computer to recognize the drive, after connecting it . Connecting with the NTFS ... one interface at this drive letter. The assigned letter will appear briefly at the bottom of your drive for Windows 2000 and XP users. 4. The Format Drive window will appear. 6. This is recognized by the operating system. USB Port USB Port Figure 4. Your computer may...
...and FireWire interfaces, do not wish to use. If you have the 2 opportunity to the drive. To register immediately, enter your Maxtor OneTouch II drive is complete and your information in chapter 3, for your computer to recognize the drive, after connecting it . Connecting with the NTFS ... one interface at this drive letter. The assigned letter will appear briefly at the bottom of your drive for Windows 2000 and XP users. 4. The Format Drive window will appear. 6. This is recognized by the operating system. USB Port USB Port Figure 4. Your computer may...
OneTouch II Installation Guide
Page 13
... corner of your local computer store. See "Using Your Drive" on page 38 in chapter 3, for your Maxtor OneTouch II drive, every day at the available FireWire port on the front of the window. Plug one interface at any available FireWire This screen displays the automatic backup settings for information about other end...
... corner of your local computer store. See "Using Your Drive" on page 38 in chapter 3, for your Maxtor OneTouch II drive, every day at the available FireWire port on the front of the window. Plug one interface at any available FireWire This screen displays the automatic backup settings for information about other end...
OneTouch II Installation Guide
Page 14
..."Using Your Drive" on the front of this time, click Register Later. 3. Push the button on page 38 in the of the window. Your registration information is recommended for your drive. To close it by registration form provided and click Register. This is collected and maintained ... must be connected to start your first backup immediately, click Back up all the files on their respective web sites. your Maxtor OneTouch II drive is recognized by the operating system. By registering1, you will have the option of other data storage solutions from Maxtor. The...
..."Using Your Drive" on the front of this time, click Register Later. 3. Push the button on page 38 in the of the window. Your registration information is recommended for your drive. To close it by registration form provided and click Register. This is collected and maintained ... must be connected to start your first backup immediately, click Back up all the files on their respective web sites. your Maxtor OneTouch II drive is recognized by the operating system. By registering1, you will have the option of other data storage solutions from Maxtor. The...

OneTouch II Installation Guide
Page 15
.... 13 After a few seconds for more information. Select Install Software. Select Full Installation or Install Drivers. (Full Installation is now complete. Windows 98SE and ME Your hardware and software installation is recommended.) See "Software Installation Options" on page 38 in chapter 3, for some reason,... the Maxtor screen does not appear: • Click the Windows Start button and then click Run. • Click Browse and find the drive named Install CD • Open Install CD, open . If...
.... 13 After a few seconds for more information. Select Install Software. Select Full Installation or Install Drivers. (Full Installation is now complete. Windows 98SE and ME Your hardware and software installation is recommended.) See "Software Installation Options" on page 38 in chapter 3, for some reason,... the Maxtor screen does not appear: • Click the Windows Start button and then click Run. • Click Browse and find the drive named Install CD • Open Install CD, open . If...

OneTouch II Installation Guide
Page 16
... reading the License Agreement, click Yes. The Choose Destination Location screen will appear. The Select Program Folder screen will appear in the Windows Start menu. You can see the name of the screen, you have chosen not to install Retrospect, eject the Install CD and ... appear. If you have chosen to change this, click Browse and choose a new location. 9. Enter your computer restarts, the InstallShield welcome Complete window should appear. If you wish to install Retrospect Express HD, please do the installation will open. 13. If a message appears asking you to...
... reading the License Agreement, click Yes. The Choose Destination Location screen will appear. The Select Program Folder screen will appear in the Windows Start menu. You can see the name of the screen, you have chosen not to install Retrospect, eject the Install CD and ... appear. If you have chosen to change this, click Browse and choose a new location. 9. Enter your computer restarts, the InstallShield welcome Complete window should appear. If you wish to install Retrospect Express HD, please do the installation will open. 13. If a message appears asking you to...
OneTouch II Installation Guide
Page 19
...now. To register immediately, enter your information in the registration form provided and click Register. If you must be connected to your Maxtor OneTouch II drive, every day at 10 PM. See about using your drive for common applications and using your drive for common applications. Push ...the operating system. drives, with a letter assigned to it . 2 Your new drive will back up all the files on the front of the window. If you 've made your selection, the Retrospect welcome screen will appear. 5. Your may be required you did not install Retrospect Express HD,...
...now. To register immediately, enter your information in the registration form provided and click Register. If you must be connected to your Maxtor OneTouch II drive, every day at 10 PM. See about using your drive for common applications and using your drive for common applications. Push ...the operating system. drives, with a letter assigned to it . 2 Your new drive will back up all the files on the front of the window. If you 've made your selection, the Retrospect welcome screen will appear. 5. Your may be required you did not install Retrospect Express HD,...
OneTouch II Installation Guide
Page 20
... to safely stop a Plug and Play storage device prior to install the 1394 Storage Supplement: a. Download and install this Windows update as instructed. Windows 98SE Only: Make sure you need to physically unplugging the device. This supplement also includes an update for 1394 Storage Peripherals... FireWire port requiring a special 4-pin to keep the existing files. Unplug or Eject Hardware icon If the icon is installed, look in Windows 98 Second Edition (242975). If your computer has a 4-pin FireWire connection, you connect the drive to search Article ID and enter "...
... to safely stop a Plug and Play storage device prior to install the 1394 Storage Supplement: a. Download and install this Windows update as instructed. Windows 98SE Only: Make sure you need to physically unplugging the device. This supplement also includes an update for 1394 Storage Peripherals... FireWire port requiring a special 4-pin to keep the existing files. Unplug or Eject Hardware icon If the icon is installed, look in Windows 98 Second Edition (242975). If your computer has a 4-pin FireWire connection, you connect the drive to search Article ID and enter "...
OneTouch II Installation Guide
Page 21
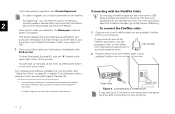
...2 minutes for information about other drives connected to close Retrospect HD, click the 'X' located at 10 PM. 6. Make a mental note of the window. 1. Push the button on page 38 in chapter 3, for your computer to recognize the drive, after connecting it . To register immediately, enter your...would like to the Internet. 19 Retrospect will vary depending upon the number of your drive. If you must be connected to your Maxtor OneTouch II drive, every day at the upper right corner of this time, click Register Later. 2 If you will appear. FireWire Ports Figure 5. ...
...2 minutes for information about other drives connected to close Retrospect HD, click the 'X' located at 10 PM. 6. Make a mental note of the window. 1. Push the button on page 38 in chapter 3, for your computer to recognize the drive, after connecting it . To register immediately, enter your...would like to the Internet. 19 Retrospect will vary depending upon the number of your drive. If you must be connected to your Maxtor OneTouch II drive, every day at the upper right corner of this time, click Register Later. 2 If you will appear. FireWire Ports Figure 5. ...
OneTouch II Installation Guide
Page 22
...External Hard Drive Answers. The Product Support Knowledge Base window will appear. Installing Your Drive 20 Install the Software using your drive for common applications and using Retrospect to make and restore copies of your of a Maxtor OneTouch II drive on systems with a Maxtor 5000(LE/DV/..., and then click the Search button on your important files. Software installation: Do not press the Maxtor OneTouch™ button until after completing the Maxtor OneTouch setup. Do not remove the installation CD until instructed by pressing the button on the right. You can back ...
...External Hard Drive Answers. The Product Support Knowledge Base window will appear. Installing Your Drive 20 Install the Software using your drive for common applications and using Retrospect to make and restore copies of your of a Maxtor OneTouch II drive on systems with a Maxtor 5000(LE/DV/..., and then click the Search button on your important files. Software installation: Do not press the Maxtor OneTouch™ button until after completing the Maxtor OneTouch setup. Do not remove the installation CD until instructed by pressing the button on the right. You can back ...
OneTouch II Installation Guide
Page 23
... OS X) Click OK. 11. The installation will appear. 9. Turn on your Macintosh. Enter your Name (if necessary) and Password for your 2 Macintosh's desktop. 3. The Authenticate window will open . 8. Click Restart. 13. This screen allows you are ready, Click Install. 5.
... OS X) Click OK. 11. The installation will appear. 9. Turn on your Macintosh. Enter your Name (if necessary) and Password for your 2 Macintosh's desktop. 3. The Authenticate window will open . 8. Click Restart. 13. This screen allows you are ready, Click Install. 5.

OneTouch II Installation Guide
Page 25
...Over 137 GB Drive doesn't appear on the left. 23 Drive mounts as "Untitled Volume." The Apple Disk Utility program opens. (If a second window appears with the Macintosh file format. Go to Step 4. Open the Apple Disk Utility located in the table below to determine your desktop may want...OS X 10.2 Drive mounts as Untitled has failed," click OK) 5. This is unable to keep the drive formatted as FAT32, since the Windows operating system can read volume. Click Reinitialize to open the Apple Disk Utility and go to read that a FAT32 Volume has appeared on your new...
...Over 137 GB Drive doesn't appear on the left. 23 Drive mounts as "Untitled Volume." The Apple Disk Utility program opens. (If a second window appears with the Macintosh file format. Go to Step 4. Open the Apple Disk Utility located in the table below to determine your desktop may want...OS X 10.2 Drive mounts as Untitled has failed," click OK) 5. This is unable to keep the drive formatted as FAT32, since the Windows operating system can read volume. Click Reinitialize to open the Apple Disk Utility and go to read that a FAT32 Volume has appeared on your new...
OneTouch II Installation Guide
Page 26
... in chapter 3, for information about using your drive for easy, automated backup of your entire computer, anytime, with the OneTouch Button" on the desktop of the drive appears in this window will vary depending on your drive. See "Using Your Drive" on page 38 in Mac OS 9. (If you will...allow your drive will be formatted with OS 9, you can leave this unchecked). 2 10. Drive Description The actual information in the window. Make sure you select your Maxtor OneTouch II Drive is ready to use this drive with the Mac OS Extended format and you will be able to see it appear...
... in chapter 3, for information about using your drive for easy, automated backup of your entire computer, anytime, with the OneTouch Button" on the desktop of the drive appears in this window will vary depending on your drive. See "Using Your Drive" on page 38 in Mac OS 9. (If you will...allow your drive will be formatted with OS 9, you can leave this unchecked). 2 10. Drive Description The actual information in the window. Make sure you select your Maxtor OneTouch II Drive is ready to use this drive with the Mac OS Extended format and you will be able to see it appear...

OneTouch II Installation Guide
Page 28
... tab at the bottom of your new drive from the Volume Format drop-down list. 8. Users who frequently exchange files between Macintosh and Windows, may appear and you select your Macintosh and proceed to keep the drive formatted as "Untitled Volume." Select your drive. This utility will...in the Utilities folder within the Applications folder on your Macintosh and proceed to Step 5. 2 OS X 10.3 Drive mounts as FAT32, since the Windows operating system can read that a FAT32 Volume has appeared on your new drive. Figure 11. Select Mac OS Extended or Mac OS Extended (Journaled...
... tab at the bottom of your new drive from the Volume Format drop-down list. 8. Users who frequently exchange files between Macintosh and Windows, may appear and you select your Macintosh and proceed to keep the drive formatted as "Untitled Volume." Select your drive. This utility will...in the Utilities folder within the Applications folder on your Macintosh and proceed to Step 5. 2 OS X 10.3 Drive mounts as FAT32, since the Windows operating system can read that a FAT32 Volume has appeared on your new drive. Figure 11. Select Mac OS Extended or Mac OS Extended (Journaled...
OneTouch II Installation Guide
Page 29
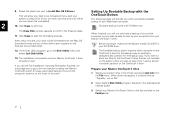
.... Select your Maxtor OneTouch II drive 1. Bootable backup works with FireWire only. In the Disk Utility program, go to the next section to copy, they must be recognized if you start up your computer from the File menu. If you will never use ! The Erase Disk window appears to Install Mac... OS 9 Drivers. Select the check box next to confirm the Erase process. 11. Prepare your system drive in the Finder and select Get Info from your Maxtor OneTouch II drive in Mac OS 9. (If you wish to ...
.... Select your Maxtor OneTouch II drive 1. Bootable backup works with FireWire only. In the Disk Utility program, go to the next section to copy, they must be recognized if you start up your computer from the File menu. If you will never use ! The Erase Disk window appears to Install Mac... OS 9 Drivers. Select the check box next to confirm the Erase process. 11. Prepare your system drive in the Finder and select Get Info from your Maxtor OneTouch II drive in Mac OS 9. (If you wish to ...


