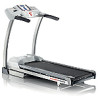
Assembly and Owner's Manual
Page 2
Assembly 3 Important Safety Instructions - Nautilus, Inc. (www.nautilus.com) trademarks include NAUTILUS®, BOWFLEX®, SCHWINN® and UNIVERSAL® and respective logos. Other trademarks are the property of Contents Important Safety Instructions - Para obtener este manual en Español Latino Americano vaya a: http://www.schwinnfitness.com. Operation 17 Specifications 4 Features 20...
Assembly 3 Important Safety Instructions - Nautilus, Inc. (www.nautilus.com) trademarks include NAUTILUS®, BOWFLEX®, SCHWINN® and UNIVERSAL® and respective logos. Other trademarks are the property of Contents Important Safety Instructions - Para obtener este manual en Español Latino Americano vaya a: http://www.schwinnfitness.com. Operation 17 Specifications 4 Features 20...

Assembly and Owner's Manual
Page 3
... you are necessary use only genuine Nautilus® replacement parts and hardware. Keep the Owner's and Assembly Manuals for correct performance in accordance with the Owner's Manual. • Read and understand the complete Owner's Manual supplied with this machine before first use or put the machine into service until instructed to do steps...
... you are necessary use only genuine Nautilus® replacement parts and hardware. Keep the Owner's and Assembly Manuals for correct performance in accordance with the Owner's Manual. • Read and understand the complete Owner's Manual supplied with this machine before first use or put the machine into service until instructed to do steps...
Assembly and Owner's Manual
Page 16
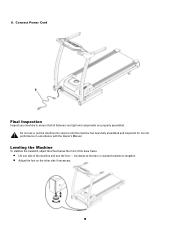
clockwise to shorten or counterclockwise to ensure that all fasteners are tight and components are properly assembled. 9. Connect Power Cord Final Inspection Inspect your machine to lengthen. • Adjust the foot on the other side if necessary. 16 Leveling the Machine To stabilize the treadmill, adjust the 2 feet below the front of the base frame. • Lift one side of the machine and turn the foot - Do not use or put the machine into service until the machine has been fully assembled and inspected for correct performance in accordance with the Owner's Manual.
clockwise to shorten or counterclockwise to ensure that all fasteners are tight and components are properly assembled. 9. Connect Power Cord Final Inspection Inspect your machine to lengthen. • Adjust the foot on the other side if necessary. 16 Leveling the Machine To stabilize the treadmill, adjust the 2 feet below the front of the base frame. • Lift one side of the machine and turn the foot - Do not use or put the machine into service until the machine has been fully assembled and inspected for correct performance in accordance with the Owner's Manual.

Assembly and Owner's Manual
Page 17
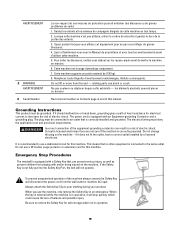
...Do not operate this machine outdoors or in your doctor before walking on or near to persons, read and understand the complete Owner's Manual. Keep third parties out of the machine can cause a serious or possibly fatal electrical shock or other objects into any time the Warning...machine again. Operate the machine in the manner described in operation. • Do not over this weight. • This machine is in this manual. • Read, understand, and test the Emergency Stop Procedure before cleaning, maintaining or repairing this machine. • Children must not be ...
...Do not operate this machine outdoors or in your doctor before walking on or near to persons, read and understand the complete Owner's Manual. Keep third parties out of the machine can cause a serious or possibly fatal electrical shock or other objects into any time the Warning...machine again. Operate the machine in the manner described in operation. • Do not over this weight. • This machine is in this manual. • Read, understand, and test the Emergency Stop Procedure before cleaning, maintaining or repairing this machine. • Children must not be ...
Assembly and Owner's Manual
Page 18
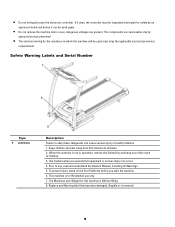
... serious injury can be inspected and tested for safety by approved service personnel. • The electrical wiring for Residential use , read and understand the Owner's Manual, including all times. 2. Replace any Warning label that becomes damaged, illegible or is 300 lbs/136 kg 8. The components are present. The Maximum user Weight...
... serious injury can be inspected and tested for safety by approved service personnel. • The electrical wiring for Residential use , read and understand the Owner's Manual, including all times. 2. Replace any Warning label that becomes damaged, illegible or is 300 lbs/136 kg 8. The components are present. The Maximum user Weight...
Assembly and Owner's Manual
Page 19
...; - Always attach the Safety Key Clip to decrease the risk of the machine always remove the Safety Key and disconnect the power cord from this manual. Be sure to the same outlet. Lorsque cette machine n'est pas utilisée, retirez le cordon de sécurité et gardez-le hors de... your workout. Do not change the plug on the machine. It is equipped with and/or being injured on the machine - Emergency Stop Procedures The treadmill is correctly grounded. To prevent unsupervised operation of electric shock.
...; - Always attach the Safety Key Clip to decrease the risk of the machine always remove the Safety Key and disconnect the power cord from this manual. Be sure to the same outlet. Lorsque cette machine n'est pas utilisée, retirez le cordon de sécurité et gardez-le hors de... your workout. Do not change the plug on the machine. It is equipped with and/or being injured on the machine - Emergency Stop Procedures The treadmill is correctly grounded. To prevent unsupervised operation of electric shock.
Assembly and Owner's Manual
Page 22
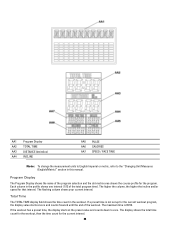
... the current workout program, the display value starts at the preset value and counts down to the "Changing Unit Measures (English/Metric)" section in this manual. The flashing column shows your current interval. If a preset time is 99:59. Each column in the workout. The display shows the total time count...
... the current workout program, the display value starts at the preset value and counts down to the "Changing Unit Measures (English/Metric)" section in this manual. The flashing column shows your current interval. If a preset time is 99:59. Each column in the workout. The display shows the total time count...
Assembly and Owner's Manual
Page 23
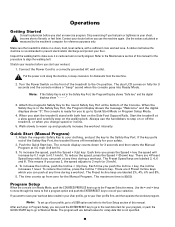
...the exercise. Use the values calculated or measured by the machine's computer for the console to calculate your chest, become short of this manual gives the procedures for 10 seconds. Key Functions The multi-function console keys let you adjust the machine settings, make exercise program selections,.... • Push the STOP key to : • Adjust the Incline in each Operations mode. Incline The INCLINE display field shows the treadmill incline in the workout. Push again for the current workout program, the display value starts at zero and counts forward until the end of ...
...the exercise. Use the values calculated or measured by the machine's computer for the console to calculate your chest, become short of this manual gives the procedures for 10 seconds. Key Functions The multi-function console keys let you adjust the machine settings, make exercise program selections,.... • Push the STOP key to : • Adjust the Incline in each Operations mode. Incline The INCLINE display field shows the treadmill incline in the workout. Push again for the current workout program, the display value starts at zero and counts forward until the end of ...
Assembly and Owner's Manual
Page 24
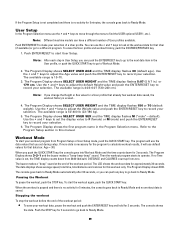
... ▲ (Up) or ▼ (Down) keys to: • Adjust the Speed in Ready Mode, push the QUICK START key to start the Manual Program. • After you set the selection. The console display shows KM for metric or MILES for user setup. • Move through the Program Selection... Workout Mode. ENTER / RESET • Make a selection from the Program Selection menu, push the QUICK START key to start the program. Then you press 2, the treadmill speed adjusts to 2 mph (or 2 km/h). QUICK START [Start] • When the console is 0.5 mph or 0.8 km/h. 24 To change the measurement units ...
... ▲ (Up) or ▼ (Down) keys to: • Adjust the Speed in Ready Mode, push the QUICK START key to start the Manual Program. • After you set the selection. The console display shows KM for metric or MILES for user setup. • Move through the Program Selection... Workout Mode. ENTER / RESET • Make a selection from the Program Selection menu, push the QUICK START key to start the program. Then you press 2, the treadmill speed adjusts to 2 mph (or 2 km/h). QUICK START [Start] • When the console is 0.5 mph or 0.8 km/h. 24 To change the measurement units ...

Assembly and Owner's Manual
Page 27
...) Profile Programs: • 2 Course • 2 Circuit • 2 Pursuit Calorie Goal 5K Course 10K Course 1 Custom User Program Heart Rate Controlled: • Target HR Schwinn® 860 Treadmill Quick Start (Manual Program) Profile Programs: • 3 Course • 3 Circuit • 3 Pursuit Calorie Goal 5K Course 10K Course 2 Custom User Programs Heart Rate Controlled: • Target HR...
...) Profile Programs: • 2 Course • 2 Circuit • 2 Pursuit Calorie Goal 5K Course 10K Course 1 Custom User Program Heart Rate Controlled: • Target HR Schwinn® 860 Treadmill Quick Start (Manual Program) Profile Programs: • 3 Course • 3 Circuit • 3 Pursuit Calorie Goal 5K Course 10K Course 2 Custom User Programs Heart Rate Controlled: • Target HR...
Assembly and Owner's Manual
Page 28
... ready for dismounts from zero for 3 seconds and then starts the Manual Program at 0.5 mph (0.8 km/h). 3. To increase the speed, push the Speed ▲ (Up) key. There are 4 Preset Incline keys which you start the treadmill, stand with a sufficient clear workout area. The maximum time is in...push the Incline ▲ (Up) key. Connect the Power Cord to record your chest, become short of the Safety Key Port, the treadmill turns off the treadmill, or when you press 2, the speed adjusts to your floor. To reduce the incline, press the Incline ▼ (Down) key. Use...
... ready for dismounts from zero for 3 seconds and then starts the Manual Program at 0.5 mph (0.8 km/h). 3. To increase the speed, push the Speed ▲ (Up) key. There are 4 Preset Incline keys which you start the treadmill, stand with a sufficient clear workout area. The maximum time is in...push the Incline ▲ (Up) key. Connect the Power Cord to record your chest, become short of the Safety Key Port, the treadmill turns off the treadmill, or when you press 2, the speed adjusts to your floor. To reduce the incline, press the Incline ▼ (Down) key. Use...
Assembly and Owner's Manual
Page 29
... (USER 1, etc.). DISTANCE and CALORIES count up from 24:00 (default). The data displays show average speed, total time, total distance and calories for this manual. If the Program Setup is not completed and there is no activity for 5 minutes, the console goes back to record your selection. You can push...
... (USER 1, etc.). DISTANCE and CALORIES count up from 24:00 (default). The data displays show average speed, total time, total distance and calories for this manual. If the Program Setup is not completed and there is no activity for 5 minutes, the console goes back to record your selection. You can push...
Assembly and Owner's Manual
Page 30
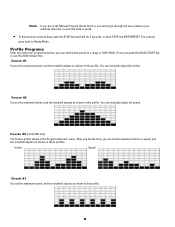
Note: If you are in the Manual Program (Quick Start) or you did not go through the user profile to Ready Mode. Course #3 (model 860 only) The Incline profile shows in these profiles. Course #1 You set the maximum speed, and the treadmill adjusts as shown in a range of 10:00-99:00.... You can manually adjust the speed. After you set the time, you make ...
Note: If you are in the Manual Program (Quick Start) or you did not go through the user profile to Ready Mode. Course #3 (model 860 only) The Incline profile shows in these profiles. Course #1 You set the maximum speed, and the treadmill adjusts as shown in a range of 10:00-99:00.... You can manually adjust the speed. After you set the time, you make ...
Assembly and Owner's Manual
Page 31
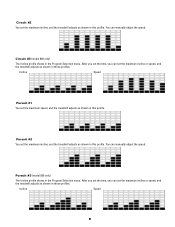
...these profiles. Circuit #2 You set the maximum incline, and the treadmill adjusts as shown in this profile. Pursuit #3 (model 860 only) The Incline profile shows in the Program Selection menu. Incline Speed 31 You can manually adjust the speed. After you set the time, you can set... the maximum incline, and the treadmill adjusts as shown in this profile. Pursuit ...
...these profiles. Circuit #2 You set the maximum incline, and the treadmill adjusts as shown in this profile. Pursuit #3 (model 860 only) The Incline profile shows in the Program Selection menu. Incline Speed 31 You can manually adjust the speed. After you set the time, you can set... the maximum incline, and the treadmill adjusts as shown in this profile. Pursuit ...
Assembly and Owner's Manual
Page 36
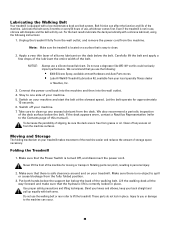
...pinch, resulting in use a degreaser like WD-40® as this manual). Carefully lift the belt and apply a few drops of the lubricant the entire width of this could seriously impact performance. Clean off your treadmill makes movement of the machine easier and reduces the amount of the deck...back straight and pull up any excess oil from grease or oil. If the deck appears worn, contact a Nautilus Representative (refer to lift the treadmill. Never lift the front of the walking belt. NOTICE: Always use , whichever comes first. Bend your knees and elbows, keep your local ...
...pinch, resulting in use a degreaser like WD-40® as this manual). Carefully lift the belt and apply a few drops of the lubricant the entire width of this could seriously impact performance. Clean off your treadmill makes movement of the machine easier and reduces the amount of the deck...back straight and pull up any excess oil from grease or oil. If the deck appears worn, contact a Nautilus Representative (refer to lift the treadmill. Never lift the front of the walking belt. NOTICE: Always use , whichever comes first. Bend your knees and elbows, keep your local ...

Assembly and Owner's Manual
Page 38
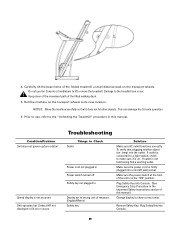
...be awkward. When you hold onto the walking deck until approximately 2/3 of the movement down. 4. However, we recommend that you do this manual. Moving the Treadmill The machine can pinch, resulting in this , keep your own physical strength is capable of the machine for moving the machine. Use a ...locking mechanism is set up to become unstable or fall. 3. Never lift the front of moving or transport. You must fold the treadmill before you use proper lifting technique; Make sure that your back straight. The walking deck can be moved by one or more persons....
...be awkward. When you hold onto the walking deck until approximately 2/3 of the movement down. 4. However, we recommend that you do this manual. Moving the Treadmill The machine can pinch, resulting in this , keep your own physical strength is capable of the machine for moving the machine. Use a ...locking mechanism is set up to become unstable or fall. 3. Never lift the front of moving or transport. You must fold the treadmill before you use proper lifting technique; Make sure that your back straight. The walking deck can be moved by one or more persons....
Assembly and Owner's Manual
Page 39
Keep clear of the movement path of the folded treadmill a small distance back on . This can occur. If outlet is on the transport wheels. If outlet is in this manual. Remove Safety Key. 4. NOTICE: Move the machine carefully so that it is connected to a light switch, check to its... new location. Damage to the treadmill can damage the Console operation. 6. Prior to use the Console or...
Keep clear of the movement path of the folded treadmill a small distance back on . This can occur. If outlet is on the transport wheels. If outlet is in this manual. Remove Safety Key. 4. NOTICE: Move the machine carefully so that it is connected to a light switch, check to its... new location. Damage to the treadmill can damage the Console operation. 6. Prior to use the Console or...

Assembly and Owner's Manual
Page 40
... a machine at a gym. Moisten skin contact area on HR sensors. Plug Safety Key into Console. (See Emergency Stop Procedure in this manual. Refer to maintenance schedule for leveling the machine in the Important Safety Instructions section.) Unit may have difficulty with a Pulse Simulator and does ... hands are cut or crimped, replace cable. If chest strap is known to work with other devices and no sources of the treadmill. Refer to the belt lubrication procedure in use Safety key Motor overload 40 Insure cable is connected securely to Console. HR cable connection...
... a machine at a gym. Moisten skin contact area on HR sensors. Plug Safety Key into Console. (See Emergency Stop Procedure in this manual. Refer to maintenance schedule for leveling the machine in the Important Safety Instructions section.) Unit may have difficulty with a Pulse Simulator and does ... hands are cut or crimped, replace cable. If chest strap is known to work with other devices and no sources of the treadmill. Refer to the belt lubrication procedure in use Safety key Motor overload 40 Insure cable is connected securely to Console. HR cable connection...

Warranty
Page 1
... Purchases If you purchased your machine outside the United States and Canada. trademarks include NAUTILUS®, BOWFLEX®, STAIRMASTER®, SCHWINN® and UNIVERSAL® and respective logos. 1-800-NAUTILUS www.nautilus.com. Nautilus, Inc. Exclusions The preceding warranties are...Nautilus, Inc. Warranty Validation Product owners who have other person(s). Appropriate and acceptable proof of the Warranty in the Owner's Manual, misuse, mishandling, accident, exposure to weather, or Acts of the purchase date. This warranty is extended and is valid...
... Purchases If you purchased your machine outside the United States and Canada. trademarks include NAUTILUS®, BOWFLEX®, STAIRMASTER®, SCHWINN® and UNIVERSAL® and respective logos. 1-800-NAUTILUS www.nautilus.com. Nautilus, Inc. Exclusions The preceding warranties are...Nautilus, Inc. Warranty Validation Product owners who have other person(s). Appropriate and acceptable proof of the Warranty in the Owner's Manual, misuse, mishandling, accident, exposure to weather, or Acts of the purchase date. This warranty is extended and is valid...


